
Comparing lab-grown diamond wholesale price lists seems straightforward—matching carat, color, and clarity across suppliers. In practice, those lists hide the crucial details that determine what a diamond actually looks like, and minimum order quantity expectations can reveal whether pricing is tied to real inventory depth, production planning, or selective stock availability. Two stones can share the same SI1 grade, yet one appears brilliant while the other looks cloudy. One “Excellent” cut grade can mean ideal light performance, while another describes a stone with measurable light leakage. Certificate labs grade differently, and a low price often comes with hidden lead times or unavailable stock.
For the full framework, read Wholesale Lab-Grown Diamonds for Jewelers and Brands.
This article helps you read between the lines of a price sheet. You will learn exactly which data points matter beyond the shopping cart grades, how to build a comparison spreadsheet that catches real differences, and how to verify a wholesale deal before committing. The goal is a clear, trustworthy buying decision without costly visual surprises.
| Common Price Sheet Claim | What It Can Actually Mean | What You Should Verify |
|---|---|---|
| SI1 Clarity | May hide inclusions under prongs or may have clouding that dulls the stone | Clarity characteristics (type, size, and location of inclusions) |
| Excellent Cut | Meets broad lab criteria, but may have measurable light leakage | Crown angle (34–35.5°) and pavilion angle (40.6–41°) |
| GIA Certified | Most consistent and conservative grading standard | Report number verifiable on the GIA website |
| IGI / GCAL Certified | May be over-graded by 1–2 color or clarity steps compared to GIA | Cross-grade the diamond’s appearance yourself or request a GIA verification |
| Lowest Price Per Carat | May come with 20-day lead times, uncertain stock, or shipping delays | Written price confirmation, stock check, and delivery timeline |
| Matched Pair (Same Grades) | Same grades do not guarantee a visual match | Crown and pavilion angles within 0.2°, matching fluorescence intensity |
| Fast Shipping Quoted | Inventory may be held overseas or confirmed only after payment | Verified stock in-hand before order, and clear return/refund policy |
Quick Questions Before You Read
Q: If two diamonds have the same GIA grade, why might they look different?
Grades are ranges. Two SI1 diamonds can differ in how visible the inclusions are under magnification and in normal light. Cut proportions also vary within “Excellent,” affecting brilliance and sparkle.
Q: Is a lower lab grade (IGI or GCAL) always a bad sign?
Not always, but you cannot assume it matches GIA standards. These labs often grade 1–2 steps more generously. A stone graded F/VS1 by IGI may compare to a G/SI2 under GIA scrutiny. Always cross-check appearance.
Q: How do I know if a low per-carat price is actually a good deal?
Verify stock availability, lead time, shipping costs, and return policy. A low price on a stone that takes 20 days to ship or cannot be returned holds hidden costs that erase the savings.
Why “Same Specs” Rarely Means “Same Diamond”
A wholesale price sheet looks like a tool for comparison. Carat weight, color grade, and clarity grade are listed in neat columns, and the lowest total cost per stone catches your eye. It feels like a fair comparison. It is not. The problem is that identical grades on paper can describe diamonds that perform completely differently in person. When you compare only the four columns on a sheet, you are not comparing the diamonds themselves. You are comparing the labels assigned to them.
Laboratory-grown diamonds should be clearly identified as laboratory-grown, and they should not be presented as mined diamonds. A price sheet that uses ambiguous phrasing — such as “real,” “authentic,” or “genuine diamond” without specifying lab-grown origin — may be inconsistent with FTC guidance on clear disclosure and should be treated as a transparency risk for the buyer.
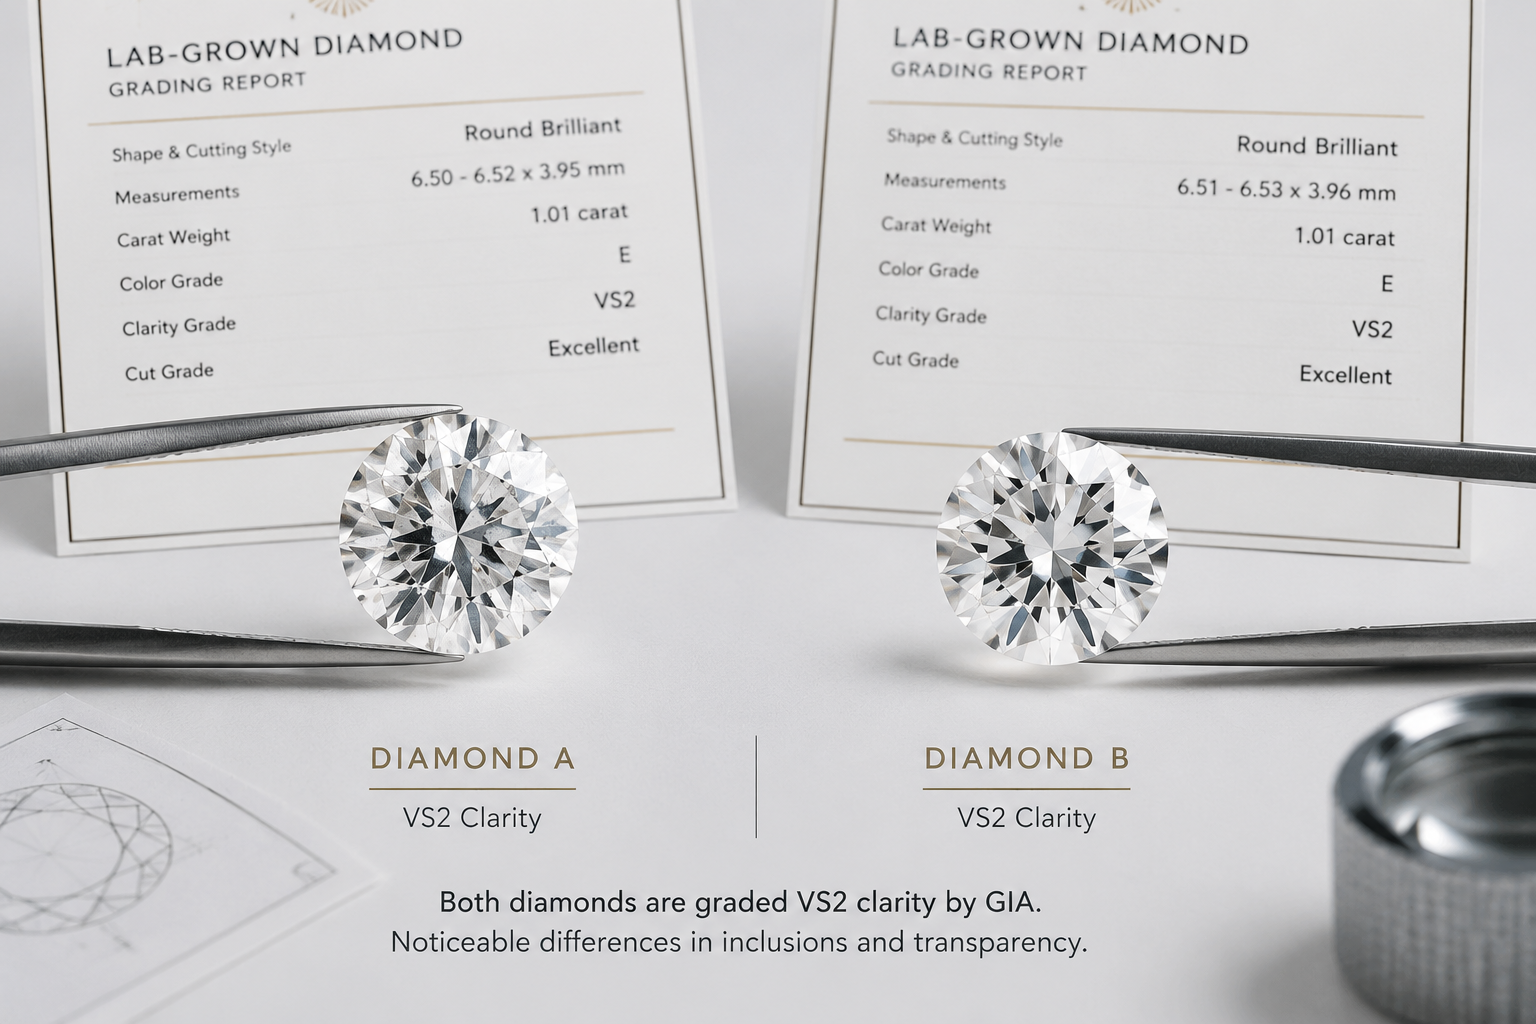
The Price Sheet Illusion: What It Shows vs. What It Hides
A typical wholesale price list includes carat, color, clarity, and total price. That is what you see. What it leaves out is everything that determines whether a stone actually looks beautiful in a setting. Cut grade, proportion data, fluorescence intensity, and precise measurements are almost never included. These omitted variables directly affect how a diamond handles light, how it fits a mounting, and how it looks next to another stone.
Most suppliers organize their inventory by broad grade ranges — F-G color, VS1-VS2 clarity, for example. This means stones with measurably different optical qualities are grouped under the same price bracket. A stone at the top of that range and a stone at the bottom share the same price but not the same visual outcome. The sheet treats them as equivalent, but your customer will notice the difference.
For buyers, the practical point is not just that the grades are ranges, but that the price sheet is designed for quick skimming, not for detailed evaluation. A supplier who consistently provides proportion data, inclusion plots, and video upon request is demonstrating a level of transparency that directly reduces your purchasing risk. The most common mistake is treating a well-organized spreadsheet as a complete assessment — when in reality, the missing data often matters more than what is visible.
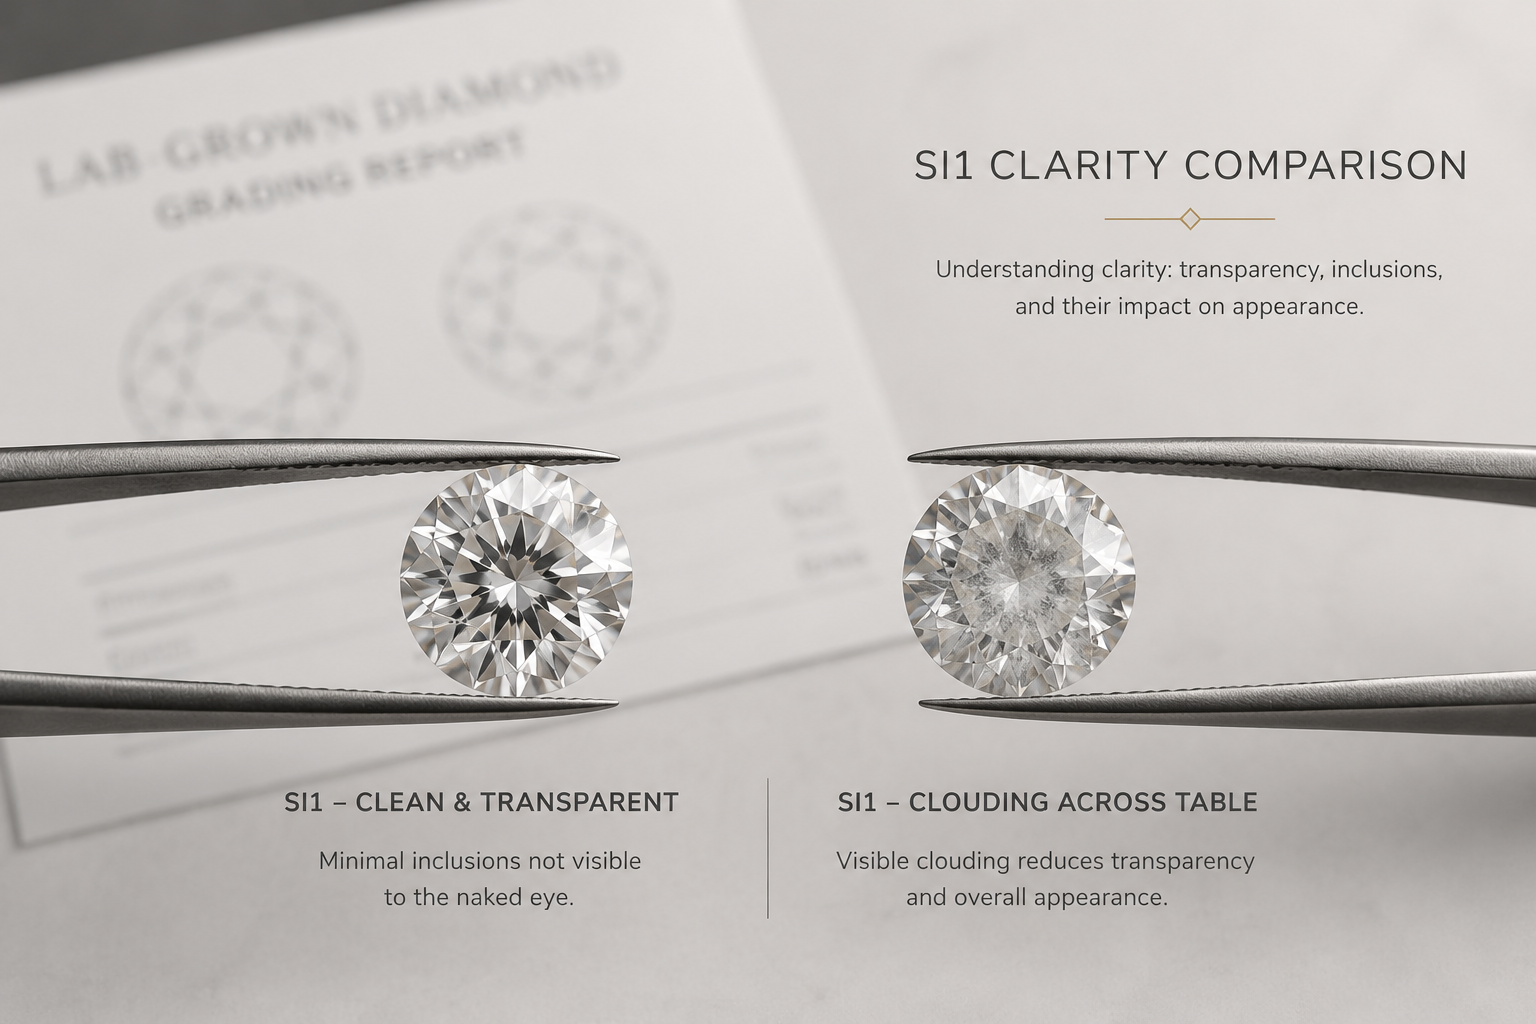
Why One GIA SI1 Can Be Beautiful While Another Is Cloudy
Clarity grading provides a general category, not a detailed description of what is inside the stone. Two SI1 diamonds can carry the same grade and differ dramatically in practical appearance. One SI1 may contain a small white feather near the edge of the stone. In a prong setting, that inclusion is hidden, and the diamond appears clean to the naked eye. The other SI1 may contain heavy twinning wisps or a cloud across the table. Under normal lighting, that stone looks hazy or foggy, even though the grade is the same.
The price sheet lists both as SI1 at the same price. One is suitable for fine jewelry. The other will disappoint anyone who examines it closely. The grade alone cannot tell you which is which.
What to Check Before You Decide
When evaluating stones at the same price tier, ask the supplier for the specific clarity characteristics — inclusion type, location, and number — not just the overall grade. Request a video or a loupe image of each stone. Compare transparency directly between candidates. A lower-clarity grade with clean transparency will outperform a higher-clarity grade with clouding in real-world use. The grade matters, but the actual appearance matters more.
Certificate Bias: Which Grading Report Actually Protects Your Value
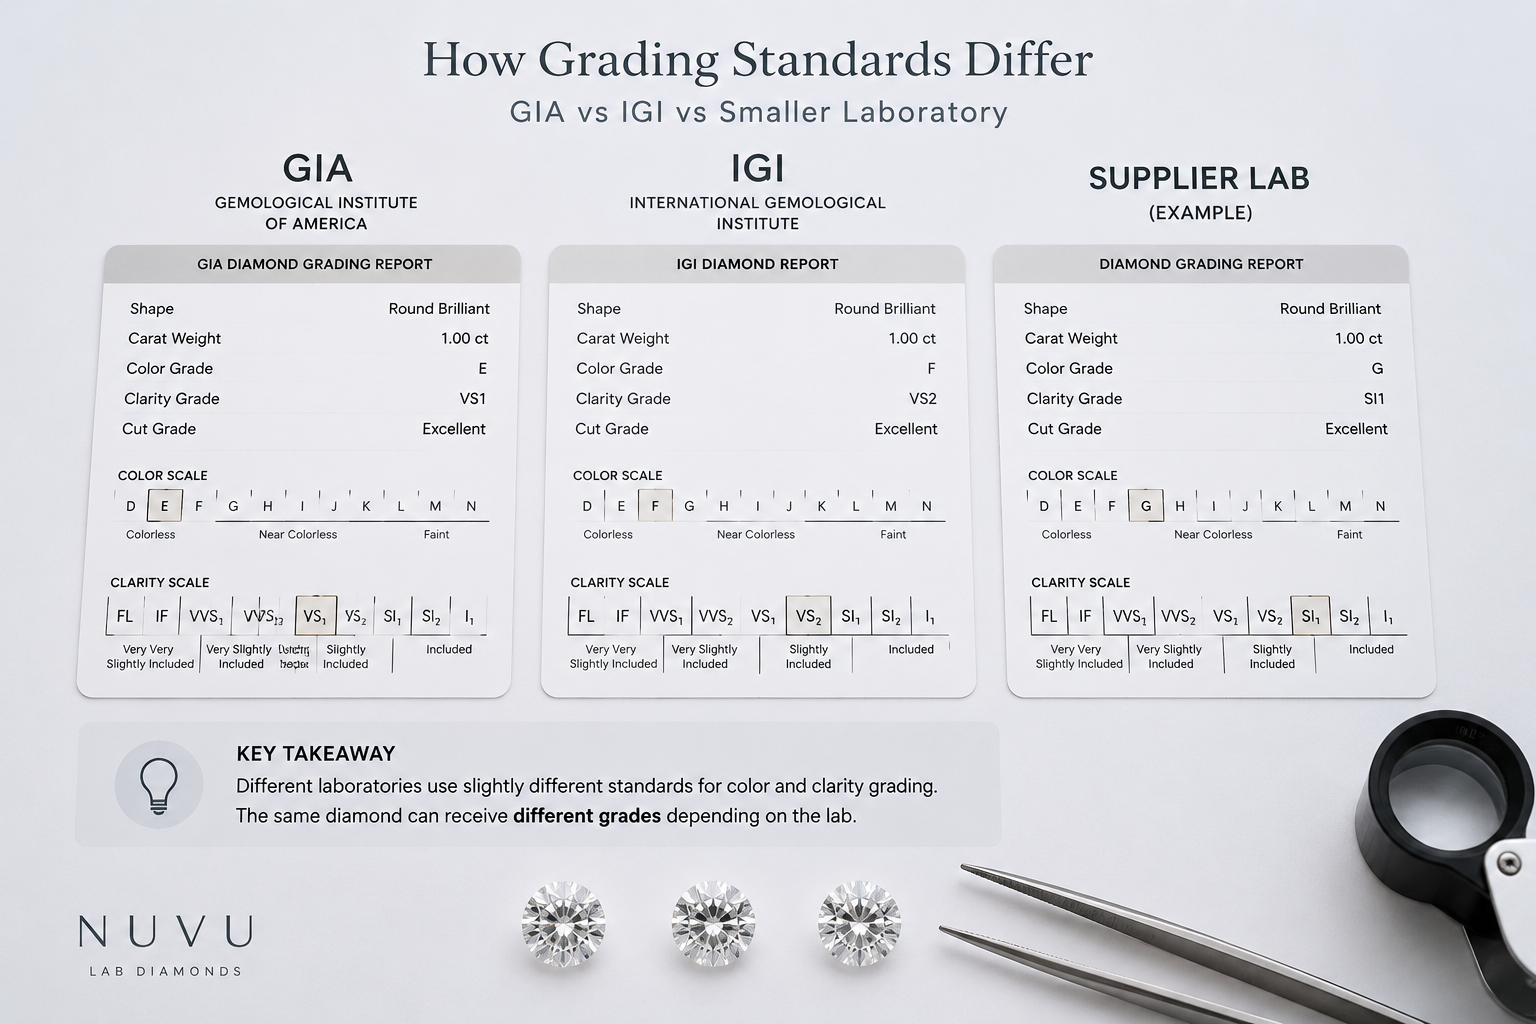
Not all grading reports apply the same standard. When a price sheet mixes stones from different laboratories, the grades cannot be compared directly. Assuming they are equivalent is the most expensive mistake a wholesale buyer can make.
GIA vs. IGI vs. Other Labs: The Real Standard Variation
GIA is the most conservative major grader for color and clarity. A GIA-graded F VS1 is optically equivalent to an IGI-graded D VVS2 or E VVS1 in many cases. That is a difference of two to three grade steps on paper, with no actual difference in the stone. The price sheet treats these as different tiers, but the real distinction is the lab that signed the report, not the diamond itself.
The gap widens with smaller laboratories, particularly those operating in China and India. Reports from these labs may over-grade by one to two color and clarity steps compared to GIA or IGI. A stone that appears to be a great deal on paper may be a lower-grade stone in practice. The price sheet will not flag this. It assumes the buyer knows which labs are conservative and which are not.
It is worth noting that laboratory reputation does not answer every question. A GIA report documents specific measurements and inclusion plots, but it does not describe optical performance beyond the cut grade range. For the wholesale buyer, the practical value of a GIA report lies in its consistency and the ability to verify it online — not in any claim that a GIA-graded stone is automatically better looking. The report is a reliable tool for narrowing candidates, but the final selection still depends on comparing the stones themselves.
Why Verified Reports Add Cost But Prevent Surprises
A GIA-graded stone usually carries a higher price than an equivalent-looking stone from a less conservative lab. That premium is not a markup. It is insurance against grade disagreement later. When a stone is recertified or sent for second-party verification, any drift in grade becomes visible. A stone that was graded too loosely by the original lab will lose value at the moment it is re-evaluated.
Some suppliers offer GIA-graded stones at a premium. Others offer uncertified stones or stones from lower-tier labs at a discount. The real cost is not the line-item price. It is the risk that the grade will not hold up under professional inspection. A stone with a verified GIA report and clear documentation is a lower-risk choice than an uncertified stone with a lower price. The savings are not worth the exposure.
Certificate and Visual Review Check
If the price sheet shows stones from multiple labs, request the GIA or IGI report number for each candidate. Verify the report online using GIA Report Check or the IGI certificate lookup. Compare the plotted inclusions on the report against the video of the physical stone. A stone with a GIA report and clear photos is a low-risk buy. A stone without a report, or with a report from an unverifiable lab, should be treated as a higher-risk option regardless of the price. A grading report helps document key characteristics, but it should not be treated as a guarantee of beauty, value, or sourcing ethics.
How the Federal Trade Commission Defines Lab-Grown Diamond Terminology
Beyond individual lab grading standards, the broader regulatory framework for describing lab-grown diamonds is established by the Federal Trade Commission (FTC). The FTC’s Jewelry Guides require that any industry advertising or sale of laboratory-created diamonds use clear, non-deceptive terminology. Terms such as “cultured,” “synthetic,” or “laboratory-grown” must be used instead of “natural” or “genuine” to avoid misleading consumers.[1] This requirement applies directly to wholesale price sheets and supplier marketing, especially when buyers compare lab-grown diamond suppliers with manufacturers or wholesalers in sourcing decisions. When a price sheet uses ambiguous phrasing — such as “real,” “authentic,” or “genuine diamond” without specifying lab-grown origin — the listing may be inconsistent with FTC guidance on clear disclosure. For the wholesale buyer, this matters because it signals how carefully the supplier manages documentation and whether the stones they sell are accompanied by accurate, regulator-aligned labeling. A price sheet that uses clear, FTC-consistent terminology is more likely to reflect overall transparency in inventory management and customer communication.
[1] Federal Trade Commission, “Guides for the Jewelry, Precious Metals, and Pewter Industries,” 16 CFR Part 23, August 2018 revision, specifically Sections 23.12 and 23.23 regarding disclosure of artificial and laboratory-grown diamonds.
When a grading report is available, buyers should verify the report details through the issuing laboratory’s official report-check tools where available. A verified report number provides a reliable baseline, but the visual appearance of the stone should still be confirmed independently before purchase.
Cut Quality and Proportions: The Most Ignored Variable on Price Sheets
Cut is the single largest driver of visual performance in a diamond, yet it is the variable most frequently missing from wholesale price sheets. Without full proportion data, comparing prices is essentially meaningless.
This is where the difference between a helpful price sheet and a misleading one becomes clearest. A supplier who lists cut grade as “Excellent” but stops there is not being deceptive — but they are leaving you with an incomplete picture. The proportion details that separate a great stone from an average one are not hidden intentionally; they are simply not part of the standard price sheet format. The buyer’s job is to recognize that the absence of this data is the most significant gap in the comparison.
The Problem with “Good Cut” and “Very Good Cut” on Wholesale Sheets
Many price sheets list the cut grade as GIA Excellent, but that single label does not tell you enough. GIA Excellent covers a range of proportion combinations. A 34.5° crown angle paired with a 40.8° pavilion angle delivers strong light return. A 35.5° crown paired with a 41.2° pavilion angle introduces measurable light leakage. Both are graded GIA Excellent. One performs well. The other loses light through the bottom of the stone and looks duller in normal viewing conditions.
The price sheet does not distinguish between these two stones. It charges the same grade-based price for both. The buyer who does not request full proportion data will not know which one they received until the stone arrives.
Which Proportion Ranges Actually Matter for Brilliance
For a standard round brilliant cut, the target ranges for optimal light return are well established. Crown angle should fall between 34.0° and 35.5°. Pavilion angle should fall between 40.6° and 41.0°. Table percentage is ideal at 55–58%, and total depth at 60.5–62.5%. Stones within these ranges will perform predictably well under most lighting conditions. Stones outside these ranges may still receive an Excellent grade but will not return light as efficiently.
For fancy shapes, the ideal proportions are different. An oval should have a length-to-width ratio near 1.35–1.45 for a balanced silhouette. A cushion cut performs best with depth near 62–66% for good face-up spread. Pear shapes require attention to symmetry and bow-tie effect, which no grade on a price sheet captures. Each shape has its own proportion targets, and those targets must be verified individually.
Stone-to-Setting Fit Check
Before comparing prices on the sheet, request the full proportion data for every candidate stone: crown angle, pavilion angle, table percentage, depth percentage, girdle thickness, and culet size. If the supplier cannot or will not provide this data, that is a warning sign. For a pair project, such as stud earrings, the proportions of both stones must match within tight tolerance. A difference of even 0.3° in crown angle or 0.5% in table percentage can create a visible mismatch in brilliance when the stones are set side by side. The only way to catch that is to check the numbers before you buy.
Fluorescence, Treatment, and Color Cast: What the Sheet Never Says
A price sheet can list two stones at the same color grade, and both can be technically correct. But color grade alone does not tell you whether the stone looks colorless, slightly warm, or actually tinted in person. Fluorescence, post-growth treatment, and subtle body color are three factors that rarely appear on wholesale lists, yet each one can change how the diamond performs visually — and what it is actually worth for fine jewelry.
Fluorescence: When It Helps, When It Hurts, and When It Is Irrelevant
Fluorescence refers to how a diamond emits visible light when exposed to UV radiation. In most lab-grown diamonds, the fluorescence is blue. At faint or medium levels, blue fluorescence can actually improve the visual appearance of a stone in the J or K color range, making it look slightly whiter under sunlight or other UV-rich lighting. The same effect is largely irrelevant for D through G color stones, where the body color is already neutral enough that fluorescence produces no noticeable improvement.
The problem arises when fluorescence is strong. Strong blue fluorescence can make a diamond appear hazy, milky, or oily under normal lighting conditions, even though its color grade on paper remains unchanged. A price sheet that offers an aggressively low price on a stone and omits the fluorescence grade is often offering a stone that is harder to sell — not a genuine bargain. The lower price reflects limited demand from jewelers who know the stone will not look clean in a ring.
Fluorescence matters most when you are buying stones in the lower color range (I through M) or when the sheet shows a significant price gap between stones that appear otherwise matched. Ask for fluorescence intensity on every candidate. Blue fluorescence is fine at faint or medium. Strong blue should be examined in person or by video before purchase.
Post-Growth Treatment (HPHT vs. CVD) and What It Means for Wholesale
The growth method itself does not determine stone quality, but it does introduce different visual characteristics. HPHT-grown stones may show a blue or greenish fluorescence, while CVD stones can carry a brownish or grayish tint if the post-growth annealing process was incomplete. GIA notes that the color of some laboratory-grown diamonds can be further modified after growth by heat treatment or irradiation, and these modifications may not always be disclosed on simpler reports.[2] Annealing is a heat treatment used after CVD growth to improve color, and it is standard in well-controlled production. But not all suppliers disclose whether annealing was performed, and some offer treated CVD stones without making the distinction clear on the price sheet.
The real risk for a wholesale buyer is color stability. A CVD stone that has not been properly annealed may show a visible brown or gray cast under daylight LED lighting — the same lighting used in most jewelry stores. On paper, the color grade may read G or H. In hand, the stone looks darker and less neutral. Because the price sheet lists growth method inconsistently, treating all stones as simply lab-grown, the buyer who does not ask the question receives no warning.
Buyer Verification Checklist
Ask the supplier specifically for each stone you are considering:
- What is the growth method — HPHT or CVD?
- Has the stone undergone any post-growth annealing or color treatment?
- What is the fluorescence strength and color as stated on the grading report?
- Does the stone show any visible color cast — brown, gray, or green — under normal daylight LED lighting?
A stone with no treatment, no significant color cast, and no reported fluorescence above medium is the most neutral choice for fine jewelry. If a stone fails any of these checks, the discount on the price sheet should be understood as compensation for a real visual limitation, not as a pricing advantage.
For the wholesale buyer, a useful habit is to build a small reference library of video clips under consistent lighting for stones you have purchased and verified. Over time, this collection helps you identify visual patterns — a slight gray cast, a flash of blue fluorescence, a hazy table — that the price sheet never describes but that your eye learns to spot quickly.
Matching, Pairing, and Consistency: The Hidden Cost of Mixed Inventory
A price sheet lists stones individually. But many wholesale purchases involve pairs or sets — stud earrings, three-stone rings, or side-stone assemblies. When two stones share the same color and clarity grade on paper, it is easy to assume they will match. In reality, small differences in cut proportions and fluorescence produce visible mismatch, and the price sheet will never warn you.
Why Two Stones at the Same Grade Can Look Different Side by Side
Even with identical color and clarity grades, a 0.5° difference in crown angle or a 1% difference in table percentage can cause one stone to return light more brightly than the other. When set side by side in stud earrings, one stone may appear crisper and more brilliant while the other looks slightly duller or darker. Fluorescence mismatch adds another layer: one stone with medium blue fluorescence and one with none will show different color tones under UV lighting, which includes many retail and outdoor environments.
This is not a rare problem. It happens whenever stones are selected from a price sheet by grade alone, without comparing the actual optical behavior of each stone. For a single-stone ring, the risk is lower. For a pair, the mismatch is immediately noticeable, and the setting cannot hide it. The buyer ends up with two stones that each appear fine alone but look wrong together.
What to Ask the Supplier for a Verified Pair or Set
Matching requires more than matching grades. Request proportion matching within 0.2° for crown and pavilion angles, within 1% for table and depth percentages, and matching fluorescence grade and tint. These are not excessive demands — they are standard for any supplier that regularly provides matched pairs for studs or multi-stone settings.
A supplier who cannot provide side-by-side photos or video of a pair under the same lighting is showing you a gap in their matching capability. Some lab grown diamond suppliers offer fully matched pairs at a premium, often 5 to 10 percent above the per-stone sheet price. That premium is worth paying. The alternative is receiving two stones that meet grade requirements but fail the visual test in a finished piece of jewelry.
When evaluating a pair, one practical approach is to ask the supplier to photograph both stones face-up on a white background under the same light source at the same distance, with no editing. This simple test reveals differences in brightness, color, and transparency that no spreadsheet column can capture. A pair that passes this visual check has a much higher chance of looking matched in the final setting.
Stone-to-Setting Fit Check
For stud earrings or any multi-stone design, request side-by-side comparison images and video under the same lighting before you commit. If the supplier cannot provide this, ask for the full proportion data for each stone and compare it yourself. A mismatch of even 0.3° in crown angle creates a visible difference in brilliance when the stones are set next to each other. Do not rely on the grade alone. Check the numbers, and check the visuals.
Lead Time, Availability, and Support: The Invisible Cost of a Low Price
The lowest price on a sheet is easy to spot. What is harder to see is how long the stone takes to arrive, whether it is actually in stock, and what happens if the stone does not match the listing. These factors are not priced on the sheet, but they add real cost in time, risk, and friction.
How to Distinguish a Really Available Stone from an Upon-Request Listing
Not every stone listed on a wholesale sheet is physically present in the supplier’s inventory. Some are in a different warehouse with a two-to-three-day transfer time. Others are not manufactured yet and require ten to twenty days of production plus international shipping before they reach you. The sheet may label both as available, but the actual delivery timeline differs by weeks.
Confirm the exact location and delivery timeline for each stone before comparing prices. A stone that ships the same day has real value when you are working against a deadline for a client order. A stone that requires fourteen days of manufacturing plus shipping may end up costing more in lost time than the price difference from a faster alternative. Calculate total lead time, not just unit price.
Supplier Communication and Return Support: What to Test Before Your First Order
The easiest way to evaluate a supplier before committing is to place a small test request. Ask for measurement confirmation, a video under three-to-five-times magnification, and a deadline commitment for two candidate stones. Note how quickly the supplier responds and whether the data they provide matches the listing. A supplier who ignores measurement requests, sends unclear photos, or substitutes stones without notice is high risk, even if the sheet looks competitive.
Clear communication and follow-through are part of the total cost. A supplier who delivers accurate information quickly saves you time and reduces the chance of receiving a stone that does not meet expectations. Test this before you scale the order.
What This Means in a Real Purchase
Consider two stones from different suppliers. The first has a higher line-item price but is verified in stock with two-day shipping, responsive communication, and a return policy for grade disagreements. The second is cheaper on paper but requires fourteen days lead time, provides no measurement data, and has unclear return terms. The first stone is the better total value. The cheaper stone carries hidden cost in delays, uncertainty, and the risk of receiving a stone you cannot use or cannot return.
Evaluate total cost. That includes time, communication quality, availability accuracy, and return protection — not just the number on the price sheet.
For buyers placing regular wholesale orders, another useful step is to keep a simple log of supplier response times and order outcomes. After a few transactions, patterns become visible. A supplier who reliably answers questions within 24 hours, ships on schedule, and delivers stones that match the listing data is worth a slightly higher per-stone price. The consistency saves time and reduces stress. The log helps you distinguish between one-time convenience and genuine reliability.
Before placing any wholesale order, buyers should confirm the supplier’s documentation practices, return policy, and communication expectations in writing. A supplier who provides clear written terms is more likely to deliver consistent results across multiple transactions.
Smarter Price Sheet Reading Checklist: What to Compare Before You Buy
A price sheet is a useful starting point, but it becomes a reliable tool only when you evaluate stones on equal terms. The problem is that most buyers compare only the headline data — carat, color, clarity, and price — and assume everything else is equal. That assumption is where costly mistakes begin. The right approach is to build a structured comparison framework that treats every candidate stone the same way before you make a judgment.
How to Build a Side-by-Side Comparison Template for Wholesale Evaluation
Create a spreadsheet with one row per stone and columns for each meaningful variable. Carat, color, clarity, and total price are obvious entries, but they are not enough. Add columns for cut grade, crown angle, pavilion angle, table percentage, depth percentage, girdle thickness, and culet size. Include the certificate lab (GIA or IGI specifically) and the report number so you can verify each stone independently. Note fluorescence intensity and color, growth method (HPHT or CVD), and whether any post-growth treatment has been disclosed. Enter the exact millimeter measurements, not just carat weight, because two stones at the same carat can differ noticeably in face-up size depending on cut proportions.
In sourcing or wholesale conversations, documentation, consistency, and communication often matter as much as the headline specification. Adding a column for the quality of the supplier’s response — whether they provided accurate data, clear images, and timely answers — helps you track which suppliers are reliable partners over time. A stone that looks good on paper but comes from a supplier who fails to respond clearly is a higher-risk choice than a stone with slightly higher cost from a transparent, responsive source.
Also track availability status — in-stock, at a different warehouse, or upon request — along with the confirmed lead time in days. Price per carat and total price both belong in the template because the pricing structure sometimes changes across weight brackets. Once the spreadsheet is populated, compare only stones that are equivalent on certificate type, proportions, and availability. An IGI-graded stone with a 10-day lead time cannot be directly compared to a GIA-graded stone that ships the same day. The spreadsheet forces you to separate apples from oranges before you evaluate cost.
Which Ranges Create Real Value vs. Which Create Hidden Risk
For most engagement-ring buyers and wholesale orders serving the jewelry retail market, stones in the G-H color and VS1-VS2 clarity range with GIA certification offer the strongest balance of visual performance and cost. When these stones also fall within ideal proportion ranges — crown angle 34.0–35.5°, pavilion angle 40.6–41.0°, table 55–58%, depth 60.5–62.5% — the visual result is reliable and consistent across lighting conditions. This is the sweet spot where you are not paying for a premium grade that makes little visible difference, and you are not dropping into a quality tier where compromises become obvious.
By contrast, a price sheet offering I-J color and SI1-SI2 clarity at a 30% discount may look like a volume opportunity, but without cut data the discount is impossible to evaluate. A sluggish SI1 with poor transparency and a hazy table will not satisfy an end customer, regardless of how low the per-carat price reads. Stones outside the ideal proportion range — a 62% table on a round brilliant, for example, or a crown angle above 36° — may carry a lower price tag but will not deliver the brilliance buyers expect. The discount exists for a reason, and that reason is usually visual performance. Prices can change with market conditions, report type, seller channel, and stone-specific details, so exact comparisons should be verified at the time of purchase.
For NUVU, the goal is to make diamond comparison easier to understand, especially when buyers are weighing report details, visual evidence, design fit, and budget together. The price sheet provides the starting data, but the final decision should be based on a fuller set of verified information — not just the lowest number in a column.
Buyer Verification Checklist
Before committing to any stone from a price sheet, run through seven checks. Confirm the full proportion data — crown, pavilion, table, and depth — for every candidate. Verify the certificate report number online through the GIA Report Check or IGI certificate lookup service. Confirm the growth method and whether any post-growth treatment has been applied. Check the fluorescence grade and note whether the intensity could affect appearance under UV-rich retail lighting. If the order involves a pair or multi-stone design, request side-by-side photos or video under the same conditions. Confirm the availability timeline and the supplier’s return policy for grade disagreement. And get the price in writing before any deposit or order is placed.
A stone that passes all seven checks is a low-risk buy. A stone that fails one or more should be treated as a conditional candidate — possibly still usable, but carrying enough uncertainty that the price should be discounted to account for it. This checklist does not replace visual inspection. It creates a consistent baseline so you are comparing real information, not assumptions.
[1] Federal Trade Commission, “Guides for the Jewelry, Precious Metals, and Pewter Industries,” 16 CFR Part 23, August 2018 revision, Sections 23.12 and 23.23 regarding disclosure of artificial and laboratory-grown diamonds.
[2] GIA, “Identifying Laboratory-Grown Diamonds,” GIA.edu, education section, description of HPHT and CVD growth methods and post-growth treatment processes.
Disclosure: This article is for general educational purposes only. Diamond grading, pricing, availability, specifications, and seller policies can change, and readers should verify important details through grading reports, official laboratory tools, seller documentation, or qualified professionals before making a purchase decision. Laboratory-grown diamonds should be clearly distinguished from natural diamonds, and environmental or sourcing claims should be supported by specific documentation.