
An eye-clean lab-grown diamond does not need to be flawless on a certificate; it needs to look clean when worn. The challenge is knowing when a clarity grade is enough, because a lab-grown diamond comparison guide should account for how inclusions that seem dramatic under 10x magnification may disappear in real life, while a dark mark under the table can be obvious even in a higher-looking grade.
For the full framework, read Lab-Grown Diamond 4Cs Guide.
This guide helps you judge clarity by face-up appearance, diamond size, shape, setting, and use. It explains why VS1–VS2 is often the practical range for many center stones, when SI1 can be a smart value, and when paying for VVS may make sense. The goal is to choose the lowest clarity grade that still looks clean in normal wear, without sacrificing cut, proportions, color, or setting fit.
Laboratory-grown diamonds should be clearly identified as laboratory-grown, and they should not be presented as mined diamonds. This article discusses clarity for lab-grown diamonds specifically; natural diamonds may be evaluated with similar clarity language, but they have a different origin and should be compared with clear disclosure.
| Buying Situation | Practical Clarity Starting Point | What to Check Before Choosing |
|---|---|---|
| Round or brilliant center stone under 2 carats | VS1–VS2 | Face-up video, inclusion color, table area |
| Possible value pick | SI1 | Only if inclusions are light, off-center, and not visible |
| Emerald, Asscher, or open-facet shape | VS1 or better | Step facets, central marks, reflections |
| Larger center stone over about 2.5 carats | VS1+ often safer | Visibility at normal distance and actual scale |
| Studs, pendants, or small accents | More flexible | Viewing distance, matching, and overall appearance |
| Custom ring design | Depends on stone and setting | Whether prongs hide or expose inclusions |
Quick Questions Before You Read
Q: Is VVS clarity necessary for an engagement ring?
Usually not. Many VS1 and VS2 diamonds look just as clean in daily wear.
Q: Can an SI1 lab-grown diamond be eye-clean?
Yes, but only after checking actual photos, video, and inclusion placement.
Q: Should I trust the certificate alone?
No. The report identifies clarity features, but it does not show how visible they are in real life.
Q: Do some shapes need higher clarity?
Yes. Emerald, Asscher, larger, and elongated stones often reveal inclusions more easily.
What “Eye-Clean” Means for Lab-Grown Diamonds
Eye-clean lab-grown diamonds are diamonds that look clean to the naked eye in normal wear. The key word is look. A diamond can have inclusions or small blemishes under magnification and still appear completely clean when viewed face-up in an engagement ring, pendant, or pair of studs.
This is where many buyers overspend. Lab-grown diamond clarity is graded under controlled conditions, often with magnification, but most people do not inspect jewelry that way. The better buying question is not “Can anything be found under magnification?” It is “Will anything distract me when I look at the diamond in real life?”
Eye-Clean Is a Visual Standard, Not a Formal Grade
What does eye-clean mean for a lab-grown diamond? In practical terms, it means the inclusions are not noticeable without magnification under ordinary viewing conditions. If you look at the diamond from a normal distance and nothing catches your eye, the stone may be considered eye-clean even if the grading report lists clarity characteristics.
A clarity grade is assigned by a lab. “Eye-clean” is a visual judgment. That distinction matters because two diamonds with the same clarity grade can look different in person. One VS2 may have a tiny pale inclusion near the edge that disappears in the setting. Another VS2 may have a darker inclusion under the table that draws attention. The grade narrows the search, but it does not finish the decision.
Evidence-based buying note: treat “eye-clean” as a seller or buyer description, not as a substitute for the grading report. The report can document the diamond’s stated clarity grade and identifying details, while the eye-clean judgment should be supported by stone-specific photos, video, and a clear viewing standard such as face-up appearance without magnification. If a seller uses “eye-clean” without showing the actual stone or explaining the viewing conditions, ask for more evidence before relying on the claim.
For buyers, the practical point is not just what the report says, but how the stone performs visually and fits the intended design. A grading report documents important characteristics under standardized viewing conditions, but it does not prove that a diamond will look brighter, cleaner, or better suited to a specific ring. Use the report to avoid blind buying, then use real media and setting context to decide whether the clarity grade is enough.
When a grading report is available, buyers should verify the report details through the issuing laboratory’s official report-check tool where available, then compare those details with the actual stone photos, video, measurements, and setting plan.
Why a Lower Clarity Grade Can Still Look Clean
Many inclusions are easy to spot in a magnified image but irrelevant in daily wear. A small white pinpoint near the outer edge of a diamond may be visible in a zoomed video and still be impossible to find once the stone is set. A faint feather or transparent inclusion may also blend into the facet pattern, especially in shapes with strong sparkle.
The opposite can also happen. A darker crystal near the center of the stone may be easier to notice even if the overall clarity grade sounds respectable. Location and contrast often matter more than the label on the report. For a buyer, the mistake is assuming that a lower grade is automatically bad or that a higher grade is automatically safer visually.
Why “Flawless” Is Usually More Than Most Buyers Need
Flawless, Internally Flawless, and many VVS diamonds can be excellent stones, but they are often more clarity than a daily-wear buyer needs. These grades may offer reassurance, rarity on paper, or personal satisfaction for someone who wants an exceptionally clean report. They do not always create a visible improvement once the diamond already looks clean to the naked eye.
For engagement rings and everyday jewelry, paying for clarity beyond what you can see can pull budget away from factors that are more visible, such as cut quality, face-up size, or the setting itself. Higher clarity is worth considering when it solves a real concern, not simply because the grade sounds more impressive.
What to Check Before You Decide
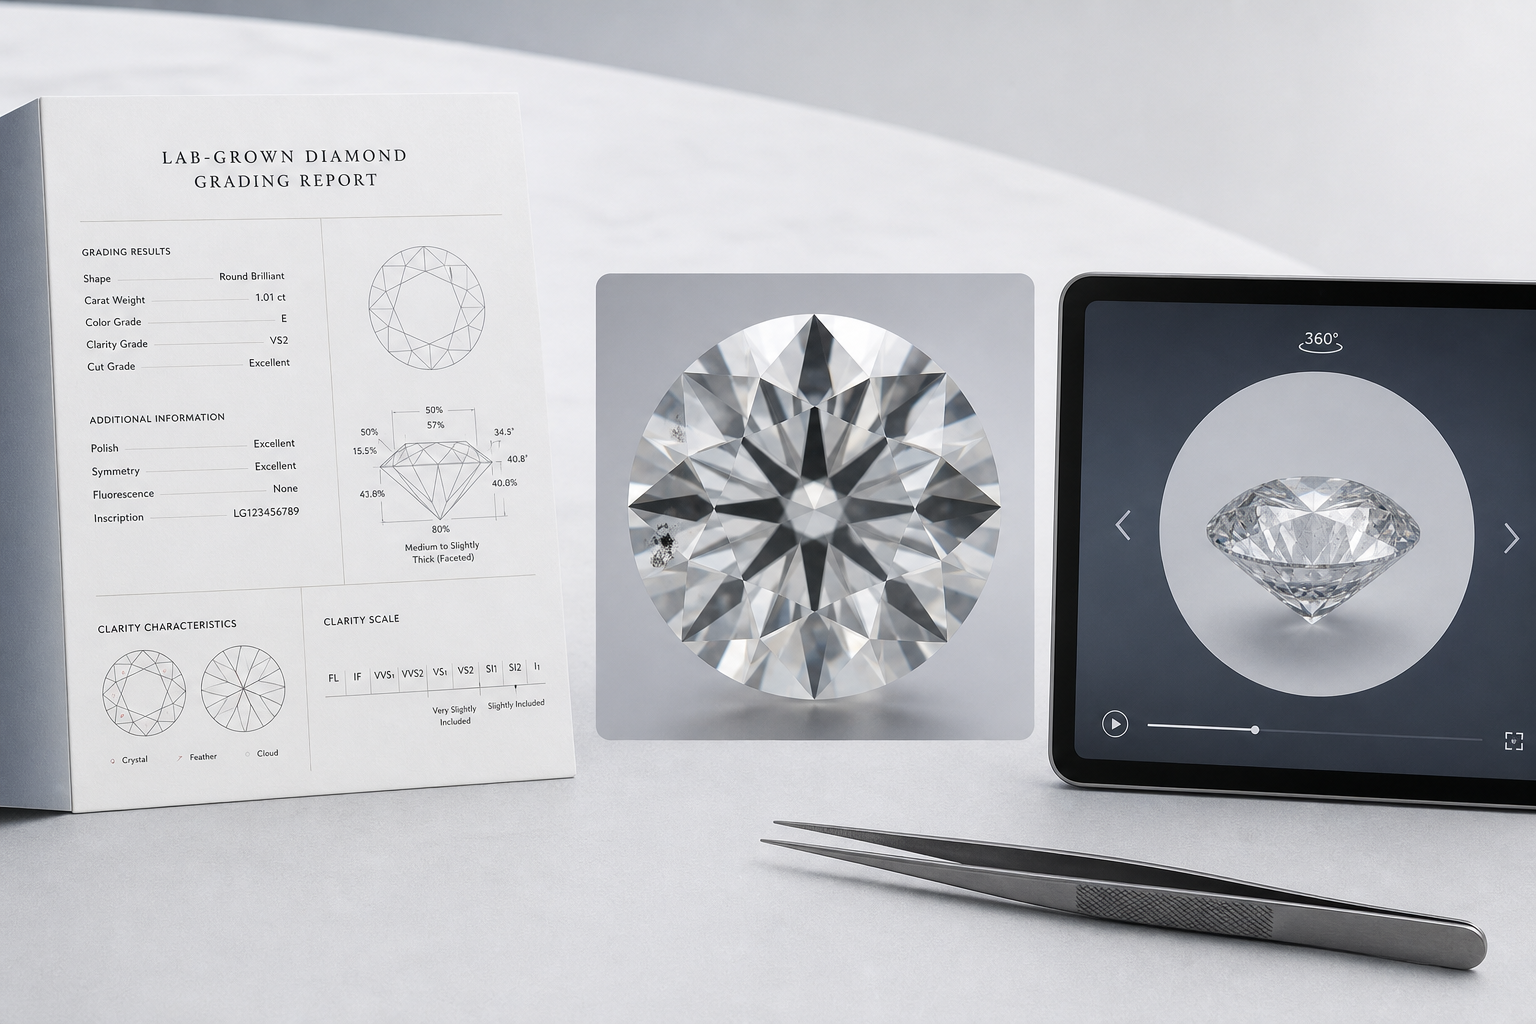
Before deciding that a lab-grown diamond is eye-clean, use three checks together. First, review the grading report so you know the clarity grade and the listed clarity characteristics. Second, inspect actual photos or a 360-degree video of the specific diamond, not a generic sample image. Third, confirm whether any inclusions are visible face-up without magnification.
No clarity grade is always eye-clean. A careful VS2 can be a better visual choice than a poorly placed VS1, and some SI1 diamonds can be strong candidates when the inclusions are small, light-colored, and out of the center. The safest approach is to use the grade as a starting point, then judge the actual diamond as it will be worn.
The Clarity Grades Most Likely to Look Eye-Clean
The best clarity for a lab-grown diamond is usually the lowest clarity grade that still looks clean in the actual stone. For many buyers, that means focusing on an eye-clean clarity grade rather than chasing the highest grade available. The practical range often falls around VS1 and VS2, with some SI1 diamonds worth considering only after careful visual review.
Clarity grades are useful because they help organize the search. They are not a guarantee of what your eye will see. The difference between VVS2, VS1, VS2, and SI1 can be obvious under magnification, but much less meaningful once the diamond is set and viewed in normal conditions.
VVS1 and VVS2: Visually Safe but Often More Than Necessary
VVS1 and VVS2 diamonds are typically very clean to the naked eye. Their inclusions are difficult to see even under magnification, so they are usually a visually safe choice for engagement rings and other jewelry. If the buyer values a very clean report or wants extra reassurance, VVS can make sense.
The tradeoff is that VVS often means paying for rarity that may not change the diamond’s appearance in real life. If a VS1 or VS2 stone looks equally clean face-up and has better cut, better proportions, or a more appealing size, the VVS grade may not be the smarter use of budget. VVS is most compelling when the report itself matters to the buyer, not when the goal is simply a beautiful-looking diamond.
VS1 and VS2: The Practical Sweet Spot for Many Buyers
VS1 and VS2 are often the practical sweet spot for lab-grown engagement ring center stones. In many diamonds, inclusions in this range are not visible without magnification, especially in brilliant-style shapes such as round, oval, cushion, pear, and radiant cuts. This is why shoppers often ask, “Is VS2 good enough for a lab-grown diamond?” In many real buying situations, the answer is yes, as long as the actual stone is reviewed.
VS1 generally gives a wider safety margin. VS2 can be excellent value when the inclusions are small, pale, off-center, or masked by the facet pattern. The risk with VS2 is not the grade itself; it is assuming every VS2 behaves the same. A well-positioned VS2 inclusion may be a non-issue, while a more visible inclusion under the table can make the same grade less desirable.
SI1: Possible Value, but Verification Matters More
SI1 is where the decision becomes more stone-specific. Some SI1 lab-grown diamonds are eye-clean, especially when the inclusion is light-colored, near the edge, or difficult to see face-up. Others show visible inclusions quickly, particularly if the inclusion is dark, central, or reflected through the facets.
So, is SI1 eye-clean? Sometimes, but it should not be treated as a safe default for an engagement ring center stone. Inclusion type, color, location, shape, and carat size all matter more at this level. SI1 can be a smart value choice only when the diamond has been verified with clear photos, video, and a direct face-up visibility check.
SI2 and Below: Higher Risk for Center Stones
SI2 and lower clarity grades carry more risk for center stones because visible inclusions become more common. This is especially true in larger diamonds, step cuts, and stones with dark or central inclusions. A lower clarity grade may still be usable in some jewelry, but the burden of proof is higher.
These grades may make more sense for small accent diamonds, certain earrings, or pieces viewed from a greater distance, provided the appearance is checked. For a main engagement ring diamond, SI2 and below should usually be approached cautiously. A lower price does not help much if the wearer keeps noticing the same inclusion every time they look at the ring.
Suggested Practical Clarity Range
For many round, oval, cushion, pear, and radiant lab-grown engagement ring center stones under about 2 carats, VS2 to VS1 is often a practical target. This range usually gives buyers a strong chance of finding a clean-looking diamond without paying for clarity that may not be visible.
For carefully reviewed stones, some SI1 diamonds may be visually acceptable, but they should be judged one by one. For emerald, Asscher, or larger stones above 2 carats, buyers may want to start around VS1 or better unless a lower grade is strongly supported by actual images and video. The better approach is not “buy this grade every time,” but “start in the right range, then verify visually.”
Viewing Distance, Lighting, and Real-Life Wear Change What You See
Eye-clean diamond viewing distance matters because lab-grown diamond clarity in real life is not the same as clarity in a magnified online video. A diamond that looks busy on a large screen may look clean on the hand. The reverse is also possible if a dark inclusion sits in a spot your eye naturally catches.
Online media is useful, but it can distort a buyer’s sense of scale. A tiny inclusion may appear dramatic when the diamond is enlarged many times beyond life size. The goal is not to ignore what you see online, but to interpret it correctly.
Normal Viewing Distance Is Not 20x Magnification
Most people view a ring from roughly hand distance, not with a jeweler’s loupe. Online photos and videos often show the diamond at extreme magnification, which can make inclusions look more obvious than they will ever appear during normal wear.
This is why diamond inclusions look bigger in photos: the stone is enlarged, the lighting is controlled, and the camera is often focused directly on details your eye would not isolate in person. If an inclusion is only noticeable when the diamond fills your entire phone or laptop screen, it may not matter once the ring is worn. If you can still spot it quickly in a face-up view at normal scale, it deserves more caution.
Face-Up View Matters More Than Side or Tilted Views
For most jewelry, especially engagement rings, the face-up view is the priority. This is the top-down view people see when the diamond is on the hand. Side views and tilted angles can reveal inclusions that are not visible in normal use, but they should not carry the same weight unless the setting leaves that area exposed or the inclusion creates a specific concern.
A buyer can waste energy rejecting a diamond because of an inclusion visible only from an unusual angle. The better question is whether the inclusion interrupts the diamond’s appearance from the top. If it does not show face-up without magnification, it may be less important than the video makes it seem.
Lighting Can Hide or Reveal Different Inclusions
Lighting changes what you notice. Bright spotlighting may emphasize sparkle and hide certain inclusions. Diffused daylight can make the body of the stone easier to study. Indoor lighting may reveal contrast differently, especially with dark crystals or inclusions near the center.
No single lighting condition proves everything. A diamond that looks clean only under strong sparkle lighting should still be reviewed in a calmer face-up image or video. At the same time, a magnified video under harsh lighting can make a minor inclusion feel worse than it is. The most useful review combines lighting context with realistic viewing distance.
Real-Life Clarity Check
A practical eye-clean check is simple: look for inclusions from about 8 to 12 inches away, face-up, without magnification. If you cannot find the inclusion from that distance after a normal look, it is unlikely to bother most wearers in daily use. If your eye goes straight to it every time, the clarity grade may not be high enough for that specific stone.
For online buying, ask whether the seller can comment on naked-eye visibility under normal viewing conditions. The most helpful answer is specific, such as whether the inclusion is visible face-up without magnification, rather than a vague reassurance that the diamond is “nice” or “high quality.” Real-life clarity is a visual judgment, and it should be confirmed in the same viewing context where the jewelry will actually be worn.
Why Inclusion Location Matters More Than Many Buyers Expect
Diamond inclusion location can matter as much as the clarity grade itself. Two lab-grown diamonds with the same grade can look very different if one has a small, pale inclusion near the edge and the other has a dark mark under the table. For buyers trying to judge eye-clean diamond inclusions, placement is one of the fastest ways to separate a promising stone from one that may keep drawing attention.
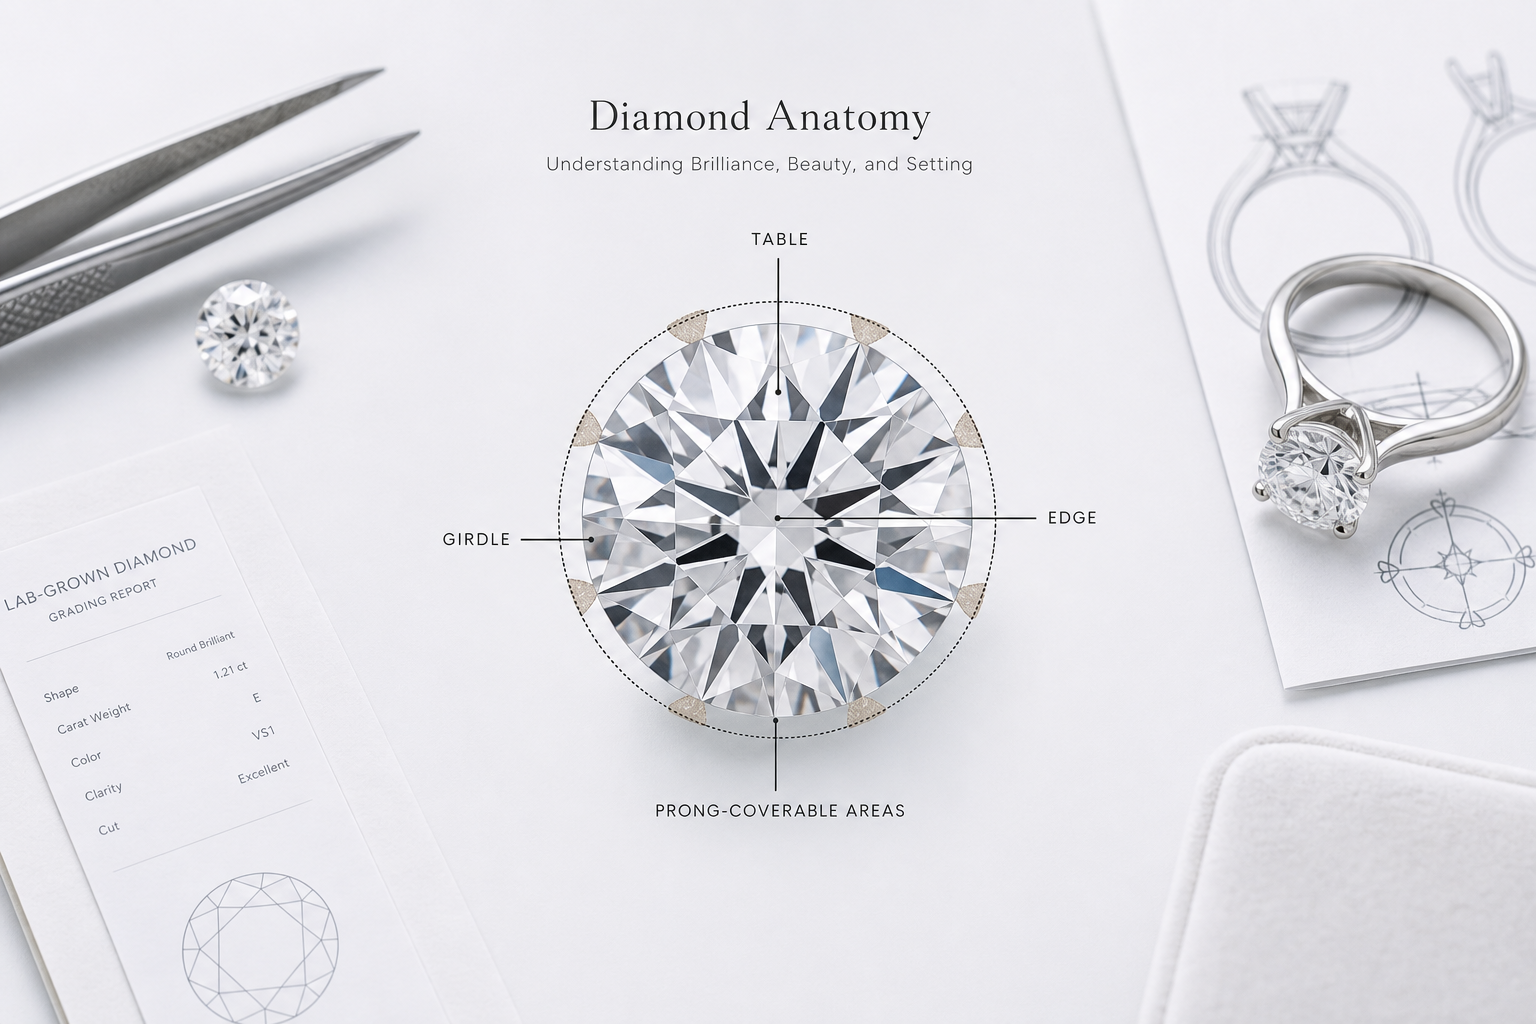
Think of the face-up view as having zones. The table is the flat top facet in the middle of the diamond. The center is the area your eye naturally checks first. The edge sits closer to the girdle, where the diamond meets the setting. The prong area is where metal may cover a small part of the stone once it is set. Inclusions in these areas do not carry the same visual risk.
Center-Table Inclusions Are Usually the Most Noticeable
Inclusions under the table or close to the center of the face-up view are usually the easiest to notice because they sit in the most exposed part of the diamond. This is especially true in larger stones, step cuts, and diamonds with quieter facet patterns. A small inclusion near the edge may disappear in normal wear, while a similar mark under the table may feel impossible to ignore once you know where it is.
The most practical question is not simply whether the report lists an inclusion. It is whether that inclusion sits where the eye keeps returning. If a dark crystal, cloud, or feather is centered in the face-up view, the diamond may appear less clean than its clarity grade suggests. For an engagement ring center stone, that matters because the diamond is viewed often, closely, and from the top.
Edge Inclusions May Be Less Noticeable or Hidden by Prongs
Inclusions near the edge or girdle are often less distracting than center-table inclusions. They may fall outside the main visual focus of the diamond, and in some settings, a prong can cover or reduce the visibility of a small edge inclusion. This is one reason a lower-clarity diamond can sometimes look cleaner in the finished ring than a higher-clarity stone with a poorly placed central inclusion.
Still, prong coverage should not be assumed. The intended setting, prong style, diamond orientation, and exact inclusion position all matter. A round solitaire, an oval set north-south, and a pear-shaped diamond with a protective tip can place metal in very different areas. Before choosing a stone because an edge inclusion “might be hidden,” confirm that the setting can cover it naturally without forcing an awkward design or creating a durability concern.
Dark Inclusions Usually Draw More Attention Than White or Transparent Ones
If you are wondering which diamond inclusions are easiest to see, dark inclusions near the center are usually the highest-risk combination. A black or dark crystal can stand out against the brightness of the diamond, especially in magnified video or direct lighting. Even when small, it may catch the eye because the contrast is strong.
White or transparent inclusions are often less noticeable, particularly when they are small, off-center, or broken up by sparkle. A pale feather near the edge may have little effect on real-life appearance, while a dark pinpoint in the center may bother a clarity-sensitive buyer even in a higher grade. The grade gives a general category, but the color and contrast of the inclusion often decide whether it becomes a visual issue.
Reflections Can Make One Inclusion Look Like Several
One overlooked clarity issue is reflection. A single inclusion can bounce through surrounding facets and appear multiple times in a photo or video. This can make the diamond look more included than the grading plot suggests, especially if the mark is dark or positioned where the facet pattern repeats it across the stone.
This is why buyers should compare the report with the actual face-up video rather than relying on either one alone. The report may show one inclusion, but the video may reveal whether that inclusion reflects across the diamond or stays visually contained. A reflected inclusion near the center is more concerning than a small edge mark that appears only from one angle.
Stone-to-Setting Fit Check
Before committing to a diamond with a visible edge inclusion, ask whether it can be covered safely by the intended setting. The right question is not just “Can a prong hide it?” but “Can this specific prong placement work with this specific stone without compromising the design?” If the answer is uncertain, the inclusion should be treated as visible rather than hidden.
A setting should not be used to disguise a problem that creates a new one. If an inclusion is close to the girdle, unusually positioned, or described in a way that raises concern, rely on the grading report and seller confirmation before making assumptions about durability. The safer buying judgment is simple: hidden by design is acceptable; hidden by force is a warning sign.
Diamond Size and Shape Change the Clarity Grade You May Need
Clarity grade by diamond size is not a minor detail. A 1-carat round brilliant and a 3-carat emerald cut should not be judged with the same expectations because they reveal inclusions differently. The best clarity for diamond shape depends on how much surface area the eye sees, how active the facet pattern is, and whether the design naturally masks or exposes internal marks.
This is where many buyers overgeneralize. A grade that feels perfectly safe in one diamond can become risky in another. VS2 may be a smart, visually clean target for many brilliant-style stones, while the same grade in a large step cut may require much more careful review. The grade is the starting point, not the final decision.
In practical buying, this is where comparisons can become misleading. Carat weight describes weight, not exactly how large the diamond looks from the top, and two stones with the same carat weight can have different face-up measurements. When judging clarity in larger or elongated diamonds, compare the actual millimeter dimensions, video scale, and center visibility rather than assuming carat weight alone tells you how easy inclusions will be to see.
Larger Diamonds Make Inclusions Easier to Notice
As carat size increases, the diamond usually presents a larger face-up area. That gives inclusions more room to be seen, especially if they are central, dark, or repeated by reflections. A tiny mark that disappears in a 1-carat stone may become easier to locate in a 2.5-carat stone because the viewing surface is larger and the buyer is likely to inspect it more closely.
For buyers asking what clarity for a 2 carat lab-grown diamond makes sense, the answer depends on shape and inclusion placement, but the review should be stricter than it would be for a smaller stone. Around the 2-carat range, VS1 to VS2 is often a safer search zone for center stones, with SI1 considered only when actual photos and video clearly support it. The larger the diamond, the less room there is for casual assumptions.
Brilliant Cuts Hide Inclusions Better Than Step Cuts
Round cut, cushion, radiant, oval, pear, and marquise diamonds are brilliant-style shapes, which means their facet patterns create more sparkle, contrast, and visual movement. That activity can help mask small inclusions, especially light-colored ones away from the center. This is one reason many buyers can find eye-clean options in VS2, and sometimes carefully reviewed SI1, for brilliant-style stones.
The tradeoff is that sparkle can hide some clarity issues but not all of them, which is why a lab grown diamond value guide can be useful when weighing clarity against visible performance. A dark inclusion under the table can still be distracting in a brilliant cut, especially in larger carat sizes. Brilliant faceting improves your odds, but it does not make every lower-clarity diamond safe.
Emerald and Asscher Cuts Usually Need Higher Clarity
Emerald cut and Asscher cut diamonds are step cuts. Instead of the busy sparkle pattern of a round or radiant, they have broader, mirror-like facets that create long flashes and open windows into the stone. This elegant look is exactly why many buyers love them, but it also means inclusions can be easier to see.
For buyers asking about the best clarity for emerald cut lab diamond options, VS1 or better is often a sensible starting point for center stones, especially above 1.5 to 2 carats. A clean-looking VS2 emerald cut can still be a strong choice if the video supports it, but the review should be more demanding than it would be for a round brilliant. In step cuts, a poorly placed inclusion has fewer places to hide.
Elongated Shapes Need Extra Review Near the Bow-Tie and Center Area
Oval, pear, and marquise diamonds need a slightly different kind of clarity review because the eye is naturally drawn along the length of the stone and toward the center. These shapes can also show a bow-tie effect, a darker area across the middle caused by facet pattern and light return. Clarity should be reviewed alongside that center appearance, because an inclusion near the bow-tie or central body of the stone may become more noticeable.
A well-placed SI1 near the edge of an oval may look cleaner than a VS2 with a dark mark in the middle. This is why elongated shapes should be judged from actual video, not just the certificate grade. The practical question is whether the center looks clean and balanced when the diamond moves.
Practical Size-and-Shape Starting Points
For round and many brilliant-style shapes under 1.5 carats, VS2 is often a reasonable starting point. Some SI1 stones may also work well if the inclusion is small, light-colored, off-center, and not visible face-up without magnification.
From about 1.5 to 2.5 carats, VS1 to VS2 is usually a safer search range for engagement ring center stones. SI1 should be treated as a case-by-case value option, not a default choice. At this size, inclusion location and contrast start to matter more because the diamond gives the eye more area to inspect.
Above 2.5 carats, or for emerald and Asscher cuts at many sizes, buyers should consider starting around VS1 or higher unless a lower-clarity stone is clearly verified as eye-clean through actual photos and video. A well-placed SI1 can outperform a poorly placed VS2 visually, but only when the evidence supports it.
How Clarity Should Be Balanced With Cut, Color, and Budget
The clearest report is not automatically the most beautiful diamond. When comparing lab-grown diamond clarity vs cut, cut quality usually has the stronger effect on what people notice first: brightness, sparkle, contrast, and overall life. A diamond clarity budget should be used to solve visible clarity problems, not to chase a grade that makes no difference once the stone already looks clean.
This is especially important for engagement ring buyers working within a set budget. Spending more on VVS clarity may feel reassuring, but if the diamond already looks eye-clean at VS1 or VS2, that extra money may produce less visible benefit than improving cut quality, choosing better proportions, refining color grade, or selecting a better-fitting setting.
Prices can change with market conditions, report type, seller channel, and stone-specific details, so exact comparisons should be verified at the time of purchase. A lower clarity grade should not be treated as a better value unless the actual stone remains visually clean and the comparison is made against similar cut, size, color, report, and setting requirements.
Cut Quality Usually Affects Beauty More Than Invisible Clarity
Once a diamond is eye-clean, additional clarity does not usually make it brighter or more lively. Cut quality controls how well the diamond handles light, which is why a well-cut VS2 can look more beautiful than a poorly cut VVS stone. Buyers often notice sparkle before they notice small internal details, especially in normal wear.
The practical priority is clear: do not upgrade clarity at the expense of visual performance. If two stones look equally clean to the naked eye, the one with stronger cut, better proportions, and more pleasing face-up appearance will usually be the better choice for real-life beauty.
Clarity Upgrades Should Solve a Visible Problem
A clarity upgrade makes sense when it removes a real concern. If an inclusion is visible face-up, sits under the table, appears dark, reflects across the stone, or distracts from the overall look, moving to a cleaner option is reasonable. In that case, the higher grade is not just a label; it is solving something the wearer may actually see.
If the only difference is that one report says VVS2 and another says VS1, but both stones look equally clean in actual media, the upgrade may be more psychological than visual. That is not wrong if the buyer values the reassurance, but it should be recognized for what it is. The question “should I pay more for higher diamond clarity” is best answered by asking whether the higher grade changes the appearance, the confidence level, or both.
Do Not Trade Away Too Much Cut Quality for a Cleaner Report
A higher clarity grade cannot rescue a dull diamond. If the cut is weak, the proportions are awkward, or the stone has poor light return, a cleaner report will not make it sparkle more. Buyers sometimes overcorrect for clarity because the grade is easy to compare, while cut quality and visual performance require more judgment.
This is one of the more expensive mistakes in lab-grown diamond shopping. A flawless-looking certificate can feel safe, but the finished ring may still disappoint if the diamond lacks brightness or looks smaller than expected for its carat weight. Clarity should support the purchase, not dominate it.
When Higher Clarity Is Still Worth Considering
Higher clarity can be worth considering for step cuts, larger center stones, and jewelry that will be inspected closely. Emerald and Asscher cuts often justify a stricter clarity target because their open facets reveal more. A larger solitaire may also warrant a higher grade because the stone is the main visual event and is viewed often at close range.
Personal preference matters too. Some buyers are highly clarity-sensitive and feel better knowing the stone is very clean even under magnification. Others are buying for a sentimental milestone and want the report to reflect that preference. In those cases, paying more for higher clarity can be a valid choice, as long as it does not sacrifice the features that visibly affect the diamond’s beauty.
Budget Allocation Check
If two stones look equally clean to the naked eye, compare cut quality, measurements, face-up spread, color grade, and setting fit before paying more for the higher clarity grade. The better-value diamond is not always the one with the lowest clarity grade or the highest one. It is the stone where the budget is going toward qualities the wearer can actually see and appreciate.
A useful rule is to let clarity matter until it stops being visible. After that point, the next dollar usually deserves more scrutiny. For most buyers, a clean-looking diamond with strong cut and good setting compatibility will outperform a technically cleaner stone that gives up too much in appearance.
What Photos, Videos, and Reports Buyers Should Review Before Purchase
Buying an eye-clean diamond online is not about trusting one document or one flattering image. The safest process combines lab-grown diamond photos, a diamond video review, and the grading report so you can connect the clarity grade to what the stone actually looks like. A certificate can narrow the field, but eye-clean verification comes from seeing whether the inclusions matter in the real diamond, not just on paper.
The most useful review materials are specific to the exact stone being considered. A generic image can show shape or setting style, but it cannot tell you whether a tiny crystal sits under the table, whether a feather reflects through the facets, or whether the diamond looks clean face-up at normal viewing distance.
Ask for Actual Stone Images, Not Only Stock Photos
Actual stone images matter because clarity is individual. Two lab-grown diamonds with the same shape, carat weight, color, and clarity grade can look different if one has a dark inclusion near the center and the other has a faint inclusion near the edge. Stock photos cannot show that difference, which makes them inadequate for judging eye-clean appearance.
Look for a clear face-up image of the diamond you are buying, preferably with enough magnification to identify inclusion placement without making the stone look worse than it would in real life. A magnified photo is useful for locating concerns; it should not be treated as the same thing as normal wear. If the only available image is a beauty shot with perfect lighting and no certificate-specific identification, that is not enough for a clarity-sensitive purchase.
Use 360-Degree Video to Locate Inclusions
A 360 video is one of the most helpful tools for diamond video review because it shows how inclusions behave as the stone moves. A still photo may hide an inclusion at one angle, while a rotating video can reveal whether it flashes near the center, disappears into the facet pattern, or becomes noticeable only from the side.
During the video, focus first on the face-up view. Then watch the center, table area, and edges as the diamond turns. The key question is not whether you can find an inclusion after staring at a magnified screen. The better question is whether the inclusion pulls your eye immediately or only appears after careful searching. If a mark keeps catching attention from multiple angles, especially in the center, it is more likely to bother you in a ring.
Be careful with overly zoomed videos. They are helpful, but they can make tiny inclusions look dramatic because the diamond is being shown many times larger than it will appear on the hand. A stone can look busy in magnification and still be clean in daily wear, so use video to identify risk, then confirm naked-eye visibility separately.
Compare the Video With the Grading Report
The grading report gives the clarity grade, measurements, certificate number, and sometimes a clarity plot showing the type and approximate location of inclusions. That information is valuable, but it does not answer the most practical question: whether those inclusions are visible enough to affect the diamond’s appearance.
Compare the report with the video instead of reading either one alone. If the report lists crystals, feathers, needles, or clouds, see whether those features appear in the actual face-up image or rotating video. If there is a clarity plot, check whether the marked inclusions line up with what you can see. If a plotted inclusion is near the edge and disappears in the video, it may be a lower concern. If a listed inclusion is not obvious on the plot but looks dark in the center of the video, the visual evidence should carry more weight.
At NUVU, we treat the grading report as a starting point rather than the final answer because reports describe characteristics under grading conditions, while buyers wear diamonds in changing light, movement, and settings.
A careful report review also means checking that the basic identity details align: shape, carat weight, measurements, color, clarity, and report number should match the stone being considered. This does not guarantee beauty or eye-clean appearance, but it helps prevent a more basic problem: evaluating media, pricing, or setting fit for the wrong diamond. If any detail is unclear, it is worth resolving before treating the stone as a serious finalist.
Documentation check: if a report number is provided, use it to confirm that the report details shown by the seller match the exact diamond being evaluated. Do not treat a report number, screenshot, or downloadable PDF as proof of eye-clean appearance by itself. It is evidence of the diamond’s documented characteristics, while the eye-clean decision still depends on the stone-specific media and the viewing standard you apply.
Understand What a Report Can and Cannot Trace
A grading report is useful because it creates a documented reference point for the diamond’s stated characteristics: shape, measurements, carat weight, color, clarity, and other grading observations. For traceability in a buyer-facing sense, those details help connect the report to the specific loose stone being compared, especially when the report number, media, and listing information are kept consistent.
At the same time, a report is not a complete history of every decision behind the diamond or the finished jewelry. It should not be treated as a promise of beauty, eye-clean appearance, sustainability, resale value, or setting compatibility. A careful buyer uses the report to confirm identity-related details, then uses photos, video, direct questions, and design notes to decide whether that specific diamond is appropriate for the intended piece.
A grading report helps document key characteristics, but it should not be treated as a guarantee of beauty, value, or sourcing ethics. If sustainability, origin, treatment, or seller policy claims matter to the purchase, those points should be supported by separate documentation rather than inferred from the clarity grade alone.
Request a Plain-English Eye-Clean Comment When Needed
If a diamond is close to your comfort line, ask the seller for a plain-English comment: Are the inclusions visible face-up, without magnification, at normal viewing distance? This is one of the most useful things to ask before buying a lab-grown diamond online because it shifts the conversation from the grade to the actual viewing experience.
The question should be specific. Ask about face-up visibility, not side visibility. Ask about normal viewing distance, not magnified inspection. Ask whether any inclusion is dark, central, reflected, or likely to stand out in the intended setting. If the answer influences your decision, keep the written response with your order details. Verbal reassurance is easy to misunderstand later, especially when a diamond has a borderline SI1 or a visible-looking inclusion in magnified media.
Buyer Verification Checklist
- Confirm the exact certificate number. Make sure the report matches the specific diamond being sold, not a similar stone.
- Review actual photos and video. Do not rely on stock imagery for clarity decisions.
- Check inclusion location against the report when available. Center, table, and dark inclusions deserve closer scrutiny than small light inclusions near the edge.
- Ask whether the stone is eye-clean face-up. The useful standard is normal viewing distance without magnification, not whether an inclusion can be found under zoom.
- Confirm measurements and setting compatibility. A diamond that looks clean loose should still fit the intended ring, pendant, or earring design properly.
- Save written confirmation before finalizing the purchase. If eye-clean appearance is a deciding factor, keep the seller’s response in writing.
Eye-Clean Clarity for Engagement Rings and Everyday Jewelry
The best clarity for engagement ring use is usually the lowest clarity grade that still looks clean in the actual stone and setting. An eye-clean engagement ring diamond does not need to be flawless, but it does need to hold up to close, repeated viewing. A center stone worn every day is different from a pendant seen from across a room, so clarity standards should follow how the jewelry will actually be used.
What clarity is best for a lab-grown diamond engagement ring? For many buyers, VS1 or VS2 is a practical starting point, with carefully reviewed SI1 stones sometimes offering good value. The recommendation changes when the diamond is large, step-cut, unusually transparent in the center, or being set in a design that draws attention to the exact area where an inclusion sits.
Engagement Ring Center Stones Deserve the Most Careful Review
An engagement ring center stone gets the most scrutiny because it is worn on the hand, viewed up close, photographed often, and seen from many angles throughout the day. A small inclusion that would be irrelevant in earrings may become irritating if the wearer notices it every time the ring catches light at the center.
This does not mean every engagement ring needs VVS clarity. It means the review standard should be stricter than it is for less closely viewed jewelry. A VS2 with a faint edge inclusion can be a stronger choice than a higher-clarity stone with a more distracting central feature. The risk is not the grade itself; the risk is buying a diamond whose visible flaw becomes the first thing the wearer sees.
Side Stones and Accent Diamonds Can Often Use Lower Clarity
Side stones and accent diamonds are usually smaller, so inclusions are harder to detect without magnification. In many rings, the more important issue is whether the accent diamonds match each other in brightness, color impression, and overall appearance. Paying for very high clarity in tiny accent stones often produces little visible benefit.
The exception is a design with larger side stones, such as a three-stone ring, where each diamond has enough face-up area to be noticed individually. In that case, side stones should be reviewed more like smaller center stones. Matching matters, but a visibly included side diamond can still pull attention away from the main stone.
Studs and Pendants May Have Different Clarity Priorities
Diamond studs and pendants are usually viewed from a greater distance than engagement rings. Because of that, eye-clean standards can often be more flexible, especially for smaller stones. A tiny inclusion that would feel distracting in a ring may never be noticed when worn on the ear or neckline.
The main mistake is applying the same clarity budget to every jewelry type. For studs, a balanced pair with good brightness, compatible measurements, and similar face-up appearance can matter more than chasing the highest clarity grade. For a pendant, the diamond should still look clean when viewed directly, but it usually does not face the same constant close inspection as a ring on the hand.
Custom Settings Should Be Planned Around the Actual Stone
For custom rings, clarity review should happen before the setting is finalized. Prong placement, stone orientation, halo proportions, and metal coverage can all affect how an inclusion is seen. If a diamond has a small edge inclusion, the design may be able to position it less noticeably, but that should be planned intentionally rather than assumed after purchase.
A setting should support the diamond, not rescue a poor choice. If hiding an inclusion requires awkward prong placement, compromises the design, or puts attention on the problem area, it is better to compare another stone. For custom jewelry, the diamond and setting are best evaluated together because a visually strong loose stone still needs to make sense in the finished piece.
For custom design, measurements matter as much as the clarity label. The same carat weight can sit differently depending on length-to-width ratio, depth, girdle outline, and corner shape, and those details influence where prongs, bezels, halos, or side stones will land. A clarity feature that seems minor in a loose-stone video can become more or less noticeable once the diamond is oriented in the final design, so the setting plan should be checked against the actual stone rather than a generic shape template.
For custom design, trust comes from matching the stone to the setting, budget, and wearer’s daily use, not from choosing grades in isolation. Before finalizing a stone, buyers should confirm the intended orientation, prong or bezel coverage, ring profile, and any areas where an inclusion may become more exposed. This is especially important for elongated diamonds, step cuts, open baskets, and designs with minimal metal coverage.
For custom jewelry, stone measurements and setting compatibility should be confirmed before finalizing a purchase. This includes the diamond’s millimeter dimensions, girdle outline, depth, corner shape, and any inclusion location that may affect prong, bezel, or halo placement.
What This Means in a Real Purchase
Consider a buyer choosing a 2.1-carat oval lab-grown diamond for a solitaire ring. One option is a VS2 with a small white inclusion near the edge. The other is a VS1 with a darker inclusion closer to the center. On paper, the VS1 has the higher clarity grade. In the finished ring, the VS2 may look cleaner if the inclusion is not visible face-up and can be positioned near a prong without forcing the design.
This is the kind of decision where grade alone can mislead. The better stone is the one that looks cleaner in actual video, places the inclusion in a less distracting area, and fits the intended setting. A higher grade is worth paying for when it solves a visible problem; it is less compelling when the lower grade already looks clean where the eye naturally goes.
Common Mistakes When Buying for Eye-Clean Clarity
The most common diamond clarity mistakes come from treating the grade as the whole story. An eye-clean diamond buying guide should make one point very clear: clarity grades help narrow choices, but they do not replace visual judgment. Overpaying for clarity is one risk; buying a stone with visible inclusions because the certificate looked acceptable is the other.
Mistake 1: Assuming Every VS2 or SI1 Looks the Same
VS2 and SI1 grades cover a range of inclusion patterns. One VS2 may have a small, pale inclusion near the girdle that disappears in the setting. Another may have a darker inclusion under the table that is harder to ignore. The same is even more true for SI1, where some stones are genuinely eye-clean and others are not suitable for a center stone without noticeable compromise.
The grade tells you severity under lab evaluation, not whether the inclusion is placed in a visually forgiving area. A clarity grade comparison is useful only when it is paired with actual photos, video, and the intended jewelry use.
Mistake 2: Judging Only From the Certificate
A certificate is useful for basic verification, but it cannot show the full visual experience of the diamond. It may list the clarity grade, identify inclusion types, and include a clarity plot, but it will not always show whether a mark jumps out in real movement or disappears into the facet pattern.
This is why online diamond buying should not stop at the report. To avoid buying a diamond with visible inclusions, review the exact stone face-up, compare the video with the report, and ask for a direct eye-clean comment when the inclusion pattern is borderline. If a seller cannot provide enough visual evidence, the safer move is to keep comparing.
Mistake 3: Paying for VVS When VS Looks Identical in Real Life
VVS clarity can be appealing, especially for buyers who value a very clean report. The mistake is assuming it automatically makes the diamond more beautiful. Once a diamond is already eye-clean, moving from VS to VVS often changes the paperwork more than the appearance.
That extra budget may be more useful elsewhere if the VS stone is clean face-up and has stronger overall visual performance. Higher clarity is worth considering when the wearer is highly clarity-sensitive, the stone is large, or the shape reveals inclusions easily. It is less useful when the upgrade does not solve anything the eye can actually see.
Mistake 4: Ignoring Shape and Size
A clarity grade that feels safe in a smaller brilliant-cut diamond may not be equally safe in a larger stone or a step cut. Bigger face-up areas give inclusions more room to be noticed, and emerald or Asscher cuts tend to reveal internal features more easily because of their open facet pattern.
The practical error is applying one rule to every diamond. A VS2 round under one and a half carats may be a very reasonable candidate, while a lab grown diamond 4Cs guide can help explain why a VS2 emerald cut above two carats may need closer review before it feels safe. Shape and size do not automatically disqualify a lower clarity grade, but they do raise the cost of being wrong.
Fast Decision Filter
If the inclusion is central, dark, repeated by reflection, or visible in normal face-up viewing, move on or compare a higher clarity option. Those issues are more likely to bother the wearer because they appear where the eye naturally looks.
If the inclusion is small, light-colored, near the edge, and not visible without magnification, the stone may still be a strong candidate. The best buying decision is not the highest clarity grade available; it is the diamond that looks clean in the way it will actually be worn.
How to Choose the Right Eye-Clean Lab-Grown Diamond With Confidence
To choose an eye-clean lab-grown diamond, start with the way the stone will actually be worn, then work backward into the clarity grade. A lab-grown diamond buying guide clarity decision should not begin with the highest grade available. It should begin with the lowest clarity range that still looks clean face-up, at normal viewing distance, in the setting you plan to use.
For many buyers, the right diamond is not the one with the cleanest report. It is the one where the inclusions do not interfere with appearance, the proportions support good visual performance, and the stone fits the jewelry design without forcing awkward compromises.
Start With a Realistic Clarity Range
For many engagement ring center stones, VS1 to VS2 is the most practical starting range. These grades often give buyers a strong chance of finding a clean-looking diamond without paying for clarity details that may only be visible under magnification.
SI1 can also be worth considering, but only when the individual stone is reviewed carefully. A well-placed, light-colored SI1 inclusion near the edge may be less noticeable than a darker inclusion closer to the center in a higher-graded stone. The grade narrows the search, but it should not make the decision for you.
Higher clarity grades, including VVS, make sense when the stone is large, the shape reveals inclusions easily, the buyer is especially clarity-sensitive, or the purchase carries emotional value beyond visual appearance. For most everyday jewelry, paying more for a higher grade should solve a real concern, not just make the certificate look cleaner.
Shortlist by Visual Evidence, Not Grade Alone
Once you have a realistic clarity range, compare the actual diamonds rather than assuming the grade tells the whole story. Actual photos, 360-degree video, certificate verification, measurements, and setting compatibility all matter because eye-clean appearance is a visual judgment.
A strong shortlist usually includes stones that look clean face-up, have inclusions that are not central or distracting, and offer proportions that support the design goal. If one diamond has a slightly lower clarity grade but better cut quality, better face-up appearance, and no visible inclusion in normal viewing, it may be the better purchase.
The mistake to avoid is choosing the “safest” clarity grade while ignoring what the stone actually looks like. A higher grade can still have an inclusion in a more noticeable location, and a lower grade can sometimes look cleaner in the finished piece.
Match the Diamond to the Jewelry Project
The best clarity choice changes with the jewelry. A solitaire engagement ring places nearly all attention on the center stone, so the diamond deserves closer review. A halo or three-stone ring still needs a clean-looking center, but the surrounding design may reduce how closely small details are noticed.
For pendants and studs, buyers can often be more flexible because these pieces are usually viewed from farther away. Matching size, brightness, and overall appearance may matter more than pushing every stone into a high clarity grade. For a custom setting, the actual loose diamond should be reviewed before the design is finalized, especially if an inclusion sits near an edge, corner, or prong area.
If you plan to buy an eye-clean lab-grown diamond for an engagement ring, treat the diamond and setting as one decision. A stone that looks excellent in a prong setting may not be the right choice for a bezel, east-west orientation, or design where an inclusion lands in a more exposed area.
Use Expert Support for Borderline Stones
Borderline stones are where good guidance matters most. If a diamond looks promising but has an SI1 grade, a visible mark in magnified video, or an inclusion near the center, ask for a plain-English review of whether it appears clean face-up without magnification.
At NUVU, this type of review is treated as part of the selection process rather than an afterthought. The certificate helps identify the grade and basic characteristics, but photos, video, inclusion location, and setting fit are what show whether the stone makes sense for a real piece of jewelry.
For custom jewelry planning, expert support can also prevent a design mistake. A prong may be able to reduce attention on a minor edge inclusion, but the setting should never be forced to hide a concern if it weakens the design, creates uneven symmetry, or places stress in the wrong area.
When a grading report is provided, buyers should compare the report details with the issuing laboratory’s verification tools where available. That verification supports traceability of the documented details, but it does not replace visual review of eye-clean appearance or confirmation of setting fit.
For buyers comparing specific NUVU lab-grown diamond options, the most useful trust signal is not a broad claim; it is a clear trail from the report number to the actual stone media and then to the finished jewelry plan. A certificate-aware selection process should confirm the lab report details first, then check whether the diamond’s photos, video, proportions, and inclusion pattern match the intended use.
If a diamond is graded by GIA, IGI, HRD Antwerp, or another recognized grading laboratory, use the report as a documentation anchor rather than as a beauty guarantee. The lab grade can help confirm identity and organize comparisons, while the buyer-facing review should still explain how the stone looks face-up, whether any inclusion is likely to be visible, and whether the setting supports the final appearance.
This kind of documentation-based communication is especially helpful for custom rings and wholesale-style sourcing, where several similar diamonds may be compared at once. Keeping the report details, stone-specific media, and design notes connected reduces confusion and helps buyers understand why one VS2 may be recommended over another VS2, or why a carefully reviewed SI1 may or may not be suitable for a particular setting.
In wholesale or multi-stone sourcing conversations, documentation should also include the matching standard being used. A parcel or matched group may need consistency in measurements, color impression, clarity visibility, cut style, and face-up appearance, not just similar grades on separate reports. Before committing, buyers should ask how stones are compared, what media is available, and how differences are communicated if one stone is visibly cleaner or less clean than another.
Final Buyer Decision Framework
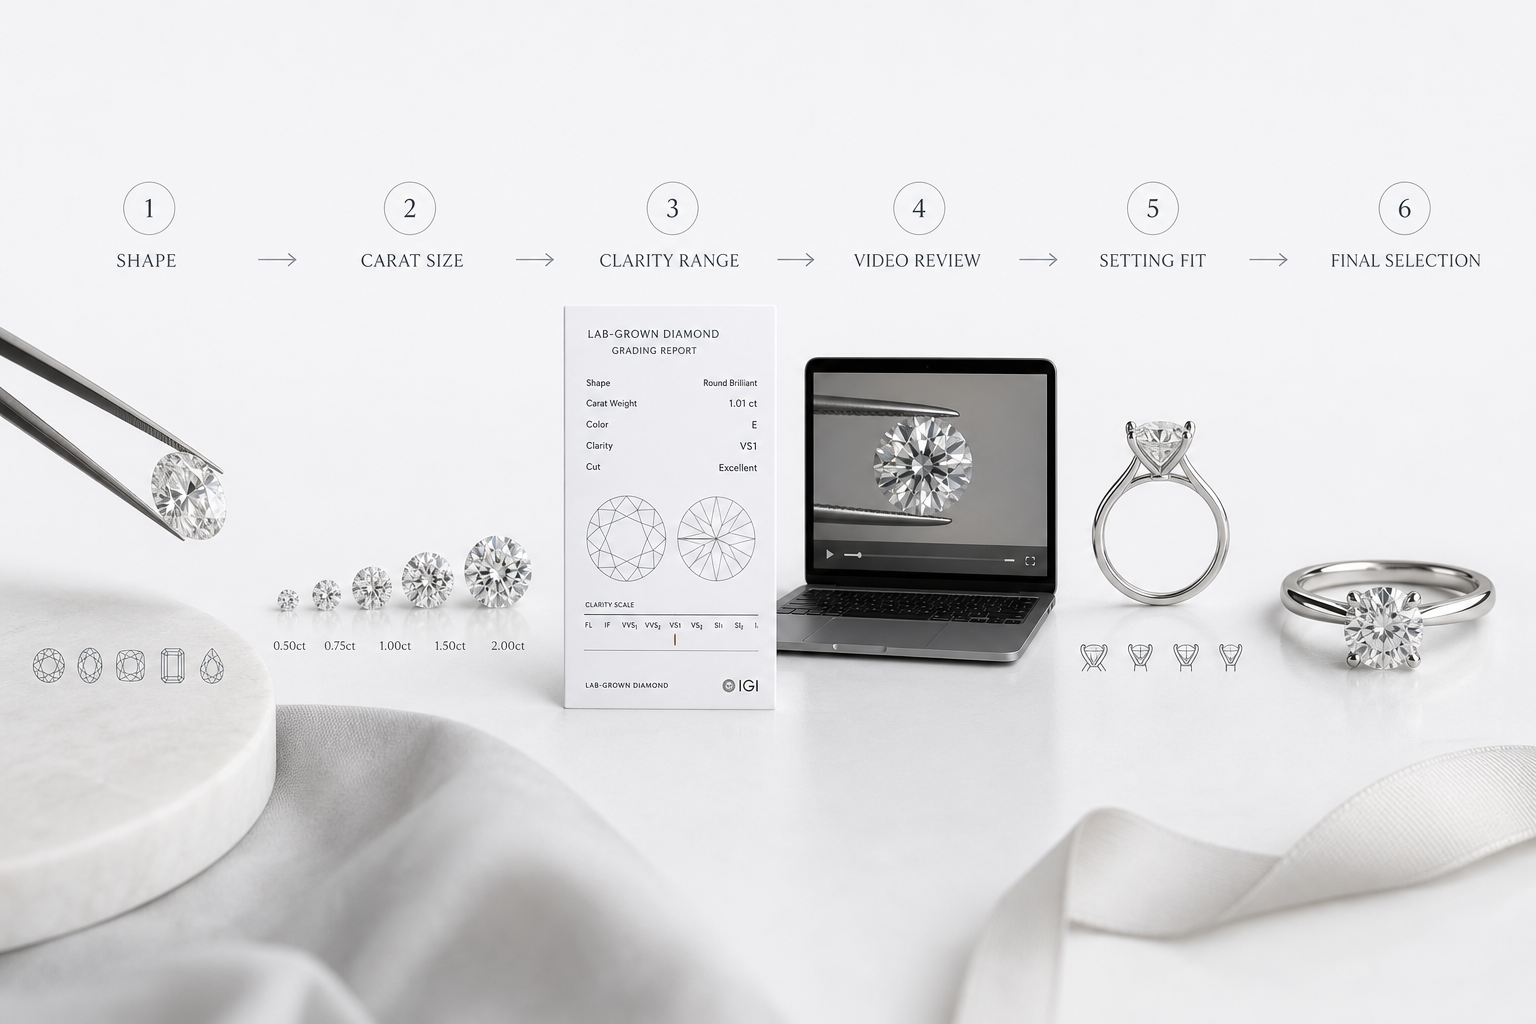
Use a simple sequence before you commit to a stone. Choose the shape and size first, because those two factors influence how strict your clarity target should be. Set a clarity search range, usually starting around VS1 to VS2 for many center stones, then widen or tighten that range based on shape, carat size, and personal sensitivity.
Next, review the certificate and actual media together. Check where the inclusions sit, whether they appear dark or light, and whether they show face-up at a realistic viewing distance. Confirm that the diamond works with the intended setting, especially for custom designs, prong placement, elongated shapes, or step cuts.
Only after those checks should price and overall value decide between finalists. If two stones look equally clean to the naked eye, the better choice is usually the one with stronger overall appearance, better fit for the setting, and a price that reflects what you can actually see.
Compliance-Aware Buying Boundaries for Lab-Grown Diamond Clarity
Clarity guidance should stay focused on what clarity can actually tell you. A VS, VVS, or SI grade helps describe the presence and visibility of internal or surface characteristics under grading conditions, but it does not confirm origin by itself, prove environmental impact, establish resale value, or guarantee how attractive the finished jewelry will look. Those questions require separate evidence, such as report details, seller documentation, stone-specific media, and design confirmation.
When growth method or post-growth treatment is relevant, buyers should look for clear disclosure in the grading report or seller documentation. HPHT and CVD are commonly discussed as lab-grown diamond growth methods, and any separate treatment or enhancement claim should be documented rather than assumed from the clarity grade or visual appearance.
Environmental and sustainability claims should be specific, documented, and limited to what can be substantiated. Lab-grown diamonds offer a different origin from mined diamonds, but buyers should avoid treating that difference as automatic proof of sustainability, ethical sourcing, or lower impact unless the seller provides clear supporting information.
Buyer protections and seller policies are also separate from clarity. Before purchase, buyers should confirm documentation, return terms, resizing policies, shipping expectations, and after-sales support directly with the seller in writing. A diamond may be well documented and visually suitable, but the practical purchase terms still need to be understood before the order is finalized.
FAQ: Eye-Clean Lab-Grown Diamond Clarity Questions
These eye-clean lab-grown diamond FAQ answers focus on the clarity questions buyers usually face right before narrowing a shortlist. The goal is not to chase the highest grade, but to avoid visible inclusions while keeping the budget focused on what improves the finished jewelry.
Is VS2 clarity good enough for a lab-grown diamond engagement ring?
Often, yes. VS2 is enough for many lab-grown diamond engagement rings, especially in round, oval, cushion, radiant, pear, and other brilliant-style cuts. The safer approach is to verify the actual photos or video, because two VS2 diamonds can look different depending on inclusion type and location.
Can an SI1 lab-grown diamond be eye-clean?
Yes, an SI1 lab-grown diamond can be eye-clean, but it is not automatic. SI1 is most promising when the inclusion is small, light-colored, off-center, and not reflected through the stone. It becomes riskier in larger diamonds, emerald cuts, Asscher cuts, or stones with dark inclusions under the table.
Is VVS worth it for a lab-grown diamond?
VVS can be worth it if you value a very clean clarity grade on paper or are buying a larger or more clarity-sensitive shape. For many everyday rings and jewelry pieces, however, VVS does not create a visible improvement over a well-chosen VS stone that already looks clean to the naked eye.
What clarity should I choose for an emerald cut lab-grown diamond?
For an emerald cut lab-grown diamond, VS1 or better is often a safer starting point, especially for a center stone. Emerald cuts have open, mirror-like facets that make inclusions easier to see, so a lower grade should only be considered after careful visual review.
Do lab-grown diamonds have fewer inclusions than natural diamonds?
Lab-grown diamonds can still have inclusions. The presence, type, and visibility of inclusions vary from stone to stone, so each diamond should be reviewed individually. A lab-grown origin does not guarantee eye-clean clarity.
Lab-grown diamonds may be produced by different growth methods, commonly discussed as HPHT and CVD, and both can produce attractive diamonds as well as stones with clarity features that need review. The growth method alone should not be used as a shortcut for judging eye-clean appearance. For a buyer, the more useful evidence is still the specific grading report, actual stone media, inclusion placement, and how the diamond looks in the intended jewelry.
Further Reading Beyond Clarity
If you are still comparing options, the next useful step is to move from clarity alone into the broader buying context. Eye-clean appearance matters, but it should be weighed alongside diamond cut, certification, shape, measurements, and the jewelry style you plan to create.
Balance Clarity With Other Buying Priorities
A broader lab-grown diamond buying guide is useful when you are still balancing clarity with carat size, color, shape, and budget. This is the better next step if you are not yet sure what tradeoffs matter most for your purchase.
Compare Cut Quality and Visual Performance
A diamond cut guide is especially helpful once you understand that invisible clarity does not improve sparkle. If two stones both look clean, cut quality and visual performance often become the more important comparison.
Understand Your Grading Report
A certification guide is worth reviewing if you want to understand report numbers, clarity grades, inclusion notes, and what a grading report can and cannot confirm. The report is important, but it does not replace actual visual review.
Compare Loose Diamonds and Plan the Setting
When you are ready to compare specific stones, loose lab-grown diamonds give you the clearest way to evaluate certificate details, photos, video, and setting fit before committing. If you plan to choose a loose lab-grown diamond for a custom ring, finalize the stone before locking in prong placement, orientation, or design details.
Resolve Your Remaining Buying Question
The most useful next step is the one that answers the question you still have. If the issue is appearance, compare real diamond media. If the issue is trust, review certification. If the issue is design fit, move into engagement ring settings or custom jewelry planning.
Choose an Eye-Clean Diamond for Your Jewelry
Compare Actual Stones Before Choosing a Grade
If you are still comparing options, start with loose lab-grown diamonds that include clear certificate details, actual photos, and video of the specific stone. The goal is not to chase the highest clarity grade on the page. It is to compare whether each diamond looks clean face-up, whether the inclusions are in a low-risk location, and whether the clarity grade makes sense for the size and shape you want.
A practical search can begin with VS1 or VS2 for many engagement ring center stones, then expand carefully if a lower grade looks clean in real viewing conditions. If two diamonds appear equally clean to the naked eye, the better buy is often the one with stronger overall visual performance, better proportions, and a better fit for the intended setting.
Plan the Setting Around the Diamond
For a custom setting, choose the stone before locking in the final design. Inclusion location, prong placement, diamond orientation, and setting style can affect how clean the finished ring appears. A small edge inclusion may be a non-issue in one setting and more exposed in another.
If you are trying to find an eye-clean lab-grown diamond for an engagement ring, compare the diamond and the setting together rather than treating them as separate decisions. This is especially important for elongated shapes, step cuts, larger center stones, and designs with open baskets or minimal prongs.
Request a Closer Review When You Are Unsure
If a diamond looks promising but you are unsure about the inclusions, ask for help before committing. A useful review should look at the certificate, actual photos, 360-degree video, face-up appearance, and how the stone will sit in the jewelry. The key question is simple: will this specific diamond look clean in real wear, not just under magnification?
NUVU can help buyers compare loose lab-grown diamond options with a clarity-first eye, especially when the choice is close between grades such as VS2 and SI1 or when a custom setting may affect visibility. The best next step is a clear review of the actual stone, not a promise based on grade alone.
Before purchase, buyers should also confirm the seller’s documentation, return policy, resizing terms, and any after-sales support in writing. Those policies are separate from clarity evaluation, but they matter because a buyer should understand both the diamond evidence and the practical purchase terms before making a final decision.
Treat the Grade as a Starting Point
No clarity grade should be treated as an automatic guarantee. A recommended diamond should still be evaluated through its certificate, media, proportions, inclusion location, and setting fit. The right choice is not necessarily the highest-clarity stone; it is the stone that gives you a clean real-life appearance without paying for clarity you will never see.
Reader Value Check
Clarity Takeaways for Your Shortlist
The clearest buying takeaway is that eye-clean lab-grown diamonds are judged by visible appearance, not by the highest possible clarity grade. VS1 and VS2 are often practical targets for engagement ring center stones because they commonly look clean without the premium attached to VVS or flawless grades. SI1 can still work, but only when the specific stone is verified with actual images, video, and inclusion review.
VVS clarity may be worth choosing for peace of mind, larger budgets, step-cut diamonds, or buyers who strongly value a cleaner report. For everyday jewelry, however, it is often more clarity than the eye can appreciate once the diamond already looks clean in normal wear.
Check Real Viewing Conditions
A useful clarity decision should be grounded in real viewing conditions. For most buyers, that means checking whether inclusions are visible face-up from about 8 to 12 inches away without magnification. If an inclusion only appears in a highly enlarged video but disappears at normal hand-viewing distance, it may not affect daily wear.
Size and shape should also change the standard. Many brilliant-style shapes can be forgiving, especially under about 1.5 to 2 carats, while larger diamonds need closer review because there is more visible surface area. Emerald and Asscher cuts usually deserve stricter clarity standards because their open, step-cut facets make inclusions easier to notice.
Separate the Factors That Affect Visibility
Eye-clean should remain a practical visual idea throughout the decision process: look at the actual diamond, identify where the inclusions sit, judge the stone at normal viewing distance, and confirm whether the intended setting helps or exposes the issue. The same grade can perform differently from one diamond to another, so the decision should not stop at the certificate.
The strongest clarity evaluations separate the major factors instead of blending them together. Inclusion location answers where the mark appears. Viewing distance answers whether it matters in real life. Diamond shape and size answer how easily the eye may catch it. Photos, video, and certificates help verify whether the concern is theoretical or visible.
Trust Standard
Clarity guidance should stay conditional because diamonds are individual stones. VS2 is often a strong choice, but it is not automatically eye-clean. SI1 may offer value, but it is not automatically safe. Even a higher grade can be less appealing if a dark inclusion sits near the center while a lower-graded diamond has a small, light inclusion near the edge.
Careful language protects the buyer from overconfidence. A clarity grade is a starting point, not the final verdict. The final decision should come from how the diamond looks face-up, how it will be worn, and whether the setting supports the stone without forcing a compromise.
Evidence boundary for this guide: clarity advice should not be used to make unrelated promises about price, resale value, sustainability, or ethical sourcing. Those topics require their own current documentation and should be evaluated separately from whether a diamond appears eye-clean. For this article, the defensible buying standard is narrower: verify the report details, inspect the actual diamond, and decide whether the inclusions are visible in the way the jewelry will be worn.
The Final Clarity Decision
If you remember one rule, make it this: choose the lowest clarity grade that still looks clean in the actual diamond, at normal viewing distance, in the jewelry setting you plan to wear. That is the point where lab-grown diamond clarity has done its job, and anything beyond it should be chosen for personal preference rather than visible necessity.
Disclosure: This article is for general educational purposes only. Diamond grading, pricing, availability, specifications, and seller policies can change, and readers should verify important details through grading reports, official laboratory tools, seller documentation, or qualified professionals before making a purchase decision. Laboratory-grown diamonds should be clearly distinguished from natural diamonds, and environmental or sourcing claims should be supported by specific documentation.