
A lab-grown diamond report is packed with technical fields, but only a handful actually tell you whether the stone looks good and is fairly priced. Most shoppers get lost in fluorescence ratings, culet sizes, and symmetry grades that rarely affect how the diamond performs in a real setting. The problem is not just information overload — it is the risk of overlooking the few numbers that genuinely matter while worrying about details that do not. Understanding lab-grown diamond traceability versus certification helps clarify which report sections truly matter. This article walks through each section of a typical grading report, explaining what to focus on, what to skip, and how to spot red flags in the comments and treatment notes. By the end, you will know exactly which fields to verify, which grades to prioritize, and how to compare two reports quickly without getting lost in jargon.
For the full framework, read Lab-Grown Diamond Certification Guide.
| Report Field | What It Actually Tells You | What to Look For |
|---|---|---|
| Report Number | Unique ID to verify the stone matches the certificate | Confirm it is laser-inscribed on the girdle; always check online before purchase |
| Shape & Cutting Style | Identifies the exact diamond for jewelers and insurers | Primarily an administrative check, not a beauty indicator |
| Polish & Symmetry | Craftsmanship quality in finishing | Excellent is ideal; Very Good is fine; symmetry matters less for fancy shapes |
| Fluorescence | Reaction to UV light, not a quality grade | Harmless for G-H color; beneficial for I-K; avoid strong in D-F |
| Comments / Treatment Notes | Disclosures about growth method and post-growth treatments | Color treatment = common and stable; clarity treatment = red flag |
| Measurements (Diameter/Depth) | Actual size and proportions, especially for carat weight | A 6.5mm 1-carat appears larger than a 6.2mm 1-carat |
| Length-to-Width Ratio (Fancy Shapes) | Proportion that affects silhouette preference | Choose based on personal taste; no universal “best” ratio |
Quick Questions Before You Read
Q: Do I need to understand every field on the report?
No. Most fields are administrative identifiers for jewelers and insurers. You only need to focus on cut grade, color, clarity, measurements, and the comments section to judge appearance and value.
Q: Is an older report date a sign of lower quality?
Not at all. An older issue date has no bearing on diamond quality. Lab-grown diamonds do not degrade over time, so the date is only useful for verifying the stone’s provenance.
Q: Should I worry about CVD vs. HPHT growth method in the comments?
Only if the comments mention post-growth treatment for clarity. The growth method itself (CVD or HPHT) is not a quality indicator. What matters is whether the stone received treatment to improve clarity — that is the real red flag.
Q: How important is the culet size?
For most buyers, it is not important at all. A large culet can be visible in some settings, but it rarely affects the overall beauty or performance of the stone. Focus on polish and symmetry instead.
Report Number and Identity Fields: The Paper Trail
Every grading report opens with a set of fields that feel administrative but serve a specific purpose. These are the numbers and labels that identify the stone, not the ones that tell you how it looks. Learning to recognize them saves you from reading too much into the wrong part of the document.
Why the Report Number Is the Most Important Number on the Page
The report number is the diamond’s unique ID. Every graded stone receives one, and that number is often laser-inscribed on the girdle of the diamond itself. This is how you verify that the stone in your hand matches the document in front of you. Most labs, including IGI and GIA, offer online lookup tools where you can enter the report number and pull up the full certificate.[1] If you are buying a loose diamond online, always confirm the number matches before you commit. Without that cross-check, the report is just a piece of paper.
What the Date Tells You
The date of issue tells you when the diamond was graded. For lab-grown diamonds, this matters less for quality and more for context. A recent date suggests the diamond was produced and graded within a shorter window, which can matter for buyers concerned about whether older inventory might reflect earlier generation growth processes. But in practice, a two-year-old report does not mean a worse diamond. The date is mainly useful for record keeping and insurance documentation.
Shape, Cutting Style, and Carat Weight: Not Just Decorative Fields
These fields are identification tools, not value indicators. The shape field will tell you whether the stone is round, oval, cushion, or another cut. The cutting style notes the faceting pattern, usually “Brilliant,” “Step Cut,” or “Mixed.” Carat weight appears here as a precise number, often to the hundredth of a carat. On a report for a round brilliant, you might see “Round Brilliant” as the shape, “1.04 ct” as the weight, and a report number like “IGI-12345678.” These numbers exist so the jeweler, the insurer, and you can confirm you are looking at the exact same stone. They do not tell you how beautiful the diamond is. That comes next.
Practical note for buyers comparing multiple reports: The shape and cutting style fields are also where buyers occasionally get tripped up by similar-sounding names. An “Old European Cut” and a “Round Brilliant” are completely different cutting styles, but a quick glance might confuse them. The cutting style field is your precise label. For fancy shapes, the cutting style field can also hint at the stone’s light performance — a “Brilliant” cut cushion tends to be livelier and show more sparkle than a “Step Cut” cushion, which has a more open, hall-of-mirrors look. Both are valid, but the choice affects the visual character of the stone in a finished ring.
Finish Fields: Polish, Symmetry, and Culet — The Subtle Quality Indicators
Once you move past the 4Cs, the next group of fields on a report covers the diamond’s finish. These are the polish, symmetry, and culet grades. They rarely dominate a buying decision, but they can tell you whether the diamond was well-crafted or merely acceptable.
Polish Grade: What It Means for Surface Smoothness
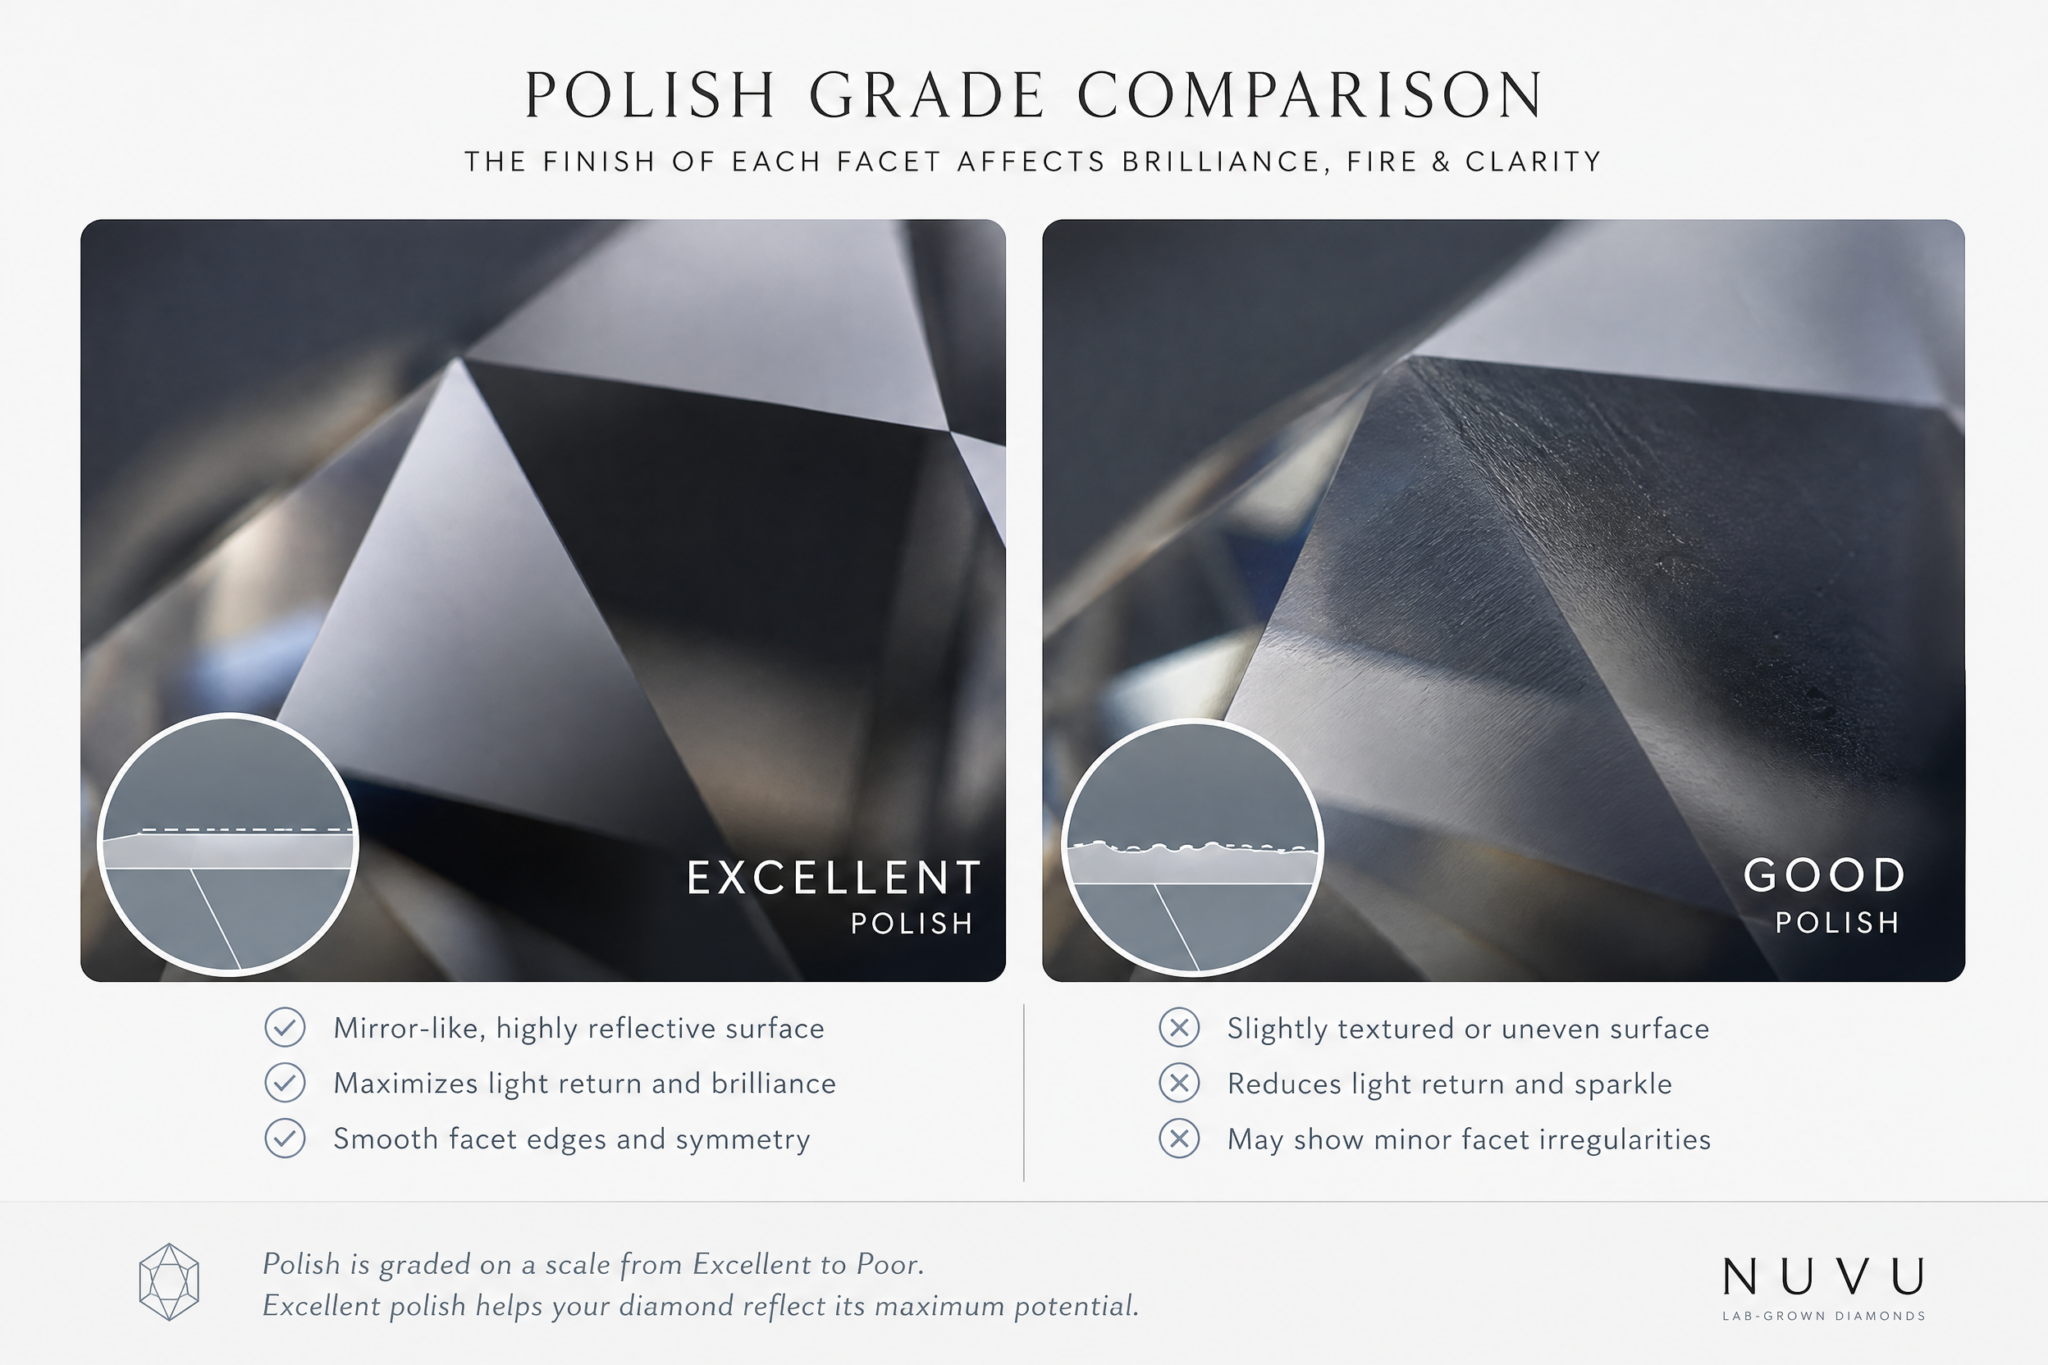
Polish refers to how smooth the diamond’s facets are after cutting and final finishing. Think of it as the difference between glass polished to a mirror finish and glass left with a slight ripple. On a report, polish is graded on a scale from Excellent down to Poor. For lab-grown diamonds, most quality stones land at Excellent or Very Good. A grade of Good is a warning. It does not mean the diamond is cloudy, but it does mean the cutter left minor surface irregularities that could slightly reduce light return and sparkle. Most buyers should target Excellent. If the stone is otherwise ideal in everything else, Very Good is an acceptable compromise that often comes with a modest price break.
Symmetry Grade: When Small Imperfections Matter
Symmetry measures how precisely the facets align with each other. A round brilliant diamond has 57 or 58 facets arranged in a specific geometric pattern. If those facets are slightly off — a table that is not perfectly centered, a girdle that wobbles, or crown facets that do not line up — the symmetry grade drops. The effect on sparkle depends on the severity. For a round brilliant, symmetry matters a great deal because any misalignment affects how light moves through the stone. For fancy shapes like ovals, pears, or cushions, symmetry is slightly less critical because the shape itself is asymmetrical and a few degrees of misalignment are harder to detect. Modern diamond certification increasingly relies on lab grown diamond laser inscription to ensure traceability and authenticity alongside traditional quality grades. In practice, an Excellent symmetry grade is ideal, but Very Good is common and perfectly acceptable. A stone with Good symmetry in a round cut should raise questions unless the price reflects the tradeoff.
Culet: A Simple Field You Can Ignore Unless It’s Large
The culet is the tiny facet at the very bottom tip of a diamond. In most modern cuts, the culet is pointed or very small. On old cuts or poorly cut stones, the culet may be medium, large, or even very large. A pointed or small culet is the standard and requires no thought. A medium culet is rare in modern lab-grown diamonds and is usually harmless. A large culet is a structural problem. It creates a visible dark circle when you look through the table, and it also means the diamond lost weight to the culet instead of to the crown and pavilion where it would contribute to sparkle. If a report lists a large or very large culet, consider that a warning sign and compare the stone against better-cut alternatives.
Fluorescence: Does It Matter for Lab-Grown Diamonds?
Fluorescence is one of the most misunderstood fields on any diamond report. It refers to a diamond’s tendency to emit a faint glow — typically blue — when exposed to ultraviolet light. On a report, it is listed as None, Faint, Medium, Strong, or Very Strong.
What Fluorescence Means on a Report
The fluorescence field is not a quality grade. It is an observation. Some diamonds contain trace elements that react to UV light, and the lab simply records what it sees. In natural diamonds, strong fluorescence has historically been treated with caution because it can sometimes make the diamond appear hazy or oily in direct sunlight. In lab-grown diamonds, the same physics apply, but the effect is generally less dramatic because the crystal structure and trace-element composition differ slightly.
When Fluorescence Helps and When It Doesn’t
The practical impact of fluorescence depends heavily on the diamond’s color grade. For colorless stones (D through F), fluorescence has no visible benefit and carries a small risk. A D-color diamond with strong blue fluorescence may appear slightly hazy under strong UV light, though this is rare and difficult to see without a side-by-side comparison. For near-colorless stones (G through H), fluorescence is neutral in most cases — not harmful, not helpful. The interesting case is lower color grades (I through K). Here, a strong blue fluorescence can actually make the diamond appear slightly whiter in certain lighting, because the blue glow offsets the warm yellow tint. A 1.50-carat J-color diamond with strong fluorescence may look closer to an H or I in normal room light, which can be a legitimate value advantage.
A note on fluorescence verification: The report lists the fluorescence grade, but the practical effect is best seen in person or through video taken under varied lighting. A stone listed as Medium fluorescence can look completely different under bright indirect light versus direct sunlight or UV-emitting indoor lighting. Buyers who are considering a stone with Medium or Strong fluorescence should request a video that includes outdoor lighting to confirm the stone does not appear hazy. Without that visual check, the report field alone can be misleading — a Medium fluorescence stone might look perfectly clear or slightly milky depending on the specific diamond and the buyer’s environment.
Should You Avoid or Seek Fluorescence on Your Report?
For the vast majority of buyers, fluorescence should not be a deciding factor. If the report says None or Faint, that is the safest bet and requires no further thought. If it says Medium or Strong, the practical question is simple: what color grade is the diamond? For D through F stones, strong fluorescence is a minor risk not worth taking unless the price is unusually attractive and you can view the stone in person under sunlight. For G through H stones, fluorescence is mostly irrelevant. For I through K stones, strong fluorescence may actually be a bonus that improves visual appearance. In every case, the effect is subtle. No one will look at a diamond and guess the fluorescence grade. The field matters more on paper than in the hand.
When a grading report is available, buyers should verify the report details through the issuing laboratory’s official report-check tool where available. This includes confirming the report number, the listed grades, and any treatment notes. A report-check lookup is a simple way to confirm the document matches the stone before committing to a purchase.
Comments, Growth Method, and Treatment Notes: The Fields That Reveal the Diamond’s Story
The bottom section of a grading report is where the real transparency lives. While the 4Cs and measurements tell you what the diamond is, the comments, growth method, and treatment notes tell you where it came from and what was done to it. This is the part of the report that most buyers skip, and it is also the part most likely to contain something that matters.
Growth Method (CVD vs HPHT): What It Tells You About the Diamond’s Origin
Every lab-grown diamond report will list the growth method. There are two main categories: CVD (Chemical Vapor Deposition) and HPHT (High Pressure High Temperature). Both produce real diamonds with identical crystal structures, but they grow differently. GIA explains that CVD diamonds grow from a gas mixture in a chamber, while HPHT diamonds form under conditions that mimic natural diamond formation.[2] CVD diamonds grow in layers inside a vacuum chamber, and trace elements from the growth environment can sometimes leave a faint brownish or grayish tint in as-grown material. This tint is usually removed by post-growth treatment, leaving the stone colorless. HPHT diamonds grow under extreme pressure and heat, mimicking natural formation, and they tend to come out very pure and white from the start. Neither method is inherently superior. Both can produce D-color, IF-clarity stones. The growth method matters most when it is paired with a treatment note.
Treatment Notes: The Most Important Field on the Report
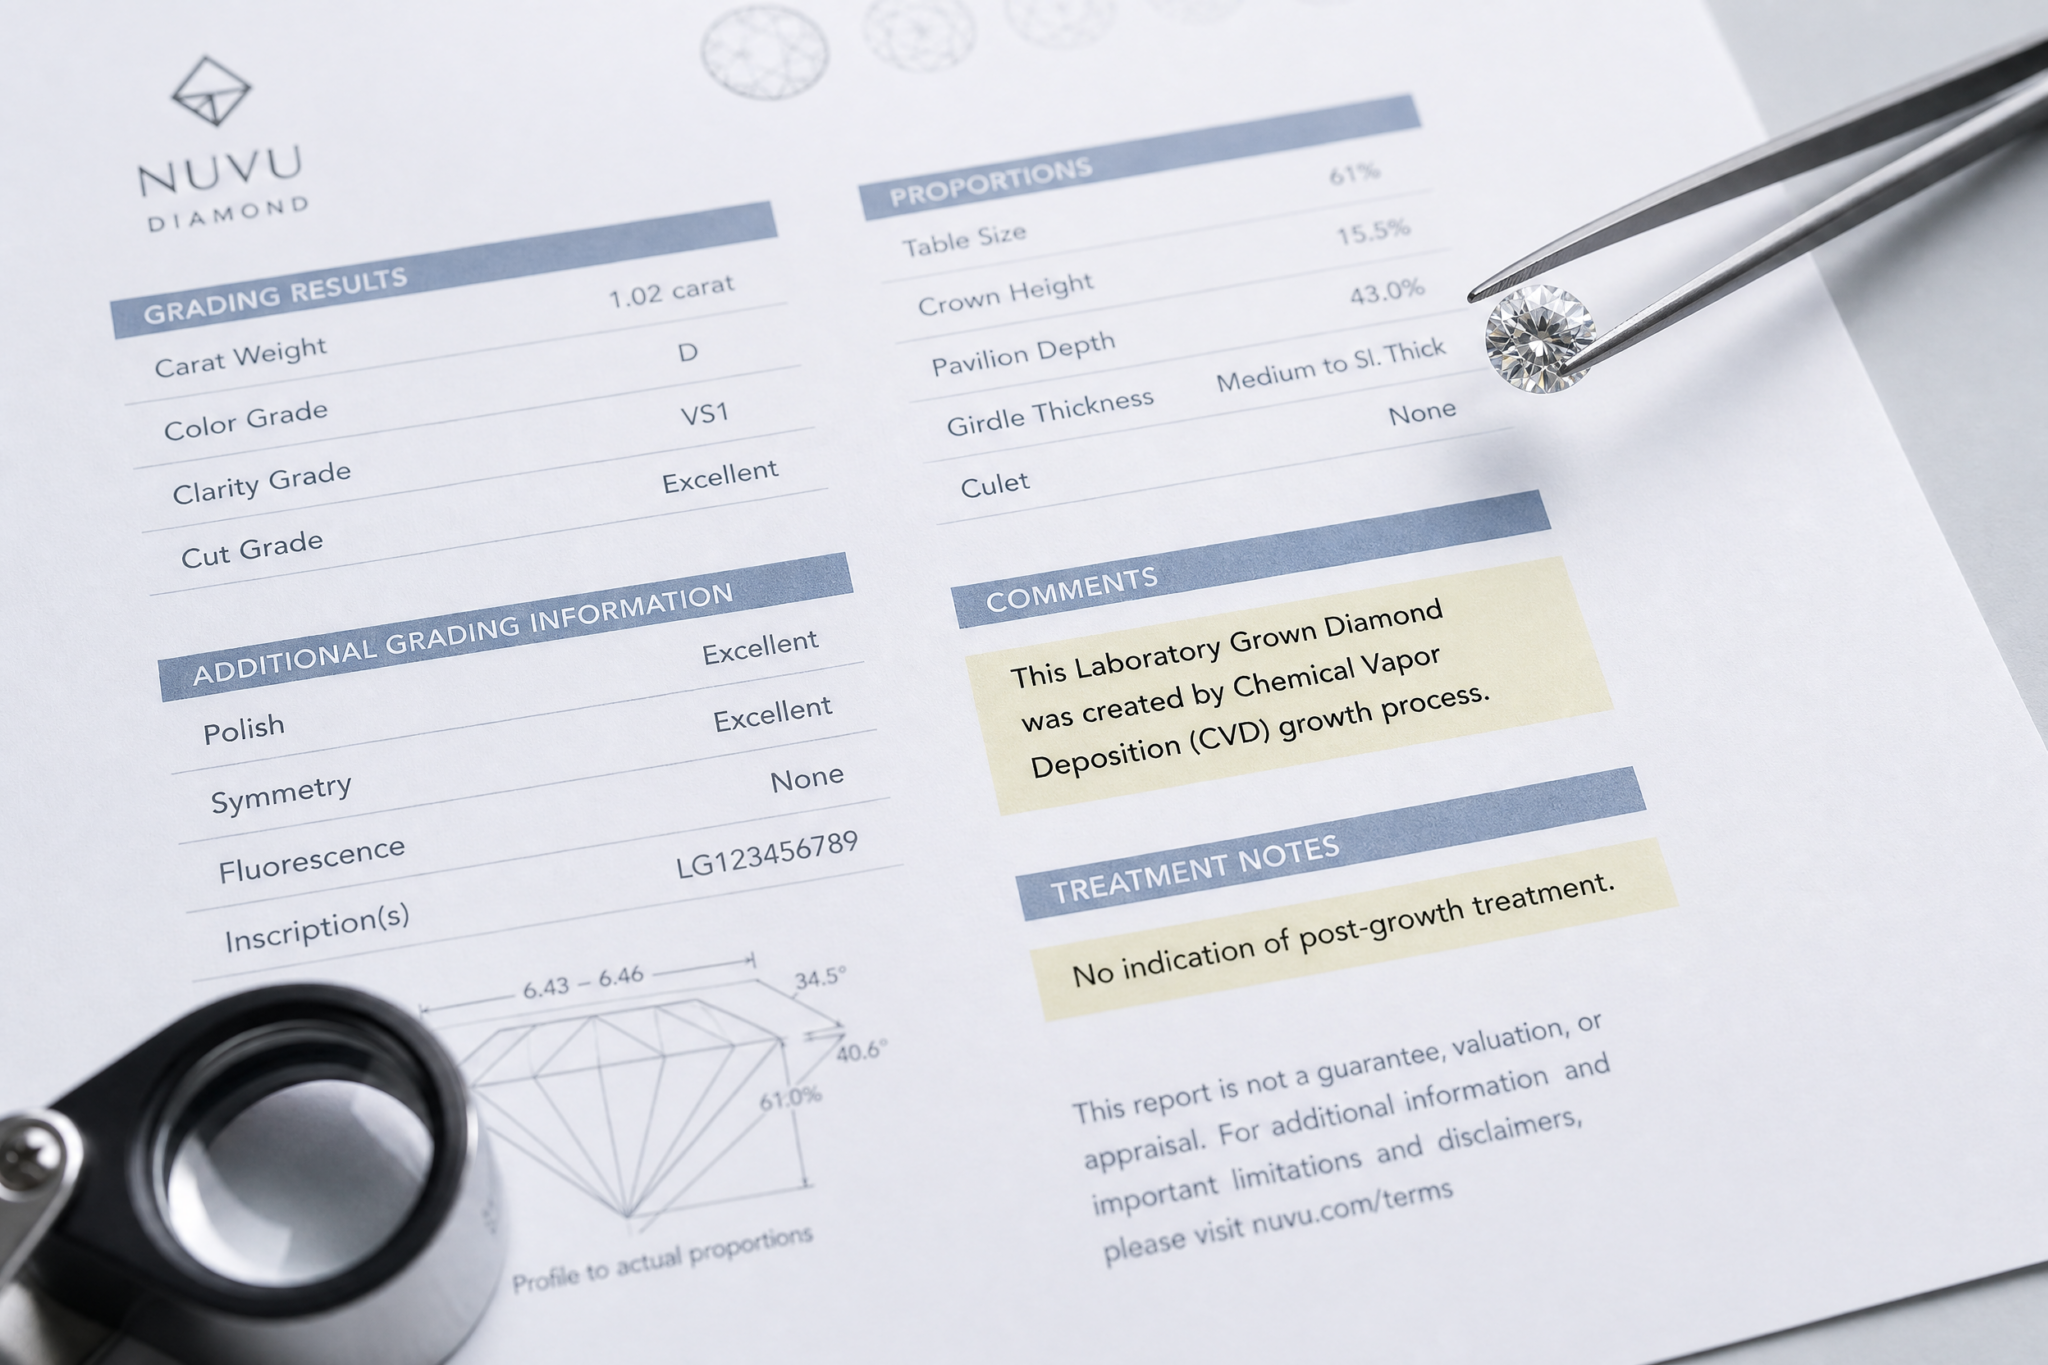
This is the field that demands your full attention. If a lab-grown diamond underwent any post-growth process to improve color or clarity, the report must note it. The most common note reads something like “Post-growth treatment applied for color improvement.” This typically means a CVD-grown diamond had a slightly warm or brownish tint after growth and was HPHT-treated to reach D or E color. This process is common, permanent, and stable — it does not affect how the diamond wears or sparkles. A more concerning note involves clarity enhancement. If the report mentions “fracture filling” or “laser drilling,” that stone has been treated to hide internal inclusions, and those treatments may not be permanent. In a high-quality lab-grown diamond, clarity enhancement should not be necessary. If you see any treatment related to clarity rather than color, treat it as a serious concern and compare against untreated alternatives.
Comments Section: What to Look For and What to Ignore
The general comments field is the catch-all. Most entries here are routine and irrelevant to buying decisions — notes about minor inclusions being plotted on the clarity diagram, measurement tolerances, or standard disclaimers. But every now and then, the comments field contains a red flag. A note about “surface-reaching fractures” means the diamond has cracks that reach the surface, creating durability risk. A note about “painted clarity” suggests that a dark inclusion was lightened or disguised rather than removed, which can affect light performance. A long list of plotted inclusions in the comments is not necessarily bad, but it means the stone has more internal features than average. The cleanest reports have a short or empty comments section. That is the buyer’s friend.
How to Verify Treatment Claims Before Buying
When you see a treatment note on a report, the first question is whether the treatment was for color or clarity. Color treatment (HPHT improvement of tint) is standard, stable, and carries no practical risk. Clarity treatment (fracture filling, laser drilling) is uncommon in high-quality lab stones and should be treated as a red flag. The second question is whether the seller discloses the same information in the product listing. If a report shows a treatment note and the listing does not mention it, that is an inconsistency worth questioning. Any reputable seller should be able to explain exactly what the treatment was and whether it is permanent. If they hesitate or give vague answers, move to another stone. This is one corner of the report where the fine print genuinely matters.
Why the Clarity Grade Deserves a Closer Look — Especially on Lab-Grown Reports
The clarity grade is a shorthand for what the grader saw under magnification, but it does not tell you the full story of how those inclusions affect the stone’s appearance. A stone graded VS1 could have a small inclusion tucked under a crown facet where it is invisible to the naked eye, while an SI1 stone could have a single dark inclusion visible from the table if you know where to look. This is why the plotting diagram on the report matters. It maps the location, type, and size of each inclusion. For lab-grown diamonds, clarity characteristics often include “feathers,” “pinpoints,” or “crystals,” and the plot shows you whether they are near the center or hidden near the girdle. Many grading reports include a key that explains the symbols used on the plot.[3] A stone with a single small inclusion near the girdle can often face up cleanly and offer a better value than a stone with a higher clarity grade but multiple inclusions scattered across the table.
Distinguishing Laboratory-Grown from Natural Diamonds in Reports
One distinction that every report makes clear is the origin of the stone. A grading report for a laboratory-grown diamond will explicitly state the stone’s origin on the document — typically with wording such as “Laboratory-Grown,” “Lab-Grown,” or “HPHT-Grown” / “CVD-Grown” near the top of the report. This disclosure is not a quality judgment; it is a factual description of how the diamond formed. A lab-grown diamond should never be presented or confused with a natural (mined) diamond, and the report itself serves as the primary documentation of that origin. When reading a report, the first field to confirm for clarity is the origin statement. Some sellers also include the origin in the product listing, but the grading report is the definitive document. Buyers should treat the origin field as a verification point, especially when comparing stones from different sellers. A well-documented report will make the distinction easy to find, and any ambiguity on this point should be addressed with the seller before purchase.
Putting It All Together: A Quick Guide to Scanning Any Lab-Grown Diamond Report
Your 6-Step Checklist for Reading a Lab-Grown Diamond Report
Once you know which fields matter, a grading report stops being a wall of jargon and becomes a simple checklist. Here is a practical sequence you can run through every time you open a new report.
Start with the report number. Confirm it matches the diamond you are considering. Then move directly to the cut grade. For a round brilliant, anything less than Excellent or Ideal means the diamond is leaving sparkle on the table. For fancy shapes, check whether a cut grade is even present, and if not, pay closer attention to the proportions.
Next, check the color and clarity grades together. A G-H color paired with VS1-SI1 clarity is the most common value combination for lab-grown diamonds. If the stone is D-F color, you are paying for near-whiteness that is rarely visible in a finished ring. If clarity drops to SI2 or below, ask for a video or in-person look before relying on the grade alone.
Then look at the measurements. Multiply length by width for an approximate sense of face-up area. A 1-carat round with a 6.5 mm diameter will look larger than one with 6.2 mm, even though both weigh the same. For fancy shapes, check the length-to-width ratio to confirm the silhouette matches what you want.
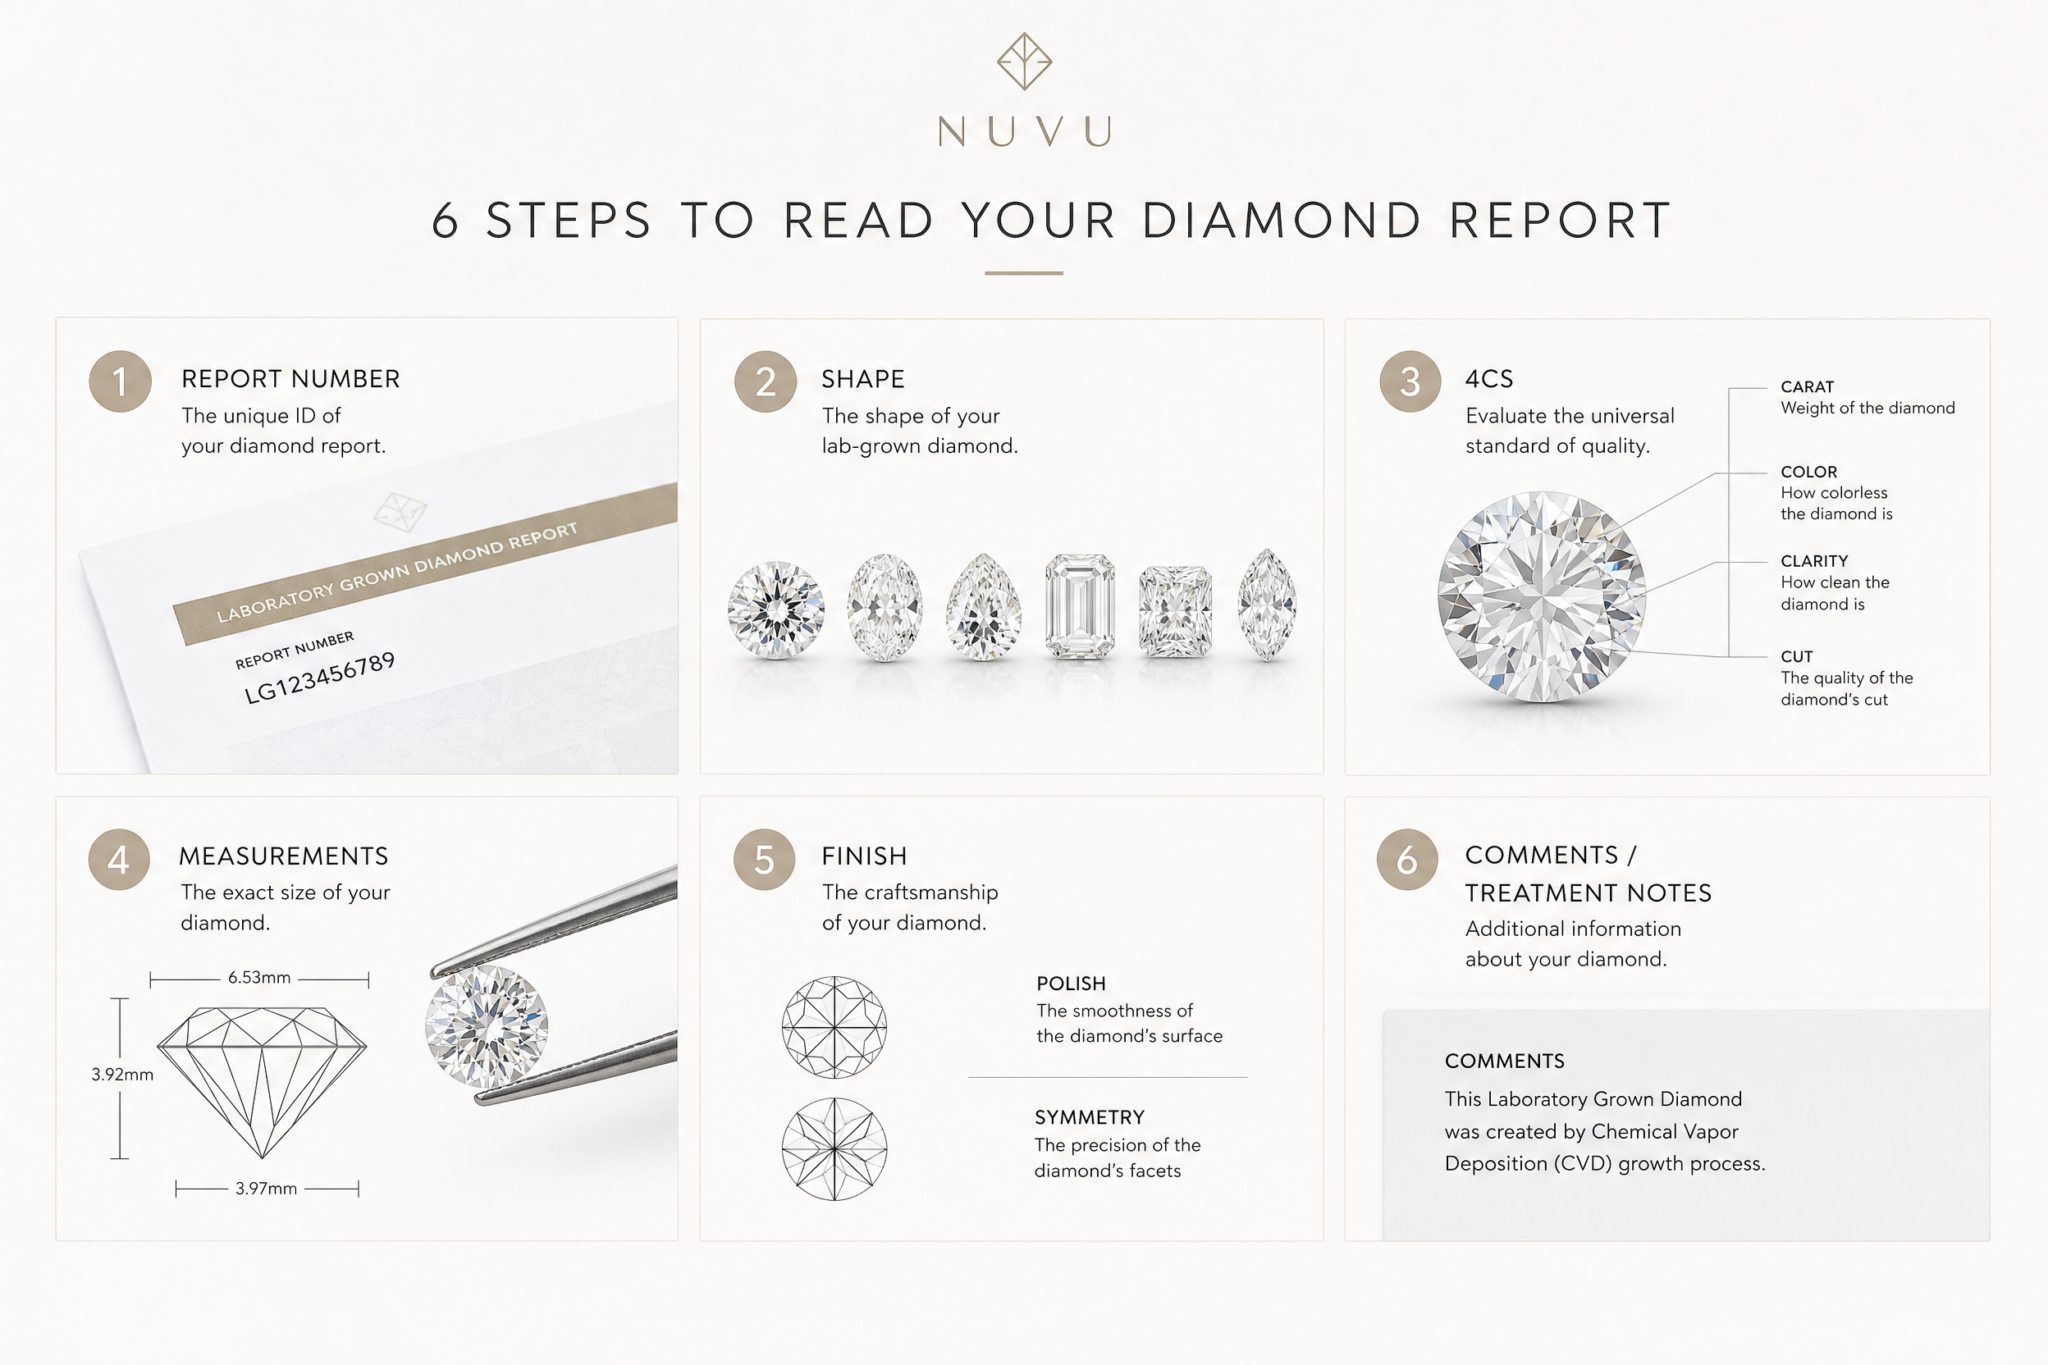
Finally, scan the finish fields and the comments section. Polish and symmetry should be Excellent or Very Good. Anything lower is a warning. In the comments, look for treatment notes. A clean comments field is reassuring. A note about post-growth treatment for color improvement is common and stable, but you should know it is there.
One additional field worth mentioning for advanced buyers: the depth percentage and table percentage, which are often listed alongside the main measurements. These proportions influence how light travels through the stone. For round brilliants, a depth percentage between 59% and 62.6% and a table percentage between 54% and 57% are common targets for optimal light return. For fancy shapes, these ranges shift and depend more on the specific shape. A stone with an Excellent cut grade already accounts for these proportions, so you do not need to recalculate them yourself. But if the report does not include a cut grade — which is the case for many fancy shapes — these percentages become your best guide to light performance. A cushion with a very high depth percentage above 70% may appear smaller face-up and darker in the center, while an oval with a table percentage above 62% may look flat. These proportion checks are useful when the cut grade is absent, but they should be interpreted as starting points, not absolute thresholds.
How Documentation Informs the Buying Process
A grading report is one document in a larger set of information that supports a buying decision. It does not replace the need to see the stone, ask questions about its intended setting, or understand the seller’s approach to communication and documentation. For buyers working with a jeweler on a custom piece, the report should be reviewed alongside the setting requirements — a stone with a long, narrow inclusion near the edge may be completely hidden by a prong, whereas the same inclusion in a bezel setting might sit exposed. For wholesale buyers or those sourcing multiple stones, consistency across reports — in grading, measurements, and treatment notes — is often more important than any single grade. The report is a tool for comparison, not a substitute for a careful evaluation of how the stone fits the wearer’s preferences and the jewelry design.
In sourcing or wholesale conversations, documentation, consistency, and communication often matter as much as the headline specification. A buyer who understands what each report field reveals is better positioned to compare options, ask informed questions, and make a decision that balances appearance, budget, and design fit.
What a Grading Report Does and Does Not Tell You
It is useful to keep in mind what a grading report can document and what it cannot. A report documents key characteristics such as carat weight, color grade, clarity grade, cut grade, measurements, fluorescence, and treatment notes. These are standardized observations made under controlled conditions by a trained grader. What a report does not do is guarantee beauty, visual sparkle, or suitability for a specific setting. A report also does not guarantee value retention or investment performance, and it does not certify ethical sourcing or environmental impact unless the report includes a specific origin or sourcing verification — which is not typical for standard grading reports. Buyers should treat the report as documentation of measurable attributes, not as a seal of approval on taste or long-term worth. A high-graded stone may still need to be evaluated visually and in the context of its intended use.
For custom design, trust comes from matching the stone to the setting, budget, and wearer’s daily use — not from choosing grades in isolation. The report helps narrow the options, but the final fit depends on how the diamond works in its intended piece. Buyers should confirm measurement compatibility and setting suitability before finalizing the stone.
A lab-grown diamond report is your buying tool, not a gemology exam. Once you separate the fields that affect appearance and price from the fields that exist for tracking, the document becomes straightforward. Use the checklist to compare, not to overthink. The right stone becomes obvious much faster.
[1] GIA, “Report Check,” GIA, accessed via gia.edu/reportcheck. Explanation of how to verify a GIA report number online.
[2] GIA, “HPHT-Grown and CVD-Grown Diamonds,” GIA, educational resource on lab-grown diamond growth methods. Accessed via GIA website.
[3] GIA, “GIA Diamond Clarity Grade,” GIA, explanation of clarity plotting and symbols. Accessed via gia.edu/gia-about/4cs-clarity.
Disclosure: This article is for general educational purposes only. Diamond grading, pricing, availability, specifications, and seller policies can change, and readers should verify important details through grading reports, official laboratory tools, seller documentation, or qualified professionals before making a purchase decision. Laboratory-grown diamonds should be clearly distinguished from natural diamonds, and environmental or sourcing claims should be supported by specific documentation. A grading report helps document key characteristics, but it should not be treated as a guarantee of beauty, value, or sourcing ethics.
Last updated: July 2025