
Lab-grown diamond prices do not rise in a perfectly smooth line as carat weight increases. They often jump around familiar sizes such as 1 carat, 1.5 carats, 2 carats, and 3 carats because many buyers search for those exact numbers, so round vs oval lab-grown diamond price comparisons should account for how inventory is commonly organized around them. The problem is that a milestone carat weight may cost noticeably more without looking much larger once the diamond is set.
For the full framework, read Lab-Grown Diamond Price Guide.
This article helps you judge whether paying for the round-number size is worthwhile or whether a slightly smaller “near-size” diamond gives better visual value. Instead of relying on carat weight alone, the better comparison is face-up millimeter size, cut quality, shape, brightness, proportions, grading report details, and how the stone will work in the finished ring or jewelry piece.
Laboratory-grown diamonds should be clearly identified as laboratory-grown, and they should not be presented as mined diamonds. Prices can change with market conditions, report type, seller channel, and stone-specific details, so exact comparisons should be verified at the time of purchase.
| Decision Point | What to Check | Practical Buying Takeaway |
|---|---|---|
| 1ct vs. 0.90–0.99ct | Diameter, cut, and face-up spread | A near-1ct stone may look very similar at a lower listed price, depending on the specific stones compared. |
| 2ct vs. 1.70–1.99ct | Millimeter measurements and brightness | Do not pay the 2ct jump unless the visual gain is clear. |
| Elongated shapes | Length-to-width ratio and setting fit | Oval, pear, and emerald cuts can appear larger than weight suggests. |
| Lower-priced same-carat stones | Color, clarity, proportions, and video | A low price usually reflects a tradeoff worth identifying. |
| Grading report review | IGI or GIA report plus actual images | Reports document specs but do not replace visual assessment. |
| Finished ring value | Setting height, security, band width, comfort | A suitable diamond is the one that works in the complete piece. |
Quick Questions Before You Read
Q: Is a 1 carat lab-grown diamond always a better buy than a 0.95 carat diamond?
No. If the 0.95ct diamond has similar measurements and better cut or appearance, it may offer stronger value.
Q: Why do prices jump at popular carat sizes?
Demand, search habits, and inventory categories often make milestone sizes more expensive than nearby weights.
Q: Should I compare carat weight or millimeter size first?
Use both, but millimeter size and face-up appearance are more useful for judging how large the diamond will look.
Q: Does certification guarantee that the diamond will look beautiful?
No. A grading report confirms graded details, but images, video, cut, proportions, and setting fit still matter.
Why Lab-Grown Diamond Prices Jump at Popular Carat Sizes
Lab-grown diamond price by carat does not move in a perfectly smooth line. A diamond that crosses a popular size threshold can cost noticeably more than one just below it, even when the two stones look very close once set in a ring. This is why a 1.00ct lab-grown diamond may feel disproportionately more expensive than a 0.90ct or 0.95ct option, and why similar jumps often appear around 1.5ct, 2ct, and 3ct.
The reason is not weight alone. Lab-grown diamond cost by carat is shaped by demand, inventory grouping, search behavior, and the way buyers think about round numbers. Milestone carat sizes are easier to remember, easier to compare, and easier to ask for. That makes them more competitive, especially in engagement ring shopping, where buyers often arrive with a clean target number already in mind.
Carat Weight Is a Pricing Category, Not Just a Measurement
Carat is technically a unit of weight, but in the jewelry market it also works like a pricing category. A stone listed at 1.00ct often sits in a different mental and retail category than a 0.97ct stone, even if the physical size difference is hard to notice without a side-by-side comparison.
This is where buyers can misread value. The extra price attached to a milestone carat size may not always translate into an equally visible difference on the hand. A diamond price jump around a threshold can reflect the desirability of the label as much as the added material. The smarter question is not simply “How many carats is it?” but “How large does it face up, how well is it cut, and is the milestone number doing enough work to justify the cost?”
Why Round Numbers Attract More Buyer Demand
Popular diamond sizes such as 1ct, 1.5ct, 2ct, and 3ct attract more attention because they feel complete. Many buyers search for “1 carat lab-grown diamond price” or “2 carat lab-grown diamond price” before they ever compare measurements, proportions, or near-size alternatives. That demand concentrates around clean numbers, which can make those stones more competitive than diamonds just below the same threshold.
The psychological pull is real. A buyer may prefer saying “one carat” over “0.94 carat,” even if the smaller stone offers a similar face-up look. For some buyers, that symbolism is worth paying for. For others, it is an expensive label. Neither choice is automatically wrong, but the decision should be intentional rather than driven by the roundness of the number.
How Inventory Sorting Can Make Threshold Sizes Feel More Expensive
Inventory systems often group diamonds by carat ranges. A diamond at 0.99ct may be filtered differently than one at 1.00ct. The same pattern can happen just below 1.5ct, 2ct, or 3ct. Since many shoppers set filters at milestone sizes, stones that barely cross the line may receive more visibility and more direct comparison against other highly searched options.
This does not mean every milestone diamond is overpriced, and it does not mean every just-under stone is a better buy. Price still depends on cut, color, clarity, shape, grading report, seller channel, and current inventory. The key judgment is that the carat threshold itself can add pressure to pricing, so a milestone size should earn its premium through visible performance and overall fit, not just a cleaner number on the certificate.
In practical buying, this is also where seller listings can oversimplify the comparison. Two stones may appear identical in a search filter because both are “2ct lab-grown diamonds,” but one may be 2.00ct with a smaller face-up spread while another may be 1.92ct with better measurements and stronger visual life. A useful comparison starts with the report, but then checks whether the stone’s dimensions, cut behavior, and visual media support the price difference.
Evidence Check: What a Threshold Premium Can and Cannot Prove
A higher price at a milestone size should not be treated as proof that the diamond is automatically better. Without current market data for the exact stones being compared, the safer conclusion is narrower: popular thresholds can influence how buyers search, how sellers categorize inventory, and how stones are compared side by side. The premium still needs to be justified by the individual diamond’s measurements, cut quality, grading details, and visual presentation.
For a defensible comparison, avoid relying on a single “price per carat” impression. A stone can look expensive or inexpensive because of the carat label, but the real explanation may be hidden in depth percentage, face-up spread, color, clarity, growth-related appearance, report type, shape demand, or the amount of visual documentation available. If two diamonds seem unusually far apart in price, treat that as a prompt to investigate the difference rather than as immediate proof that one is a bargain.
Traceable Comparison: Keep the Evidence Attached to the Price
When comparing carat-price jumps, it helps to keep each price tied to the exact evidence that supports it: the report number if a grading report is available, the listed measurements, shape, color, clarity, cut-related details, and the images or video used for review. This makes the comparison traceable instead of relying on memory or a filtered search result. If a 1.98ct diamond appears more attractive than a 2.00ct diamond, the reason should be visible in the documentation or visual evidence, not only in the lower price.
This is especially useful when several diamonds are close in size. A buyer can create a simple comparison using carat weight, face-up dimensions, report details, and setting notes. The purpose is not to make the purchase overly technical; it is to prevent the carat milestone from hiding the real tradeoffs. A transparent comparison should show why a stone is being considered, what has been verified from documentation, and what still depends on personal preference or visual judgment.
What This Means in a Real Purchase
If you are comparing a 0.95ct and a 1.00ct lab-grown diamond, or a 1.85ct and a 2.00ct option, do not assume the higher carat weight is automatically the better value. The milestone stone may be more satisfying if the exact number matters to you or if it also has stronger cut quality, balanced proportions, and the look you want. But if the near-size stone faces up similarly and leaves room in the budget for a better setting or higher visual quality, the smaller number may be the more rational choice.
The first mistake to avoid is treating carat weight like a straight size ladder. Around popular thresholds, lab diamond pricing often reflects what buyers search for and how inventory is presented, not just what your eye will see.
The Main Carat Milestones: 0.5ct, 1ct, 1.5ct, 2ct, and 3ct
The most common lab-grown diamond carat sizes each play a different role in the buying decision. Some are chosen for budget control, some for tradition, and some for visual presence. Understanding how each milestone behaves helps you compare lab-grown diamond price by carat without treating every size increase as equally meaningful.
Lab-grown diamonds have made larger center stones more accessible than comparable natural diamonds, but bigger still brings tradeoffs. As carat weight rises, the stone becomes more visually dominant, price differences become more noticeable, and proportion issues become harder to ignore. A larger diamond can be impressive, but it also gives mistakes more room to show.
Lab-grown diamonds and natural diamonds have different origins. A laboratory-grown diamond is not a diamond simulant, and it should be described with clear laboratory-grown origin disclosure in seller listings and grading documentation where available.
0.5ct: A Smaller Milestone Where Cut Still Matters
A 0.5 carat lab-grown diamond is often chosen by buyers who want a modest center stone, a lower total ring budget, or a more understated look. It can work especially well in delicate solitaire settings, three-stone designs, bezel settings, or jewelry pieces where the diamond is not meant to dominate the entire design.
The common mistake at this size is assuming cut quality matters less because the stone is smaller. In practice, a well-cut 0.5ct diamond can look lively and intentional, while a poorly cut one may appear flat even if its color and clarity grades look strong on paper. If the goal is value, cut should not be sacrificed just to reach the half-carat label.
1ct: The Classic Threshold That Often Carries Extra Demand
The 1ct mark remains the classic psychological benchmark for engagement rings. Many shoppers begin by asking about 1 carat lab-grown diamond price because it feels like the standard reference point: substantial enough to be noticed, familiar enough to compare, and easy to communicate.
That popularity is exactly why the 1ct threshold can carry extra pricing pressure. A 1.00ct stone may cost more than a slightly smaller diamond that looks very similar once mounted. If the emotional value of reaching one full carat matters, the premium may feel worthwhile. If your priority is visual value, the better comparison is often between the 1ct stone and well-cut options just below it.
1.5ct: A Middle Ground Between Everyday Wearability and Larger Presence
A 1.5 carat lab-grown diamond is often the point where buyers want a clearly larger look without moving into a size that feels too bold for daily wear. It can offer more presence than a 1ct diamond while still working comfortably in many classic engagement ring styles.
The tradeoff is that 1.5ct is also a recognized milestone. Buyers who find 1ct too small and 2ct too large often concentrate here, which can make the threshold more competitive. The smartest comparison is not only “1.5ct or 2ct,” but whether a stone in the 1.35ct to 1.49ct range gives enough of the same look with better cut, better proportions, or a more balanced total ring budget.
2ct and 3ct: Bigger Visual Impact, Bigger Tradeoffs
A 2ct lab-grown diamond creates a major visual step up from the classic 1ct benchmark. It has enough presence to define the ring, especially in a solitaire or thin-band setting. Because many buyers search specifically for 2 carat lab-grown diamond price, this threshold can also be one of the more price-sensitive points in the buying process.
A 3ct diamond moves into statement territory. At this size, the diamond’s proportions, shape, setting height, and wearability matter much more than they do with smaller stones. A 3 carat lab-grown diamond cost may look attractive compared with a natural diamond of the same weight, but the practical question is whether the finished ring will feel balanced, secure, and comfortable for the wearer’s daily life.
At 2ct and 3ct, weak cut or awkward proportions become more obvious. A larger stone does not hide poor choices; it magnifies them. For buyers deciding between these sizes, the better diamond is not always the heavier one. It is the one that delivers the right visual presence without creating avoidable compromises in performance, setting design, or wearability.
Why Visual Size Does Not Increase as Fast as Carat Weight
One of the most useful things to understand before comparing diamond carat size is that carat weight and visual size are not the same thing. Carat measures weight. Your eye mostly sees the top surface of the diamond: its diameter, length, width, and overall spread.
This is why a 2ct diamond does not look twice as wide as a 1ct diamond. The extra weight is distributed in three dimensions, including depth, not just across the top. For lab-grown diamond visual size, the face-up measurements often matter more in practice than the carat number alone.
Carat Measures Weight, While Your Eye Sees Diameter
A diamond is not a flat object. As carat weight increases, some of that weight goes into width, but some also goes into depth and overall volume. The buyer sees the diamond from above most of the time, especially once it is set in a ring. That means face-up size is driven by measurements, not just weight.
This distinction matters most near milestone sizes. A buyer may pay a noticeable premium to move from 1.80ct to 2.00ct, expecting a dramatic difference, only to find that the visible spread is more modest than the price difference suggests. The same logic applies when comparing 0.90ct with 1.00ct or 1.40ct with 1.50ct. The carat label changes cleanly, but the visible change may be subtler.
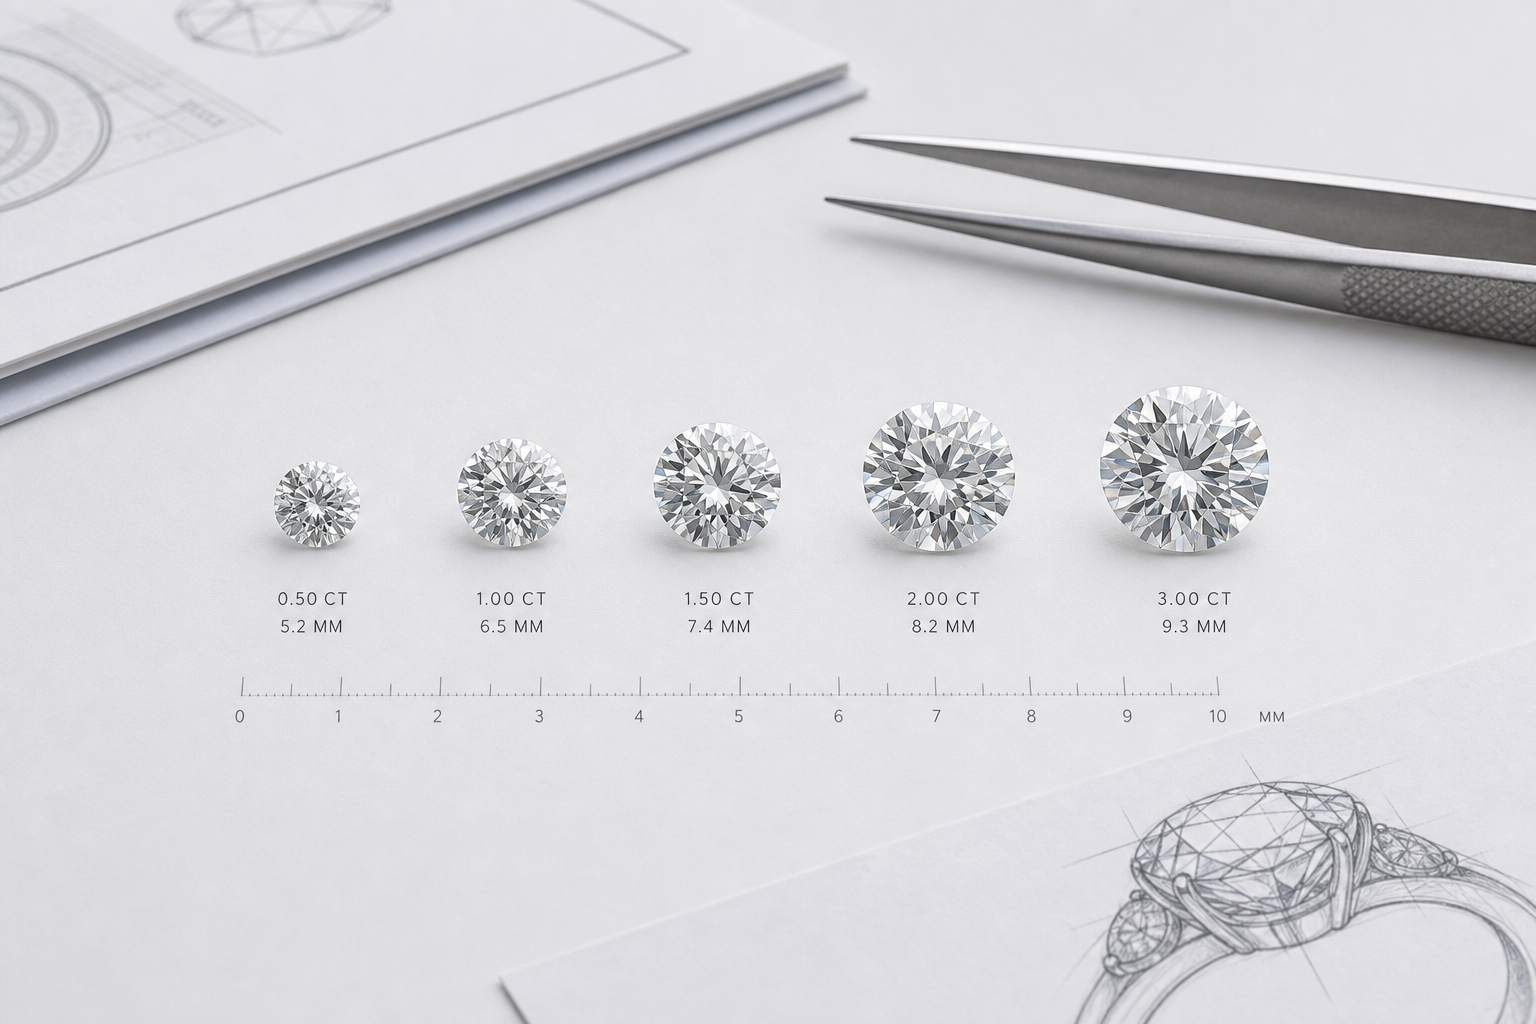
Approximate Round Diamond Size Benchmarks by Carat
Round brilliant diamonds are useful for comparison because their measurements are relatively consistent when proportions are well balanced. The following benchmarks should be treated as practical approximations, not fixed standards, because actual diameter depends on cut and proportions:
0.50ct round diamond: around 5.1mm in diameter
1.00ct round diamond: around 6.4mm to 6.5mm in diameter
1.50ct round diamond: around 7.3mm to 7.4mm in diameter
2.00ct round diamond: around 8.0mm to 8.2mm in diameter
3.00ct round diamond: around 9.2mm to 9.4mm in diameter
These numbers show why carat weight can feel misleading. A 2ct round diamond weighs twice as much as a 1ct round diamond, but it is not twice the diameter. The visual increase is meaningful, but it is not proportional to the weight increase. That gap between weight and visible spread is one reason milestone pricing deserves careful comparison.
Because these diameter figures are approximate, they should be used as a screening tool rather than a buying rule. If a listed round diamond falls noticeably outside the expected range for its carat weight, that does not automatically make it bad, but it does deserve closer review. A smaller-than-expected diameter may indicate weight carried in depth, while an unusually wide spread may require closer inspection for shallow proportions or weaker light return.
Why a Higher Carat Weight Can Still Face Up Smaller Than Expected
A heavier diamond can face up smaller if too much of its weight is hidden in depth, which is one reason a 1 carat diamond price guide should consider cut proportions as well as carat weight. An overly deep stone may carry carat weight below the girdle, where it does not add much visible size from the top. An overly shallow stone may spread wider, but it can lose brightness or show weaker light performance if the proportions are not working well.
This is where buyers need to avoid chasing spread at any cost. A diamond that looks large for its weight is not automatically a better value if it sacrifices sparkle, contrast, or overall balance. The strongest choice is usually a stone that combines healthy face-up measurements with cut quality that supports visual performance.
Grading Report and Visual Review Check
A grading report can help confirm the carat weight, measurements, proportions, color, clarity, and other listed characteristics. It is a necessary starting point, but it does not fully show how the diamond will look in motion, in different lighting, or in the intended setting.
A grading report helps document key characteristics, but it should not be treated as a guarantee of beauty, value, or sourcing ethics. Before paying more for a milestone carat size, compare the report measurements with the visual evidence. Look at the diameter or length and width, review the proportions, and use images or video when available. If a lower-carat stone offers similar face-up size and better visual performance, the smaller number may be the stronger buy.
For buyers, the practical point is not just what the report says, but how the stone performs visually and fits the intended design. A report can confirm that a diamond weighs 2.00ct, but it cannot prove that the extra weight is visible from the top or that the stone is the right match for a particular ring. This is why measurement review is especially important before paying a threshold premium.
When a grading report is available, buyers should verify the report details through the issuing laboratory’s official report-check tool where available, then compare those details with the stone’s measurements and visual media.
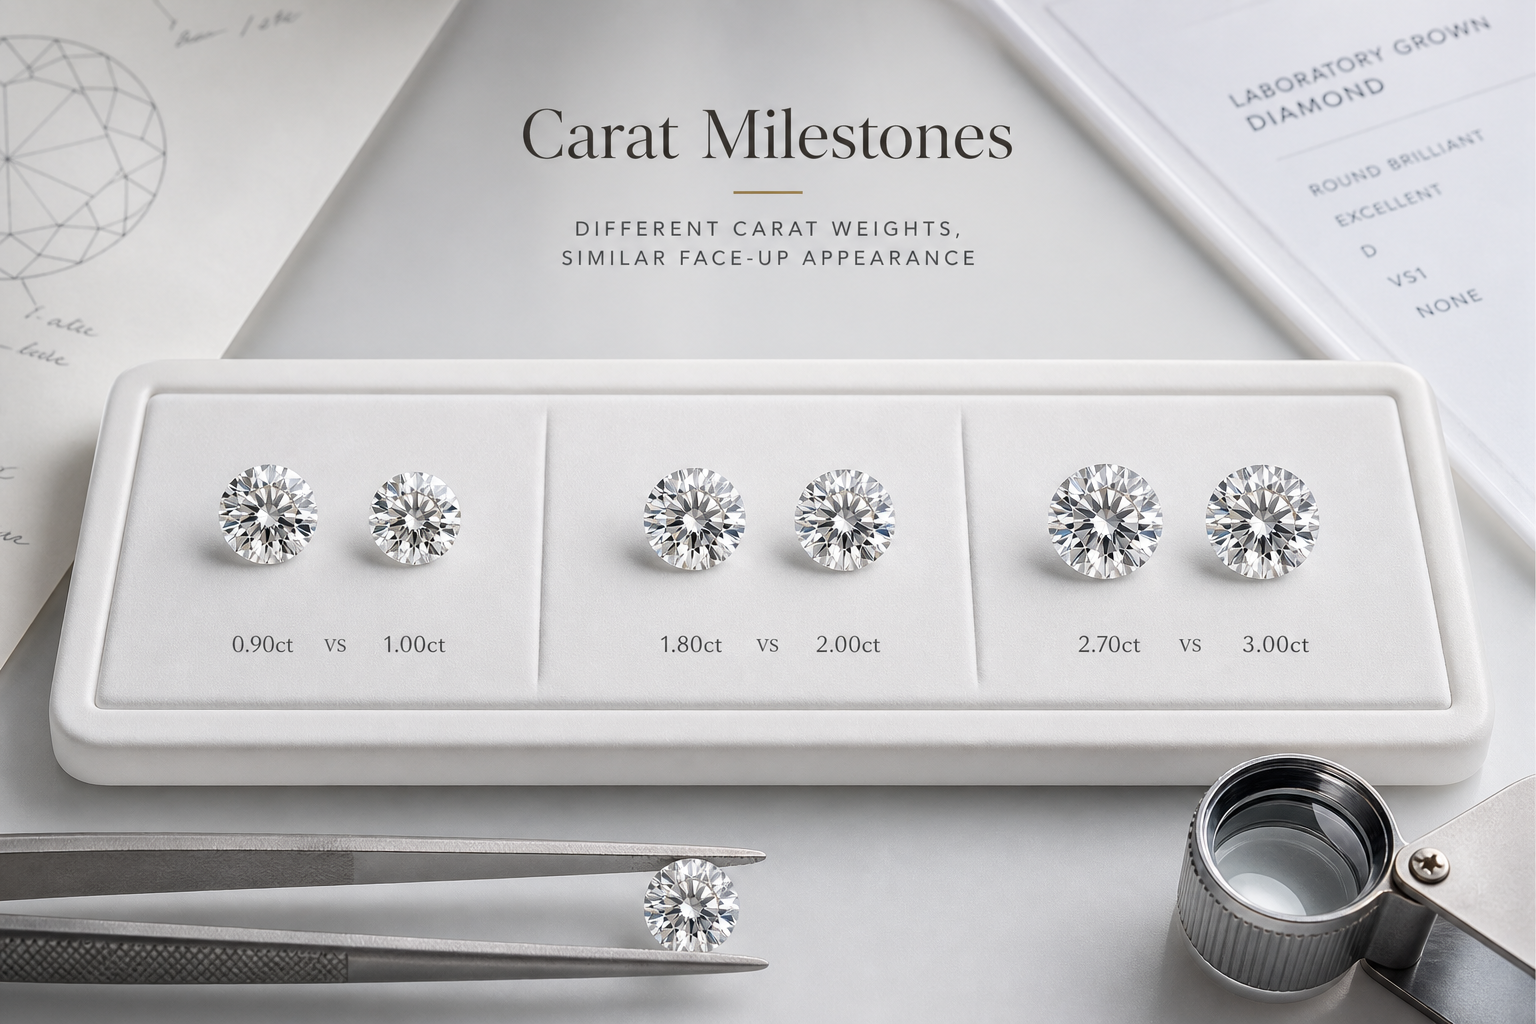
Near-Size Alternatives: When 0.90ct Looks Close to 1.00ct
Near carat diamond sizes are often where buyers find the most practical value. A diamond just below a popular milestone can look very close to the milestone size once it is set, especially if the stone has strong measurements, good proportions, and strong light performance. The tradeoff is psychological: the grading report may not say “1.00 carat” or “2.00 carats,” even if the finished ring gives nearly the same visual impression.
This strategy works best when the buyer is comparing actual stones, not just filtering by carat weight. A poorly cut 0.98ct diamond may not be a better choice than a well-cut 1.00ct stone. A well-proportioned 0.94ct round, however, can sometimes face up close enough to a 1.00ct option that the visible difference is hard to justify if the milestone stone is carrying extra price pressure.
Smart Ranges to Compare Below Each Milestone
The most useful near-size ranges usually sit just below the carat points many buyers search for first. For a buyer considering a 1ct diamond, the 0.90 to 0.99ct range is worth reviewing. For a 1.5ct target, compare 1.35 to 1.49ct stones. For a 2ct look, do not skip 1.70 to 1.99ct options. For a 3ct target, the 2.70 to 2.99ct range can be especially relevant because price sensitivity often becomes stronger as the stone gets larger.
The best range depends on how much visible difference the buyer is willing to accept. A 0.90ct stone may be meaningfully below a full 1ct on paper, while a 0.97ct stone may feel almost identical in many ring designs. Near 2ct, a 1.80ct stone may still have strong presence, but a 1.95ct stone can be much closer to the milestone look. The closer the stone is to the threshold, the less the carat label alone should drive the decision.
The mistake is assuming every just-below diamond is automatically a better value diamond size. It is only a better value if the measurements, cut quality, color, clarity, and shape support the choice. If the stone is deep and faces up small, the lower carat weight may not deliver the visual value the buyer expected.
0.90ct vs 1.00ct: The Classic Near-Size Example
The 0.90 vs 1.00 carat diamond comparison is the clearest example of milestone pricing. Many buyers begin by searching for “1 carat” because it feels complete, familiar, and easy to compare. That demand can put extra pressure on 1.00ct stones, even when a well-selected under 1 carat diamond looks very similar once mounted in a ring.
Consider a buyer looking for a round lab-grown diamond for a simple solitaire. Several 1.00ct stones meet the basic grade target, but one 0.94ct option has a strong diameter, better cut proportions, and a more attractive price than the available 1.00ct choices. In that situation, the smarter decision may be the 0.94ct stone, not because it is smaller, but because it allocates value toward what the eye actually sees: brightness, spread, and balance.
The tradeoff is real. Some buyers want the clean satisfaction of saying the diamond is one full carat, and that can matter emotionally. But if the priority is visual value, a near-size lab-grown diamond below the milestone can make more sense than paying extra for a number that may not create a noticeable difference on the hand.
1.80ct vs 2.00ct and 2.70ct vs 3.00ct: Larger Stones, Larger Price Sensitivity
Near-size comparisons become even more important as diamonds get larger. A buyer asking whether a 1.8 carat diamond is close to 2 carat should look first at measurements and shape, not just the 0.20ct difference. In many cases, a well-cut 1.80ct to 1.95ct stone can deliver a substantial center-stone look without needing to cross the 2.00ct line.
The same logic applies to 2.70ct through 2.99ct diamonds compared with 3.00ct stones. At this size, the milestone label can carry more weight in the buying process, but the finished ring may not reward the extra spend if the 3ct stone has weaker proportions, visible cut issues, or a shape that does not suit the setting. Larger diamonds also make flaws in proportion, transparency, and shape balance easier to notice.
For buyers who want maximum presence, crossing the milestone may still be the right move. A 2.00ct or 3.00ct diamond can be satisfying if the stone is well cut and fits the design. The warning is not to treat the milestone as the goal by itself. A larger number with weaker visual performance is usually a poor trade.
What to Check Before You Decide
Before choosing a near-size alternative, compare the millimeter measurements, not only the carat weight. For round diamonds, diameter gives a quick sense of face-up spread. For ovals, emerald cuts, pears, and other fancy shapes, length, width, and length-to-width ratio matter more because two stones with the same carat weight can look noticeably different on the finger.
Review the cut and proportions carefully. A just-under-milestone diamond should not be chosen simply because it is cheaper. It should earn the choice by offering a strong visual profile: good spread, attractive brightness, balanced shape, and no obvious proportion penalty. If a near-size stone only saves money because it faces up small or performs poorly, the buyer has not gained value.
The practical rule is simple: buy below the milestone when the visual difference is minor and the quality or price advantage is meaningful. Buy the milestone when the number matters to the wearer, the stone is visually stronger, or the near-size alternatives require too much compromise.
How Shape Changes the Price and Size Equation
Carat thresholds do not look the same across every diamond shape. A 2ct round lab-grown diamond, a 2ct oval lab-grown diamond, a 2ct emerald cut lab-grown diamond, and a 2ct cushion cut lab-grown diamond can all carry the same weight on paper but create different impressions on the hand. This is why lab-grown diamond price by shape matters when interpreting carat value.
The main issue is face-up size by shape. Some shapes distribute weight in a way that makes them appear larger from the top, while others hold more weight in depth or have softer outlines that reduce the visual spread. A buyer who only compares carat weight may pay for size that is not fully visible in the finished ring.
Why Round Diamonds Are Easy to Compare but Often Highly Demanded
Round diamonds are the easiest shape to compare because their diameter expectations are more standardized. If two round brilliant diamonds have similar carat weight but one has a noticeably smaller diameter, that is a warning sign that the stone may be carrying extra weight in depth. This makes round diamonds useful for clean carat-to-measurement comparisons.
The downside is demand. Round diamonds remain one of the most searched and widely purchased shapes, especially around milestone carat sizes. That demand can make clean round numbers feel more competitive than similar near-size alternatives. A buyer who wants a round stone should compare diameter, cut grade, proportions, and visual performance before assuming the milestone stone is the better choice.
Why Ovals, Pears, and Emerald Cuts Can Look Larger Face-Up
Elongated diamond shapes often look larger for their carat weight because the eye reads length strongly. Ovals, pears, marquise cuts, and many emerald cuts can create more finger coverage than a round diamond of the same weight. For a buyer trying to maximize visual presence, these shapes may be worth comparing before moving up to the next carat threshold.
The tradeoff is that elongated shapes are less forgiving. Ovals and pears can show bow-tie effects if the cut is not well balanced. Emerald cuts can look elegant and broad, but their step-cut faceting makes transparency, clarity, and windowing more obvious. A shape that looks larger but has distracting optical issues is not a value upgrade.
Length-to-width ratio also changes the impression. A longer oval may look larger and slimmer, while a shorter oval may feel fuller and closer to a round outline. Neither is automatically better. The right choice depends on the wearer’s hand, the setting style, and whether the buyer wants length, width, or balanced presence.
Why Cushions and Fancy Shapes Need Measurement Review
Cushion cuts need more scrutiny than many buyers expect. Two cushion cut lab-grown diamonds with the same carat weight can look quite different because cushion proportions vary widely. Some are square and compact, some are elongated, and some carry more depth that reduces face-up spread. A 2ct cushion may not always look as large as a buyer imagines from the carat number alone.
Fancy shapes also create different pricing patterns because demand, cutting yield, and visual preference vary by shape. A suitable lab-grown diamond shape for value is not the one that is cheapest per carat; it is the one that gives the desired look without introducing problems the buyer cannot ignore. A low-priced fancy shape with poor symmetry, awkward proportions, or visible transparency issues is usually not the better buy.
Stone-to-Setting Fit Check
Shape should be judged with the setting in mind. An elongated diamond may look impressive in a solitaire but require careful prong placement to protect the tips or ends. An emerald cut may need a setting that keeps the stone secure without overwhelming its clean lines. A cushion may look more substantial in one setting and softer or smaller in another.
Before choosing a shape to avoid a carat threshold, check the actual length, width, depth, and how the outline will sit in the intended ring. The better decision is not always the shape that looks largest loose. It is the shape that delivers the right visual size once it is set and worn.
For custom design, the stone cannot be evaluated separately from the setting. A long oval, for example, may need a different prong layout than a round diamond of the same carat weight, and an emerald cut may need enough open space for its step-cut outline to look intentional. When the design is being made around a specific stone, measurements and shape balance often matter more than reaching the next round-number carat size.
Why Cut Quality Can Matter More Than Reaching the Next Carat Threshold
Chasing the next carat threshold can lead buyers into the wrong compromise. If two diamonds are close in visible size, diamond cut quality often has more impact than the extra weight. A brighter, better-proportioned stone can look more lively and more valuable than a heavier stone that leaks light or faces up poorly.
This matters most near popular milestones. A buyer may be tempted to choose a 1.00ct, 2.00ct, or 3.00ct diamond because the number feels better, even when a slightly smaller option has stronger visual performance. In practical terms, lab-grown diamond value improves when the stone looks better in real viewing conditions, not when the grading report simply shows a rounder carat number.
Bigger Is Not Always Brighter
Carat weight does not create sparkle. Sparkle comes from how well the diamond is cut to return light to the eye. A larger stone with weak proportions can look dull, glassy, dark in the center, or uneven across the face. A smaller stone with stronger light performance can look more crisp and attractive, even if it gives up a little weight on paper.
This is where buyers often overpay for size. If the upgrade from 1.85ct to 2.00ct comes with weaker cut quality, the visible benefit may be smaller than expected. The stone is heavier, but not necessarily more beautiful. That tradeoff becomes unacceptable when the buyer is paying a threshold premium and sacrificing the feature that most affects how the diamond actually performs.
How Cut Can Affect Face-Up Size and Sparkle
Cut affects both brightness and apparent size. A diamond that is too deep can carry weight below the girdle, making it look smaller from the top than its carat weight suggests. A stone that is too shallow may show spread, but it can lose light performance if the proportions are not balanced. The goal is not the largest measurement at any cost; it is a strong combination of spread, brightness, and pattern.
For round brilliant diamonds, buyers often compare table percentage, depth percentage, crown angle, pavilion angle, diameter, symmetry, and polish. These details should not be treated as a rigid checklist in isolation, but they help explain why two diamonds with the same carat weight can look different. For fancy shapes, measurements, outline, facet pattern, and video review become especially important because the grading report may not reduce cut quality to a simple score.
When a Smaller Better-Cut Stone Is the Smarter Choice
A smaller better-cut stone is usually the smarter choice when the size difference is modest but the visual performance difference is obvious. If a 1.42ct diamond looks bright, balanced, and well spread, it may be more satisfying than a 1.50ct stone that looks dark or poorly proportioned. The same logic applies near 2ct and 3ct, where buyers may pay more for the milestone while accepting compromises that are easier to see in a larger diamond.
The recommendation changes when the larger stone is also well cut and the buyer strongly values the milestone size. In that case, paying more may be reasonable. But if the larger stone wins only by carat weight, the buyer should pause. A diamond that looks weaker every day is not improved by a better number on the report.
Grading Report and Visual Review Check
A grading report is useful because it confirms the stated carat weight, measurements, color, clarity, and other identifying details. It also helps narrow the comparison field. It does not fully show how the diamond behaves in motion, how bright it looks across the face, or how well its proportions work with the intended setting.
At NUVU, we treat the grading report as a starting point for comparison, not the final decision. For threshold sizes especially, the better approach is to compare the report, images or video, measurements, and overall visual impression together. The diamond worth choosing is the one that performs well in the finished piece, not simply the one that reaches the next carat line.
How Color, Clarity, and Certification Affect Carat-Based Pricing
Carat weight may be the most visible price driver, but it is not the only reason two stones with the same size label can cost different amounts. A 2ct lab-grown diamond with stronger color, cleaner clarity, better cut, and a detailed lab-grown diamond grading report may sit in a different price bracket than a 2ct stone with more visible tradeoffs. The carat number gets the buyer’s attention; the supporting grades explain why the price is where it is.
This matters most around milestone sizes because buyers often compare stones too quickly. A lower-priced 2.00ct option may look attractive next to other 2ct diamonds, but the discount may come from a warmer diamond color grade, lower clarity, weaker proportions, less desirable shape demand, or a less complete visual presentation. Lower price is not automatically better value if the stone gives up something the buyer will notice every day.
Why Two 2ct Lab-Grown Diamonds Can Have Different Prices
Two lab-grown diamonds with grading reports can both weigh 2.00ct and still be very different products. One may be near-colorless, eye-clean, well cut, and supported by an IGI report or GIA report. Another may share the same carat weight but have a lower color grade, inclusions that are easier to see, or proportions that make it look less lively. The size is the same on paper, but the buying experience is not the same.
The biggest mistake is treating carat as the final answer. Carat sets the category; color, clarity, cut, shape, grading, and seller channel set the context. If a diamond is priced well below similar stones at the same milestone size, the right question is not “Why is this such a deal?” It is “What tradeoff is creating that price?” Sometimes the tradeoff is acceptable. Sometimes it is exactly what will bother you later.
Color and Clarity Tradeoffs Around Larger Sizes
Color and clarity become more important as diamonds get larger because there is more surface area for the eye to examine. A clarity grade that looks completely fine in a smaller brilliant-cut diamond may be more noticeable in a larger stone, especially if the inclusion sits near the center. A warmer color grade can also become easier to detect as carat weight increases, particularly in shapes with broad, open facets.
For many buyers, the smartest target is not the highest possible grade. It is a diamond that appears near-colorless in the chosen setting and eye-clean in normal viewing conditions. Paying heavily for grades that cannot be seen may be less useful than putting that budget toward better cut, a stronger face-up size, or a setting that suits the stone. The exception is when the shape is less forgiving. Emerald cuts, Asscher cuts, and some elongated shapes tend to reveal body color and clarity characteristics more clearly than round, oval, or cushion brilliant styles.
This is where same-carat comparisons need judgment. A 2ct round brilliant may allow more flexibility on clarity than a 2ct emerald cut. A larger elongated diamond may need closer review for both color concentration and inclusion placement. The grade matters, but the shape determines how much the grade will show.
What a Grading Report Can and Cannot Tell You
A lab-grown diamond grading report helps confirm the stated characteristics of the stone, including carat weight, measurements, color grade, clarity grade, and cut details where applicable, which are key inputs in any lab-grown diamond price guide, along with identifying information. Reports from grading organizations such as IGI or GIA are useful because they give buyers a shared reference point instead of relying only on a seller’s description.
The report does not tell the whole story. It cannot fully show how bright the diamond looks in motion, whether a particular inclusion catches your eye, how the stone appears in different lighting, or how well it fits a specific ring design. It also does not make a diamond automatically desirable just because the grades look strong. A grading report is a filter, not a substitute for visual review.
At NUVU, we usually treat the grading report as the starting point for comparison, not the final decision. The report narrows the field, but video, measurements, proportions, and setting compatibility are what help determine whether the diamond is actually the right buy.
It is also worth separating documentation from marketing language. A grading report can support the identity and measured characteristics of a lab-grown diamond, but broader claims about sustainability, origin, or production practices should be backed by clear seller documentation rather than assumed from the word “lab-grown.” Lab-grown diamonds can offer a different sourcing path, but buyers should still ask what can actually be verified for the specific stone or supplier.
Documentation Boundary for Lab-Grown Diamond Claims
When comparing lab-grown diamonds by carat, be careful not to let one verified detail stand in for another. A report can document graded characteristics, but it should not be stretched into proof of environmental impact, supplier practices, resale value, or future price behavior. Those are separate claims and would need separate support. This matters because buyers often see strong marketing language beside the carat weight, and not every claim has the same kind of evidence behind it.
A good seller should be able to separate measured facts from practical opinion. “This diamond weighs 1.92ct and has these measurements” is different from “this diamond is the best value.” The first statement can be checked against documentation; the second depends on comparison, visual preference, budget, and setting goals. Keeping those categories separate makes the buying decision more transparent.
How to Verify This Before Buying
Before choosing between same-carat diamonds, compare the grading report details against the actual visual presentation. Check the measurements, not only the carat weight. Review the color and clarity in relation to the shape. Look for images or video when available, especially for larger stones and step cuts. If one diamond is much cheaper than others with similar size and grades, slow down and identify the reason before assuming it is better value.
A practical verification process should answer four questions: does the diamond face up well for its carat weight, does it look clean to the eye, does the color suit the metal and setting, and is the grading report consistent with the seller’s description? If the answer is unclear, the safer move is to compare another stone rather than force the purchase around the carat number.
How Setting Choice Changes the Real Cost of a Larger Diamond
The loose diamond price is only part of the real lab-grown diamond ring cost. Once the stone becomes larger, the setting has to support more visual weight and physical presence. A diamond that looks like a strong value as a loose stone may require a more carefully built setting, different prong placement, a wider band, or a lower-profile design to feel secure and wearable.
This is especially relevant when comparing milestone sizes. Moving from a near-size diamond to a clean-number stone may change more than the center stone cost. It can change the ring proportions, the setting style that looks balanced, and how practical the finished piece feels for daily wear.
Why the Loose Stone Price Is Only Part of the Budget
A buyer comparing a 1.80ct and a 2.00ct diamond may focus on the loose stone difference, but the finished ring may widen that gap. A larger center stone can call for stronger prongs, a different basket, a more balanced band width, or design changes that keep the ring from feeling top-heavy. Those choices may not be dramatic individually, but they affect the total engagement ring budget.
The setting also changes perceived value. A well-proportioned ring with a slightly smaller diamond can look more intentional than a larger stone placed into a setting that was not designed around its measurements. A suitable setting for a 2 carat lab-grown diamond is not simply the one that holds it; it is the one that keeps the stone secure, visually balanced, and comfortable enough for the wearer’s lifestyle.
How Larger Stones Affect Setting Proportions and Wearability
As center stones get larger, height and security become more important. A 3ct diamond may have strong presence, but if it sits too high, it can catch on clothing, feel exposed, or look less integrated with the band. A low-profile setting can improve wearability, but it still needs enough structure to protect the stone and allow the shape to be seen properly.
Band width is another common tradeoff. A very thin band can make a diamond look larger by contrast, but it may not always be the right match for a heavier center stone. A slightly wider or more structured band can make the ring feel more balanced, even if it reduces the illusion of maximum size. For elongated shapes such as oval, pear, marquise, and emerald cuts, orientation and prong placement matter because the tips, corners, and length-to-width ratio all affect how secure and elegant the final ring appears.
When a Setting Can Make a Smaller Stone Look More Substantial
A smaller or near-size diamond can gain presence from the right setting. A 0.90ct or 1.00ct center stone may look more substantial on a slim band because the contrast emphasizes the diamond. A halo or hidden halo can also increase the visual footprint, though the effect is different: a traditional halo changes the outline of the ring, while a hidden halo adds detail from the side without making the top view look as much larger.
This does not mean every buyer should use a halo to compensate for carat size. If the goal is a clean solitaire look, adding more metal or accent stones may work against the design. The better judgment is to choose the setting that supports the wearer’s style first, then decide whether the center diamond needs to be larger. Sometimes a 1.5ct diamond in the right setting looks more balanced than a 2ct diamond in a design that feels oversized for the hand.
Stone-to-Setting Fit Check
Before committing to a larger center stone, check how its measurements work with the setting, not just whether the carat weight sounds right. Review the length, width, depth, prong positions, band width, and setting height. A diamond that looks ideal loose can feel too tall, too wide, or too exposed once mounted.
For custom jewelry, our team looks at the stone and setting together because the finished piece has to work as one object. A beautiful diamond still needs the right physical fit, especially when the buyer is choosing between a milestone size and a near-size alternative.
Custom Design Fit: What Should Be Confirmed Early
For custom design, trust comes from confirming practical fit before the stone is treated as final. The diamond’s length, width, depth, girdle condition, corner or tip shape, and setting style should be reviewed together. This is especially important for elongated ovals, pears, marquise cuts, emerald cuts, and larger stones, where small measurement differences can change prong placement, ring height, and finger coverage.
A buyer should also confirm whether the intended design supports the way the ring will be worn. A higher setting may emphasize the diamond but feel less practical for daily use. A very slim band may make the stone look larger but may not give the same visual balance as a more structured design. These are not certificate questions; they are design-fit questions, and they should be discussed before the purchase is finalized.
For custom jewelry, stone measurements and setting compatibility should be confirmed before finalizing a purchase. This is especially important when a buyer chooses a near-size stone to avoid a threshold premium, because the stone still needs to meet the physical and visual requirements of the intended design.
A Smarter Way to Choose Your Lab-Grown Diamond Carat Range
The right lab-grown diamond carat size is not always the largest number that fits the budget. A smarter approach is to choose a diamond size range based on the finished look, then compare stones inside and around that range. This keeps the decision focused on visual value instead of chasing a milestone that may cost more than it adds to the ring.
If the priority is symbolic, a clean milestone such as 1ct, 1.5ct, 2ct, or 3ct may be worth paying for. If the priority is visual value, near-size options often deserve a serious look. If the priority is maximum presence, shape and setting may matter nearly as much as carat weight. If the priority is daily wearability, size, height, and comfort should carry more weight than the number on the report.
Start With the Look You Want, Not the Number First
Begin with the visual goal: subtle, classic, noticeable, or statement-making. A buyer who wants an understated everyday ring may not need to stretch from 1.5ct to 2ct, even if the budget allows it. A buyer who wants strong finger coverage may be better served by comparing elongated shapes, measurements, and setting style rather than only moving to the next carat threshold.
This order matters because carat weight can distract from the actual result. A 2ct diamond that faces up small, sits awkwardly, or sacrifices cut quality is not automatically a better choice than a well-selected 1.8ct diamond. The question should be, “Which stone creates the look I want in the finished ring?” not “Which one has the rounder carat label?”
Compare Near-Size Options Before Committing to a Milestone
Before buying a milestone stone, compare the near-size range below it. Look at 0.90ct to 0.99ct before choosing 1.00ct, 1.35ct to 1.49ct before choosing 1.50ct, 1.70ct to 1.99ct before choosing 2.00ct, and 2.70ct to 2.99ct before choosing 3.00ct. The goal is not to avoid milestones at all costs. The goal is to make sure the milestone is earning its price.
The better option depends on measurements, cut quality, and how the diamond looks in the chosen shape. If the near-size stone has similar face-up spread and stronger visual performance, it may be the better buy. If the milestone stone has better proportions, a cleaner appearance, and a more satisfying finished presence, paying more may be reasonable.
Balance Carat, Cut, Shape, Grading Report, and Setting
A strong carat weight decision brings several factors together. Carat sets the size category, cut affects brightness and face-up impression, shape changes visual spread, the grading report supports the stated grades, and the setting determines how the diamond actually wears. Overweighting any one factor can create a lopsided purchase.
For most buyers, cut and measurements should be prioritized before paying extra for a threshold label. Color and clarity should be judged by visibility, not only by grade prestige. A grading report should confirm what is being sold, but it should not replace images, video, and setting review. The finished ring is what the wearer sees, not the search filter used to find the diamond.
Buyer Verification Checklist
- Define the intended look first. Decide whether the ring should feel subtle, classic, bold, or statement-sized before choosing a carat target.
- Compare just-below milestone sizes. Review near-size diamonds before assuming a round number is worth the price jump.
- Check measurements. Face-up size depends on length, width, and diameter, not carat weight alone.
- Review cut and visual performance. A brighter, better-proportioned stone can outperform a heavier one.
- Match color and clarity to the shape. Step cuts and larger stones usually need closer review than more forgiving brilliant cuts.
- Use the grading report as confirmation. An IGI report, GIA report, or other diamond grading document helps document characteristics, but it should not be the only basis for the decision.
- Consider the total ring cost. Setting style, band width, prong structure, and wearability can change the real budget.
The right carat range is the one that gives the finished piece the strongest mix of appearance, quality, comfort, and cost control. A milestone number can be satisfying, but it should not be allowed to override what the diamond actually looks like and how the ring will be worn.
How NUVU Supports a Certificate-Aware Selection Process
When a buyer is choosing between a milestone carat weight and a near-size alternative, the most helpful support is not pressure toward the larger stone. It is a clear comparison of what can be documented, what can be seen, and what will matter in the finished jewelry. For that reason, NUVU’s selection process places the grading report, millimeter measurements, visual media, and setting requirements in the same conversation rather than treating carat weight as the only priority.
For example, if a buyer is deciding between a 1.95ct and a 2.00ct lab-grown diamond, the comparison should identify whether the 2.00ct stone actually faces up larger, whether both diamonds have comparable color and clarity appearance, and whether either stone creates a better fit for the intended setting. This type of review can help buyers avoid paying for a threshold label when the practical benefit is limited, while still respecting the fact that some buyers genuinely prefer the emotional clarity of a full milestone size.
When a grading report is provided, buyers should compare the report details with the issuing laboratory’s verification tools where available. Report verification supports the listed specifications, but it should still be paired with visual review, measurement review, and setting-fit discussion.
Documentation, Communication, and After-Purchase Confidence
A trustworthy buying process should make it easy to understand what is included with the diamond and what is still a matter of personal preference. The grading report can confirm the listed characteristics, but the buyer should also be able to ask how a stone compares visually with another option, whether its measurements are appropriate for the setting, and whether the final design will be comfortable for regular wear. Clear answers to these questions are often more useful than simply recommending the heaviest stone within budget.
This is especially important for custom jewelry and wholesale selection, where consistency and communication matter as much as the individual diamond. Matching the right carat range to the right setting reduces avoidable revisions, helps maintain design balance, and gives buyers or retail partners a clearer basis for explaining the finished piece. A careful process does not remove every subjective choice, but it does make the tradeoffs visible before the order is finalized.
For NUVU, the buyer-first goal is to make diamond comparison easier to understand: what the report shows, what the visuals reveal, and whether the stone fits the intended piece. That is different from treating the grading report as a promise that every buyer will prefer the same stone. Two buyers can look at the same 2ct lab-grown diamond and make different choices because one values the milestone size while the other values a lower profile, a different shape, or a near-size stone with stronger proportions.
Wholesale and Custom Selection: What Documentation Should Clarify
In wholesale, private-label, or custom sourcing conversations, documentation and communication often matter as much as the headline specification. A buyer comparing multiple stones should ask how stones are matched, which grading documents or identifying details are available, how visual differences are communicated, and what standards are being used when several diamonds need to look consistent in a finished collection.
This does not require inflated claims. It requires clear language. For example, a wholesale buyer may need to know whether a parcel is being matched by carat range, measurement range, color and clarity target, shape outline, or visual appearance. A custom buyer may need to know whether the selected stone’s depth and outline will work with a planned setting. The more specific the communication is before selection, the easier it is to trace why a particular diamond was chosen.
Buyers should also be cautious with broad sustainability or ethics language attached to lab-grown diamonds. Lab-grown origin is one important fact, but claims about environmental impact, energy use, production practices, or sourcing responsibility should be specific and documented. Responsible language is more useful than broad promises because it tells the buyer what can actually be checked.
Compliance-Aware Buying Boundaries for Price Comparisons
Price comparisons are most useful when they compare like with like. A 1.90ct lab-grown diamond and a 2.00ct lab-grown diamond may seem close, but the comparison is incomplete unless shape, measurements, cut-related details, color, clarity, report type, visual media, and setting requirements are reviewed together. A lower listed price does not, by itself, prove better value; it only creates a reason to ask what tradeoff is present.
Environmental and sustainability claims should be specific, documented, and limited to what can be substantiated. A laboratory-grown origin may appeal to buyers who prefer an alternative to mined origin, but it should not be used as a blanket substitute for evidence about production practices, energy use, or sourcing responsibility. If these factors matter to the purchase, ask for documentation that speaks directly to the claim being made.
Buyer guidance should also stay separate from seller policies. Before purchase, buyers should confirm documentation, return terms, resizing policies, service support, and any other after-sale terms directly with the seller. Unless those policies are provided in writing by the seller, they should not be assumed from the fact that a diamond has a grading report or from the fact that it is laboratory-grown.
Key Takeaways on Lab-Grown Diamond Price by Carat
Milestone Sizes Matter, but They Are Not the Whole Value Story
Lab-grown diamond price by carat often changes unevenly because buyers concentrate around milestone carat sizes such as 1ct, 1.5ct, 2ct, and 3ct. Those numbers matter in the market, but they do not always create the same level of visible difference on the hand.
The mistake is assuming the cleaner number is automatically the better diamond. A stone that crosses a carat threshold may cost more because it fits a popular search category, not because it delivers a proportional improvement in beauty, spread, or wearability.
Near-Size Diamonds Can Offer Strong Visual Value
A near-size diamond can be a better value when it gives the same general visual impression without carrying as much threshold-driven price pressure. The strongest comparison is not “just under” versus “exactly at” by weight alone; it is actual measurements, face-up appearance, cut quality, and how the stone looks in the intended setting.
For buyers trying to avoid overpaying for diamond carat size, the practical move is to compare the milestone stone against nearby alternatives before deciding. If the visual size difference is small but the price gap is meaningful, the near-size option deserves serious consideration.
The Better Choice Depends on Measurements, Cut, Shape, and Setting
Carat weight should guide the search, not control the entire decision. Measurements show how large the diamond will appear, cut affects brightness and visual performance, shape changes perceived size, and the setting determines how the stone works in the finished ring or piece of jewelry.
Strong lab-grown diamond value usually comes from choosing the stone that performs well visually and financially for the complete design. A rounder carat number may feel satisfying, but the better purchase is the diamond that looks right, wears well, and keeps the total piece in balance.
Disclosure: This article is for general educational purposes only. Diamond grading, pricing, availability, specifications, and seller policies can change, and readers should verify important details through grading reports, official laboratory tools, seller documentation, or qualified professionals before making a purchase decision. Laboratory-grown diamonds should be clearly distinguished from natural diamonds, and environmental or sourcing claims should be supported by specific documentation.