
The CAD file you approve is the final engineering blueprint for your custom lab-grown diamond jewelry—once the design is cast in metal, fixing a structural flaw is expensive and time-consuming. Yet many buyers approve a CAD after only a quick glance at the face-up view, missing critical details that affect durability, comfort, and long-term wear. This article walks through the specific measurements, views, and design elements—as detailed in the custom lab-grown diamond necklace guide—you must check before giving the go-ahead, from band thickness and stone height to prong coverage and shank reinforcement. The goal is to help you separate aesthetic preferences from structural dealbreakers, so you approve a design that actually works in daily life.
For the full framework, read Custom Lab-Grown Diamond Jewelry Guide.
| What to Check | Minimum Standard | Why It Matters |
|---|---|---|
| Band thickness | 1.5–1.6 mm | Thinner bands bend or break under normal wear. |
| Band width (3+ carat stone) | 2.2–2.5 mm | Narrow bands cause the ring to spin and the stone to wobble. |
| Stone height (daily wear) | 5–6.5 mm | Stones above 7 mm catch on clothing and bump into surfaces. |
| Shank bottom thickness | 1.8 mm | Thinner shanks crack over time from repeated bending. |
| Prong corner coverage (square stones) | Full corner wrap | Exposed corners chip easily and weaken stone security. |
| Pavé channel thinness | 1.2 mm minimum | Overly thin channels crack or lose accent stones during resizing. |
Quick Questions Before You Read
Q: Can I rely on the jeweler’s photos alone to approve the CAD?
No. Photos can hide perspective issues and missing measurements. Always require a labeled view showing exact widths, thicknesses, and stone heights.
Q: What is the most common mistake buyers make when approving a CAD?
Approving based only on the top-down face view. The side profile reveals prong depth, cathedral reinforcement, and whether the setting will actually hold the stone securely.
Q: Do I really need a 3D resin print before final approval?
For non-standard designs or if you are unsure about fit, yes. A resin model lets you test comfort on your finger and spot proportion issues that even careful screen review misses.
Q: Can I change the design after I approve the CAD?
Technically yes, but the jeweler must reopen the file and redo the render, which adds cost and delays. Treat approval as final unless you are prepared for those charges.
Why the CAD Is the Most Important Checkpoint in Custom Jewelry
The CAD file is the single most consequential document in the entire custom jewelry process. It is not a preview, a suggestion, or an artist’s sketch. It is the dimensional blueprint that will determine exactly how your ring is built. Approving a CAD without verifying the right details is the most expensive mistake a buyer can make, because after the metal is cast, almost nothing is cheap or easy to fix.
How a CAD Rendering Becomes a Physical Ring
The CAD file is converted into a physical wax model through 3D printing or CNC milling. That wax model is then invested in plaster and burned out, leaving a cavity that is filled with molten metal. Every millimeter specified in the CAD becomes a fixed, permanent dimension in the final piece. There is no “we’ll adjust it during casting.” If the band thickness is 1.2 mm in the file, the ring will have a 1.2 mm band. If the stone sits 8 mm above the finger in the file, that is where it will sit. Changes after casting require cutting the ring apart, rewelding sections, or scrapping the piece entirely and starting over. The CAD is not an early draft. It is the final engineering document before production begins.
The Difference Between “Looks Nice” and “Fits Correctly”
A CAD rendering is a perfectly lit, idealized preview. The software smooths surfaces, removes casting texture, and shows the stone at its most flattering angle. What looks balanced on screen may sit awkwardly on a finger, catch on clothing, or feel noticeably heavy after an hour of wear. The approval process should focus on structural and wearable parameters, not screen aesthetics. A ring that looks beautiful in a 3D render but has a band thickness below safe minimums, a stone height that snags on everything, or a prong placement that blocks light entry is not a good design, regardless of how the rendering appears. The question is not “does this look pretty?” The question is “will this function correctly in daily use?”
Common Mistakes Buyers Make at the CAD Stage
The most frequent misstep is approving based on the face-up view alone. A top-down rendering hides nearly every critical detail: the side profile, the band cross-section, the prong-to-stone interface, and the clearance between the stone and the finger. Another common error is assuming the CAD is a general template that will be refined during production. It will not be refined. The CAD is the production file. A third mistake is failing to request specific measurement callouts. Jewelers will dimension exactly what the buyer asks for, but if the buyer does not ask, some critical measurements may be left out of the file.
What to Check Before You Decide
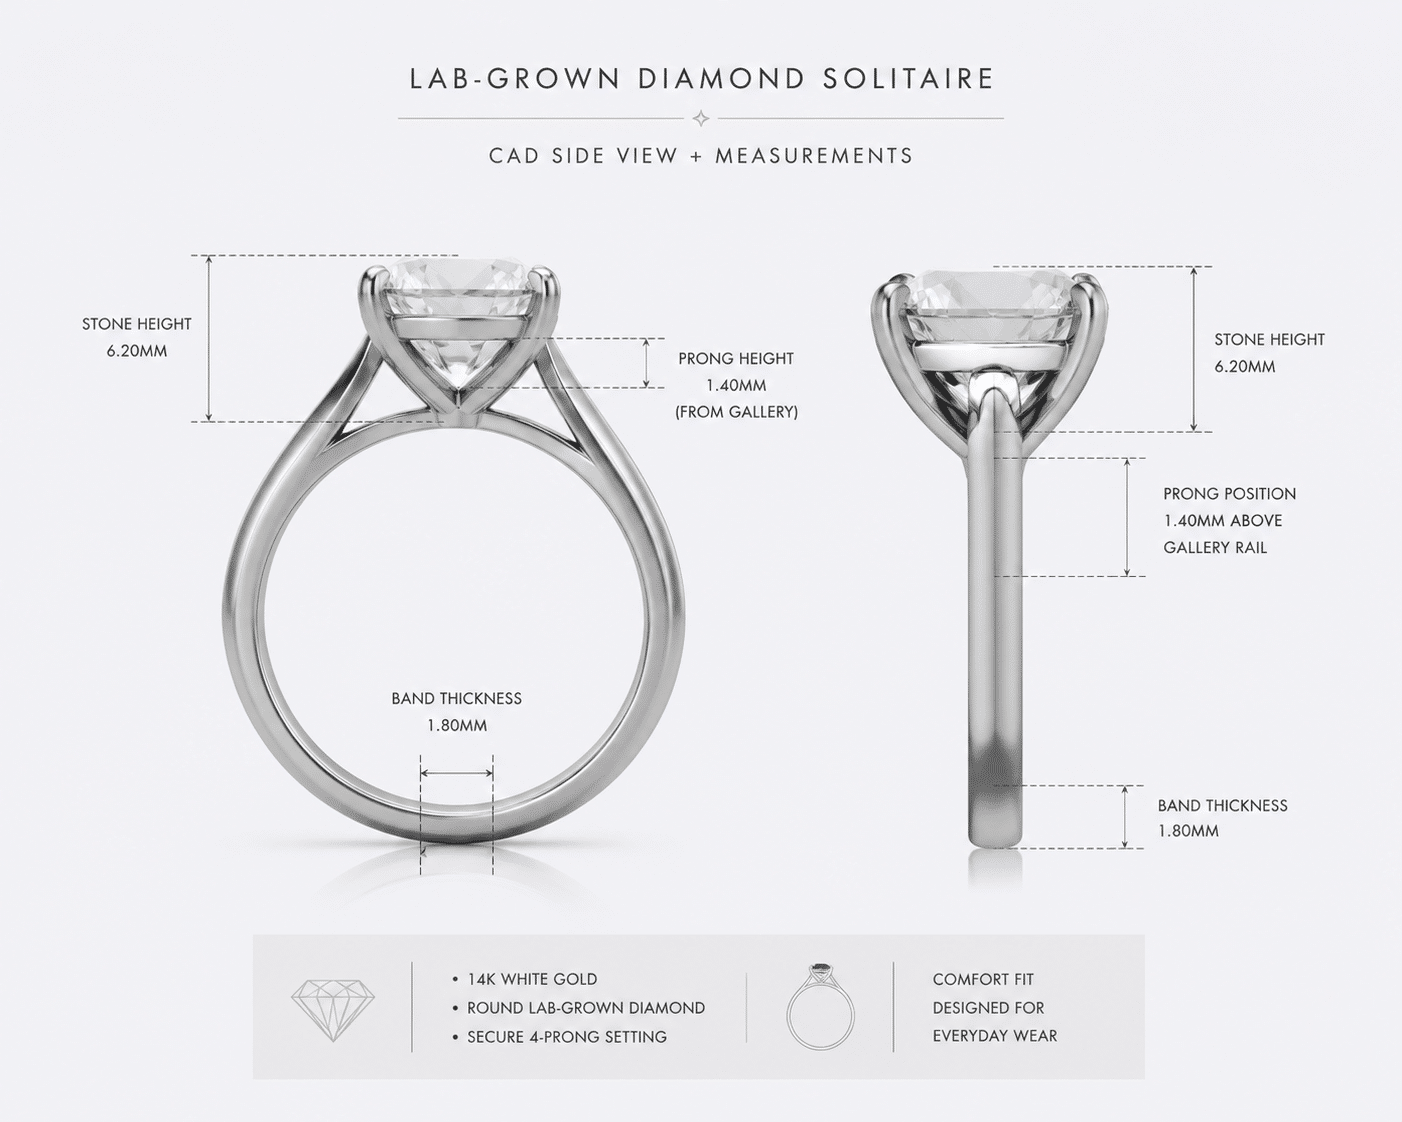
Confirm that the CAD shows labeled measurements for all key dimensions: band thickness, band width, stone height above the finger, and shank bottom thickness. If the side profile view is not included in the render set, request it before reviewing. Ask the jeweler whether the file you are viewing is the final production file or a preliminary concept. A preliminary file may lack the structural detail needed for a safe approval.
For buyers, the practical point is that a visually balanced rendering does not automatically mean the dimensions are safe. The CAD’s lighting and perspective can make a thin band look substantial, or a high setting look proportionate. The only reliable way to confirm safety is to verify the labeled measurements independently.
Stone Height: The Most Overlooked Parameter in Daily Wear
Stone height above the finger is the dimension most buyers ignore and most wearers regret. It directly affects comfort, snag risk, and the long-term security of the setting. A ring that fits perfectly everywhere else can become unwearable if the stone sits too high.
How Height Affects Snagging and Everyday Comfort
A diamond set 7 to 8 mm above the finger creates a constant snag risk against clothing, bags, countertops, and door frames. Every snag delivers a mechanical shock to the prongs and the stone. Lower profiles, in the 5 to 6.5 mm range, reduce snagging significantly but may limit the amount of light that can enter the stone from underneath. This is a real tradeoff. The right height depends on the wearer’s lifestyle. Someone who types at a desk all day, wears gloves, or frequently reaches into bags should prioritize a lower profile. Someone who can accept some height in exchange for maximum light return may prefer a taller setting.
When a Higher Setting Makes Sense
Larger stones, particularly elongated shapes such as cushions, radiants, and pear cuts, often require slightly higher settings to allow full light return underneath the stone. The pavilion of the diamond needs clearance from the finger to allow light to bounce through the stone and back out through the table. If the setting is too low, the bottom of the stone sits too close to the finger, and the diamond may appear darker or less brilliant. The CAD should show the angle of the stone’s bottom and the clearance between the pavilion and the finger. If that clearance is less than what the diamond’s proportions require, the setting height may need to increase.
How to Measure Height from the CAD
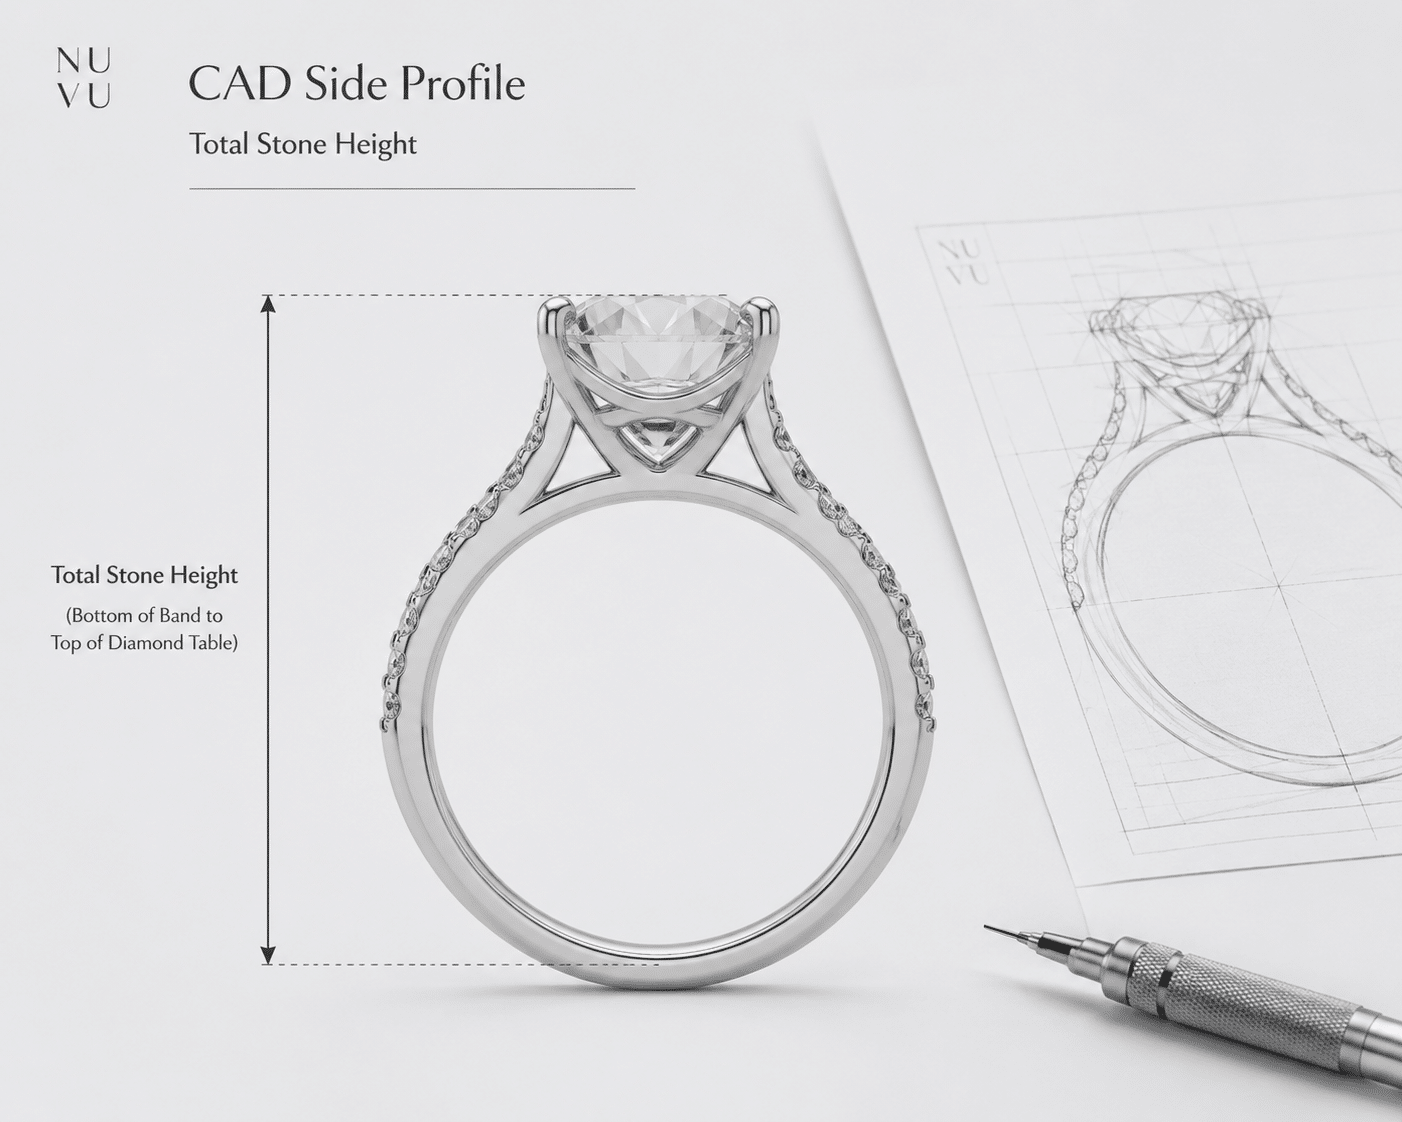
Do not rely on a visual estimate. Require the CAD to include a side-view dimension that marks the distance from the bottom of the band to the top of the stone’s table. This is the total height above the finger. Many jewelers default to showing the height above the setting, which misses the band thickness. The number you want is the total height from the inside of the band to the highest point of the stone.
Stone-to-Setting Fit Check
Request a side-view CAD screenshot with the total height measurement clearly labeled. Compare the height to a ring you already own and find comfortable. If you do not have a reference, 6 mm or lower above the finger is a safe target for most active lifestyles. Above 7 mm, the ring becomes a high-snag design that should be reserved for occasional wear, not daily use.
It is also worth noting that stone height interacts with ring size. On a smaller finger, the same 7 mm height will feel taller and more obstructive relative to the hand’s proportions. On a larger finger, the same height may feel more balanced. The CAD should always be considered in relation to the wearer’s specific finger size, not as a universal standard.
Band Thickness and Width: Structural Strength vs. Comfort
Band dimensions are the most common area where visual appeal and structural safety diverge. A thin band looks elegant on screen, but below certain minimums, it will bend, warp, or break under normal daily pressure. Buyers need to know which dimensions matter and how to read them from the CAD.
The Minimum Thickness That Prevents Warping
For platinum or 18 karat gold, the minimum band thickness at the thinnest point should be 1.6 mm. For 14 karat gold or palladium, 1.5 mm is the practical floor. Below these values, the band is likely to bend under the leverage created by the setting, especially if the design uses a cathedral shoulder or a peg head. The CAD should show the thinnest point on the band, not the average. Many rings taper toward the bottom, so the measurement at the bottom of the shank is the one that matters most.
Why Width Matters for Finger Proportion and Stone Size
A 1.8 mm wide band may look perfectly balanced under a 1-carat center stone. Under a 3-carat stone, the same 1.8 mm width will look undersized and structurally inadequate. Larger stones require wider bands for visual proportion and for mechanical support. A general rule is that a 3-carat or larger center stone justifies a band width of 2.2 to 2.5 mm at the center point. The CAD should include the top-view width measured at the center of the band, not at the widest point of the shoulders.
Comfort Fit vs. Standard Fit: Which Shape the CAD Should Show
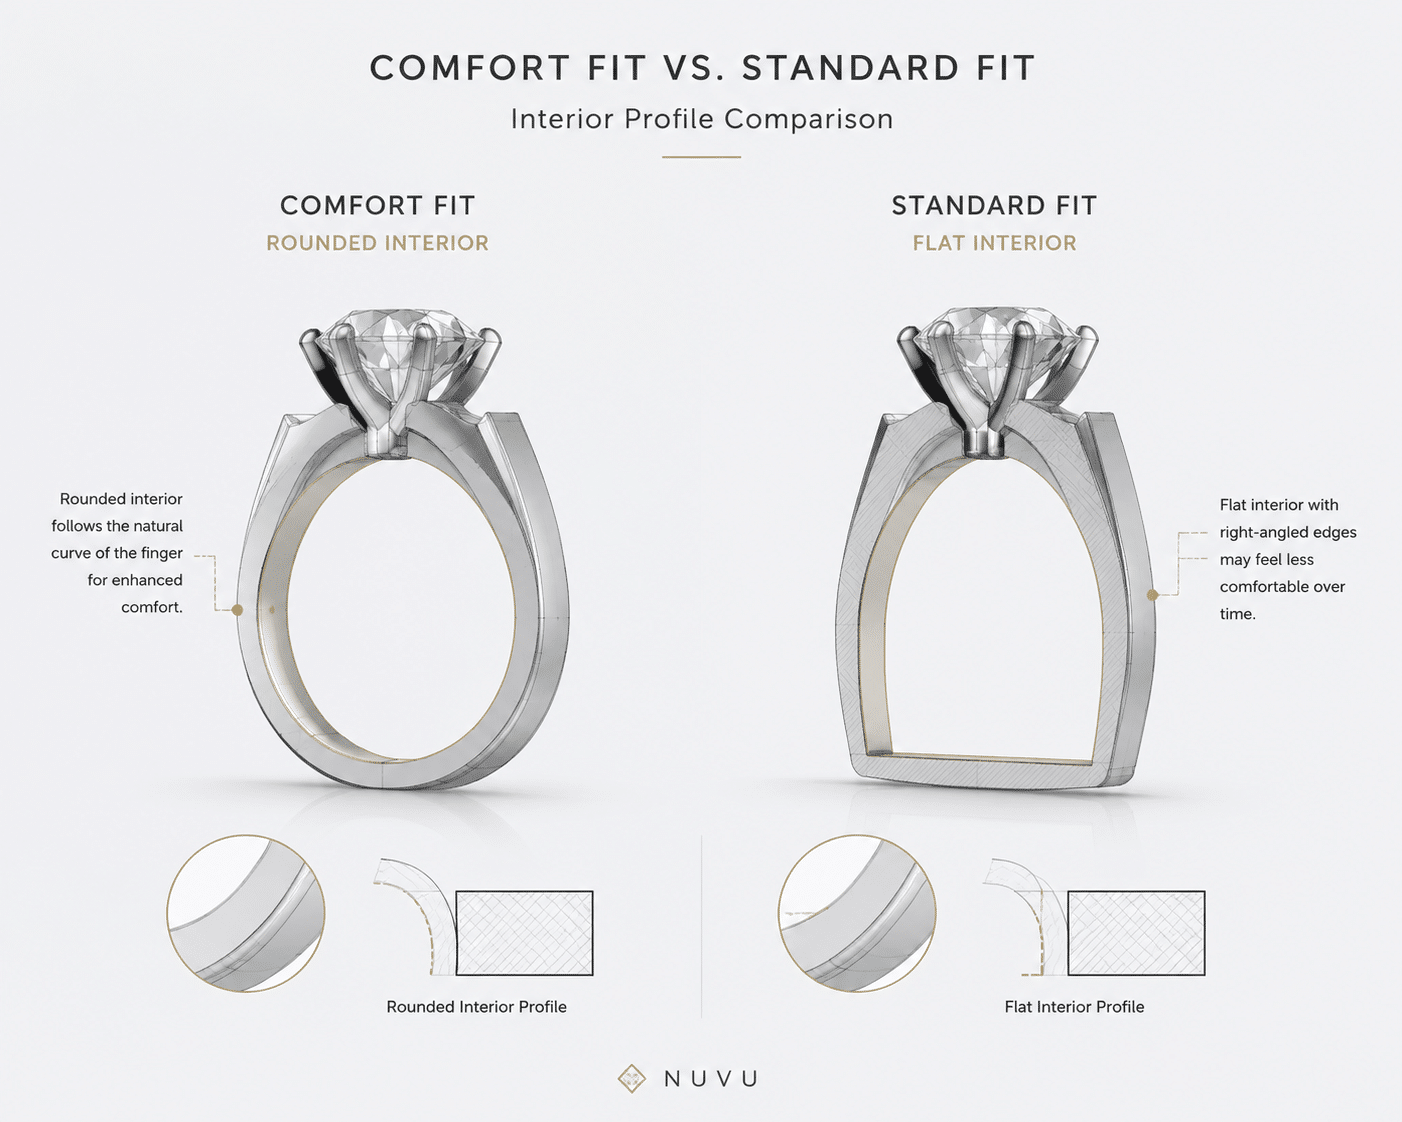
A comfort-fit band has a rounded interior cross-section, which reduces friction on the finger and makes the ring feel lighter. A standard-fit band is flat inside, which can create pressure points and make the ring feel tighter, especially in warmer weather when fingers expand. The CAD cross-section view should show the interior profile clearly. A smooth curve indicates a comfort fit. A sharp interior corner indicates a standard fit. For rings worn daily, the comfort fit is almost always the better choice, regardless of the visual style of the outer band.
Buyer Verification Checklist
Confirm that the CAD shows the thinnest band point measurement, not an average or a maximum. Check the cross-section view to verify that the interior rounding is present if comfort is a priority. For larger stones, verify that the band width increases to match the stone size. A ring with a 3-carat center stone and a 1.8 mm band is a structural failure waiting to happen.
Another factor to consider is the metal’s hardness and its effect on wear over time. Platinum, while dense and heavy, tends to develop a matte patina and can thin more predictably under abrasion. Gold alloys, especially higher karats, are softer and may wear faster at contact points. The CAD dimensions should account for the specific metal being used, not just as a material choice but as a factor in long-term structural integrity.
Prong Position and Security: What the Face-Up View Does Not Show
Most buyers approve a CAD based on the face-up view. The stone looks centered. The ring looks balanced. But the face-up view hides nearly everything that determines how securely that stone is held. Prong type, placement, and corner coverage are only visible in zoomed or rotated views. Skipping those views is one of the most common approval mistakes.
Claw vs. Round vs. V-Prong: When Each Is Chosen
Claw prongs are tapered, coming to a finer point at the top. They offer more metal mass over the stone while visually elongating the corners, which is why they are common on round and oval diamonds. Round prongs are less visible and softer-looking, but they provide less corner protection. V-prongs are specifically used for exposed corners on princess, radiant, and emerald cuts, where a straight prong would leave the corner vulnerable. The CAD should clearly show the prong tip shape and indicate whether the prong wraps over the crown or rests flush against the girdle. If the only available view is face-up, ask for a close-up of each prong contact point.
How Prong Placement Affects Light Performance
Prongs do not just hold the stone. They also block light. If a prong tip sits directly over the crown, it will reduce brilliance at that point by preventing light from entering the diamond. The preferred position is at the girdle level, with the prong tip curving over the crown edge without extending onto the table or covering the upper facets. In the CAD, check whether the prongs appear to overlap significant portions of the crown. A zoom-in view of the prong-to-stone interface will show whether the jeweler has accounted for light entry or simply placed prongs where they look symmetrical.
Why Corner Protection Matters for Square and Rectangular Shapes
Princess, Asscher, radiant, and emerald cuts all have exposed corners that are the most fracture-vulnerable points on the stone. A light knock against a countertop or door frame can chip an unprotected corner. The CAD should show a V-prong or bezel corner extending fully beyond each corner, not simply meeting the edge. Flush placement offers almost no protection. For these shapes, corner coverage is not an aesthetic preference. It is a structural requirement. If the CAD shows corner prongs stopping exactly at the stone edge, request a revised design before approving.
What to Check Before You Decide
- Request a close-up view of each prong contacting the stone
- Confirm that corner prongs extend beyond the stone corner, not flush with it
- Ask whether a gallery rail or crossbar is included for additional security
For lab-grown diamonds specifically, buyers sometimes assume that because the stone is created in a controlled environment, it is inherently tougher or more impact-resistant than a mined stone. This is not the case. The same material properties apply, and the same chipping risks exist. Corner protection in the CAD is equally critical regardless of the diamond’s origin.
Side Profile and Gallery: The View That Reveals Structural Weaknesses
The face-up view sells the design. The side profile evaluates it. If you only review one non-top view, make it this one. The side profile shows the actual structural decisions that will determine whether the ring survives daily wear.
What the Side Profile Shows That the Top View Hides
From the side, you can see the cathedral shoulder angle, the thickness of the peg-head connection, the depth of the gallery or basket, and the clearance between the stone’s pavilion and the wearer’s finger. All of these dimensions directly affect durability and comfort. A top view may make a ring look solid. The side view may reveal that the connection point between the head and the band is barely thicker than a paperclip. Do not approve a CAD until you have seen a true side elevation view.
Cathedral Settings: Shoulder Angle and Stability
A cathedral setting uses a shoulder that rises from the band to meet the stone head. The angle of that shoulder determines how lateral force is distributed. For adequate stability, the shoulder angle should be at least 30 degrees from vertical. Shallower angles increase leverage on the connection point, meaning a sideways knock puts more stress on the head-to-shank junction. The CAD should show the shoulder angle from a true side elevation, not a perspective view that distorts the measurement. If the angle is not labeled, request it.
Peg-Head vs. Integrated Head: Which Connection the CAD Should Show
A peg-head setting uses a separate head that is soldered onto the band. An integrated head is milled from the same metal piece or cast as one continuous unit. Peg heads are more repairable because they can be removed and replaced without remaking the entire band. But the soldered junction is a weak point, and peg heads are more prone to bending under pressure. Integrated heads are stronger but harder to repair if damaged. The CAD should clearly show whether the head is a separate piece or continuous metal. If the connection appears as a visible seam in the cross-section view, it is likely a peg head.
Certificate and Visual Review Check
- Request a true side elevation view (not a 3D perspective) showing the shoulder-to-band connection
- Ask whether the head is peg or integrated
- Confirm the gallery depth does not allow a fingernail to press directly on the stone’s pavilion
Tying the Setting Dimensions to the Specific Diamond: A Traceability Note
A common gap in the CAD review process is the assumption that any diamond of a given carat weight and shape will fit identically into the setting. In practice, two lab-grown diamonds with the same shape and carat weight can have measurably different length, width, and depth proportions—particularly regarding pavilion depth and crown height. These differences directly affect how the stone sits in the setting, how much clearance is needed under the pavilion, and how the prongs engage with the girdle.
Before approving the CAD, buyers should confirm that the file was built around the actual measurement dimensions of the specific diamond they have chosen, not a generic representation. A grading report from a lab such as GIA or IGI will list the stone’s exact length, width, and depth, and the setting’s internal cavity should match these measurements within a reasonable tolerance. When the setting dimensions are tied to the specific stone’s measurements, the risk of a poor fit, a loose stone, or a prong that does not align correctly is significantly reduced.
For NUVU, the goal is to make this verification step more transparent: the CAD dimensions should be cross-referenced with the specific stone’s measurements before approval, so the buyer can see that the fit is intentional, not assumed.
Buyer Verification Step
Ask the jeweler whether the CAD dimensions—especially the basket width, depth, and prong spacing—are based on the specific dimensions of your diamond as listed on its grading report, or on an average for the carat weight and shape. Request a confirmation note in the design file if the setting is tailored to your stone.
Hidden Halos and Accent Stones: Designing for Clean Assembly
Accent stones add detail, but they also add constraints. Hidden halos, pavé bands, and shared-prong settings each affect how the ring is assembled, how it fits, and whether it can be resized later. These details are often treated as decorative choices, but they have real structural consequences that the CAD reveals.
How Hidden Halos Affect Stone Height and Finger Fit
A hidden halo sits below the center stone and is visible only from certain angles. It adds approximately 1.5 to 2 mm to the total stone height. That extra height is not always obvious from the top view. In the CAD side view, the hidden halo appears as a small ring of accent stones under the center stone. If you are concerned about snagging or a high profile, check the total height measurement with the halo included. A hidden halo that adds 2 mm may push the center stone from a comfortable 6 mm height to a problematic 8 mm above the finger.
Pavé Taper and Stone Retention on Curved Bands
On curved or tapered bands, pavé stones must be proportionally sized to maintain consistent visual density. The CAD should include dimension callouts for each pavé stone. If the band taper drops below 1.2 mm in width, pavé setting becomes structurally risky. At that narrow point, the metal between the stones may be too thin to hold them securely, increasing the risk of stone loss during wear. Request a close-up of the narrowest section of the pavé band to verify that the bead-setting metal is adequate.
Shared prongs between accent stones reduce metal visibility and create a cleaner, more continuous line of diamonds. But they also complicate resizing. Shared prongs typically limit resizing to plus or minus one or two sizes before the prong alignment breaks. Separate settings add more metal between stones but allow resizing over a wider range. If you anticipate needing to resize the ring in the future, ask which method the CAD uses, as outlined in the custom engagement ring process guide, and if it uses shared prongs, confirm whether the jeweler can resize without resetting stones.
What This Means in a Real Purchase
- For hidden halos, confirm the height increase and ask if it changes the band thickness at the center
- Request a close-up of pavé stones wider than 1.5 mm
- If resizing may be needed, ask whether shared prongs or separate settings are used
For buyers considering a lab-grown diamond with specific clarity or color characteristics, the cut of accent stones in a halo or pavé setting is also worth verifying. If the accent stones are poorly cut or noticeably mismatched in color, the overall visual effect can be diminished, especially under direct light where the contrast between the center stone and the accent stones becomes visible.
Comfort and Finger Fit: How the CAD Can Predict Daily Wear
A ring that looks beautiful on screen can still be uncomfortable to wear for eight hours a day. The CAD is the only stage where you can evaluate comfort before metal is committed. Most comfort issues are predictable from the file if you know where to look.
Interior Profile: What a Comfortable Band Looks Like Inside
The interior shape of the band determines how the ring feels against the skin, especially on adjacent fingers. A comfort-fit band has a rounded interior cross-section that reduces friction and makes the ring feel lighter than its actual weight. It also allows easier resizing later because the metal is more evenly distributed.
A standard fit band has a flat interior wall with sharper inner edges. Over long wear, those edges create pressure points, particularly on the pinky side of the hand where rings tend to sit against the next finger.
The CAD cross-section view should show a smooth interior curve, not a sharp corner where the wall meets the floor. If the file shows a flat inside edge with a right angle at the transition, that ring will feel tighter than its measured size suggests. Request the cross-section view before approving.
How Stone Shape Affects Finger Rotation and Alignment
Square and rectangular stones — emerald, radiant, Asscher, and princess cuts — are prone to rotation on round fingers. The wide flat sides of these shapes create leverage that shifts the stone off-center during daily movement. Once a rectangular stone rotates even slightly, the ring looks misaligned and the wearer will instinctively try to twist it back.
Band width is the primary correction factor. If the band is narrower than 2 mm, a rectangular stone will almost certainly rotate. The CAD should show whether the band includes a euro-shape profile: a flattened bottom curve that resists spinning. This is a subtle modification, but it makes a measurable difference for square and rectangular stones on round finger shapes.
For elongated shapes like emerald or radiant cuts above 2 carats, consider increasing the band width to 2.2 mm or asking for a slight belly on the inside of the shank to improve rotational resistance.
Practical Comfort Checks the CAD Cannot Show
The CAD cannot tell you whether the ring will feel warm, whether a sharp edge will bother the adjacent finger, or whether the ring will pinch skin folds between the stone and band. These are tactile realities that no rendering can simulate.
The closest practical substitute is a 3D resin print. Many jewelers offer a resin model of the final CAD at a small additional cost. The resin print allows you to physically test the fit, feel how the band sits between your fingers, and confirm whether the stone height interferes with daily activities like typing, driving, or buttoning a shirt.
This is especially useful for designs with unusual band shapes, asymmetric profiles, or wide gallery sections. Approving a CAD without a resin test is a reasonable choice when the design is a standard solitaire with familiar proportions. For anything outside that, the resin print is the cheapest insurance against a regret.
Buyer Verification Checklist
– Request the cross-section view of the band interior to confirm comfort-fit rounding
– For square or rectangular stones on round fingers, ask if the band includes rotation resistance
– Consider ordering a resin test model before final approval, especially for non-standard designs
Structural Strength: Where Most Custom Rings Fail and How to Prevent It
Most custom ring failures share one characteristic: the weak point was visible in the CAD but was not evaluated structurally. Aesthetic approval alone does not prevent breakage. The CAD reveals stress concentrations that will determine whether the ring lasts five years or five decades.
How Metal Thickness at the Shank Bottom Affects Long-Term Integrity
The shank bottom — the portion of the band that contacts surfaces when the hand is resting — experiences the most cumulative wear. Every desk, countertop, handrail, and doorknob gradually thins this section. The CAD should show the shank bottom thickness as a labeled measurement.
For daily wear in platinum or 18k gold, the shank bottom should be at least 1.8 mm at the thinnest point. Below 1.5 mm, the ring may fatigue and crack at the bottom after 5 to 10 years of regular wear, depending on how active the wearer is. Fourteen karat gold is slightly harder than 18k, but the same minimum applies because the structural load, not the metal hardness, is the limiting factor.
The center measurement on a ring shank is not the same as the shank bottom. A band can average 1.8 mm along the sides and taper to 1.3 mm at the bottom where it matters most. Confirm the shank bottom dimension specifically.
Stress Points at the Head-to-Shank Junction
The junction where the head meets the shank is the highest stress concentration point in any ring. Every lateral force — catching the ring on a pocket, gripping a handle, shaking a hand — is transferred through this connection.
A well-designed CAD shows reinforcement at this junction: either a cathedral shoulder that distributes force along the band, a bridge connecting the head to both sides of the shank, or a thickened connection point at least 2 mm across. A sharp 90-degree angle at the head-to-shank junction with no reinforcement is a predictable failure point. The ring may not break immediately, but repeated stress will eventually crack the solder joint or bend the head.
In the side elevation view, look at how the head meets the band. If the connection looks like a T-junction with no fillet or shoulder, ask whether reinforcement has been added. Most jewelers can adjust this without changing the visible ring profile.
Why Casting Orientation Matters in Thin Designs
For thin bands under 1.5 mm and fine pavé settings with small accent stones, the orientation of the model during casting affects metal density. Casting from the wrong angle can create microscopic porosity in thin sections, which later becomes a crack initiation point.
The CAD file typically includes an orientation mark that tells the casting house how the model should be positioned. You will not see this mark in the buyer-facing render, but you can ask whether the casting orientation has been reviewed by an experienced jeweler. For designs with exceptionally thin sections — under 1.3 mm — this is not a technical detail to skip. It is a legitimate structural question.
If the jeweler cannot confirm the casting orientation has been reviewed, and the design includes thin sections, request a thicker baseline or a different connection strategy. It is better to adjust the file than to discover a porosity crack after polishing.
What to Check Before You Decide
– Confirm the shank bottom thickness measurement is at least 1.8 mm (1.5 mm absolute minimum)
– Ask whether the head-to-shank junction includes reinforcement and request a side view to verify
– If the CAD shows sections under 1.3 mm, ask for a castability review or consider thickening the design
For custom designs involving lab-grown diamonds, it is worth noting that the diamond itself may have specific proportions that affect the setting’s structural demands. A deeper pavilion, for instance, may require a taller basket or gallery, which shifts the center of gravity and changes the stress distribution across the head-to-shank junction. The CAD should not be evaluated solely on the ring’s geometry; the specific stone’s measurements should be cross-referenced with the setting dimensions.
How to Request Changes on the CAD: Language That Works with Jewelers
The difference between a fast revision and a frustrating back-and-forth is almost always the clarity of the request. Jewelers work with precise files. Vague language creates guesswork, which either wastes a revision round or produces a result that still misses the mark.
Examples of Clear Revision Requests vs. Vague Requests
Vague: “Can you make the band thicker?”
Clear: “Please increase the band thickness at the thinnest point to 1.6 mm and the center width to 2.0 mm.”
Vague: “The ring looks too high.”
Clear: “Please reduce the total stone height above the finger to 6.5 mm. The current side view measurement shows 8.2 mm.”
Vague: “I don’t like the prongs.”
Clear: “Please change the prongs from round to claw style, maintaining the same number of four prongs, with tips sitting at the girdle level and curving over the crown edge.”
Jewelers cannot interpret adjectives. They can interpret numbers, named profile types, and reference views. Every revision request should specify what to change, to what value, and in which view it should be verified.
What Can Be Revised and What Requires a New CAD
Changes within the existing CAD file are generally possible for:
– Band height, thickness, and width adjustments
– Prong type, number, and placement changes (within reason)
– Accent stone size, placement, or number
– Gallery rail or crossbar additions
– Comfort-fit profile changes
– Hidden halo height adjustments
Changes that typically require a new CAD file include:
– Changing the center stone shape (round to emerald, oval to princess)
– Changing the ring style category (solitaire to three-stone, halo to bezel)
– Changing the metal type (14k to platinum), which changes shank dimensions and setting tolerances
– Changing the overall ring size by more than two full sizes, which requires re-proportioning the entire model
When requesting a change that falls into the second group, expect an additional design fee and a longer timeline. The file must be rebuilt from the base geometry, not modified from the current model.
How to Confirm a Revision Without Approving Twice
Receiving a revised CAD does not mean the changes were applied correctly. A rotated stone axis, an unadjusted measurement, or a prong that still matches the old design can slip through if the revision was not verified against the specific request.
The safest workflow: request a written change order or a list of revision notes from the jeweler before viewing the updated CAD, as detailed in the custom lab grown diamond jewelry guide, then open the new file and check only the dimensions that were requested. Do not approve the revised CAD by email without verifying those specific measurement callouts in the file.
If the revision involved a dimension change, confirm that the measurement labels in the CAD match the requested values, not just the visual appearance. A band that looks thicker may still measure below the requested minimum if the label was not updated.
What This Means in a Real Purchase
– Write every revision request with specific numbers, not adjectives
– Ask whether the change requires a new CAD file generation before requesting it
– Confirm the revision in writing before the jeweler proceeds to casting
When to Approve and When to Hold: Decision Framework for the Final CAD
The final CAD approval is a binding decision. Once you give the go-ahead, the file moves to casting. There is no undo button. Approving based on a single attractive render is the most common mistake in custom jewelry. A structured framework prevents it.
The Three-View Approval Checklist
Never approve a CAD based on one perspective. A 3D render can hide thin sections, awkward prong placement, and poor stone clearance. You need three standard views before making a judgment: the top view, the side elevation view, and the cross-section view. The top view shows proportion and symmetry. The side elevation reveals stone height, cathedral angle, and how the setting sits on the finger. The cross-section shows interior band shape, metal thickness at every point, and the profile of the prong-to-stone connection. If the jeweler has not provided all three, ask for them before approving. A design that looks balanced from above can be structurally unsound from the side.
The Difference Between Design Preference and Structural Risk
Aesthetic revisions and structural changes are not the same thing. Changing a prong from round to claw is a design preference. Approving a band that tapers to 1.0 mm at the shank bottom is a structural risk, regardless of how elegant it looks. Many buyers focus on the overall silhouette and miss the measurements that determine whether the ring will last. A shank bottom under 1.5 mm, a peg-head connection without reinforcement, or a stone set more than 8 mm above the finger are not design choices anyone should treat as flexible. They are compromises that shorten the ring’s lifespan. Learn to separate what you like visually from what will survive daily wear. If the CAD looks beautiful but contains a dimension below the structural minimums covered earlier, the correct response is not approval. It is a revision request.
What to Do If You Are Unsure
If you look at the CAD and something feels off, even if you cannot name it, do not approve. The safest option is to request a resin print of the final CAD. Resin models are inexpensive, usually under fifty dollars, and they let you physically test the ring before committing to metal. You can put it on your finger, check how it feels against adjacent fingers, and see whether the height catches on clothing. You can also compare the resin model to rings you already own. A physical test eliminates almost all the uncertainty that screen images create. Never approve a CAD for casting if you have any doubt about the dimensions, the fit, or the stone clearance. The resin model costs a fraction of redoing a cast ring.
What to Check Before You Decide
- Use the three-view checklist—top, side elevation, and cross-section—before approving.
- If any dimension is below structural minimums, do not approve until revised.
- Request a resin test model if you have any remaining doubts about fit or comfort.
The Role of Diamond Proportions in the CAD Fit: A Practical Traceability Check
For custom designs where the diamond has been selected before the CAD phase, the specific cut proportions of the stone can significantly influence how it fits into the setting. Two diamonds of the same shape and carat weight can have different pavilion depths, crown heights, and girdle thicknesses. These variations affect the necessary clearance between the pavilion and the finger, the height at which the stone sits, and the exact point where the prongs should engage the girdle.
When the CAD is built around a generic stone model, there is a risk that the final setting will not accommodate the diamond’s exact measurements, leading to a loose fit, a stone that sits too high, or prongs that do not seat properly. Buyers should request that the CAD dimensions—particularly the internal basket width, the depth of the gallery, and the prong spacing—are cross-referenced with the stone’s specific measurements from its grading report. The grading report from a lab such as GIA or IGI includes the length, width, and depth of the diamond, which should be the basis for the setting’s internal cavity.
This step is especially important for elongated shapes like emerald, radiant, and oval cuts, where the length-to-width ratio can vary noticeably within the same carat weight. A setting designed for a 1.40 ratio emerald cut may not fit a 1.30 ratio stone in the same carat range. Confirming the fit against the actual stone dimensions before approving the CAD reduces the risk of a costly mismatch after casting.
Buyer Verification Step
Provide the full length, width, and depth measurements from your diamond’s grading report to the jeweler before the CAD is finalized. Confirm that the setting dimensions are built to match those specific numbers, not a general average for the shape and carat weight.
Frequently Asked Questions About CAD Approval for Custom Jewelry
How Many Revisions Should I Expect Before the CAD Is Final?
Most jewelers include two to three revision rounds in the initial CAD fee. Each round typically takes three to seven business days, depending on the complexity of the change and the jeweler’s workload. Simple adjustments such as band thickness, prong type, or stone height are usually handled within one revision. More substantial changes—altering the setting style, adding or removing accent stones, or changing the metal type—may count as a full revision or require a new CAD file. If you are working with a jeweler who offers only one revision round, ask whether additional rounds are available and what they cost before you begin. Knowing the revision limit helps you prioritize the most important changes first.
Can I Request Changes After the CAD Is Approved but Before Casting?
Changes after approval are technically possible, but they come with costs. The CAD file must be reopened, adjusted, and rechecked for production errors. Most jewelers will charge an additional CAD fee and require a new approval cycle. Never approve a CAD expecting that minor changes will be made during casting. Casting follows the file exactly. Any modifications after casting require cutting, welding, or restarting the piece entirely, which is more expensive and risks damaging the metal or stone. Treat the approval as final. If you are not certain about a dimension, hold the approval and ask for clarification. A few extra days in CAD review is far less painful than receiving a ring that does not fit.
Does the CAD Guarantee the Final Ring Will Look Exactly Like the Render?
The CAD guarantees dimensions and proportions. The physical ring will match the file’s measurements. What the CAD cannot show is how the metal will actually look after polishing, how the stone will perform under natural light, or how the surface finish will reflect. The render includes computer-generated lighting and material simulations that often look more glossy, more even, and more dramatic than real polished metal. The diamond in the render is a generic visual placeholder. Its actual cut precision, color tint, and clarity characteristics are not visible. What the CAD guarantees is that the ring will be built to those numbers. What it does not guarantee is the visual impression of the final materials. That depends on the stone’s actual quality and the metal finish, which you should verify separately through video, inspection, or in-person viewing.
For buyers working with a specific lab-grown diamond that has been selected before the CAD phase, it is useful to remember that the stone’s individual cut proportions—such as pavilion depth and crown angle—can affect how it fits in the setting. Two diamonds of the same carat weight and shape may have different measurements, and the CAD should ideally be built around the exact stone you have chosen, not a generic placeholder.
When a grading report is provided with your diamond, the report details—including the stone’s exact dimensions—can be cross-referenced with the CAD file to confirm the setting is designed for that specific stone. GIA’s online Report Check service may be used to verify the report’s authenticity details when available.
Your Next Step: What to Prepare Before Contacting a Jeweler About CAD
Walking into a CAD conversation unprepared forces you to make decisions you do not need to make. A few minutes of preparation reduces revision rounds, speeds up the timeline, and produces a ring that matches what you actually wanted.
What Reference Materials Help the Jeweler the Most
Jewelers work best with visual and numeric references. Collect photos of rings whose style, proportion, or setting details match what you want. If you already have a ring that fits well, measure its band width, band thickness, and total height, and share those numbers. Provide the exact dimensions of your stone—length, width, and depth—so the jeweler can set accurate clearances. State your metal preference and, if applicable, whether you want a comfort-fit or standard-fit interior. The more specific your reference materials, the fewer guess-based revisions the CAD will need. A jeweler who receives a photo, a stone measurement, and a target band thickness can often get the first CAD very close to final.
How to Compare CAD Proposals from Different Jewelers
If you are evaluating CAD proposals from multiple jewelers, do not compare based on how polished the render looks. A beautiful render with no measurement callouts tells you nothing useful. Ask each jeweler to label the same key dimensions: band thickness at the thinnest point, band width at the center, total stone height above the finger, shank bottom thickness, and prong type. With those numbers side by side, you can see which design is structurally sound and which one relies on visual tricks. The proposal with the cleanest render but the thinnest shank bottom is the weaker choice. Compare numbers, not lighting effects.
Why a Written Approval Email Protects Both You and the Jeweler
A verbal approval or a quick email saying “looks good” leaves too much room for interpretation. The standard practice is to send a written approval email that lists the specific dimensions you have reviewed and confirmed. Include the band thickness, band width, stone height, shank bottom thickness, prong type, and any accent stone detail. State clearly that you approve the CAD for casting based on those measurements. This email creates a record that both you and the jeweler can reference during production. If a dimension is later questioned or changed, the written record resolves the dispute without guesswork. A written approval is not about distrust. It is about protecting the accuracy of a project that involves both significant cost and personal meaning.
Understanding Industry Terminology and Disclosure for Lab-Grown Diamonds
When reviewing a CAD for a lab-grown diamond setting, it is also helpful to understand the terms used to describe the stone itself. Clear disclosure in terminology—the language used by sellers and graders—helps buyers evaluate what they are purchasing and how the diamond is represented in the final piece.
The Gemological Institute of America (GIA) provides guidance on how lab-grown diamonds are identified and described on grading reports. GIA explains that lab-grown diamonds have the same chemical composition, crystal structure, and physical properties as natural diamonds, but they are produced in controlled laboratory environments rather than mined from the earth.[1] This distinction is clearly noted on GIA reports, which include specific language identifying the stone as a lab-grown diamond. Buyers should look for this identification on any grading report they receive for their stone.
The U.S. Federal Trade Commission (FTC) has also issued guidance on how lab-grown diamonds should be described in advertising and sales. According to the FTC, terms such as “sustainable” or “eco-friendly” require specific, substantiated evidence; general claims without clear documentation may not be appropriate.[2] This guidance is relevant for buyers who encounter marketing language in the product listing: any sustainability or environmental claim should be specific and verifiable. A grading report identifies the stone’s origin, but it does not automatically prove broader environmental claims.
Understanding these disclosure boundaries matters at the CAD stage because the stone you have chosen—whether accompanied by a GIA, IGI, or another grading report—will define the dimensions and structural needs of the setting. The CAD should be built around the actual measurements of your specific lab-grown diamond, not a generic model of a stone with the same carat weight and shape.[1]
CAD Approval and Grading Reports: What a Report Does and Does Not Prove
When a grading report accompanies your lab-grown diamond, it is natural to view it as a complete quality summary. Understanding what the report documents—and what it does not—can help you evaluate the CAD more effectively.
A grading report from a laboratory such as GIA or IGI documents key characteristics of the diamond: carat weight, color grade, clarity grade, cut grade (for round brilliants), and the stone’s exact dimensions (length, width, and depth). These measurements are directly relevant to the CAD file: they tell the jeweler the precise size of the stone and form the basis for setting tolerances. However, a grading report should not be treated as a guarantee of beauty, overall visual performance, or ethical sourcing. The report documents specific attributes, but visual appeal also depends on how the stone interacts with light in a specific setting, which no report can fully capture.
For this reason, the CAD file should be cross-referenced with the stone’s measured dimensions from the report rather than with the carat weight alone. Two stones of the same carat weight can differ by several tenths of a millimeter in length or width, and a setting built around a generic size may not fit the actual stone. Buyers can reduce this risk by providing the full length, width, and depth measurements from their grading report to the jeweler before the CAD is finalized, and by confirming that the setting’s internal cavity is designed around those specific numbers.
A grading report helps document characteristics, but it should be read alongside visual evidence, the CAD’s measurement callouts, and the intended jewelry use. The report is one useful tool in the verification process, not a complete substitute for checking the dimensions yourself before approving the file.[3]
Key Terminology: Distinguishing Laboratory-Grown Diamonds, Natural Diamonds, and Simulants
Throughout the CAD review process, it helps to be precise about the terms used to describe your stone. The jewelry industry uses distinct categories for different types of stones, and clear terminology helps prevent confusion between the CAD design and the final product.
Laboratory-grown diamonds are diamonds that have the same chemical composition (carbon arranged in a crystal structure) and the same physical properties as natural diamonds, but they are produced in a controlled laboratory environment rather than mined from the earth. They should be clearly identified as “laboratory-grown” or “lab-grown” in any documentation, including grading reports, seller listings, and invoices. A lab-grown diamond is the same material as a natural diamond, but the two have different origins, and this distinction matters for buying, grading, and disclosure.
Diamond simulants, by contrast, are materials that look like diamonds but are not diamonds. Cubic zirconia (CZ) and moissanite are common simulants. A simulant is not a diamond—it has different chemical and physical properties—and should never be described or sold as a lab-grown diamond. Buyers reviewing a CAD should verify that the stone intended for the setting is clearly identified as a lab-grown diamond and not a simulant, especially if the stone is being sourced from a third party.
When a grading report is provided, it should clearly indicate whether the stone is laboratory-grown, natural, or a simulant. If the report does not use explicit terminology, ask the seller for written confirmation of the stone’s identity. The CAD file itself may use default placeholder representations of the stone, so it is the accompanying documentation—not just the render—that should clarify the stone type.
Clarity in terminology at the CAD stage helps ensure that the final piece matches your expectations, both in terms of what the diamond is and how it is disclosed in all associated documentation.
Evaluating Sourcing and Environmental Claims in the Context of Your Custom Design
Buyers considering lab-grown diamonds sometimes encounter marketing language suggesting that a stone is inherently “sustainable,” “eco-friendly,” or “ethical” because of its production origin. These claims, while appealing, should be evaluated with the same careful verification as any other aspect of the purchase.
The U.S. Federal Trade Commission (FTC) has issued guidance indicating that broad environmental claims such as “sustainable” or “eco-friendly” require specific substantiation. A claim that is not supported by clear, documented evidence about production practices, energy sources, or supply chain transparency may not be appropriate.[2] When a seller uses such language, it is reasonable to ask: what documentation supports this specific claim? Is the claim limited to the diamond itself, or does it also apply to the metal, setting process, and overall supply chain?
At the CAD stage, the buyer’s primary focus should be on structural and dimensional accuracy. However, if environmental or sourcing claims influence your choice of a particular stone or setting approach, those claims should be verified independently. The CAD file itself does not prove sourcing claims—it only documents the ring’s geometry. A grading report can confirm the stone’s origin as laboratory-grown, but it does not automatically verify broader environmental claims about energy use, carbon offsets, or supply chain ethics. For any claim that matters to your decision, request written documentation from the seller that is specific, verifiable, and dated.
For NUVU, the approach is to keep the focus on what the CAD can actually show—measurements, structural fit, and design intent—while encouraging buyers to treat sourcing and environmental claims as separate questions that should be verified against seller documentation rather than assumed from a single term.
[1] GIA, “GIA Report Check,” GIA.edu, available at: GIA Report Check. See also GIA educational content regarding lab-grown diamond identification and terminology.
[2] Federal Trade Commission, “Guides for the Jewelry, Precious Metals, and Pewter Industries,” 16 CFR Part 23, FTC.gov. See especially guidance on environmental claims and disclosure terminology related to lab-grown diamonds.
[3] This guidance is consistent with general industry practices for using grading reports as a reference tool rather than a guarantee of overall quality or sourcing ethics.
Disclosure: This article is for general educational purposes only. Diamond grading, pricing, availability, specifications, and seller policies can change, and readers should verify important details through grading reports, official laboratory tools, seller documentation, or qualified professionals before making a purchase decision. Laboratory-grown diamonds should be clearly distinguished from natural diamonds, and environmental or sourcing claims should be supported by specific documentation.