
Starting a custom ring design with only an inspiration photo or a diamond’s carat weight is the most common mistake buyers make. A ring that looks great on a display hand can fail structurally once paired with the wrong stone shape, setting style, or metal thickness. The actual millimeter dimensions of your chosen lab-grown diamond—not its 4Cs alone—determine whether a setting will be secure, comfortable, and durable for daily wear. Shape-specific vulnerabilities, like the exposed corners of an emerald cut or the fragile tip of a pear, demand different prong and bridge solutions. This guide walks you through the exact sequence of lab grown diamond stone selection decisions: how to match stone measurements to setting structure, how metal choice affects longevity and maintenance, and what to verify in CAD previews before production begins. The goal is a ring that looks custom and stays solid.
For the full framework, read Custom Lab-Grown Diamond Jewelry Guide.
| Decision Area | Common Mistake | Better Approach |
|---|---|---|
| Stone selection | Choosing by carat weight only | Use exact millimeter dimensions to check setting fit |
| Shape + setting | Mounting a pointed stone in standard prongs | Request V-prongs, bezel, or cathedral shoulders for protection |
| Metal choice | Picking 18k gold for its value feel | Choose 14k gold or platinum for scratch-resistance and daily wear |
| Band width | Selecting a thin 1.8mm band for elegance | Use 2.5mm+ if adding engraving or side stones |
| Two-tone design | Expecting white gold to stay white permanently | Plan for periodic replating or choose platinum/palladium |
| Verification | Skipping CAD review or written metal specs | Confirm thickness, prong tightness, and stone alignment in final video |
Quick Questions Before You Read
Q: Can I use my own lab-grown diamond for a custom setting?
Yes, but you must provide the exact millimeter dimensions of your stone, not just carat weight. The setting must fit those measurements precisely to stay secure.
Q: Is a bezel setting always safer than a prong setting?
It offers the most physical protection but blocks more light, reducing the diamond’s brilliance and making the stone appear smaller. It works best for active lifestyles or fragile shapes like emerald cuts.
Q: Does metal purity matter for ring durability?
Yes. 14k gold is harder and more scratch-resistant than 18k gold or pure platinum. Platinum is durable but develops a matte patina over time, which some owners love and others prefer to polish away.
Q: What is the most important thing to check before approving a CAD file?
Confirm the metal thickness at the band’s weakest point (bottom and around the head) and verify that prongs fully cover any vulnerable stone corners or tips. You can ask for written confirmation of thickness specs.
Why a Custom Ring Should Not Start from a Picture Alone
A beautiful inspiration photo can capture a specific look, but it rarely reveals the information needed to build a safe, well-proportioned ring. The stone dimensions, prong placement, metal thickness, and finger size that make that photo work are almost always invisible. Replicating a look without understanding these hidden variables is one of the fastest ways to end up with a ring that feels wrong, looks unbalanced, or puts the center stone at risk.
The Problem with Inspiration-Only Design
An inspiration image shows a finished ring, not the decisions behind it. That 2-carat oval sitting elegantly on a size 4 finger will behave very differently when replicated as a 1.2-carat emerald cut on a size 7 finger. The stone width changes the proportion. The prong placement required to protect an emerald cut’s corners is different from what works for an oval. The band width that looked balanced on a small finger may appear thin or fragile on a larger one. None of this is visible in the photo, but all of it affects whether the final ring works. A custom design that starts from an image alone ignores the physical reality of the stones and fingers involved.
The Real Starting Point: Stone Dimensions and Proportions
The foundation of any custom ring is not the photo. It is the actual measurement of the center stone. Length-to-width ratio, table size, depth percentage, and crown height determine what settings are structurally safe and visually balanced. A 6.5 mm round diamond and a 7×5 mm pear shape require completely different setting logic. The round can sit comfortably in a four-prong basket. The pear needs protection at its pointed tip, often requiring a V-prong or a bezel, and its asymmetric shape demands careful prong placement to stay centered. Without exact stone measurements, a designer is guessing. A custom ring should begin with a specific stone in hand, not a general idea of carat weight or shape. The numbers drive the design, not the other way around.
Understanding Your Center Stone as a Physical Object
Before choosing a setting, it helps to stop thinking of the diamond as a symbolic object and start treating it as a physical one. A center stone has measurable dimensions, weight distribution, and structural vulnerabilities. These factors determine what settings are safe, how the ring will sit on the finger, and how the stone will behave under daily wear. Ignoring the physical reality of the stone is where many custom designs go wrong.
Carat Weight vs. Visual Face-Up Size
Carat weight tells you how much the stone weighs, not how large it looks from above. A shallow-cut 1-carat round may face up larger than a deep 1.05-carat round, because more of its weight is distributed across the table. For setting design, the stone’s diameter and width matter far more than its weight. A setting built for a 6.5 mm round will not fit a 6.2 mm round, even if both weigh the same. Always use the stone’s millimeter measurements, not its carat weight, when evaluating setting compatibility.
Shape-Specific Setting Constraints
Every diamond shape has structural weak points that the setting must address. Pointed shapes like pear, marquise, and emerald cuts require protection at their tips, either through a V-prong, a bezel, or cathedral shoulders that shield the corners from impact. Round brilliants and cushions are more forgiving because they have no sharp edges or exposed points. They offer more setting flexibility and can sit securely in simpler prong configurations. Common shape-specific failure points include chipped tips on marquise cuts, corner damage on emerald cuts, and loose prongs on pear shapes where the setting does not align with the stone’s natural asymmetry. The shape of the stone dictates the minimum level of structural protection required.
Setting Security and Stone Retention
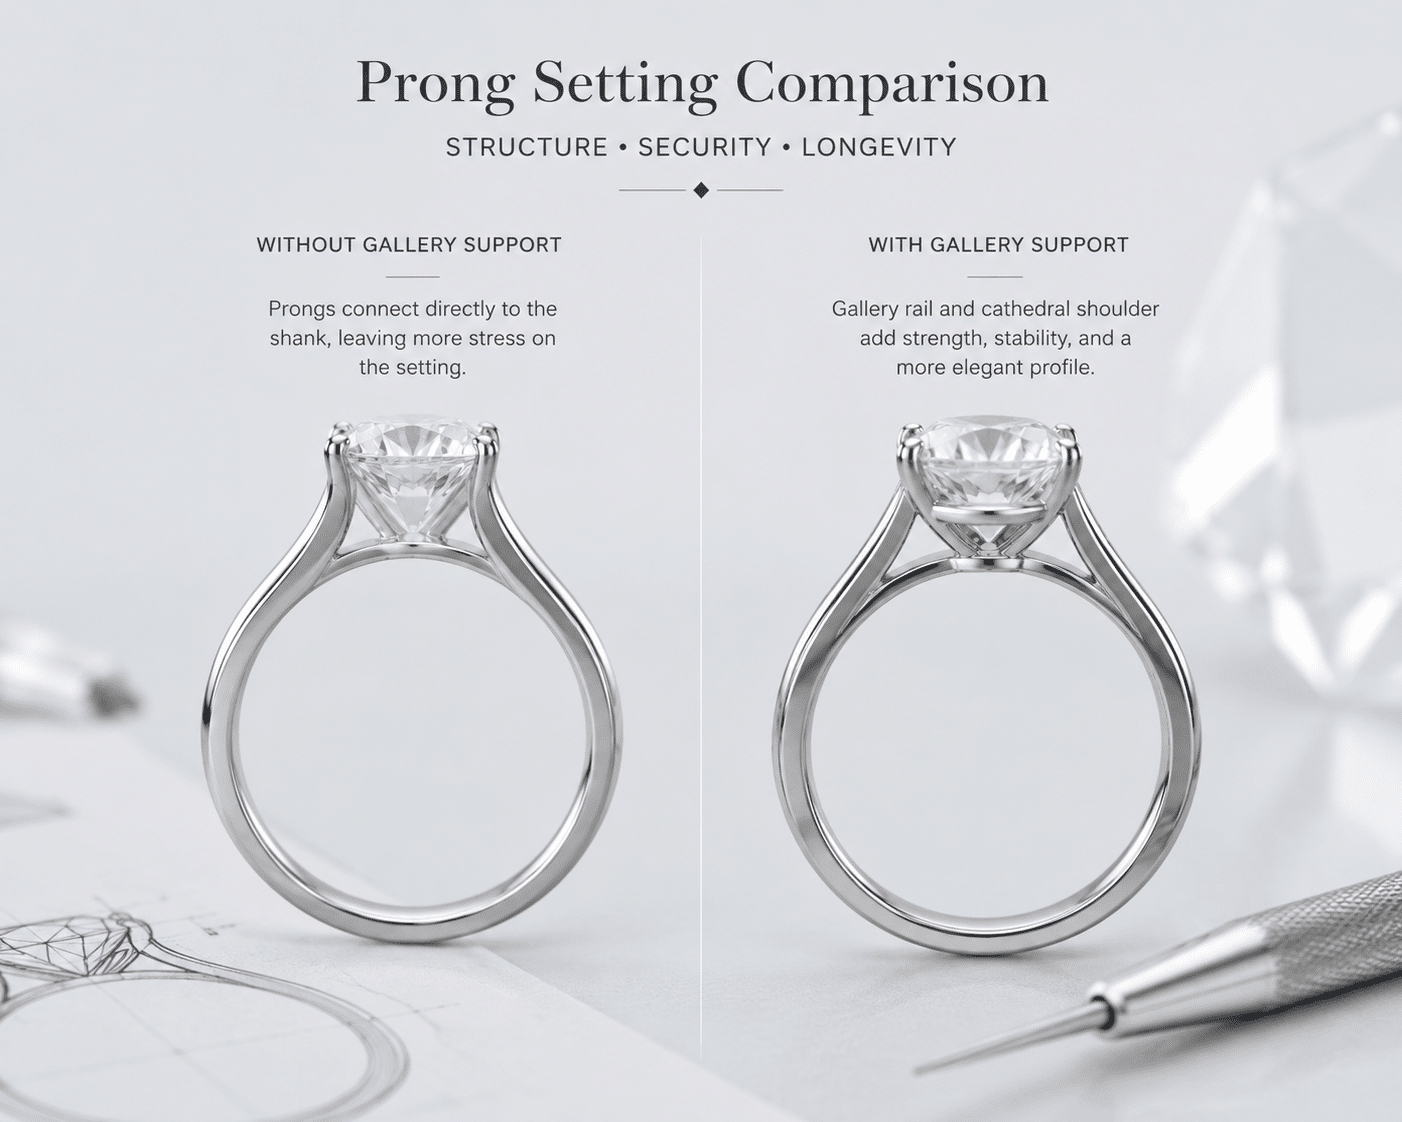
Prong count, prong placement, shoulder height, and gallery rail support all affect how securely the stone is held. A six-prong setting distributes holding force more evenly than a four-prong one, reducing the risk of stone movement over time. A gallery rail, which connects the prongs beneath the stone, adds a second layer of protection by preventing the diamond from shifting downward if a prong is bent. A setting with fewer prongs and no gallery rail may look cleaner, but it also increases the risk of stone loss from a single impact. For active wearers, the tradeoff between a minimalist look and long-term security should be weighed carefully.
How to Verify Setting Safety Before Committing
Before confirming a custom design, ask for specific visual evidence. Request side-view images showing how the prongs engage the stone edge and whether the prong height exposes or protects the tip. Ask for cross-section drawings or CAD screenshots that show the gallery support and metal thickness around the stone. Get written confirmation of the minimum metal thickness at the narrowest point of the band and around the stone. Finally, ask whether the design has been reviewed against the wearer’s typical daily activities. A ring worn during manual work or frequent travel needs a different level of protection than one worn primarily in an office.
For buyers, the practical point is not just whether the stone looks secure in a photo, but whether the setting accounts for the specific forces the ring will encounter. A design that passes a visual check may still fail if the prongs lack enough metal to withstand repeated lateral pressure from daily movement.
Matching Metal Type to Lifestyle, Not Just Aesthetics
Metal choice is often treated as a purely visual decision. In reality, the metal affects how the ring wears over time, how often it needs maintenance, and how well it protects the center stone. The right metal depends as much on daily habits as on color preference.
Metal Hardness and Everyday Durability
Platinum, 14k gold, 18k gold, and palladium each behave differently under daily wear. Platinum is dense and heavy. It does not lose metal when scratched, but it develops a patina over time that some buyers prefer and others do not. 14k gold is harder than 18k gold because of its higher alloy content, making it more resistant to scratches and bending. 18k gold is softer and more prone to surface wear, but it has a richer color and a heavier feel. Palladium is lightweight, naturally white, and hypoallergenic, but it is less common and may be harder to service locally. A softer metal like 18k gold can still work well if the ring has a thicker band profile and a protective setting. The tradeoff is maintenance frequency, not whether the metal is usable.
Metal Color and Stone Appearance
The metal color changes how the center stone’s body color is perceived. Yellow gold and rose gold tend to mask slight warmth in a lower-color lab-grown diamond, making a stone with a G or H color look whiter than it would in a white metal setting. White gold and platinum do the opposite. They reflect the stone’s true body color, which means a lower-color diamond may look noticeably warmer in these metals. A high-color stone, D or E, looks best in white metal because nothing interferes with its colorless appearance. Matching metal color to stone color is one of the simplest ways to improve the overall look without upgrading the diamond grade.
Allergy, Skin Reaction, and Practical Wear
Nickel sensitivity is a real concern with white gold alloys. Most white gold contains nickel as part of the alloy, which can cause skin reactions in some wearers. Palladium and platinum are naturally hypoallergenic and do not require nickel. If white gold is preferred but nickel sensitivity is a concern, ask for a nickel-free white gold alloy, which exists but is less common. Rhodium plating, which gives white gold its bright white finish, also wears off over time. Most white gold rings require re-plating every one to two years depending on wear frequency. Factor this into the long-term maintenance cost when choosing the metal.
What to Check Before Choosing a Metal
Before finalizing the metal, confirm the exact alloy composition in writing, including any nickel content if relevant. Understand the ring profile and ask whether the band may wear thin at the bottom over time, especially if a resizing is likely. For white gold, ask about the rhodium plating schedule and whether the jeweler offers re-plating services. A metal choice should be based on the physical reality of how the ring will be worn, not just a preference for how it looks in a display case.
Grading Reports and the 4Cs: What They Document and What They Leave Out
An official grading report from a recognized laboratory provides a standardized description of a diamond’s characteristics. Most reports from labs such as GIA and IGI document the four Cs — carat weight, color grade, clarity grade, and cut grade (for round brilliants) — along with a plotted diagram of clarity characteristics and a proportional diagram of the stone’s measurements.[1] This documentation is useful for narrowing options and confirming that a stone’s basic parameters match the buyer’s preferences.
However, a grading report has limits that are often misunderstood. It does not describe how the stone will look in a specific setting, whether it will fit a particular metal type, or how the stone’s proportions will interact with the ring’s overall design. GIA itself uses standardized terminology to describe lab-grown diamonds, distinguishing them from natural diamonds through clear language on the report.[2] This helps buyers understand what they are purchasing, but it does not address whether the stone’s face-up appearance will satisfy the wearer under daily lighting conditions. The report is a starting point for verification, not a full evaluation of the stone’s visual performance or structural compatibility with a custom setting.
When designing a custom ring, the grading report should be treated as one reference among several. The buyer should also review high-resolution video of the actual stone, compare its millimeter measurements against the setting’s internal dimensions, and confirm that the stone’s shape-specific vulnerabilities are addressed by the setting design. A stone that looks excellent on paper may still be a poor fit if its cut proportions create a visible dark area in the center or if its girdle thickness falls outside the safe range for the intended prong or bezel style.
Setting Structure: How the Ring Holds Everything Together
The difference between a ring that lasts thirty years and one that loses its stone within three is almost always a matter of setting structure, not diamond quality. The setting is the engineering that keeps the center stone in place under normal daily impact, accidental bumps, and years of wear. A visually beautiful setting that lacks structural support is a risk, especially for certain stone shapes or active lifestyles.
Prong Settings and Gallery Support
A standard four-prong setting holds the stone by tension across the crown and girdle. That works well for round brilliants and cushions because they have continuous curved edges. For pointed shapes such as pears, marquise cuts, and emerald cuts, prongs alone are often insufficient. The tip or corner of these shapes is vulnerable to direct impact, and a single prong at the tip provides little protection if the ring hits a hard surface.
To improve stone retention without changing the overall look, designers add structural elements beneath the stone. The most common is a gallery rail, a thin metal bar that runs under the girdle between prongs. If a prong bends or breaks, the gallery rail prevents the stone from falling out entirely. Cathedral shoulders, where the band rises to meet the setting on both sides, add another layer of protection by distributing impact force along the band rather than concentrating it on the prongs. Basket settings, which wrap metal around the lower half of the stone, offer the highest retention but reduce light access from the side.
The tradeoff is visual. A gallery rail is visible from certain angles, and a full basket blocks side light entry. For buyers who prioritize a clean, open look, the structural risk is higher, and the choice should reflect whether the ring will face daily physical wear or more controlled environments.
Bezel and Semi-Bezel Settings
A full bezel setting surrounds the stone with a continuous metal rim. This is the safest option for active wearers and for fragile shapes such as emerald cuts and marquises. The stone is fully protected around its perimeter, and there is no risk of a prong catching or bending. The bezel also seals the girdle edge, reducing the chance of chipping.
The tradeoff is visual size and light performance. A bezel rim adds visible metal width around the stone, making the diamond appear slightly smaller than a prong setting of the same carat weight. The metal rim also blocks some light entry from the side, which can reduce brilliance in certain lighting conditions. A thin well-made bezel minimizes both problems, but a heavy bezel significantly changes the look.
A semi-bezel setting covers only part of the stone perimeter, typically the top and bottom or just the sides. This provides edge protection for the most vulnerable points while keeping an open look around the rest of the stone. It is a good middle ground for someone who wants extra security without a fully closed setting. The less metal used, the closer the light performance gets to a prong setting, but the structural tradeoff is less retention if the semi-bezel is too minimal.
Tension and Hidden-Halo Alternatives
Tension settings hold the stone by pressure from the band itself rather than prongs or bezels. The band is split and slightly compressed to grip the stone at two or more points. This creates a floating appearance with minimal visible metal. The catch is that tension settings require exact stone dimensions. A variation of 0.1 mm in girdle thickness can make the stone too loose to stay in place or too tight to set safely. Not every stone is a candidate, and the setting cannot be adjusted after casting. For shapes without parallel sides, tension settings are often structurally unsound.
Hidden halos are a popular alternative for buyers who want visual size without the structural risk of a prong-only or tension design. A hidden halo places small accent stones around the girdle of the center stone, visible only from the side angle. This has two effects: it adds perceived face-up size without increasing carat weight, and it reinforces the stone’s circumference with an additional metal ring. The limitation is that a hidden halo requires enough crown height to be visible from the side. A stone with a very shallow crown will hide the halo rather than showing it off.
Neither tension nor hidden-halo settings are inherently unsafe. They are simply more constrained. The structural soundness depends on exact stone measurements and a design that has been properly tested for the specific stone shape and size.
Setting Compatibility Checklist for Loose Stones
Before committing to a specific setting, confirm the following:
– The stone’s girdle thickness falls within the range that the setting can accept. A very thin girdle may not hold safely in a prong setting. A very thick girdle may not fit a bezel or tension setting.
– The pavilion depth and overall stone height do not cause the culet to touch or sit too close to the base of the setting.
– For bezel settings, the stone’s outline matches the bezel cavity dimensions within 0.1 mm to prevent movement or stress.
– The setting includes a gallery rail or other retention mechanism if the stone shape has pointed corners or tips.
– For tension settings, the stone shape has at least two parallel or near-parallel sides that can be securely gripped.
A designer who cannot or will not confirm these details before casting is a red flag. The setting should be designed around the stone, not the other way around.
Finger Size, Ring Width, and Visual Balance
A custom ring must look right on the wearer’s finger, not just in a photo or display case. The relationship between the center stone, the band, and the finger determines whether the ring feels proportional or off-balance. Many buyers focus entirely on carat weight and setting style and discover only after delivery that the ring looks smaller or larger than expected because they did not account for finger size.
Proportion Guide: Stone Width vs. Finger Size
Carat weight alone does not tell you how a stone will look on a specific finger. Two stones of the same carat weight can have very different face-up dimensions depending on shape and cut proportions. A 2-carat oval that measures 9.5 mm by 6.5 mm may look proportional on a size 8 finger but oversized and covering more than half the finger width on a size 4 finger. The same mismatch happens when a buyer replicates an inspo photo without checking the stone dimensions and finger size used in the original image.
The general guideline is that the stone width should not exceed 60 to 70 percent of the finger width at the ring base. For a size 5 finger, a stone that is roughly 8 to 9 mm wide will usually fill the finger nicely. For a size 8 finger, a stone width of 10 to 11 mm feels more proportional. Length-to-width ratio matters too: elongated shapes such as ovals, pears, and marquises, as detailed in the custom lab grown diamond quality check, tend to look more proportional on longer fingers because the extended line complements the finger shape.
Round stones and cushions appear smaller in face-up area relative to their carat weight compared to elongated shapes. A 1.5-carat round looks modest on a size 7 finger, while a 1.5-carat oval of the same carat weight can look noticeably larger. If the buyer wants substantial finger coverage, an elongated shape is usually the more efficient choice in terms of carat weight per visible area.
Band Width and Stone Size Relationship
The band width directly affects the ring’s visual balance and structural durability. A thin band between 1.5 mm and 2.0 mm makes the center stone appear larger relative to the finger. This is a common choice for buyers who want the stone to stand out. The risk is structural. A thin band wears thinner over time, especially at the bottom where the shank rubs against surfaces. A 1.5 mm band on a heavy stone may also twist on the finger because the ring lacks enough mass to stay oriented properly.
A wider band between 2.5 mm and 3.0 mm creates a more substantial look and significantly improves long-term durability. The band can accommodate more metal thickness at the bottom, reducing wear-through risk. The visual tradeoff is that the stone looks proportionally smaller because the band competes for visual attention. For stones over 2 carats, a band under 2.0 mm is generally not recommended unless the metal is one of the harder alloys such as platinum or 14k gold.
The general recommendation is to match band width to stone width. A stone wider than 8 mm generally benefits from a band of at least 2.0 mm. A stone under 6 mm wide can sit comfortably on a 1.5 mm band without looking mismatched. The band should also taper smoothly into the setting head so the transition does not look abrupt.
Daily Wear Habits and Structural Choices
How the ring will actually be worn matters more than most buyers realize. A ring worn every day through typing, childcare, cooking, gym sessions, and sleeping experiences very different forces than a ring worn for special occasions only.
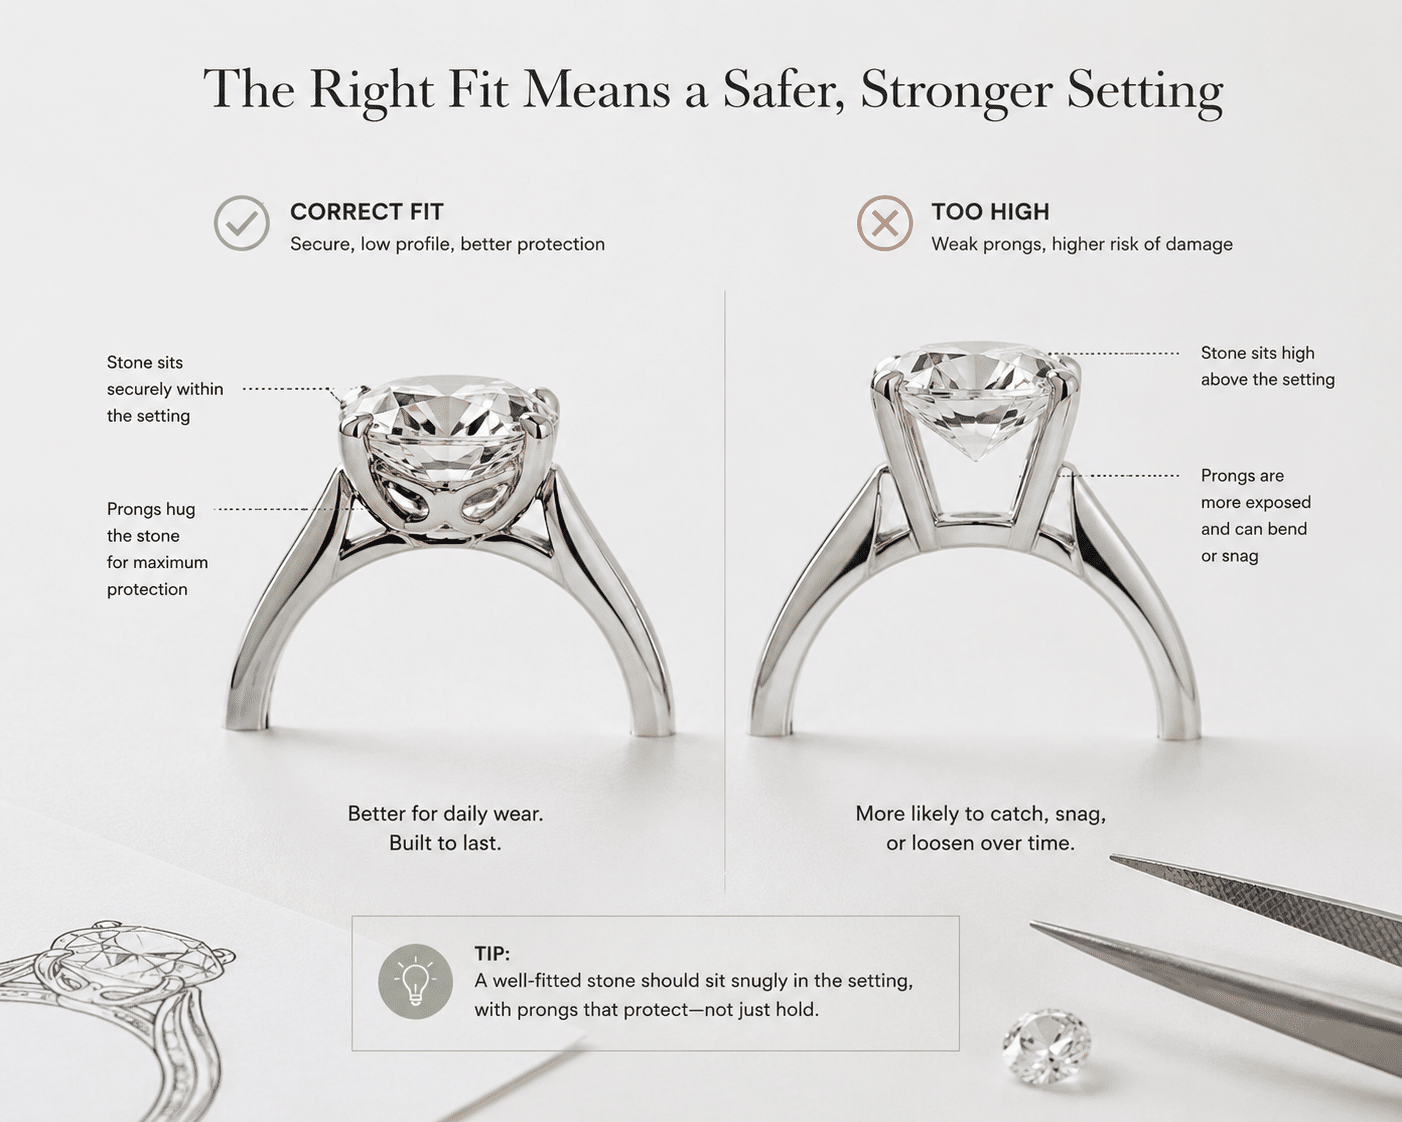
Higher-set stones are more vulnerable to snagging and impact. A prong setting with a high crown sits above the finger by several millimeters. It catches on fabric, zippers, bags, and door handles. Over time, this repeated snagging weakens the prongs and can damage the stone edge. For someone who works with their hands or spends time around small children, a high-set ring is a higher-risk choice regardless of how beautiful it looks.
Low-profile designs, where the stone sits closer to the finger, reduce snagging risk significantly. Bezel settings are inherently low profile because the stone rim is at or near the same height as the metal edge. Some prong settings can also be built with lower crowns, though this requires careful adjustment of the prong height to avoid visually crowding the stone. A cathedral setting can lower the overall profile while still providing structural support.
The buyer should be honest about their daily environment. A ring that is removed for every activity is more likely to be lost or left behind. A ring that stays on through normal daily life should be designed to survive that life.
Real-World Wear Simulation Check
Before finalizing the design, request a side-profile image or CAD rendering that shows the ring at its actual height. Evaluate the following:
– Does the ring clear the fabric of a winter glove without catching?
– If you run your finger across a table edge or keyboard, does the stone or setting make contact first?
– Would the ring snag on a zipper, bag strap, or pocket edge?
– For active lifestyles, does the stone sit noticeably above the finger more than 5 mm?
If the answer to any of these is unclear, ask the designer to adjust the profile. A slight change in prong height or setting angle can make the difference between a ring that catches on everything and one that stays safe through daily wear. Confirm the wearer’s daily environment so the designer can offer a realistic recommendation.
The Custom Design Workflow: From Consultation to Finished Ring
A professional custom design process follows a clear sequence of decisions. The buyer who understands this sequence will ask better questions and end up with a ring that fits both the stone and the lifestyle. The process is not mysterious, but it requires coordination between stone selection, structural design, metal confirmation, and final inspection.
Step 1: Stone Selection Based on Measurements, Not Just Grade
The 4Cs alone are insufficient for custom design. A diamond may have excellent color, clarity, and cut grades but still be a poor candidate for a specific setting. The critical parameters are the stone’s actual dimensions in millimeters, its length-to-width ratio, its girdle thickness, its crown height, and its pavilion depth. These measurements determine whether the stone fits the setting’s internal cavity size, whether a bezel or prong can hold it securely, and whether a hidden halo or tension setting is structurally possible.
At NUVU, our team treats stone selection for custom rings as a measurement-first process. The stone must physically match the intended setting before any other factor matters. Visual review of the stone, not just a grading report, confirms that the face-up appearance aligns with the buyer’s expectations. Shape-specific cut quality also matters: an elongated pear with a strong bow-tie effect may look fine in a display but disappointing in daylight. The buyer should see the actual stone in motion or high-resolution video before the setting design begins.
Step 2: CAD Design and Structural Review
Once the stone is selected, the designer creates a CAD model showing the ring from every angle. The model includes the band thickness, prong or bezel dimensions, gallery rail placement, stone height, and overall profile. This is the buyer’s opportunity to evaluate whether the design looks structurally safe and visually balanced.
What to look for in CAD renderings:
– The stone should sit centered and level in the setting, with equal metal distribution around the girdle.
– Prongs should visibly overlap the stone edge without covering a large portion of the crown.
– The gallery rail or basket should be visible under the stone, confirming that retention support exists.
– Band thickness should be consistent. A sharp taper from a wide head to a thin shank indicates a weak point.
If something looks off in the CAD, it will look worse in the final ring. Request adjustments before moving to casting. A reputable designer will make reasonable modifications without additional cost at this stage.
Step 3: Material Confirmation and Casting
After the CAD is approved, the buyer confirms the metal choice, the specific alloy composition, and the finishing type. The finishing type matters for appearance: high polish shows scratches more visibly but has a brighter luster, while brushed or hammered finishes hide daily wear marks better. Some buyers prefer a combination, such as high polish on the setting head and brushed finish on the band.
The ring is then cast from a wax model of the CAD design. The metal is poured into the mold, cooled, and cleaned. At this point, the basic metal ring exists. The center stone has not yet been set, and adjustments are limited.
Step 4: Stone Setting and Final Inspection
The center stone is physically set into the casting. This is the most delicate part of the process. The setter adjusts the prongs or bezel rim to hold the stone securely without applying excessive pressure that could damage the girdle. The stone must sit level, with equal clearance around all sides.
When reviewing the finished ring, check the following:
– Center stone alignment. The stone should sit straight, not tilted in any direction.
– Prong placement symmetry. All prongs should make even contact with the stone edge.
– Metal finish consistency. There should be no visible tool marks, uneven polish, or discolored sections.
If buying in person, bring a loupe and examine the prongs from multiple angles. If ordering remotely, request a high-resolution video showing the ring from the top, both side profiles, and an angled close-up of each prong or bezel edge.
Verification Points Before Accepting the Finished Ring
Before paying the final balance, confirm:
– Each prong is tight against the stone without visible gaps or excessive metal covering the crown.
– The stone culet does not touch the inside of the setting. There should be a small air gap or a clear view of the pavilion.
– The girdle is visible and not fully buried under metal. A setting that covers the girdle completely can hide damage or make future re-setting difficult.
– The metal finish is consistent across all visible surfaces with no rough edges or sharp spots.
– The ring fits the wearer’s finger properly. If a resizing is needed, it should be done before the stone is set, or the stone must be removed first to avoid thermal stress.
For remote purchases, arrange a video call or request a recorded inspection showing all angles under consistent lighting. A reputable seller will accommodate this without resistance.
The custom process is sequential but not rushed. Each step builds on the previous one. The buyer who participates actively in stone measurement review, CAD evaluation, and final inspection will receive a ring that fits, functions, and lasts.
All lab-grown diamonds discussed in this article with grading reports have been verified against official laboratory records where applicable. As an authorized retailer, we stand behind the authenticity and quality of every diamond we supply. Independent verification is available upon request through the issuing laboratory’s online report check service. All purchases include a certificate of authenticity and a 30-day return policy for complete peace of mind.
Buyers should note that laboratory-grown diamonds are distinct from natural mined diamonds in their origin, and this distinction should be clearly reflected in any seller documentation or grading report. When considering a lab-grown diamond for a custom ring, it is helpful to confirm that the report or seller description explicitly identifies the stone as laboratory-grown to avoid confusion.
Integrating Personal Style Without Compromising Safety
A custom ring is supposed to feel personal. But personal does not have to mean fragile. The challenge is not whether you can add decorative details, but whether the structure can support them without reducing the ring’s long-term reliability. Most decorative choices involve tradeoffs in metal thickness, profile shape, or setting security. Understanding those tradeoffs ahead of time lets you keep the aesthetic you want without discovering a weak point later.
Engraving, Milgrain, and Side Stones
Engraving removes metal. That is the basic tradeoff. Deep hand engraving or heavy machine engraving along the band reduces the effective cross-section of the shank. On a thin 1.5 mm band, that reduction can make the ring structurally unstable over time, especially if resizing is needed later. If engraving is important to you, start with a wider band — 2.5 mm or more — so there is enough metal left after the engraving is cut.
Milgrain adds texture but does not remove material. Applied carefully around the edge of a band or bezel, it creates a vintage look without weakening the structure. The risk is not structural but practical: milgrain beads can wear down over time, especially on rings worn daily. If you want milgrain, ask whether it will be cut into the metal or added as applied beads. Applied beads are more likely to wear smooth in high-contact areas.
Side stones create a separate set of constraints. Small melee diamonds or accent stones require enough metal to hold them securely, which means the band or basket must have adequate wall thickness. A ring with side stones usually needs a gallery rail or a continuous channel to prevent stone loss if one prong bends. A common failure point in side-stone settings is a prong bending just enough to drop a small stone without the wearer noticing immediately. If side stones are part of the design, ask about prong coverage and whether the setting includes a hidden rail underneath.
Contrast Finishes and Two-Tone Metal Designs
Mixed metals can create visual separation between the band and the setting, which sometimes helps the center stone appear more distinct. A platinum or white gold setting paired with a yellow gold band, for example, as per the custom lab grown diamond jewelry guide, reduces the risk of color bleed from the metal into the stone. Low-color lab-grown diamonds often look whiter in a white setting, while a high-color stone can stand out against warmer band metal without competing.
The practical concern with two-tone designs is maintenance. If one section is white gold and the other is yellow, only the white gold section will need periodic rhodium replating. Over time, the contrast between the two metals will shift as the white gold loses its bright topcoat. Some buyers prefer this — the slight warmth of unplated white gold against bright yellow can look intentional. Others find it uneven and prefer to plate both sections or avoid white gold entirely.
If the design includes a contrast finish within the same metal type — say, a high-polish band with a brushed center — durability is less of a concern. The finish difference will fade on high-contact areas over time, but the metal structure is unchanged. This is a low-risk way to add visual interest without affecting the ring’s long-term security.
Ethical and Transparent Sourcing of Both Stone and Setting
A custom ring is made of two separate components: the stone and the metal setting. Both should be documented. At NUVU, the origin of every lab-grown center stone is confirmed before it enters a design. The metal used in the setting is also verified, so the buyer knows exactly what they are receiving. This is not about marketing claims. It is about having a clear, written record of where each part came from and how it was made.
For the stone, the grading report provides a starting point. But the report does not always state the manufacturer or the growth method used (HPHT or CVD). If you want that level of detail, ask explicitly. A reputable designer should be able to provide the information — not as a vague assurance, but as a document or a verifiable statement. A grading report can document key characteristics, but it should not be treated as a guarantee of ethical sourcing, sustainability, or beauty.
For the setting metal, ask about the alloy composition, whether the gold is recycled, and whether the platinum or palladium is pure or alloyed with other metals. Nickel content matters if you have a sensitivity. Rhodium plating schedules matter if you choose white gold. A written summary that includes these details is the best protection against surprises later.
In practice, a buyer should not assume that a grading report covers everything. The report documents color, clarity, and cut within a specific range, but it does not verify the stone’s visual performance under the intended setting or confirm its physical compatibility with the chosen design. These are separate judgments that require visual review and measurement comparison.
Confirmation Checklist for a Custom Design
Before you approve the final design, request a written summary that includes:
– Stone origin and growth method (HPHT or CVD)
– Grading report number and laboratory
– Metal alloy composition for each component (band, setting head, any accent metal)
– Setting type and all component measurements
– Warranty or service policy for future prong tightening, replating, or resizing
– Documentation for both the stone certificate and the metal sourcing, if available
This checklist is not about distrusting the designer. It is about having a clear reference point so that maintenance, resizing, or future repairs can be handled without confusion.
Next Steps: What to Prepare Before Contacting a Designer
A custom ring conversation goes better if you come prepared. You do not need to be a diamond expert, but having a few key pieces of information ready will save time and reduce the chance of miscommunication. The designer should be guiding the process, but you will make better decisions if you know what to ask and what to watch for.
Information to Have Ready
Bring these details to your first conversation:
– Finger size, measured recently and preferably by a jeweler
– Preferred metal type and finish (high polish, brushed, hammered)
– A short description of your daily wear environment — office work, frequent manual activity, regular gym use, childcare, cooking, or sleeping with the ring on
– Separate budget for the center stone and the setting, so you can evaluate tradeoffs independently
– Reference images that show the setting style you are drawn to, not an exact replication you expect the designer to copy
The reference images should help the designer understand your taste in prong style, band width, profile height, and decorative detail. They are not blueprints. A good designer will use them as inspiration, then adjust the design to fit your specific stone and finger.
Questions to Ask the Designer
These questions separate a thorough designer from one who is rushing the process:
– Can you show me similar designs at my stone size and metal choice?
– What is the typical wall thickness for this band at my finger size?
– How is the prong or bezel height determined for this specific stone?
– What is your process for making adjustments if the stone sits noticeably higher or lower than expected?
– Can you share a CAD preview that includes side and top views before casting?
A designer who answers these questions clearly and provides visual references is likely to produce a safer, better-fitting result than one who gives vague assurances or skips the structural details.
Red Flags to Notice in a Custom Design Process
Some warning signs indicate that a designer is not treating custom work with the care it requires:
– A designer who quotes a design without asking for your stone’s exact measurements
– A designer who guarantees a specific look without seeing the stone in person or via video
– A designer who offers no CAD preview or structural review before the metal is cast
– A policy that does not allow adjustments to prong height, band thickness, or gallery support after the CAD stage
Any of these signals suggest that the process is more about completing an order than about getting the design right. A proper custom ring involves multiple decision points, and the designer should leave room for changes based on what the stone actually requires.
Final Buyer Verification
Before paying the final balance, run through this short check:
– Confirm that the stone certificate and setting documentation are available
– Confirm the return or revision policy in writing, including what happens if the ring does not fit or the stone is not seated correctly
– Confirm that the ring can be serviced after purchase — prong tightening, replating, and resizing should not require a full redesign
If you are buying remotely, ask for a high-resolution video inspection before final delivery. The video should show the stone from multiple angles: top, side, and close-up on the prongs or bezel edge. Look for even spacing between prongs, smooth metal finish around the setting, and the stone sitting level without tilt. A quick video check at this stage can catch issues that would be difficult to fix after the order is finalized.
How to Interpret a Grading Report for a Custom Design Context
A grading report from a laboratory like GIA or IGI is a useful document, but it was not designed to answer the specific questions a custom ring buyer needs to ask. The report records the stone’s weight, color, clarity, and cut within a standardized framework, but it does not evaluate how the stone will perform in a low-set bezel, whether its girdle thickness is safe for a prong setting, or how its proportions interact with a specific finger size. These are design decisions, not grading decisions.
When using a report to guide a custom design, focus on the measurable data rather than the descriptive grades. The report’s proportional diagram shows the crown angle, pavilion angle, and total depth. These figures matter for stone retention because they determine how much of the stone sits above the setting and how much is embedded. A stone with a steep pavilion angle may require a deeper setting cavity, which could conflict with a low-profile design. Similarly, a stone with a very thin girdle, often noted as “thin to medium” on the report, may not hold securely in a four-prong setting and might need a bezel or a gallery rail for added support.
The clarity plot on a report maps inclusions, but it does not tell you whether those inclusions will be visible in the setting. An inclusion located near the girdle may be hidden by a prong or a bezel rim, while an inclusion near the table center will remain visible regardless of the setting. If the clarity grade is driven by an inclusion near the edge, the buyer can safely prioritize a lower clarity grade without compromising the visible appearance. The report provides the data, but the interpretation depends on the design context.
For custom design, the report should be cross-checked against the stone’s actual millimeter measurements. A report lists the stone’s dimensions, but those need to be compared with the setting’s internal cavity size. A difference of 0.2 mm in width can mean the stone either fits snugly or rocks inside the setting. The buyer should ask the designer to confirm that the report’s dimensions match the setting’s specifications before approving the CAD.
When a grading report is available, buyers should verify the report details through the issuing laboratory’s official report-check tools where available. This step confirms that the report has not been altered and that the documented measurements match the stone. It is a straightforward check that adds a layer of assurance before the design process begins.
[1] GIA, “Report Check,” Gemological Institute of America. Provides an interactive guide to understanding the components of a GIA grading report, including color, clarity, cut, carat weight, and proportion diagrams.
[2] GIA, “GIA Clarifies the Terminology for Describing Laboratory-Grown Diamonds,” press release, July 2018. Explains GIA’s use of specific language on grading reports for laboratory-grown diamonds to avoid misleading terminology and ensure clear disclosure.
Disclosure: This article is for general educational purposes only. Diamond grading, pricing, availability, specifications, and seller policies can change, and readers should verify important details through grading reports, official laboratory tools, seller documentation, or qualified professionals before making a purchase decision. Laboratory-grown diamonds should be clearly distinguished from natural diamonds, and environmental or sourcing claims should be supported by specific documentation. A grading report helps document key characteristics, but it should not be treated as a guarantee of beauty, value, or sourcing ethics. Prices can change with market conditions, report type, seller channel, and stone-specific details, so exact comparisons should be verified at the time of purchase.