
Two loose lab-grown diamonds can look very different even when their certificates list the same carat, color, clarity, and cut grade. The difference often comes from how the full cut system works together: proportions, depth, table size, crown and pavilion relationship, facet alignment, polish, symmetry, and the way the stone returns light in real viewing conditions. A report can confirm important facts for eye-clean loose diamonds, but it cannot fully show brightness, fire, contrast, bow tie control, step-cut patterning, or how lively the diamond appears in motion.
For the full framework, read Loose Lab-Grown Diamonds Buying Guide.
This guide helps you judge cut quality as a visible result, not just a grade on paper. You will learn when to trust measurements, when to rely more on video, how shape changes the evaluation, and why a slightly smaller or lower-graded stone may be the better choice if it looks brighter, cleaner, and better suited to the final setting.
Laboratory-grown diamonds should be clearly identified as laboratory-grown, and they should not be presented as mined diamonds. Lab-grown diamonds and natural diamonds are both diamonds, but they have different origins; this guide focuses on loose laboratory-grown diamonds and how their cut quality affects visible performance.
A grading report helps document key characteristics, but it should not be treated as a guarantee of beauty, value, or sourcing ethics. Use the report as structured evidence, then compare it with actual-stone visuals, measurements, seller documentation, and the intended jewelry design.
| What You’re Comparing | What to Check | Buyer Risk to Avoid |
|---|---|---|
| Round brilliant diamonds | Table, depth, crown angle, pavilion angle, symmetry, video | Assuming “Excellent” always means stronger sparkle |
| Fancy shapes | Overall shape, bow tie, facet pattern, brightness across the center | Using round-diamond standards for every shape |
| Certificate details | Report number, measurements, polish, symmetry, cut data | Treating the report as proof of visual beauty |
| Carat versus appearance | Face-up size, depth, spread, light return | Choosing a larger stone that looks dark or flat |
| Video review | Brightness, fire, contrast, scintillation, performance in motion | Buying from one flattering still image |
| Setting compatibility | Depth, length-to-width ratio, prong or bezel fit, side-stone balance | Selecting a stone that does not suit the ring design |
Quick Questions Before You Read
Q: Can two lab-grown diamonds with the same 4Cs look different?
Yes. Proportions, facet precision, contrast, and light return can make one stone look much livelier than another.
Q: Is a certificate enough to choose a loose diamond?
No. Use the certificate to verify facts, then review actual photos or video of the specific stone.
Q: Should cut matter more than carat?
Often, yes. A well-cut smaller diamond can look brighter and more balanced than a larger stone with weaker light performance.
Q: Do fancy shapes need a different evaluation?
Yes. Bow ties, overall shape, facet pattern, center brightness, and setting fit matter more than a simple cut label.
Why Similar Loose Lab-Grown Diamonds Can Look Different
Two loose lab-grown diamonds can look nearly identical on paper and still look different in real life. They may share the same carat weight, color range, clarity grade, and even a strong cut grade, yet one may appear brighter, more lively, or better balanced than the other. The difference usually comes down to loose lab-grown diamond cut quality: how the stone returns light, how its facets create contrast, and how its proportions affect both sparkle and face-up appearance.
This is where many buyers get surprised. A grading report may make two diamonds seem interchangeable, but diamond visual performance is not created by the 4Cs alone. Brightness, fire, scintillation, and overall eye appeal depend on how the whole stone works as an optical design. If the goal is strong lab-grown diamond sparkle, the better choice is not always the stone with the most impressive-looking grade label.
For buyers, the practical point is not just what the report says, but how the stone performs visually and fits the intended design. A certificate can help prevent obvious mismatches, but it does not remove the need to compare the actual stone’s proportions, video behavior, and physical measurements against the ring or jewelry style being planned.
The Fast Answer: Certificates Describe, but They Do Not Fully Show
A certificate is useful because it gives organized information. It helps confirm carat weight, color, clarity, measurements, polish, symmetry, and cut grade where that grade is provided. It also gives buyers a way to compare diamonds with more discipline than relying on a seller’s description alone.
What a certificate cannot fully show is how the diamond looks in motion. It cannot show whether the center stays bright as the stone turns, whether the contrast pattern feels crisp or uneven, or whether the flashes of light look lively under normal viewing conditions. A report narrows the field, but it does not replace visual judgment. At NUVU, we treat the grading report as the starting point, not the final answer, because the stone still has to perform visually in the way the buyer expects.
How to Trace a Loose Stone From Listing to Report
Traceability begins with matching identity, not with assuming the nicest image is the correct stone. A buyer should check whether the report number, shape, measurements, and any inscription or laser marking align with the listing images and description. If the seller offers multiple diamonds with similar grades, that matching step becomes essential.
It also helps to look for consistency across the full listing. The photos, video, stated measurements, and report should describe the same outline and proportions. If the stone looks noticeably different from one image to another, or the dimensions do not fit the stated carat weight in a believable way, ask for clarification before moving forward. A traceable purchase is one where the paperwork and the visuals support the same conclusion.
For buyers planning custom jewelry, traceability matters because the chosen stone may be removed from its temporary listing context and set into a ring weeks later. Keep a copy of the report, the listing details, and the seller’s dimensional notes so the stone can be matched again when the setting is being finalized or inspected.
When a grading report is available, buyers should verify the report details through the issuing laboratory’s official report-check tool where available, then compare those details with the stone’s photos, video, and measurements.
The Real Reason: Cut Quality Is a System, Not One Grade
Cut quality is not controlled by a single number. Table size, depth, crown structure, pavilion angles, facet alignment, polish, symmetry, and overall shape design all interact. If those elements work well together, the diamond can return light cleanly and create a balanced mix of brilliance, fire, and scintillation. If they do not, a stone can look flat, dark in the center, overly glassy, or smaller than its carat weight suggests.
The common mistake is treating one specification as the answer. A good table percentage does not guarantee beauty if the pavilion is poorly balanced. Excellent symmetry on a report does not always mean the contrast pattern will be the most appealing. Strong loose lab-grown diamond cut quality comes from the relationship between the numbers and the actual look of the stone, not from any single line on the certificate.
Buyer Scenario: Two 1.50-Carat Round Lab Diamonds With Similar Reports
Imagine Emily is comparing two 1.50-carat round lab-grown diamonds online. Both are near-colorless, both have VS clarity, and both carry Excellent cut grades. On the report, the choice looks simple. In video, however, one diamond faces up bright from edge to edge, with clean dark-and-light contrast as it rotates. The other looks slightly dull through the center and seems less energetic, even though its paper grades are nearly the same.
The difference may come from proportion balance, facet precision, or the way the stone handles obstruction and contrast. Emily does not need to become a gemologist to notice the result. She only needs to recognize that similar certificates do not always mean similar appearance. If she chooses by grade alone, she may miss the diamond that actually looks better on the hand.
What to Check Before You Decide
Before choosing a loose lab-grown diamond, compare the grading report, face-up video, proportions, measurements, and seller-provided imagery side by side. Start with the report to confirm the basics, then use visual evidence to judge whether the diamond looks bright, balanced, and lively. If two stones have similar grades but one consistently looks more attractive in comparable video, that visual difference should matter.
Pay special attention to face-up size, center brightness, contrast pattern, and whether the diamond keeps its life as it turns. A lower-priced or higher-clarity stone may not be the better choice if it looks less vibrant. The practical takeaway is simple: when learning how to choose a loose lab-grown diamond, use the certificate to screen options, but let actual visual performance decide between close contenders.
What Cut Quality Actually Means for a Loose Lab-Grown Diamond
Diamond cut quality describes how well a diamond has been shaped, proportioned, faceted, and finished to return light to the eye. For a loose lab-grown diamond, this matters because the stone is being judged before it becomes part of a ring or jewelry setting. Carat tells you weight, color tells you body color, and clarity tells you the presence of inclusions or blemishes. Cut is the factor that most directly controls how alive the diamond looks.
A strong lab diamond cut does not simply mean the stone has a popular shape or a high grade. It means the facet arrangement, polish, symmetry, and proportions work together in a way that supports brightness, fire, and movement. If a buyer wants to understand what makes a lab diamond sparkle, cut quality is the performance engine behind the answer.
Cut Is About Light Behavior, Not Just Shape
Shape and cut quality are often confused, but they are not the same thing. Shape is the outline of the diamond, such as round, oval, emerald, cushion, radiant, pear, or marquise. Cut quality is how well that chosen shape has been designed and executed. A round diamond can be well cut or poorly cut. The same is true for an oval, cushion, or emerald cut.
This distinction matters because buyers sometimes fall in love with a shape and assume the rest is automatic. It is not. An oval with an attractive outline may still show a distracting dark bow tie. A cushion may have a pleasing silhouette but a sparkle pattern the buyer does not like. A round brilliant may have strong grades but less impressive light return than another round stone with better-balanced proportions. The right question is not only “Which shape do I like?” but “How well does this specific stone perform within that shape?”
The Three Visual Outcomes Buyers Notice First
Most buyers respond first to three visible effects: brilliance, fire, and scintillation. Brilliance is the white light that comes back to the eye. It is what makes a diamond look bright rather than sleepy or dim. Fire is the colored flash that appears when light separates into spectral colors. Scintillation is the pattern of sparkle seen when the diamond, the viewer, or the light source moves.
These effects are connected, but they are not identical. A diamond can look bright in a still photo but feel less lively in motion. Another may show strong flashes but have a pattern that feels uneven. The best cut for lab-grown diamond sparkle depends on balance, not exaggeration. A stone that combines steady brightness with crisp contrast and lively movement will usually be more satisfying than one that performs well in only one visual category.
Why Loose Stones Need Extra Review Before Setting
A loose diamond gives buyers a valuable inspection window. Before the stone is mounted, it can be viewed from more angles, compared against its report, and evaluated for face-up appearance without prongs, bezels, halos, or side stones influencing the impression. This is especially useful for buyers planning an engagement ring or custom jewelry project, where the diamond’s measurements and visual character need to work with the final design.
Once a diamond is set, some views may be blocked and the setting can change how the eye reads the stone. Prongs may hide small areas near the girdle. A bezel can frame the diamond differently. A halo can make the center stone appear larger, while also changing how its outline is perceived. This does not make loose diamonds risky; it makes the loose-stone stage the best time to catch mismatches between report data, appearance, and design goals.
For custom design, the stone should not be evaluated separately from the setting. A diamond that looks appealing loose may need different prong placement, basket height, side-stone scale, or halo proportions to look balanced once mounted. This is especially true for elongated shapes, step cuts, and stones with unusual depth or outline proportions.
If a listing uses broad language about responsible sourcing or environmental benefits, it is worth asking what those claims are based on. Specific documentation is more useful than generic green wording, especially when buyers are comparing lab-grown diamonds across different production methods or sellers.
Environmental and sustainability claims should be specific, documented, and limited to what can be substantiated. A laboratory-grown origin may appeal to buyers who want an alternative to mined origin, but it does not by itself prove a particular environmental impact, energy profile, or sourcing standard.
Certificate and Visual Review Check
When evaluating diamond cut quality, check the cut grade if listed, polish, symmetry, measurements, depth percentage, table percentage, and available video. For round brilliant diamonds, these details often give a useful first screen. For fancy shapes, the report may not provide the same kind of overall cut grade, so the actual look of the diamond becomes even more important.
Use the certificate and video together. The report tells you what the diamond is; the video helps show how it behaves. If the report looks strong but the video shows a dull center, uneven contrast, or a shape issue that bothers you, do not ignore what your eye is telling you. A well-chosen loose lab-grown diamond should make sense both on paper and in motion.
The Cut Grade on a Certificate: Useful, but Not the Whole Story
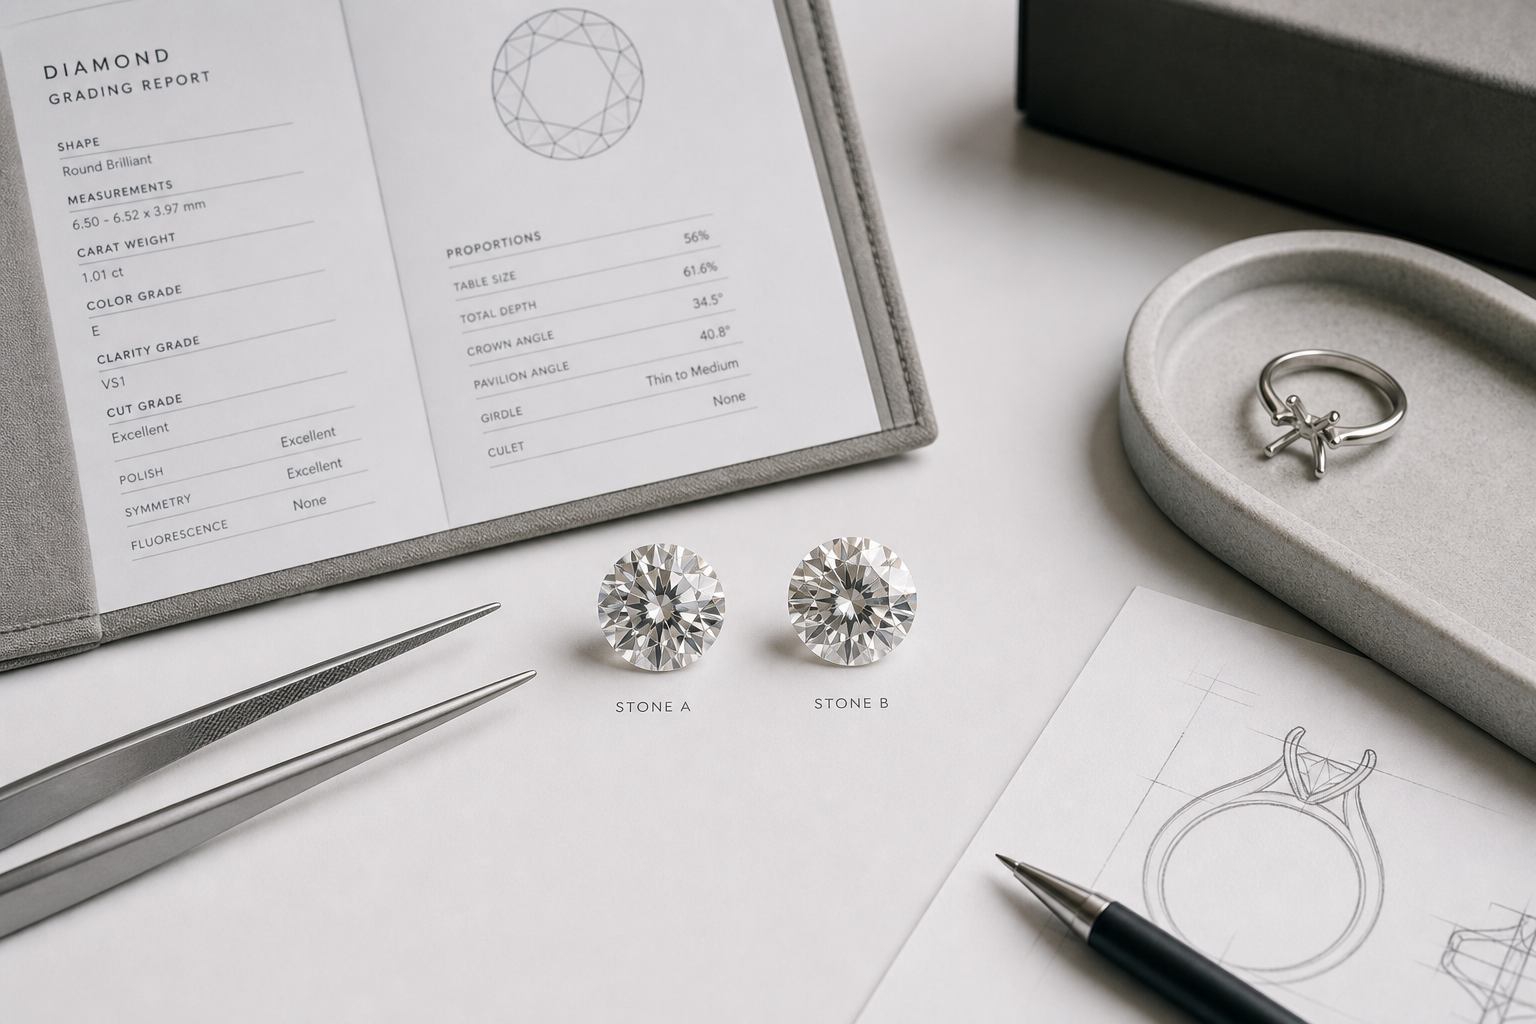
A diamond certificate cut grade is one of the most helpful screening tools a buyer has, but it should not be treated as a complete beauty score. A lab-grown diamond certificate can confirm important facts about the stone and help reduce uncertainty, especially when buying online. What it cannot do is fully predict the diamond’s real-world sparkle, contrast, or personal appeal.
This distinction is important because buyers often ask, “Does Excellent cut guarantee sparkle?” The better answer is that an Excellent or Ideal grade is a strong starting point, not a visual guarantee. A diamond grading report helps you avoid obvious mismatches, but close decisions still require actual imagery, video, and proportion review.
What the Report Can Confirm
A grading report can confirm identity-related and grading information, including carat weight, measurements, color, clarity, polish, symmetry, and cut grade where provided. It may also list fluorescence, inscription details, and other stone-specific information depending on the laboratory and report format. Reports from recognized labs give buyers a structured reference point instead of relying only on sales language.
This information matters because it helps you compare diamonds fairly. If two stones are described as 1.50 carats, the report lets you check the actual measurements and confirm whether one carries its weight differently. If a listing claims a certain color or clarity, the report gives you a document to verify against. The mistake is not trusting certificates; the mistake is expecting them to show everything the eye will see.
What the Report Cannot Fully Show
A report cannot fully show real-time sparkle, eye appeal, contrast behavior, or how a diamond looks in different lighting. It does not show whether the stone appears lively as it turns, whether the center looks balanced, or whether the overall pattern appeals to your taste. It also does not replace actual photos or video of the specific diamond being sold.
This is especially important online, where a diamond may look stronger in one controlled image than it does in motion. Lighting angle, camera setup, background, and rotation speed can all affect perception. A certificate tells you the diamond’s documented characteristics; visual review tells you whether those characteristics translate into the look you want.
Different report formats may emphasize different details, and not every report gives the same depth of cut information for every shape. This does not mean the report is unhelpful; it means buyers should read it for what it documents and then verify the remaining questions through measurements, actual-stone media, and seller clarification where needed.
Evidence Standard for Reading a Diamond Report
A careful buyer should separate three kinds of evidence: what the report documents, what the listing claims, and what the actual stone visuals show. The report is strongest for identifying the documented diamond characteristics. The listing is useful for price, availability, setting options, and seller terms. Photos and videos are most useful for visual performance, including brightness, contrast, bow tie visibility, and overall pattern appeal.
This distinction prevents one common source of overconfidence. A report can support a statement such as “this diamond is listed with these measurements and grades,” but it should not be stretched into “this diamond is automatically the most beautiful option.” Likewise, a flattering video can show an attractive appearance, but it should still be matched to the report number, measurements, and stone identity before the buyer relies on it.
If a seller makes broader claims about sourcing, sustainability, growth method, or special performance standards, those claims should be supported by specific documentation rather than assumed from the fact that the diamond is lab-grown. For cut quality, the safest evidence stack is simple: verified report details, actual-stone visuals, clear measurements, and a setting plan that explains why the diamond will work in the final design.
When growth method or post-growth treatment is relevant, buyers should look for clear disclosure in the grading report or seller documentation. HPHT and CVD may refer to laboratory diamond growth methods, while treatment status should not be assumed unless it is specifically disclosed and documented for the stone being considered.
Why “Excellent” or “Ideal” Still Needs Context
Top cut-grade categories can include a range of proportion combinations. Two diamonds may both fall within a high grade while having different depth, table, crown, pavilion, symmetry, or contrast behavior. One may lean brighter, another may show more fire, and another may have a pattern that feels less balanced to the viewer. The label is useful, but it does not make all stones inside the category visually equal.
This is not a criticism of grading laboratories. It is simply how cut evaluation works in practice. A grade groups diamonds within a standard, while the buyer still has to choose between individual stones. When learning how to read a lab diamond certificate, the most useful habit is to treat the cut grade as a filter, then compare the details and visuals before making the final call.
How to Verify This Before Buying
Before buying, verify the report number on the grading laboratory’s website when that option is available. Match the carat weight, measurements, shape, and grading details against the seller’s listing. If the stone has an inscription, confirm that the listing and report information align. Any mismatch between the listing and the report should be clarified before you proceed.
Then compare the report data with the actual stone imagery. Look for video or photos that represent the specific diamond, not a generic sample. If the listing shows strong grades but limited visual evidence, the risk is not that the diamond is automatically poor; the risk is that you are being asked to make a visual decision without enough visual information. For close comparisons, the better purchase is usually the one where the documentation and the appearance support the same conclusion.
For custom or wholesale-style purchases, it also helps to confirm communication expectations in writing: which images show the exact stone, what happens if the measurements change, and how the seller will identify the stone before it is mounted or shipped onward. Traceability is strongest when the document trail stays intact from listing to final setting.
Proportions That Affect Sparkle: Depth, Table, Crown, and Pavilion
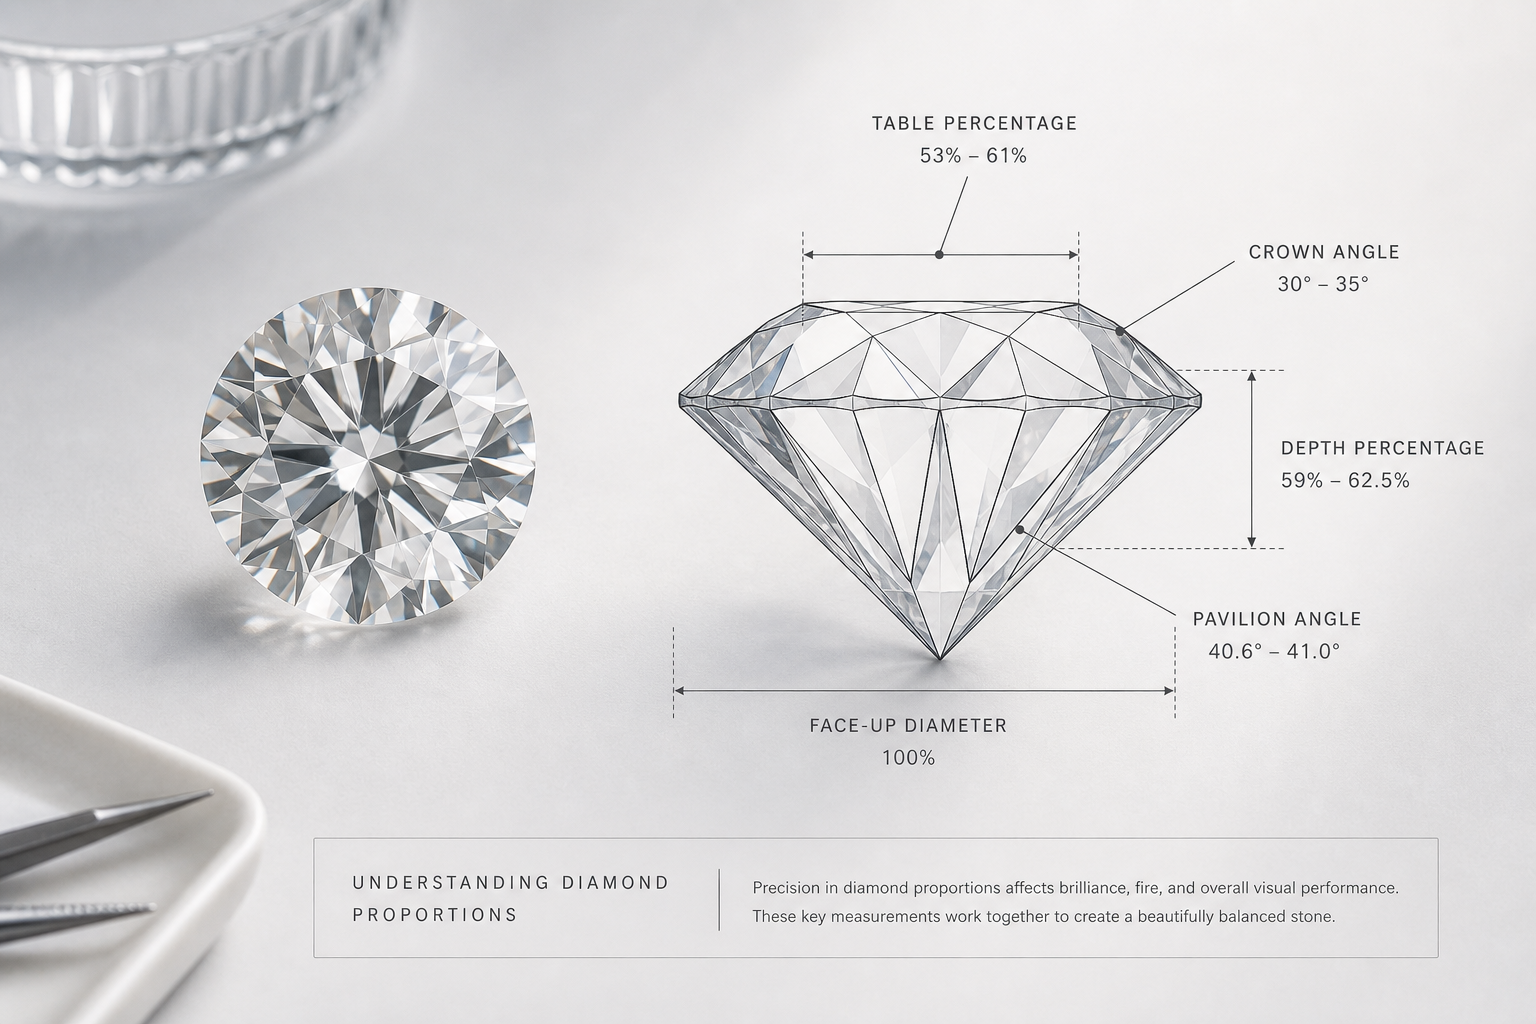
Diamond proportions are the measurements and angles that determine how light moves through the stone. For loose lab-grown diamond sparkle, these numbers matter because they influence three things buyers notice quickly: how bright the diamond looks, how large it appears from the top, and whether the sparkle pattern feels balanced or uneven.
The mistake is treating one measurement as a magic answer. A good table percentage cannot rescue a poorly matched pavilion angle. A favorable depth percentage does not guarantee strong light return if the crown and pavilion do not work together. Use proportions as a screening tool, not as a substitute for seeing the actual diamond.
Depth Percentage: Why Too Deep or Too Shallow Can Matter
Depth percentage compares the diamond’s total height to its width. In practical terms, it affects both light behavior and face-up size. A diamond that carries too much weight in its depth can look smaller than expected for its carat weight because more of the mass sits below the top view. This is one reason two 1.50-carat diamonds can have different visible diameters even when their reports look similar.
A diamond that is too shallow can create a different problem. It may appear spread out and attractive on paper, but shallow proportions can allow light leakage or weaken the contrast pattern that gives the stone visual life. The risk is not simply “deep is bad” or “shallow is bad.” The real issue is whether the depth supports the rest of the cut design.
For buyers, depth should raise questions before it makes the decision. If a diamond has an unusual depth percentage, check the diameter, video, and overall brightness before assuming it is a bargain or rejecting it outright.
Table Percentage: The Window That Shapes Brightness and Fire
The table is the large flat facet on the top of the diamond. Table percentage tells you how wide that top facet is compared with the diamond’s overall width. Because it is the main window into the stone, it affects how the diamond presents brightness, fire, and contrast.
A very large table can make a diamond look open and bright, but it may reduce the crown area that helps create colored flashes in some stones. A smaller table can support more fire when paired with the right crown and pavilion structure, but it is not automatically better. If the rest of the proportions are poorly balanced, a smaller table can still produce a stone that looks dark, tight, or less lively than expected.
The common buying mistake is choosing the table number in isolation. Table percentage only becomes meaningful when it is read with depth, crown angle, pavilion angle, and actual face-up appearance.
Crown and Pavilion Angles: The Hidden Drivers of Light Return
The crown is the upper portion of the diamond above the girdle, and the pavilion is the lower portion below it. Their angles have a major effect on diamond light return because they help determine whether light reflects back to the viewer or escapes through the stone.
The pavilion angle is especially important because small changes can affect brightness and leakage. The crown angle influences fire, contrast, and the way the diamond breaks light into flashes. Neither number should be judged alone. A slightly steeper crown may work well with one pavilion angle and poorly with another. A pavilion angle that looks acceptable on a report can still underperform if the full proportion set is not harmonious.
This is where buyers should be careful with “ideal” language. There are useful ranges, but no single crown or pavilion angle guarantees the best diamond proportions for sparkle. The better judgment is to look for a balanced relationship between the numbers, then confirm that the diamond actually looks lively in video.
Practical Round Diamond Proportion Checks
For many well-cut round brilliant diamonds, proportion review can help you shortlist stones before moving to video. Instead of treating one exact table, depth, crown, or pavilion value as a universal rule, look for a balanced combination: the diamond should not appear unusually deep for its face-up size, the table should not dominate the crown visually, and the crown and pavilion relationship should support brightness and contrast rather than a dull or leaky appearance.
- Table percentage: use it to flag tables that look unusually large or unusually small for the overall design.
- Total depth percentage: compare it with the millimeter spread to see whether carat weight is helping face-up presence.
- Crown structure: review whether the diamond shows a pleasing mix of brightness and fire in motion.
- Pavilion structure: watch for center brightness, leakage, and whether the stone looks lively as it turns.
These checks are not a guarantee of beauty. They are practical screening questions that can help you avoid obvious proportion extremes when comparing round brilliant loose lab-grown diamonds. A diamond with balanced-looking numbers can still have weaker visual performance if facet precision, symmetry, or contrast is poor. A diamond with slightly unusual numbers may still look excellent if the full cut design works well.
Fancy shapes should not be judged by round brilliant standards. Ovals, cushions, emerald cuts, radiants, pears, and marquise diamonds have different cutting priorities and different visual risks. For those shapes, a lab grown diamond shapes guide can help clarify why measurements, outline balance, bow tie behavior, pattern style, and video review become more important than trying to force round-diamond proportion rules onto a different design.
Why Exact Proportion Numbers Need Context
Proportion charts can be useful, but they can also give buyers a false sense of certainty. A number that looks attractive in isolation may not work as well when paired with the rest of the diamond’s geometry. The opposite can also happen: a stone may sit slightly outside a buyer’s preferred range but still perform beautifully because the full design is balanced.
The more defensible way to use proportion data is as a warning system, not a verdict. If a measurement is noticeably unusual, it should trigger closer visual review. If several measurements work together and the video looks strong, the diamond may deserve serious consideration. This approach keeps the buyer from making unsupported assumptions based on one data point.
What This Means in a Real Purchase
Use proportion checks to narrow the field, not to make the final choice. If two round diamonds are close in carat, color, clarity, and certificate grade, the one with stronger proportions, a healthy face-up diameter, and better video performance is usually the safer choice than the one that only wins on a single spec.
A slightly outside-preference diamond should not be rejected automatically if it looks bright, balanced, and lively in actual imagery. Major extremes deserve closer review, especially if the stone looks small for its carat weight, has a dull center, shows uneven contrast, or appears overly flat in motion. The best decision comes from reading the numbers and then testing them against what the diamond actually shows.
Symmetry, Polish, and Facet Precision: Small Details That Change the Look
Strong proportions are the design plan. Symmetry, polish, and facet precision are the execution. A loose lab-grown diamond can have promising numbers and still look less crisp if the facets do not align cleanly or the surface finish weakens reflection. These details are easy to overlook because they sound minor, but they can explain why two diamonds with similar reports do not perform the same visually.
The priority is not to chase microscopic perfection at any cost. If polish and symmetry grades are already high, differences may be subtle. The point is to avoid assuming that proportion numbers alone tell the whole story, especially when two stones are close in price and paper quality.
Symmetry: Why Alignment Affects Pattern and Balance
Diamond symmetry describes how well the facets align, meet, and mirror one another. Better symmetry helps create a more organized pattern of light and dark areas across the diamond. That pattern matters because contrast is part of sparkle. Without it, a diamond may look bright in a flat way but less lively as it moves.
A certificate symmetry grade is useful, but it does not show every visual nuance. Two diamonds with the same symmetry grade can still present different contrast patterns, especially in video. One may show clean, balanced flashes across the stone, while another may have a distracting dark area, uneven patterning, or less coordinated movement.
For buyers, symmetry is most important when the diamond’s appeal depends on pattern. Round brilliants, step cuts, and elongated fancy shapes all benefit from a balanced visual structure, though they express it differently.
Polish: Why Surface Finish Can Influence Light Transmission
Diamond polish refers to the quality of the facet surface finish. Clean, well-polished facets support sharper reflections and clearer light return. Poorer polish can soften the way light moves through the stone, especially if surface features are significant enough to affect transparency or crispness.
In many buying situations, the difference between high polish grades may not be obvious to the naked eye. A buyer should not usually sacrifice a better-looking diamond just to move from one already-strong polish grade to another. The warning sign is a stone with otherwise appealing specs but polish that raises questions, especially if the video also looks hazy, muted, or less sharp than comparable diamonds.
Facet Precision: Why Two Diamonds With Similar Proportions May Still Differ
Facet precision is where the report can become less complete. Proportion data often uses averages, but a diamond is made up of many individual facet relationships. Tiny differences in facet alignment, meet points, and optical symmetry can change how cleanly the diamond returns light.
This is why two stones can show similar table, depth, crown, and pavilion measurements but still look different. One may have a tighter, more coordinated sparkle pattern, while the other may feel slightly scattered or less energetic. The difference may not appear as a dramatic flaw; it may show up as one diamond simply looking more alive.
The practical takeaway is clear: when two loose stones are close on paper, choose the one with stronger visual organization in motion, not the one with the more impressive-looking average numbers alone.
Buyer Verification Checklist
Before choosing between similar diamonds, compare the polish and symmetry grades, then look at the actual imagery with the same level of attention. High-resolution photos can reveal general finish quality, but still images are often taken under flattering lighting and may not show how the stone behaves in normal movement.
- Confirm the polish and symmetry grades on the grading report.
- Review high-resolution images for obvious surface or pattern issues.
- Watch video for balanced contrast, not just brightness.
- Look for crisp flashes across the whole stone, including the center.
- Ask whether the video shows the actual diamond, not a sample stone.
If a seller cannot provide actual-stone visuals, the risk is not automatically unacceptable, but the uncertainty is higher. In that case, the buyer should be more cautious about paying a premium based only on certificate data.
Before finalizing a custom setting, recheck the loose stone against the design plan. Exact measurements, shape, depth, and length-to-width ratio should still make sense once the mount is being planned, because a stone that looked ideal online can reveal a fit problem when the setting details are finalized.
Light Return, Contrast, Fire, and Scintillation in Real Viewing Conditions
Diamond light return is what buyers often describe as brightness, but visual performance is broader than brightness alone. A diamond also needs contrast, fire, and scintillation to feel lively. This is why a stone can look impressive in a single image and still feel less engaging in video or in person.
The most useful question is not “Does this diamond sparkle?” Almost every diamond will sparkle under strong lighting. The better question is whether the sparkle stays balanced, crisp, and attractive across normal viewing conditions.
Brightness Is Not the Same as Sparkle
Brightness is white light returning to your eye. It gives a diamond its clean, illuminated look. Sparkle includes more than that: movement, flashing, contrast, and the way light turns on and off across the facets.
A diamond can look very bright in a controlled photo because the lighting is designed to make it look that way. In motion, the same stone may reveal weaker contrast or a less dynamic sparkle pattern. This matters because jewelry is rarely viewed as a still object. Rings move with the hand, shift under different light, and are seen from changing angles throughout the day.
For buyers comparing online, a stone that looks slightly less bright in one still image but shows lively, balanced flashes in video may be more appealing in real life than a diamond that only looks strong in a single perfect frame.
Fire Depends on More Than Color Grade
Diamond fire is the colored flashing created when light separates into spectral colors. It is not caused by the diamond’s color grade. Color grade describes body color, while fire depends more on cut design, crown structure, lighting conditions, and viewing distance.
Some diamonds produce more visible fire under spot lighting, while others show stronger white brightness in diffused daylight. Neither outcome is automatically better. If you prefer rainbow flashes, pay attention to how the stone performs in video under lighting that actually reveals fire. If you prefer a cleaner white sparkle, strong brightness and balanced contrast may matter more.
The mistake is assuming that a higher color grade will make a diamond more fiery. Once the diamond is within the buyer’s preferred color range, cut behavior has the larger effect on fire and sparkle character.
Scintillation Is Best Judged in Motion
Scintillation is the sparkle pattern you see when the diamond, the light, or the viewer moves. It includes the quick flashes and dark-to-light changes that make a diamond feel alive. This is difficult to judge from a static image because a photo freezes one moment of performance.
Video is especially useful because it reveals whether the flashes are crisp, balanced, and distributed across the stone. Watch the center carefully. A diamond that looks bright around the edges but dull or glassy in the middle may be less satisfying once set in a ring.
The best lab diamond for light performance is not simply the one with the most intense flash in a single second of video. Look for consistency. A diamond that maintains attractive brightness and contrast through rotation is usually a safer choice than one that only looks good from one angle.
Lighting Conditions Can Change Your Impression
The same diamond can look different in jewelry store lighting, daylight, office lighting, and low light. Strong spotlights can exaggerate fire and flashing. Soft daylight may reveal overall brightness and transparency more honestly. Office lighting can make some stones look quieter, while low light may show whether the diamond still has enough contrast to remain visually interesting.
This is why one photo or one video environment should not carry the entire decision. If a diamond only looks compelling under highly controlled lighting, it may not be the strongest option for daily wear. A good loose lab-grown diamond should not need perfect conditions to look appealing, even though every diamond changes with the environment.
How to Review Online Diamond Videos
When judging diamond sparkle online, compare stones under similar video conditions whenever possible. A fair comparison means similar lighting, similar background, similar rotation, and similar magnification. Otherwise, the video setup may influence your impression as much as the diamond itself.
- Look for consistent brightness across the stone, not just bright edges.
- Check for balanced dark-and-light contrast that creates visual rhythm.
- Watch for lively flashes during rotation rather than one isolated sparkle moment.
- Avoid stones with an obvious dull central area unless the appearance is acceptable to you.
- Compare multiple diamonds side by side before deciding which one has the stronger visual performance.
If two diamonds have similar certificates, the video often becomes the deciding evidence. The better choice is usually the stone whose report, proportions, and real viewing behavior all support the same conclusion.
Shape Matters: Cut Quality Is Not Judged the Same Way for Every Diamond
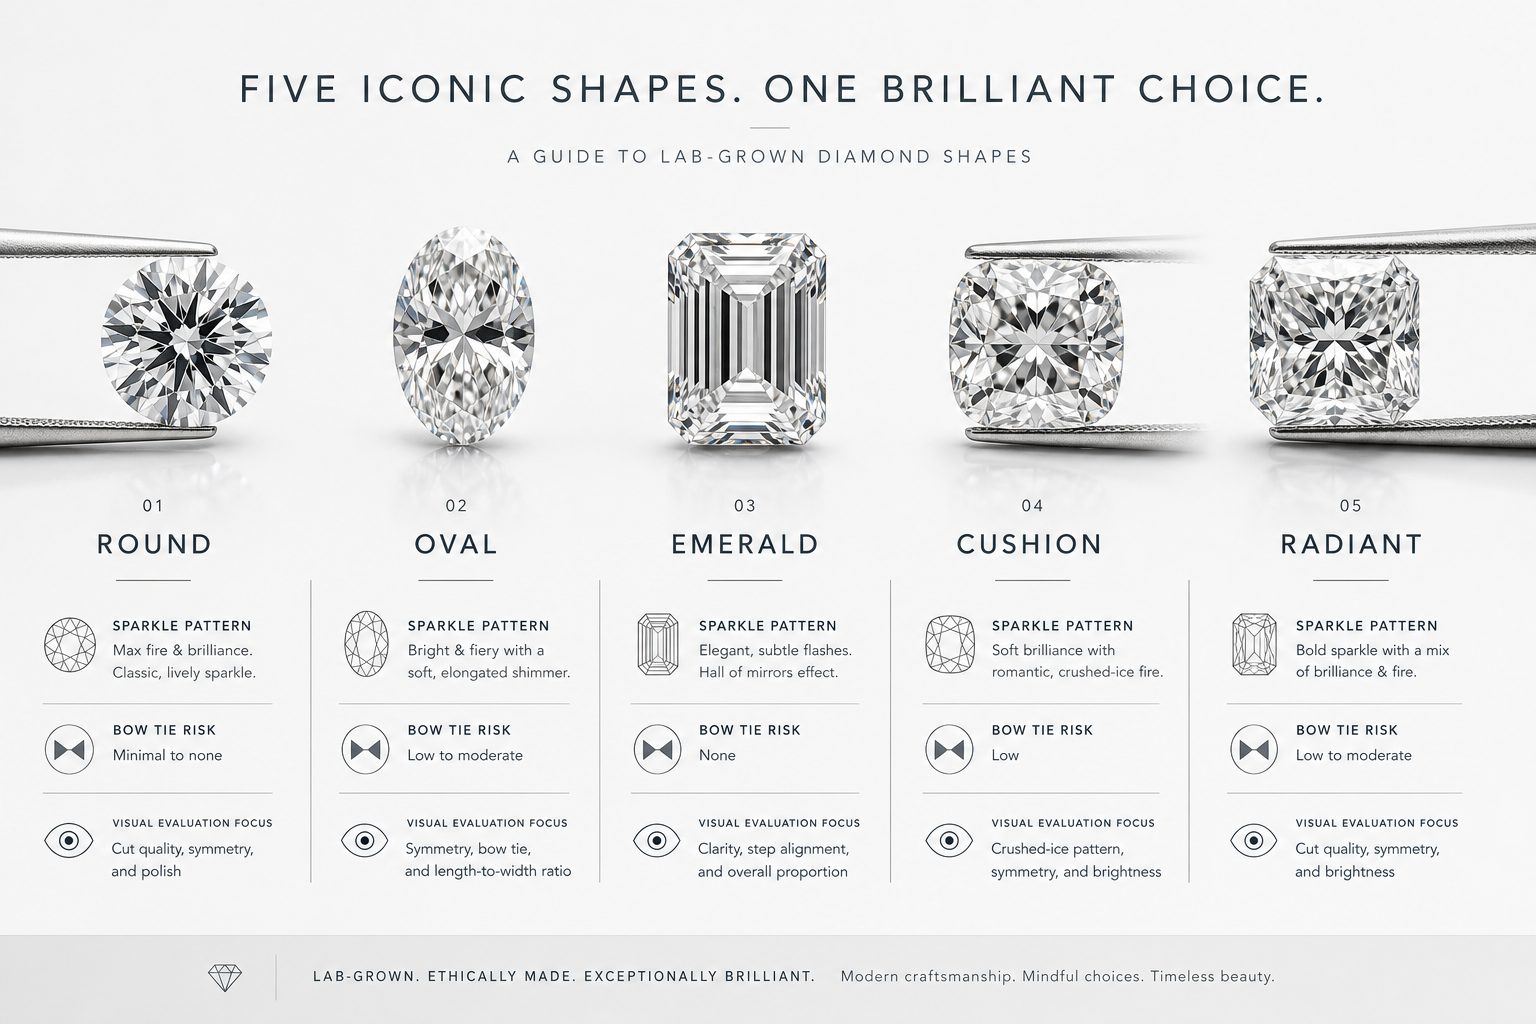
Diamond shape and cut quality are connected, but they are not judged by one universal standard. A round brilliant, an oval, an emerald cut, and a radiant cut are designed to handle light differently, so applying round-diamond expectations to every loose lab diamond shape can lead to the wrong choice.
This matters most with fancy shape lab-grown diamonds because the certificate often gives less direct cut guidance than it does for round brilliants. The buyer has to rely more heavily on proportions, outline, video, and visual balance. The best choice is not always the shape with the most sparkle in the abstract; it is the one whose pattern, brightness, size, and setting fit match the look you actually want.
Round Brilliant Diamonds: The Most Standardized Cut Evaluation
Round brilliant diamonds are the easiest shape to screen by numbers because their cut evaluation is more developed than many fancy shapes. Table, depth, crown angle, pavilion angle, polish, and symmetry can all help narrow the field before you even look at the video.
That does not mean a round diamond should be chosen from specifications alone. Two round brilliants can both sit within strong proportion ranges and still differ in contrast pattern, brightness distribution, and how lively they look in motion. For round diamonds, numbers are especially useful as a filter, but visual review still decides whether the stone feels crisp, balanced, and alive.
Ovals, Pears, and Marquise: Watch for Bow Tie and Shape Balance
Ovals, pears, and marquise diamonds need a different kind of judgment because elongated brilliant cuts often show a bow tie effect. This appears as a darker area across the center of the stone, and it can range from subtle contrast to a distracting dead zone. A little bow tie is common and not automatically a problem; the concern is when the center looks dull while the ends or edges do most of the work.
For these shapes, the best cut for an oval lab diamond is not defined by one table or depth number. Center brightness, outline symmetry, and length-to-width ratio usually matter more in practice. A very elongated oval may look elegant but show more obvious contrast issues, while a shorter oval may look brighter but less dramatic on the hand. Pears and marquise cuts add another layer: the points and shoulders should look balanced, not twisted, heavy on one side, or visually pinched.
Emerald and Asscher Cuts: Clarity of Pattern Over Intense Sparkle
Emerald and Asscher cuts are step cuts, so they are not meant to perform like round brilliants or radiants. Their appeal comes from broad flashes, clean geometry, and a calm hall-of-mirrors effect rather than constant glitter. A buyer who expects nonstop sparkle from an emerald cut may reject an excellent-looking stone for the wrong reason.
The better question is whether the steps look even, the reflections feel balanced, and the center appears transparent rather than flat or glassy. Because step cuts have larger open facets, inclusions and body color can also be easier to notice than they would be in many brilliant cuts. In this category, visual pattern and clarity comfort are often more important than chasing the same kind of scintillation you would expect from a round diamond.
Cushion and Radiant Cuts: Compare Pattern Style, Not Just Labels
Cushion and radiant cuts can vary dramatically even when the certificate label looks simple. One cushion may have broad, chunky flashes; another may show a crushed-ice texture with many smaller reflections. Radiants can look bright and splintery, bold and geometric, or somewhere in between depending on facet arrangement and shape outline.
This is where buyers often make the mistake of asking which pattern is “better.” The useful question is which pattern suits the design and wearer. A crushed-ice cushion may hide inclusions well and create a glittery look, but some buyers find it less crisp. A chunkier cushion can feel more structured and romantic, but it may reveal contrast areas more clearly. With radiants, strong brightness is appealing, but a stone with uneven dark zones or a watery center should be reviewed carefully before purchase.
Shape-Specific Evidence to Request
For fancy shapes, ask for visual evidence that answers the shape’s main risk. For an oval, pear, or marquise, the key question is whether the bow tie is acceptable to you in motion. For an emerald or Asscher, the key question is whether the step pattern looks clean and the center looks transparent. For a cushion or radiant, the key question is whether the facet pattern matches the style you prefer rather than only the name on the listing.
This is also where side-by-side comparison is more useful than isolated inspection. A single oval may look fine until it is compared with another oval that has better center brightness. A single emerald cut may seem clean until another shows more balanced steps. The evidence does not have to be complicated: comparable videos, accurate measurements, and a clear report can prevent many shape-specific buying mistakes.
Stone-to-Setting Fit Check
Before choosing a fancy shape, confirm the exact measurements, length-to-width ratio, and setting compatibility. Carat weight alone will not tell you whether the stone will look balanced in a solitaire, halo, three-stone ring, bezel, or custom setting.
Prong placement can change how the eye reads the outline. A pear’s point needs protection without making the stone look shorter. A marquise can look elegant or overly sharp depending on the setting style. A cushion may look softer in a halo and more architectural in a bezel. An elongated radiant may need careful side-stone proportions so the ring does not feel crowded.
If you are learning how to choose a fancy shape lab diamond, treat shape-specific video as essential rather than optional. Deeper shape guides can help with individual preferences, but the immediate buying decision should focus on whether the actual stone has the outline, pattern, brightness, and setting fit you want.
For custom jewelry, stone measurements and setting compatibility should be confirmed before finalizing a purchase. This includes the center stone’s length, width, depth, girdle description, outline, and any design-specific requirements such as prong position, bezel fit, halo spacing, or side-stone scale.
How to Compare Two Loose Lab-Grown Diamonds Beyond the 4Cs
To compare loose lab-grown diamonds well, start by making the comparison fair. A 1.50-carat oval and a 1.50-carat round are not competing on the same visual terms. Even two diamonds with the same shape, color, clarity, and carat can differ in face-up size, sparkle pattern, and setting fit. The decision should move from paper comparison to performance comparison.
The strongest diamond buying checklist is not the longest one. It is the one that helps you avoid choosing a stone for the wrong reason. The goal is to identify which diamond gives you the best balance of documentation, visual performance, size, and final design compatibility.
Step 1: Match the Basic Specs, Then Look for Performance Differences
Begin with diamonds that are close enough to compare: same shape, similar carat range, similar color and clarity range, and comparable grading report context. If one stone is a D color and another is an H, or one is a round brilliant and another is an elongated cushion, the comparison becomes muddy because too many variables are changing at once.
Once the basic specs are aligned, shift attention to cut-related differences. Look at the proportions, polish, symmetry, face-up appearance, and video behavior. This is often where the better diamond becomes obvious. A stone with slightly less impressive paper specs can be the stronger choice if it looks brighter, cleaner in motion, and better suited to the ring design.
Step 2: Compare Measurements, Not Just Carat Weight
Carat is weight, not visible size. Two diamonds with the same carat weight can look different from the top because depth, spread, and outline affect face-up size. A deeper stone may carry extra weight below the girdle, where it adds cost but not much visible presence. A shallower stone may face up larger but can risk weaker light return if the rest of the cut is not well balanced.
Measurements are especially important for custom rings and fancy shapes. For example, two 2.00-carat ovals may have noticeably different length-to-width ratios, giving one a slim elongated look and the other a fuller, softer shape. Neither is automatically better, but choosing without checking measurements can lead to a ring that looks different than expected.
Step 3: Watch the Actual Stone in Motion
Video review is one of the most useful tools when deciding which lab-grown diamond should I choose. A still photo can show general outline and clarity, but motion reveals whether the stone has lively flashes, balanced contrast, and consistent brightness across the face.
The video should show the actual diamond whenever possible, not a sample image or a generic representation. If no video is available, ask for more visual information or decide whether the price and seller information justify the uncertainty. For many buyers, a lower price is not worth the risk if the diamond cannot be visually evaluated before purchase.
Step 4: Decide Which Tradeoff You Accept
Every diamond purchase involves a tradeoff. The mistake is pretending the tradeoff does not exist. You may be choosing between a slightly larger stone and a more lively one, a higher clarity grade and better cut quality, a lower price and stronger visual confidence, or ideal round-diamond specs and a fancy shape pattern you simply prefer more.
Cut quality should usually win when sparkle and brightness are the main goal. Clarity should move up the priority list when inclusions are visible or when the shape makes them easier to see, as with some step cuts. Size may reasonably matter more when the stone still performs well and the setting is designed around presence. At NUVU, this is where guided comparison can be useful: the stronger choice is not just the diamond with the highest grade, but the one whose report, visuals, and design purpose work together.
Price differences can reflect more than one factor: carat weight, cut execution, report details, availability, shape demand, and how much visual evidence is provided. A lower price is not automatically a warning sign, and a higher price is not automatically proof of better beauty. The useful question is whether the stone’s documentation, actual appearance, and setting fit justify the tradeoff for your specific goal.
Prices can change with market conditions, report type, seller channel, availability, and stone-specific details, so exact comparisons should be verified at the time of purchase. When comparing price, compare like-for-like specifications and evidence: same shape family, similar measurements, comparable report context, similar visual media, and similar setting requirements.
Buyer Comparison Checklist
- Report number verified: Confirm the grading report matches the listed diamond.
- Measurements reviewed: Check length, width, depth, and face-up size, not just carat weight.
- Depth and table checked: Use proportion data to flag extremes that deserve closer review.
- Polish and symmetry compared: Strong finishing supports cleaner visual performance.
- Actual video reviewed: Look for brightness, contrast, and sparkle in motion.
- Shape-specific issues inspected: Watch for bow tie, uneven outline, watery centers, or distracting dark areas depending on shape.
- Setting compatibility confirmed: Make sure the stone’s dimensions and outline suit the intended ring or jewelry design.
- Total design considered: Choose the diamond that fits the finished piece, not just the spreadsheet.
Common Cut-Quality Mistakes When Buying Loose Lab Diamonds Online
Buying loose lab diamonds online can work well when the comparison is disciplined. The problems usually come from giving too much weight to the easiest number to understand, such as carat weight or price, while ignoring the details that affect how the diamond will look once it is worn.
The most common lab-grown diamond mistakes are not signs that online buying is unsafe. They are signs that buyers need to slow down at the points where a listing can look better than the diamond will perform in real life.
Mistake 1: Choosing the Biggest Carat Weight First
A larger diamond is not automatically a better-looking diamond. If the added weight comes with weaker proportions, duller light return, or a less balanced pattern, the stone may look less appealing than a slightly smaller diamond with stronger cut quality. This is especially frustrating because the bigger diamond may cost more while offering less visual satisfaction.
Size can still be a valid priority. If the diamond has good brightness, pleasing proportions, and a setting that benefits from the larger outline, choosing more carat weight can make sense. The mistake is treating carat as the first filter and cut quality as something to check only afterward.
Mistake 2: Treating Color and Clarity as More Important Than Cut
Color and clarity matter, but their visible effect has limits once they meet the buyer’s comfort level. If a diamond looks white enough in the chosen metal and eye-clean at normal viewing distance, moving to a higher color or clarity grade may not improve the ring as much as choosing a better-cut stone.
This is one of the easiest diamond cut quality mistakes to make because color and clarity grades feel precise. Cut performance is harder to reduce to a single label, but it often has the larger impact on beauty. A high-clarity stone that looks sleepy is rarely more satisfying than an eye-clean stone with stronger brightness and movement.
Mistake 3: Ignoring Face-Up Measurements
Carat weight does not guarantee visible size. A diamond can weigh more because it is deeper, not because it looks meaningfully larger from the top, and a loose lab diamond buying guide can help clarify why, in a loose diamond listing, this can make one stone appear like a better value when the actual face-up presence is not much different from a smaller, better-proportioned option.
Face-up measurements are especially important when comparing stones near common carat markers, such as 1.50, 2.00, or 3.00 carats. A buyer may pay for the psychological appeal of the higher carat number while getting little practical size advantage. Always compare the millimeter dimensions alongside the carat weight before deciding that one diamond offers more presence.
Mistake 4: Trusting One Perfect-Looking Photo
A single photo can be misleading because lighting, angle, background, magnification, and image processing all affect how a diamond appears. A stone photographed under ideal conditions may look bright and clean in one frame but show uneven contrast or a dull center in motion.
Video is more useful because it exposes how the diamond behaves as it turns. Even then, compare stones under similar video conditions whenever possible. A diamond filmed in dramatically different lighting may seem better or worse for reasons that have little to do with the stone itself.
Mistake 5: Treating Unsupported Claims as Proof
Some listings use confident language that sounds technical but does not give the buyer much to verify. Phrases such as “premium sparkle,” “perfect make,” or “exceptional brilliance” can be useful descriptions only when they are backed by the report, measurements, actual-stone imagery, or a clear explanation of why the stone performs well. Without that supporting information, the language should be treated as sales copy rather than evidence.
This matters because cut quality is visible but not always easy to summarize. A responsible comparison should ask, “What can I check?” rather than “What sounds best?” If the report, video, and measurements all support the claim, the buyer can feel more confident. If the claim is broad and the evidence is thin, the safer move is to ask for clarification or compare with better-documented stones.
What to Confirm in Writing
Before buying, confirm that the listing corresponds to the exact diamond being offered, the report number matches the grading document, and the carat weight and measurements align across the report and seller page. If images or video are provided, ask whether they show the actual stone.
If something about the proportions or appearance seems unusual, ask the seller to explain it clearly. A very low price, a flattering photo, or a strong certificate grade should not replace basic verification. The better online purchase is the one where the documentation, visuals, and seller information all point to the same diamond with no avoidable confusion.
When a Higher Cut-Quality Diamond Is Worth Prioritizing
A higher cut-quality diamond is worth prioritizing when the visual result matters more than maximizing a single grade on paper. For most buyers, this means choosing the stone that looks brighter, more balanced, and more alive in normal viewing conditions, even if it means accepting a slightly smaller carat weight or a clarity grade that is not the highest available.
The best value lab-grown diamond is not always the largest one within budget. Value is stronger when the certificate, proportions, visual performance, and final setting all work together. A diamond that carries more weight in its depth, shows weaker contrast, or looks flat in video may feel less satisfying than a slightly smaller stone with stronger light return.
Prioritize Cut When Sparkle Is the Main Goal
If sparkle is the main reason you are choosing a diamond, cut quality should sit near the top of your budget allocation. Brightness, fire, and movement are usually more visible to the eye than small differences between high clarity grades, especially once the diamond is already eye-clean.
This is where the lab diamond cut vs carat tradeoff becomes practical. A buyer comparing a larger stone with average visual performance against a slightly smaller stone with stronger brightness should not assume the larger diamond is the better choice. Size is noticed first, but weak light performance is noticed every time the ring is worn.
A higher clarity grade can be worth paying for when inclusions are visible or when the diamond shape makes clarity easier to notice, such as in some step cuts. But for many brilliant-cut stones, moving from an already eye-clean clarity grade to a higher one may have less visible impact than choosing better proportions, stronger symmetry, and livelier video performance.
Prioritize Shape Preference When the Look Is Shape-Driven
Cut quality still matters in every shape, but not every shape should be judged by the same expectations. With emerald cuts and Asscher cuts, the goal is not constant glitter. The better diamond is usually the one with clean step reflections, pleasing transparency, and a calm, balanced pattern. Paying more for “sparkle” in the round brilliant sense may not match what makes these shapes attractive.
For elongated ovals, pears, and marquise diamonds, outline and bow tie control can be more important than chasing idealized numbers. A slight bow tie is common, but a dark, distracting center can make the diamond feel less bright even if the rest of the report looks strong. In this case, visual review should carry more weight than a neat specification list.
Cushion and radiant cuts add another layer because their facet styles vary widely. Some buyers prefer broader flashes, while others like a finer crushed-ice texture. Neither preference is automatically better, but choosing by label alone is risky. The better choice is the pattern you actually like in motion, not the one that sounds more impressive in a listing.
Prioritize Setting Compatibility for Custom Rings
A loose diamond should be evaluated with the final setting in mind, especially for custom engagement rings. Measurements, depth, girdle thickness, and length-to-width ratio can affect how the stone sits, how large it appears, and whether the design feels balanced on the hand.
A diamond with strong visual performance can still be the wrong fit for a specific setting style. A deep stone may sit higher than desired. A very elongated shape may need different prong placement to feel secure and proportional. A wide halo, bezel, or side-stone layout can change how the center stone reads once mounted.
For custom work, the practical question is not only “Is this a good diamond?” but “Is this the right diamond for this design?” That distinction prevents a common mistake: choosing a loose stone in isolation, then discovering later that its dimensions or outline do not support the intended ring style as well as expected.
When a Slight Spec Tradeoff May Be Reasonable
A slight spec tradeoff can be reasonable when it protects the traits the eye will notice most. If a diamond is eye-clean, visually bright, and well matched to the setting, accepting a slightly lower clarity grade may be smarter than paying more for a grade difference that does not change the appearance in daily wear.
Color can work the same way, depending on shape, metal color, and personal sensitivity. A near-colorless diamond may look clean and bright in a yellow gold setting, while the same buyer might prefer a higher color grade in platinum or white gold. The right decision depends on the design context, not the grade alone.
The tradeoff becomes unacceptable when the lower spec creates a visible problem. A clarity grade is not a good value if inclusions bother you in close viewing. A lower color grade is not a good value if the warmth is obvious against the chosen setting. A lower-priced stone is not a good value if its video shows dullness, uneven brightness, or a distracting center.
What This Means for a NUVU Buying Path
For buyers comparing loose lab-grown diamonds, NUVU treats the grading report as one part of the decision rather than the finish line. The stronger buying path looks at certificate data, actual visual performance, measurements, and setting goals together.
This matters most when the diamond is being chosen for a specific ring or custom jewelry project. A well-documented stone with lively performance and the right physical fit is usually a stronger choice than a stone selected only because one grade looks better on paper. The goal is not to chase perfect specifications; it is to choose a diamond whose beauty, documentation, and design fit make sense together.
Before finalizing a purchase, buyers should confirm the seller’s documentation, return and resizing policies, and any after-sales support in writing if those terms matter to the buying decision. For loose stones, the documentation trail should stay clear from listing to setting.
Before a custom setting is made, it is worth rechecking the stone’s measurements, report details, and visual media together so the diamond being mounted is still the same diamond that was selected.
FAQ: Loose Lab-Grown Diamond Cut Quality
Does cut matter as much for lab-grown diamonds as it does for natural diamonds?
Yes. Lab-grown and natural diamonds follow the same optical principles, so cut quality strongly affects brightness, sparkle, fire, and overall visual performance. They differ by origin: a lab-grown diamond is created in a laboratory environment, while a natural diamond formed geologically. In either origin category, weak cut quality can make a diamond look less lively even if its color and clarity grades are high.
Can a lab-grown diamond with an Excellent cut grade still look dull?
It can happen. An Excellent cut grade is useful, but it does not fully show how the diamond performs in motion, how balanced the contrast looks, or how the proportions work together. Video review is still worth doing, especially when comparing similar stones.
What depth and table should I look for in a round lab-grown diamond?
Look for a balanced proportion set rather than one isolated number. Table and depth should be reviewed with crown structure, pavilion structure, polish, symmetry, millimeter spread, and actual video. If the diamond looks unusually deep, unusually shallow, dull in the center, or small for its carat weight, it deserves closer review before purchase.
Are fancy shape lab-grown diamonds graded for cut the same way as round diamonds?
No, not always. Round brilliant diamonds usually have more developed cut evaluation, while fancy shapes often require more visual judgment. With ovals, cushions, emerald cuts, radiants, pears, and marquise diamonds, shape balance, pattern, bow tie, and face-up appearance become especially important.
Should I choose better cut or higher clarity?
If the diamond is already eye-clean to your standard, better cut quality will often have a greater visible impact than moving to a higher clarity grade. Higher clarity may still matter for step cuts, larger stones, or buyers who are sensitive to inclusions, but clarity should not automatically outrank sparkle and light performance.
Why Similar Reports Can Lead to Different Choices
If two loose lab-grown diamonds have similar carat weight, strong color and clarity grades, and credible certificates, why does one look brighter than the other? This is one of the most common frustrations in online diamond shopping. On paper, the stones can appear nearly identical. In video or in person, one may look crisp, lively, and balanced, while the other looks flatter or darker through the center.
The reason is that the 4Cs do not tell the whole visual story. Carat, color, clarity, and cut are useful starting points, but loose lab-grown diamond cut quality depends on more than a grade label. Proportions, depth, table size, symmetry, polish, facet precision, contrast, and shape-specific design all influence how the diamond returns light to the eye.
A certificate helps you compare important facts, but it cannot fully show motion, sparkle pattern, personal eye appeal, or how the diamond will look in the setting you choose. That does not make the report unimportant. It means the best decision combines documentation with visual review.
This guide explains how to judge lab-grown diamond sparkle beyond the basic 4Cs, including how proportions affect light return, why similar reports can produce different appearances, and how to compare loose stones before committing to a ring or custom jewelry design. You do not need to become a gemologist. You do need to know which details actually change what you see.
Further Reading Beyond Cut Quality
Loose Lab-Grown Diamond Buying Guide
If you want a broader buying process beyond cut quality, start with a loose lab-grown diamond buying guide. Cut is one of the most visible factors, but it still needs to be weighed against carat size, color preference, clarity comfort, certificate details, budget, and the final jewelry design.
This is most useful when you have not yet narrowed your search to a specific stone. A step-by-step buying guide can help you decide which specs matter first, where you have room to compromise, and when a diamond that looks strong on paper still needs closer review.
Lab-Grown Diamond Certification Guide
Use a certification guide when you want to understand what a grading report confirms and where its limits begin. A report is valuable because it gives organized information about the diamond, but it does not replace visual review, actual video, or comparison under similar viewing conditions.
This becomes especially important if two listings appear nearly identical. Verifying the report number, matching measurements, and understanding how cut, polish, symmetry, and proportions are documented can prevent you from treating a certificate as more complete than it really is.
Lab-Grown Diamond 4Cs Guide
A 4Cs guide is helpful when you need a clean foundation for carat, color, clarity, and cut. The mistake to avoid is treating the 4Cs as four equal buying levers. In real shopping situations, once color and clarity meet your comfort level, cut quality often has the stronger effect on what people actually notice.
Use the 4Cs as a starting framework, then move beyond it. The best decision usually comes from comparing the report, the stone’s measurements, its video, and the way it will work in the intended setting.
Diamond Shape Guides
Shape-specific guides are useful because cut quality is not judged the same way for every diamond outline. Round brilliants have more developed proportion guidance, while ovals, cushions, emerald cuts, radiants, pears, and marquise diamonds require more visual judgment.
If you are considering a fancy shape, a deeper shape guide can help you evaluate the details that matter most for that style, such as bow tie visibility in ovals and pears, step pattern clarity in emerald cuts, or the difference between crushed-ice and broader facet patterns in cushions and radiants.
Custom Engagement Ring Design Guide
A custom engagement ring design guide is useful once you are choosing a loose diamond for a specific setting. A stone can be visually appealing and still be a poor fit for a particular design if the measurements, depth, outline, or length-to-width ratio do not support the ring style.
For custom work, the diamond and setting should be considered together. Prong placement, bezel style, halo proportions, side stones, and band width can all change how the center stone looks once it is mounted.
Compare Your Shortlist Before Choosing
Review the Actual Loose Diamond
If you are comparing loose lab-grown diamonds, do not stop at the highest grade label or the largest carat weight. Compare the certificate data, proportions, measurements, actual visuals, and intended setting together before deciding which stone offers the strongest balance.
NUVU can help buyers approach that comparison with a clearer process: start with the report, review the proportions, inspect the actual diamond imagery, and consider how the stone will look in the finished piece. The goal is not to chase perfect numbers, but to choose a diamond whose documented details and visual performance work well together.
Plan the Diamond and Setting Together
If you are planning a custom ring, begin with the loose diamond before finalizing the setting. Confirm the stone’s exact measurements, shape, depth, length-to-width ratio, and visual character so the design can support the diamond rather than work around a mismatch.
This is especially important for elongated shapes, step cuts, halos, bezels, and rings with side stones. The right loose diamond should fit the wearer’s style, the setting structure, and the desired visual effect, not just the budget or certificate grade.
Take Time to Resolve the Tradeoffs
The best next step is a careful comparison, not a rushed purchase. A strong loose lab-grown diamond choice comes from combining documentation with real visual review and practical design fit.
No guide can promise that one specification set will produce the best sparkle for every buyer. What matters is choosing with enough information to avoid the common tradeoffs that lead to disappointment: paying for a grade you cannot see, choosing size at the expense of light performance, or selecting a stone before knowing how it will sit in the final ring.
Use Cut Quality to Resolve a Close Comparison
Once the basic carat, color, clarity, and report requirements are acceptable, compare proportions, polish, symmetry, face-up measurements, and the actual diamond in motion. Check the visual issues that matter for the chosen shape and confirm compatibility with the intended setting.
A grading report helps narrow the field but does not fully show how a diamond handles light. Compare brightness, contrast, and visible pattern under similar viewing conditions. Choose the stone whose documentation, appearance, and design fit work together.
Reader Value Check
Actionable Takeaway
A strong grading report is a useful filter, but it should not be treated as proof that a loose lab-grown diamond will look better than another stone with similar specs. The buyer’s real task is to connect the report to what the diamond actually does with light. That means checking the proportions, polish, symmetry, measurements, and actual video before placing too much weight on a single grade label.
The most common mistake is assuming that better paper automatically means better appearance. In practice, two diamonds with similar carat, color, clarity, and cut grades can differ in face-up size, contrast, center brightness, and motion. Shape matters too: an oval with a distracting bow tie, an emerald cut with uneven steps, or a cushion with a pattern the buyer does not like may be the weaker choice even if the certificate looks appealing.
The practical takeaway is simple: choose the diamond that performs well visually, fits the intended setting, and has documentation that supports what you are seeing. If one of those pieces is missing, the decision deserves a closer look.
Decision Framework
A repeatable buying process helps prevent the comparison from turning into guesswork. Start with the grading report to confirm the basics: carat weight, color, clarity, measurements, polish, symmetry, and cut information where available. Then use the proportion data to screen for obvious concerns, such as a stone that carries too much weight in depth or has a table and depth relationship that deserves closer visual review.
After that, move from data to appearance. Watch the actual diamond in motion when possible, not just a still image. Look for even brightness across the stone, balanced contrast, lively flashes, and any shape-specific issues that could bother you once the diamond is set. Compare stones under similar viewing conditions so one diamond is not benefiting from better lighting, a more flattering angle, or a different video style.
The final decision is usually a tradeoff, not a search for a flawless spec sheet. A slightly smaller diamond with stronger light performance may be the better choice than a larger stone that looks flat. An eye-clean clarity grade may make more sense than paying for clarity improvement you cannot see, especially if that budget could support better cut quality or a better setting fit. The right loose lab-grown diamond is the one that balances sparkle, visible size, documentation, and the final jewelry design in a way that matches the buyer’s priorities.
Trust Standard
A trustworthy cut-quality guide should not tell buyers to ignore certificates, and it should not imply that every diamond needs perfect numbers. Grading reports matter because they create a common reference point and help verify what is being compared. Their limitation is that they cannot fully show brightness, fire, scintillation, contrast, or personal eye appeal in real viewing conditions.
The strongest buying judgment comes from combining restraint with visual evidence. A diamond slightly outside a preferred range may still be attractive if the video is strong and the measurements make sense. A diamond with excellent-looking specs may still deserve caution if the imagery is weak, the center looks dull, or the shape has a visual issue that the report does not fully describe.
The best loose lab-grown diamond is not simply the one with the highest grade on paper. It is the stone whose documented specifications, real visual performance, and setting compatibility work together without forcing the buyer to overlook a visible compromise.
Disclosure: This article is for general educational purposes only. Diamond grading, pricing, availability, specifications, and seller policies can change, and readers should verify important details through grading reports, official laboratory tools, seller documentation, or qualified professionals before making a purchase decision. Laboratory-grown diamonds should be clearly distinguished from natural diamonds, and environmental or sourcing claims should be supported by specific documentation.