
Choosing a loose lab-grown diamond for a custom engagement ring is not just about finding the highest carat weight or the best-looking certificate; a loose diamond verification checklist can help align documentation, proportions, and fit expectations before the stone and setting have to work together physically and visually. Shape, millimeter measurements, depth, spread, prong layout, basket height, band width, metal color, and daily wear all affect whether the finished ring feels balanced, secure, and comfortable.
For the full framework, read Loose Lab-Grown Diamonds Buying Guide.
This guide helps you judge a diamond as part of a complete ring design, not as an isolated purchase. You’ll see why two diamonds with the same carat weight can need different settings, why elongated or pointed shapes require extra planning, and why photos, video, side profile, and written design details matter before production begins. The goal is to help you choose a stone and setting combination that looks right, fits properly, and holds up to real life.
| Decision Point | What to Check | Why It Matters |
|---|---|---|
| Carat vs. measurements | Length, width, depth, and face-up spread | Same carat stones can look and fit differently |
| Diamond shape | Rounded, elongated, pointed, or sharp corners | Shape affects prongs, protection, and balance |
| Setting profile | Basket height, side view, and band fit | Controls comfort and wedding band compatibility |
| Cut style | Brilliant sparkle, step-cut clarity, bow-tie, windowing | Visual issues become more noticeable once mounted |
| Metal and band width | White, yellow, rose metal; thin or sturdier band | Changes color appearance, durability, and stability |
| Final approval | Certificate, images, video, specs, costs, policies | Prevents vague assumptions before custom work starts |
Quick Questions Before You Read
Q: Should I choose the diamond before the setting?
Not entirely. Start with the finished ring style, then choose a diamond whose shape and measurements suit that design.
Q: Is a larger lab-grown diamond always better for a custom ring?
No. A slightly smaller, better-proportioned stone can look more balanced and sit more securely.
Q: Does a certificate prove the diamond will work in my setting?
No. It confirms key specs, but fit, height, appearance, and setting compatibility still need review.
Q: Which diamond shapes need extra protection?
Pear, marquise, heart, princess, and other pointed or sharp-cornered shapes often need careful prong planning.
Choose the Loose Diamond and Setting Together
A custom engagement ring works best when the loose lab-grown diamond and the setting are planned together from the beginning. The right question is not only which diamond looks good on a screen or grading report. It is which diamond will look balanced, secure, and intentional in the specific ring design you want to wear every day.
This matters because a lab-grown diamond engagement ring is not built from isolated choices. Diamond shape affects the mood of the design. Stone measurements affect how large the ring looks on the finger. Carat size affects presence, but not always in the way buyers expect. Setting style, prong layout, band width, and metal choice all change how the same center stone appears once it is mounted.
For buyers, the practical point is to separate documented facts from design judgments. A grading report can document the stone’s listed characteristics, while the setting decision depends on how those characteristics behave in the intended ring. Both forms of evidence matter, but they answer different questions.
For custom design, trust comes from matching the selected stone to the setting, budget, and wearer’s daily use rather than choosing grades in isolation. A transparent comparison should make clear what the report confirms, what the visuals show, and which design assumptions still need confirmation before production.
Start With Stone-to-Setting Compatibility
Most buyers comparing loose lab-grown diamonds are trying to answer a more specific question than “Which diamond should I buy?” They want to know how to choose a loose lab diamond for a custom ring without ending up with a stone that fights the setting. A diamond can have attractive grades and still be the wrong physical fit for the ring design if its proportions, depth, or outline do not support the finished look.
The practical goal is compatibility. A wide oval may create strong finger coverage but require a sturdier basket. A deep emerald cut may look elegant from the top but sit higher than expected. A delicate pavé band may look beautiful in a rendering but feel underbuilt if paired with a large elongated center stone. The better decision is usually made before either the diamond or the setting is treated as final.
Planning Your Custom Engagement Ring
This guide is for U.S. buyers preparing for a custom engagement ring project, especially those who are already browsing loose lab-grown diamonds and trying to picture the finished ring. You may already understand the basics of carat, cut, color, and clarity. The harder part is translating those specs into a real ring with the right visual balance, wearability, and structure.
If you are comparing a custom engagement ring with a loose diamond, the most useful details are often not the most obvious ones. The face-up measurements, length-to-width ratio, setting height, prong placement, and band width may affect the final ring more than a small difference in color or clarity grade. Buyers who focus only on the headline specs can miss the issues that show up after the stone is mounted.
Will This Diamond Work in Your Ring?
The central decision is how to choose a loose lab-grown diamond by evaluating the stone and setting as one design system. Shape, measurements, cut quality, carat size, setting style, prong layout, band width, metal color, and lifestyle should be reviewed together before committing to either the stone or the design.
For a custom ring, the best loose lab-grown diamond is not automatically the largest stone within budget. It is the diamond that gives the desired look while still allowing a secure setting, comfortable profile, and realistic daily wear. A slightly smaller stone with better proportions can produce a stronger finished ring than a larger stone that forces awkward prongs, excessive height, or a band that feels too fragile for the wearer.
Evidence Boundary for This Guide
This guide treats grading reports, measurements, images, video, and written design approvals as different kinds of evidence. A grading report can help verify the stone’s listed identity and measurements. Visual media helps evaluate appearance. A CAD, rendering, or written setting description helps confirm how the stone will be mounted. None of these pieces should be used as a substitute for all the others.
Custom design depends on the exact diamond and setting. Be cautious of claims that one lab is best for every buyer, one shape is safest for every lifestyle, or one metal is correct for every diamond. When a claim depends on a specific stone, ring design, seller process, or wearer preference, check the actual documentation and confirm the design details in writing.
When a grading report is available, buyers should verify the report details through the issuing laboratory’s official report-check tool where available, then compare those details with the seller’s listing, visual media, and custom design record.
Look Beyond Grades to the Finished Ring
Evaluate the 4Cs, price, and origin alongside stone-to-setting compatibility. A certificate is helpful, but it does not show whether the diamond will sit too high, whether the prongs will protect the shape well, or whether the band has enough visual and structural support.
The focus here is the finished ring. A smart buyer should be able to look at a specific loose diamond and ask whether its shape, millimeter measurements, profile, and visual performance support the engagement ring setting under consideration. That is a different skill from simply filtering stones by grade.
Disclosure, Documentation, and Buyer Verification
When a custom ring is built around a laboratory-grown diamond, the stone should be clearly identified as laboratory-grown and not presented as a natural or mined diamond. If growth-method language such as HPHT or CVD appears in the report or listing, buyers should read it as part of the stone’s documented production method. If any post-growth treatment is relevant, it should be disclosed and supported by documentation rather than assumed.
A grading report can document key characteristics, but it should not be treated as a guarantee of beauty, value, sourcing ethics, or environmental performance. The report is one part of the buying record. Buyers still need images, video, measurements, and setting details to judge whether the stone is suitable for the ring they want to wear.
Environmental and sourcing claims should stay specific. It is more useful to ask for transparent production information, energy-use details when available, and clear seller documentation than to rely on broad words like “eco-friendly,” “sustainable,” or “ethical.” In a custom engagement ring project, careful wording matters because the claim should match what can actually be shown, not what sounds reassuring.
Before Approving Production in Writing
Custom design approvals should name the exact loose diamond, ring size, metal, band width, prong style, basket height, and whether the intended wedding band needs to sit flush. This reduces the risk of a finished ring being built from assumptions instead of confirmed design choices.
Buyers should also confirm any seller-specific policy directly before paying or approving production. That includes return terms, resizing limits, and after-sales support if offered. If a policy is not written down or verified by the seller, it should not be treated as promised.
- Match the report number to the listing and the stone media where possible.
- Confirm the setting is built for the exact measurements, not just the carat weight.
- Ask whether the design has been checked for comfort, security, and wedding band compatibility.
- Save the final quote and approval record together with the report and rendering.
For custom design, stone measurements and setting compatibility should be confirmed before finalizing a purchase.
Questions to Resolve Before Approval
By the end of this guide, you should be able to bring a specific loose diamond and design idea to a jeweler or custom ring team and ask sharper questions: Will this stone fit the setting securely? Will the ring sit high or low? Does the band width make sense for this diamond size? Do the prongs protect the stone without overpowering it? Will the metal color support the diamond’s appearance?
Those questions help prevent the most common custom ring mistake: choosing a beautiful diamond and a beautiful setting that do not work well together.
Start With the Finished Ring, Not Just the Loose Diamond
A loose lab-grown diamond should not be chosen in isolation if the end goal is a custom engagement ring. The finished ring determines whether the center stone feels balanced, wearable, and secure. A diamond that looks impressive by itself may become too wide, too tall, too delicate-looking, or visually mismatched once it is placed into an engagement ring setting.
This is especially true for custom design. Unlike choosing a stock ring where the setting already has fixed limits, a custom ring gives you more control over proportions. That control is useful only if the diamond’s physical characteristics are considered early, not after the design direction is already locked.
Why the Diamond and Setting Should Be Chosen as a Pair
The diamond’s shape, length, width, depth, and visual spread all affect how the setting must be built. A round diamond usually gives designers more flexibility because its outline is symmetrical and well supported by many prong layouts. An oval, pear, marquise, emerald cut, or radiant cut can create a more distinctive silhouette, but those shapes place more pressure on proportion, orientation, and support.
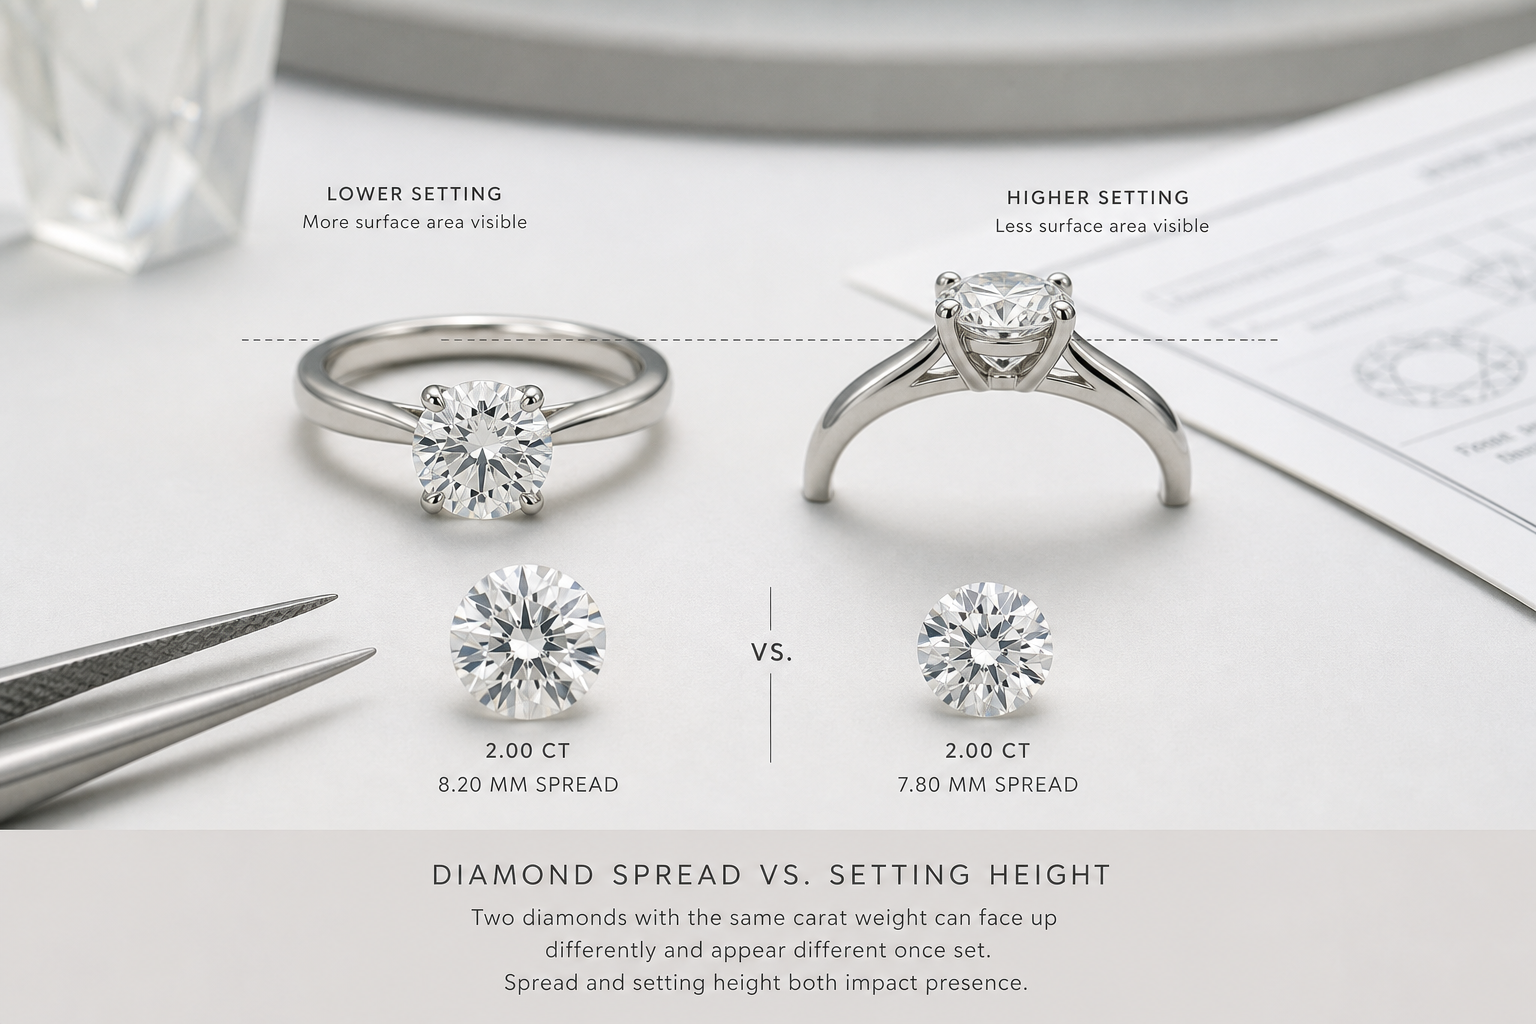
The most common misunderstanding is assuming that carat weight tells you how the ring will look. It does not. A 2.00 ct diamond with a deeper pavilion may face up smaller but require a taller basket. Another 2.00 ct diamond with a broader spread may look larger from the top but need a setting that can properly support its footprint. The better choice depends on the finished ring, not the number alone.
At NUVU, custom design conversations usually start with the relationship between the stone and the setting because a strong diamond on paper can still be the wrong fit for a specific ring. The issue is rarely whether the diamond is “good” in general. The issue is whether it works for this design, this finger coverage, this setting height, and this lifestyle.
The Main Planning Sequence for a Custom Ring
A practical custom ring process starts with style direction. Decide whether the finished ring should feel minimal, vintage-inspired, architectural, delicate, bold, or low-profile. That decision narrows the diamond shapes that make sense before you start comparing individual stones.
Next, choose a suitable diamond shape and review actual measurements. The length, width, depth, and overall proportion should be checked before carat weight is treated as final. From there, choose the setting type: solitaire, halo, bezel, three-stone, pavé, or another custom approach. Each one changes how much support the center stone needs and how much attention is placed on the diamond’s outline.
After the setting style is clear, confirm the prong or bezel layout. This is where many design problems are solved or created. A pointed pear or marquise may need a V-prong. A large oval may need prongs positioned to support the long sides without making the stone look boxed in. A bezel can add protection but changes the edge definition of the diamond. Only after those structural choices are clear should the final metal and band width be approved.
Scenario Grounding: A Realistic Buyer Decision
Emma wants a 2.00 ct oval lab-grown diamond with a thin pavé band. In the video, the diamond looks bright and large, and the carat weight feels right for the look she wants. But when the measurements are reviewed, the stone has a longer length-to-width ratio and enough depth that it will sit higher than she expected in a delicate setting.
Her decision is not simply whether she likes the diamond. She has three realistic options. She can choose a slightly lower-profile oval with dimensions that work better for the setting. She can keep the original stone but use a sturdier band and basket. Or she can accept a taller ring profile because the size and outline matter more to her than low-profile wear. None of these answers is automatically wrong, but ignoring the tradeoff would be a mistake.
This is why planning the diamond and setting together is more reliable than choosing the stone first and forcing the ring to adapt later.
What to Check Before You Decide
Before committing to a loose diamond for a custom engagement ring, compare the millimeter measurements, not just the carat weight. Ask how the stone’s length, width, and depth will affect the face-up look, setting height, and prong placement. A diamond with strong visual spread may need a different basket than a deeper stone of the same carat size.
Also ask whether the engagement ring setting can support the stone securely. A very thin band may make the center stone look larger, but it may not be the most practical choice for every wearer, especially with a larger or elongated stone. A low setting may feel comfortable, but it may not allow the preferred wedding band to sit flush. A taller setting may add presence and clearance, but it can catch more easily during daily wear.
The right starting point is the finished ring: how it should look, how it should wear, and how the selected center stone helps or complicates that goal.
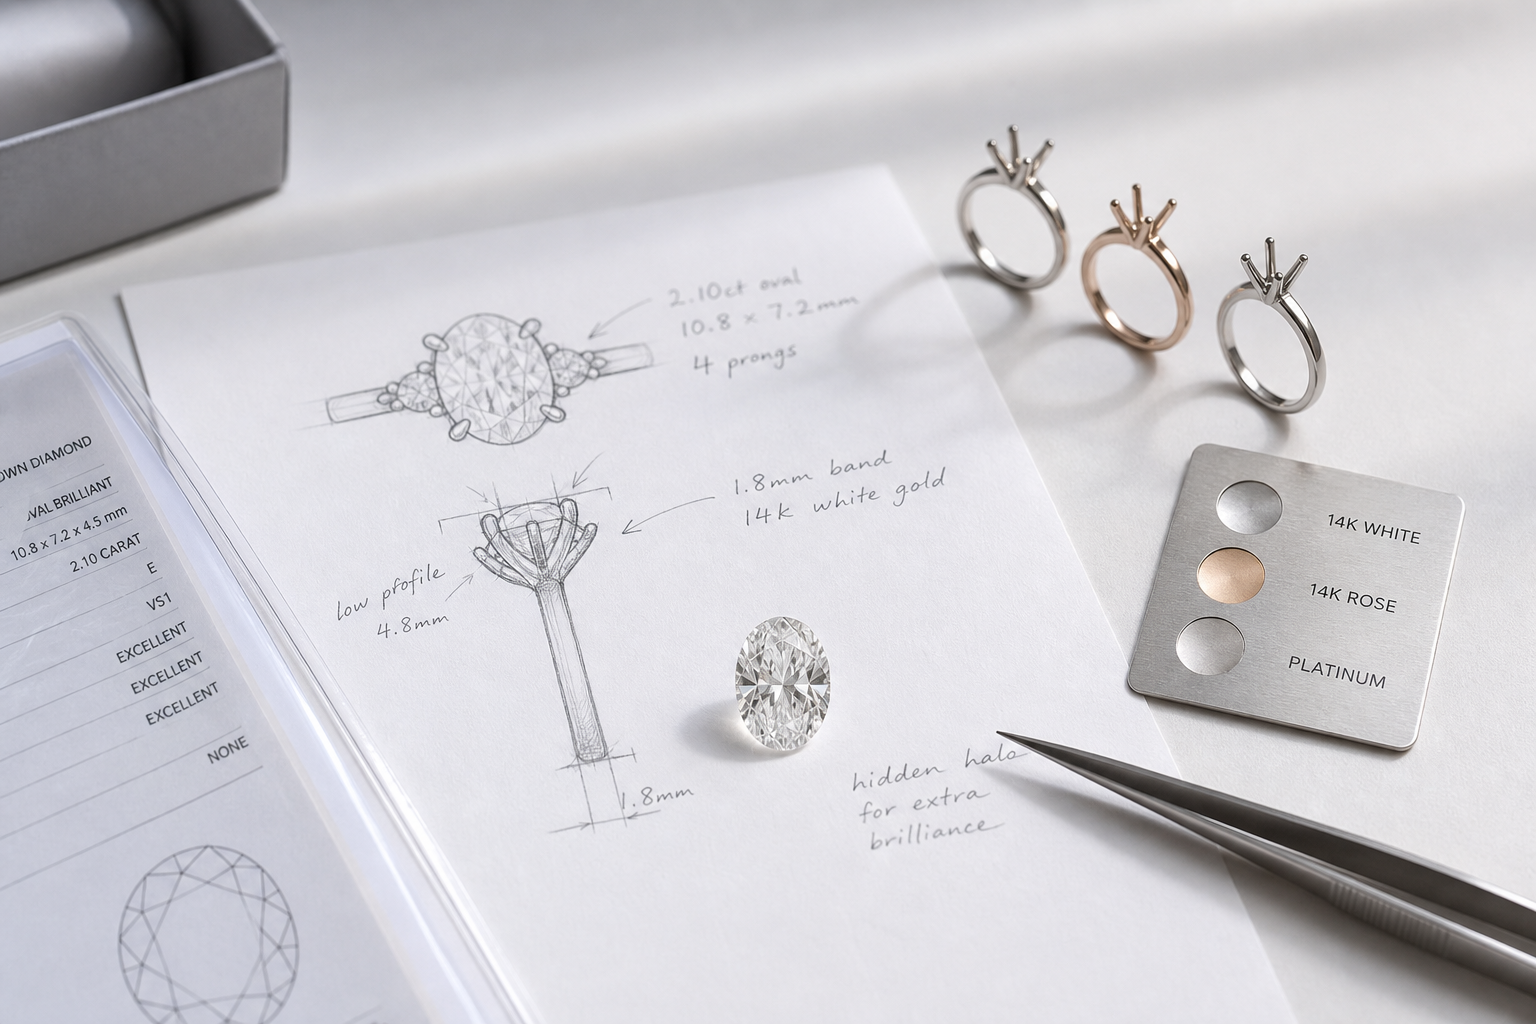
Diamond Shape Determines the Ring’s Overall Design Language
Diamond shape is one of the first choices that changes the entire direction of a custom engagement ring design. It affects the style of the ring, the setting options that make sense, the apparent size on the finger, the prong layout, and how protected the stone feels in daily wear.
The best diamond shape for a custom engagement ring is not simply the one that looks most attractive in a loose stone video. It is the shape that supports the wearer’s style while fitting the setting structure. A round lab diamond setting gives broad flexibility. An emerald cut custom engagement ring needs cleaner proportion control. An oval lab diamond engagement ring setting must account for length, symmetry, and how the stone is supported across its longer outline.
Round, Oval, and Cushion: Flexible Shapes for Many Settings
Round diamonds are usually the most setting-flexible because their balanced outline works with solitaires, halos, pavé bands, three-stone designs, bezels, and many prong layouts. If a buyer wants maximum design flexibility and fewer proportion surprises, round is often the safest shape to build around. The tradeoff is that round diamonds may not create the elongated finger coverage some buyers want.
Oval diamonds are popular because they create more visual length on the finger and often feel larger face-up than many buyers expect. They work well in solitaires, hidden halos, three-stone rings, and delicate pavé designs, but they require closer review. Symmetry matters. A slightly uneven outline can become more noticeable once prongs frame the stone, and a strong bow-tie effect can draw attention in a simple setting.
Cushion cuts sit between soft and structured. They can support vintage-inspired designs, modern solitaires, halos, or slightly romantic settings without feeling as sharp as princess or emerald cuts. The key risk is facet appearance. Some cushions have a chunkier facet pattern; others have a more crushed-ice look. Neither is automatically better, but the wrong facet style can feel out of step with the ring design. A clean solitaire may expose a busy-looking cushion more than a halo or detailed setting would.
Emerald, Radiant, and Elongated Shapes: Proportions Matter More
Emerald cuts create a cleaner, more architectural look, but they are less forgiving than brilliant cuts. Their step-cut faceting emphasizes clarity, straight lines, and proportion. In a custom engagement ring, emerald cuts often work best when the setting does not compete with the stone’s geometry. Solitaires, three-stone designs, tapered side stones, and clean bezels can all work, but the wrong prong placement or overly busy band can make the design feel visually crowded.
Radiant cuts offer a different kind of flexibility. They have a rectangular or square outline but more sparkle-driven faceting, which makes them easier to pair with pavé, halos, or bolder designs. For elongated radiants, length-to-width ratio becomes a major design choice. A lower ratio feels fuller and more compact; a higher ratio creates stronger finger length but may require more careful side support.
For elongated shapes, proportion often matters more than the label on the certificate. Two emerald cuts or two radiants can feel completely different at the same carat weight if one is broad and the other is narrow. If the setting is delicate, a very elongated stone may dominate the band. If the setting is substantial, a shorter, fuller stone may look more balanced. This is where matching diamond shape with setting style becomes a design decision, not just a preference.
Pear, Marquise, and Heart: Distinctive Shapes Need Stronger Setting Planning
Pear, marquise, and heart-shaped diamonds create a more distinctive custom ring, but they leave less room for casual setting choices. Their outlines are part of the design statement, so prong placement, orientation, and protection matter more. A poorly positioned prong can interrupt the shape. A setting that is too delicate can make the stone feel exposed rather than intentional.
Pointed shapes usually need extra protection at vulnerable ends. A pear or marquise often benefits from a V-prong at the tip, and the setting should hold the stone securely without making the outline look heavy. A heart shape requires even more attention to symmetry and orientation because small differences in the lobes or cleft can become noticeable once the stone is mounted.
These shapes are better choices for buyers who want a more recognizable silhouette and are willing to plan the setting around it. They are weaker choices when the buyer wants a very low-effort, minimal setting with little discussion about protection or profile. The more distinctive the shape, the more the setting must be designed around the stone rather than selected afterward.
Shape-to-Setting Fit Check
Before approving a shape for a custom engagement ring design, ask how many prongs are recommended and where they will sit. For pointed or sharp-cornered stones, ask whether V-prongs are needed. For elongated stones, ask whether the diamond should be set north-south for length or east-west for a wider, more unconventional look.
The setting should visually support the diamond’s outline, not fight it. If the prongs hide the best part of the shape, the band looks too thin for the stone, or the basket must sit higher than the wearer expects, the design needs more review before production begins.
It is also useful to ask how the same shape would be handled in more than one setting option. For example, an oval may work in both a solitaire and a hidden halo, but the prong position, basket height, and band width may change. Comparing those design paths helps the buyer see which details are fixed by the stone itself and which details are style choices.
Carat Weight Is Less Useful Than Millimeter Measurements
Diamond measurements matter more than lab-grown diamond carat size when you are designing a custom engagement ring. Carat weight tells you how much the stone weighs; loose diamond dimensions tell you how much space it will take up on the finger, how it will sit in the setting, and whether the finished ring will feel balanced.
This is one of the easiest places to make an expensive mistake. Two loose lab-grown diamonds can both be listed as 2.00 carats, but one may face up wider while the other carries more weight in depth. Once mounted, the wider stone may look larger and lower, while the deeper stone may require a taller basket and still appear smaller from the top.
Why Carat Weight Does Not Equal Visual Size
Carat is a weight measurement, not a measurement of surface area. For engagement ring design, the more practical question is how much of the diamond you see face-up. Length, width, depth, and overall proportions determine that answer more clearly than carat weight alone.
A deeper diamond can hold extra weight below the girdle, where it does not add much visible size. That can be perfectly acceptable if the stone has strong light performance and the setting is designed for the depth. It becomes a poor choice when the buyer expects maximum visual spread, a low-profile ring, or a delicate setting that was not built to support the stone’s height.
A well-proportioned diamond may look larger without increasing carat weight because more of its weight is distributed across the face-up outline. This is especially relevant for oval, emerald, radiant, pear, and marquise shapes, where length-to-width ratio changes the entire look of the ring. A 2.00 carat oval that measures long and narrow will feel very different from a 2.00 carat oval with a fuller outline, even if the price and grade look similar on paper.
The practical takeaway is simple: if you are trying to choose diamond size for a custom ring, do not stop at the carat number. Compare the actual millimeter footprint and ask how those dimensions will translate into the intended setting.
Useful Measurement Ranges to Discuss With a Custom Ring Designer
Measurement ranges are planning tools, not rigid rules. A diamond outside a common range can still be beautiful, but the design should account for what that proportion does visually and structurally. The goal is not to chase a “perfect” number; it is to avoid choosing a stone that fights the ring design.
- Oval diamonds: A length-to-width ratio around 1.30 to 1.50 is common for many engagement ring designs. Lower ratios look fuller and softer, while higher ratios look more elongated. If the oval is very long, the setting may need stronger end support and a band that does not look too narrow beneath the stone.
- Emerald cuts: A length-to-width ratio around 1.30 to 1.50 often works well, but the effect is different from an oval. A lower ratio can feel more classic and substantial; a higher ratio can feel more architectural. Because emerald cuts show large, open facets, the measurements should be judged together with clarity, color, and visual symmetry.
- Radiant cuts: For elongated radiant styles, a ratio around 1.20 to 1.45 is a useful discussion range. Shorter radiants can feel bold and compact; longer radiants create more finger coverage. The wrong ratio for the setting can make the ring look either too square for the design or too stretched for the band.
- Round diamonds: For rounds, compare millimeter diameter within the same carat range. A small difference in diameter can change how large the stone appears, especially in a solitaire or thin band design where the center stone is the main visual event.
- Band width: Many delicate-to-classic custom engagement rings fall around 1.6 mm to 2.2 mm, depending on the design, metal, stone size, and wearer’s lifestyle. A very thin band can make the center stone look larger, but it may not be the best structural match for a large or elongated diamond.
These numbers are most useful when paired with a real design goal. For example, a buyer who wants a low-profile oval solitaire may need to prioritize depth and basket height more than a buyer who wants a cathedral setting with more vertical structure. The same diamond measurements can be a good fit in one design and a compromise in another.
Measurement Evidence to Request Before Design Approval
When a seller presents a loose diamond for a custom ring, ask to see the measurements in the grading report and in the seller’s listing. The numbers should align closely enough that the same stone is clearly being discussed. If there is a mismatch in shape, carat weight, length, width, depth, color, clarity, or report details, pause before approving the design.
It is also helpful to ask the custom team to explain how the measurements affect the setting. A buyer does not need to become a jeweler, but the seller should be able to describe whether the stone requires a taller basket, wider head, modified prongs, stronger gallery, or different band width. This turns measurements into practical design evidence rather than leaving them as abstract numbers.
When comparing two similar stones, record the exact measurements and intended setting notes side by side. A stone that looks slightly less impressive by grade may be the better custom choice if its depth, spread, and outline reduce setting height or improve balance. This traceable comparison is more useful than relying on memory or screenshots alone.
How Stone Depth Affects Ring Height
Depth is where custom ring planning becomes more than appearance. A deeper stone often needs a taller setting because the pavilion requires enough room beneath the girdle. If the setting is forced too low, the stone may not sit properly, the basket may look compressed, or the design may create awkward clearance issues.
A taller ring is not automatically a problem. Some settings need height to create structure, allow a wedding band to sit closer, or give the center stone enough presence. The issue is whether that height matches the wearer’s daily life. Someone who works with their hands, wears gloves often, or prefers a low-maintenance ring may find a high-set stone more prone to catching on clothing or feeling exposed.
Depth also affects how the ring stacks with a wedding band. A low basket may create a gap if the band cannot slide underneath or sit flush against the engagement ring. A higher basket may solve that problem, but it can change the side profile and comfort. This is why stone depth should be reviewed before the setting is finalized, not after the diamond has already been purchased.
Measurement Review Checklist
Before approving a loose diamond for a custom engagement ring, review the length, width, depth, table percentage, total depth percentage, and actual millimeter footprint. The grading report gives the technical measurements, but photos and video help show whether those measurements translate into the visual spread and profile you expect.
For elongated shapes, pay close attention to length-to-width ratio and how the outline looks in motion. For rounds, compare diameter against other stones in the same carat range. For any shape, ask whether the stone’s depth will require a higher basket and whether that height works with the wearer’s comfort, wedding band plans, and daily habits.
If the diamond looks appealing only because of the carat weight, pause and review its certified loose lab-grown diamonds details against the measurements, grading report, and cut data. A custom ring should be built around the stone’s real dimensions, not just the number on the listing.
Cut Quality and Visual Performance Must Match the Setting Style
Lab-grown diamond cut quality becomes more important once the stone is mounted because the setting can either support the diamond’s visual strengths or make its weaknesses harder to ignore. A custom ring diamond is not viewed like a loose stone on a screen. It is seen from above, from the side, in motion, under mixed lighting, and against metal, prongs, side stones, or pavé.
The mistake is assuming that a setting can compensate for weak loose diamond visual performance. An ornate design may add decoration around the stone, but it will not fix dull light return, distracting dark areas, a strong bow-tie effect, or a facet pattern the wearer does not like. If the center stone is the focus, cut and visual behavior need to be judged before the design is approved.
A grading report can support the cut conversation, but visual performance still needs direct review. In practical buying, two stones with similar listed grades may look different because of facet pattern, contrast, depth, symmetry impression, or how the diamond responds to movement and lighting.
Why Cut Quality Matters More Once the Stone Is Mounted
A well-cut diamond can look lively in a simple solitaire because it does not need visual assistance from the setting. The stone carries the design. This is especially important for clean, minimal custom engagement rings, where the eye goes straight to the diamond’s brilliance, fire, scintillation, outline, and symmetry impression.
A poorly performing stone has fewer places to hide once mounted. In a solitaire, it may look flat. In a halo, contrast between the center stone and smaller accent diamonds may make the center appear less bright. In a three-stone design, side stones with stronger sparkle can compete with or expose the center stone’s weaker performance.
The strongest judgment here is that cut should not be treated as a secondary detail after carat size. If the design is simple, cut quality has to carry more of the ring. If the design is detailed, the center stone still needs enough visual strength to hold its place rather than being overshadowed by the setting.
Brilliant Cuts Versus Step Cuts in Custom Settings
Brilliant cuts, including round, oval, radiant, pear, marquise, and many cushion diamonds, are designed for active sparkle. Their facet patterns can often hide minor clarity characteristics better than step cuts, especially when the inclusions are small, light-colored, or positioned away from the center. This makes brilliant cuts more forgiving for buyers who want strong sparkle and flexibility across solitaire, pavé, halo, and hidden halo designs.
Step cuts, such as emerald and Asscher diamonds, behave differently. They show broader flashes of light rather than constant sparkle, and their open facets make clarity, body color, and cut precision more visible. A step cut can look exceptional in a clean solitaire, bezel, or three-stone setting, but it is less forgiving if the buyer chooses a lower clarity grade or a stone with visible windowing.
This does not mean brilliant cuts are better than step cuts. It means they solve different design problems. Choose a brilliant cut if the priority is sparkle, motion, and some forgiveness in clarity. Choose a step cut if the priority is clean geometry, understated flashes, and a more architectural ring, but be stricter about visual review before committing.
Shape-Specific Visual Issues to Review Before Setting
Ovals, pears, and marquise diamonds should be checked carefully for bow-tie visibility. A bow-tie is a dark area across the center of the stone. Some contrast is normal in many elongated shapes, but a heavy bow-tie can dominate the diamond once it is set, especially in a minimalist ring where there is nothing to distract from the center.
Emerald and Asscher cuts should be reviewed for windowing and extinction. Windowing can make parts of the diamond look see-through or watery; extinction can create overly dark areas. Both issues are easier to notice in step cuts because the facet pattern is broad and open. A grading report may tell you the measurements and grades, but it will not fully show how those facets behave in real viewing conditions.
Cushion and radiant diamonds deserve a close look at facet style. Some have a crushed-ice appearance with many small flashes; others show broader, more organized sparkle. Neither is automatically wrong, but the choice should match the setting. A crushed-ice radiant may work well in a high-sparkle design, while a buyer expecting crisp, defined flashes may prefer a different facet pattern.
Certificate and Visual Review Check
Review the grading report, photos, 360-degree video, and side profile when available. The certificate helps confirm carat weight, measurements, color, clarity, polish, symmetry, and other listed details, but it does not fully answer whether the diamond is visually right for the intended setting.
Before approving the stone, look for sparkle distribution, dark zones, symmetry impression, bow-tie strength, facet pattern, and how the diamond appears from the side. If a custom setting will place the stone high, frame it with a halo, surround it with side stones, or expose the profile, those views matter. A diamond that looks acceptable in one static image may not be the right choice once the ring is built around it.
Setting Style Changes How the Loose Diamond Looks and Wears
An engagement ring setting does more than hold the diamond. It changes how the loose diamond looks, how large it feels, how protected it is, and how practical the ring becomes for daily wear. The best setting for a loose lab-grown diamond is the one that supports the exact stone’s shape, dimensions, depth, and visual personality.
The same diamond can feel clean and architectural in a solitaire, larger and more decorative in a halo, more protected in a bezel, or more formal in a three-stone ring. None of these outcomes is universally better. The right choice depends on whether the design should emphasize the center stone alone, add visual coverage, increase protection, or create more structure around the diamond.
Solitaire Settings: Best for Highlighting the Center Stone
A solitaire setting puts the most responsibility on the center stone. Because there are no halos or side stones to redirect attention, the diamond’s shape, cut quality, face-up size, and proportions become the main design. This is a strong choice when the loose diamond has attractive measurements and strong visual performance.
The risk with a solitaire is that it exposes compromises. A heavy bow-tie in an oval, a small face-up diameter in a round, or a dull facet pattern in a radiant will be easier to notice. If the buyer wants a simple solitaire, it is usually better to prioritize cut, proportions, and visual review over pushing carat size to the limit.
Halo and Hidden Halo Settings: More Visual Presence, More Proportion Control
A halo can make a center stone appear larger and give the ring more visual coverage, but it also requires precise proportion control. The melee diamonds need to match the center stone’s outline closely. If the halo is too bulky, it can make the ring look dated or overwhelm the center. If it is too fine, it may not deliver the visual presence the buyer expects.
Halos are especially sensitive to shape. An oval halo should follow the oval cleanly; a cushion halo should not make the center look distorted; a pear halo needs careful work around the point and rounded end. The center stone’s measurements matter because a stock halo setting may not fit the diamond’s exact outline well.
A hidden halo is different. It usually affects the side profile more than the face-up view. Buyers sometimes expect a hidden halo to make the diamond look much larger from the top, but its main role is adding detail under or around the basket. It is a good choice when the wearer wants a subtle design feature, not when the main goal is maximum face-up size.
Bezel and Semi-Bezel Settings: Protection With a Different Visual Edge
Bezel and semi-bezel settings can be practical choices for daily wear, especially for diamonds with points, corners, or edges that benefit from extra protection. Pear, marquise, emerald, princess, and elongated shapes can all gain a more secure feel when the setting is thoughtfully designed around the stone.
The tradeoff is visual. A bezel defines the outline more strongly and can make the ring feel more modern, sleek, or substantial. It may also slightly change how much of the diamond edge is visible and how light interacts with the stone. This does not make bezels inferior, but buyers who want an airy, delicate, prong-set look may find a full bezel too visually strong.
A semi-bezel can be a useful middle ground. It offers some edge protection while leaving more of the diamond visible. The design must still be matched to the exact loose diamond dimensions, especially for elongated or asymmetrical shapes where poor alignment is easy to see.
Three-Stone and Side-Stone Settings: Matching Is Critical
Three-stone and side-stone settings add meaning, structure, and presence, but they also introduce more ways for the design to go wrong. The side stones need to complement the center stone in scale, shape, color, and brightness. If they are too large, they compete. If they are too small, they can look like an afterthought.
Elongated center stones need particular care. An emerald cut with tapered baguettes can feel balanced and architectural, while the wrong side-stone proportions can make the center look narrow or crowded. An oval with side stones may need careful spacing so the ring does not become too wide across the finger.
Color and brightness matching also matter. If the side stones are noticeably brighter, whiter, or cut in a completely different visual style, the center diamond may lose impact. For custom ring settings, side stones should be chosen around the center diamond, not treated as generic accents.
Stone-to-Setting Fit Check
Ask whether the setting is being built around the exact stone measurements or adapted from a standard stock size. For a true custom ring setting, the basket, prongs, side-stone layout, and overall proportions should be planned around the selected loose diamond.
Before approval, confirm how the diamond will sit, how high the setting will be, how the prongs or bezel will protect the stone, and whether the design works with the intended band width and wedding band plans. A beautiful loose diamond can still become a frustrating ring if the setting treats it like an approximate size instead of a specific stone.
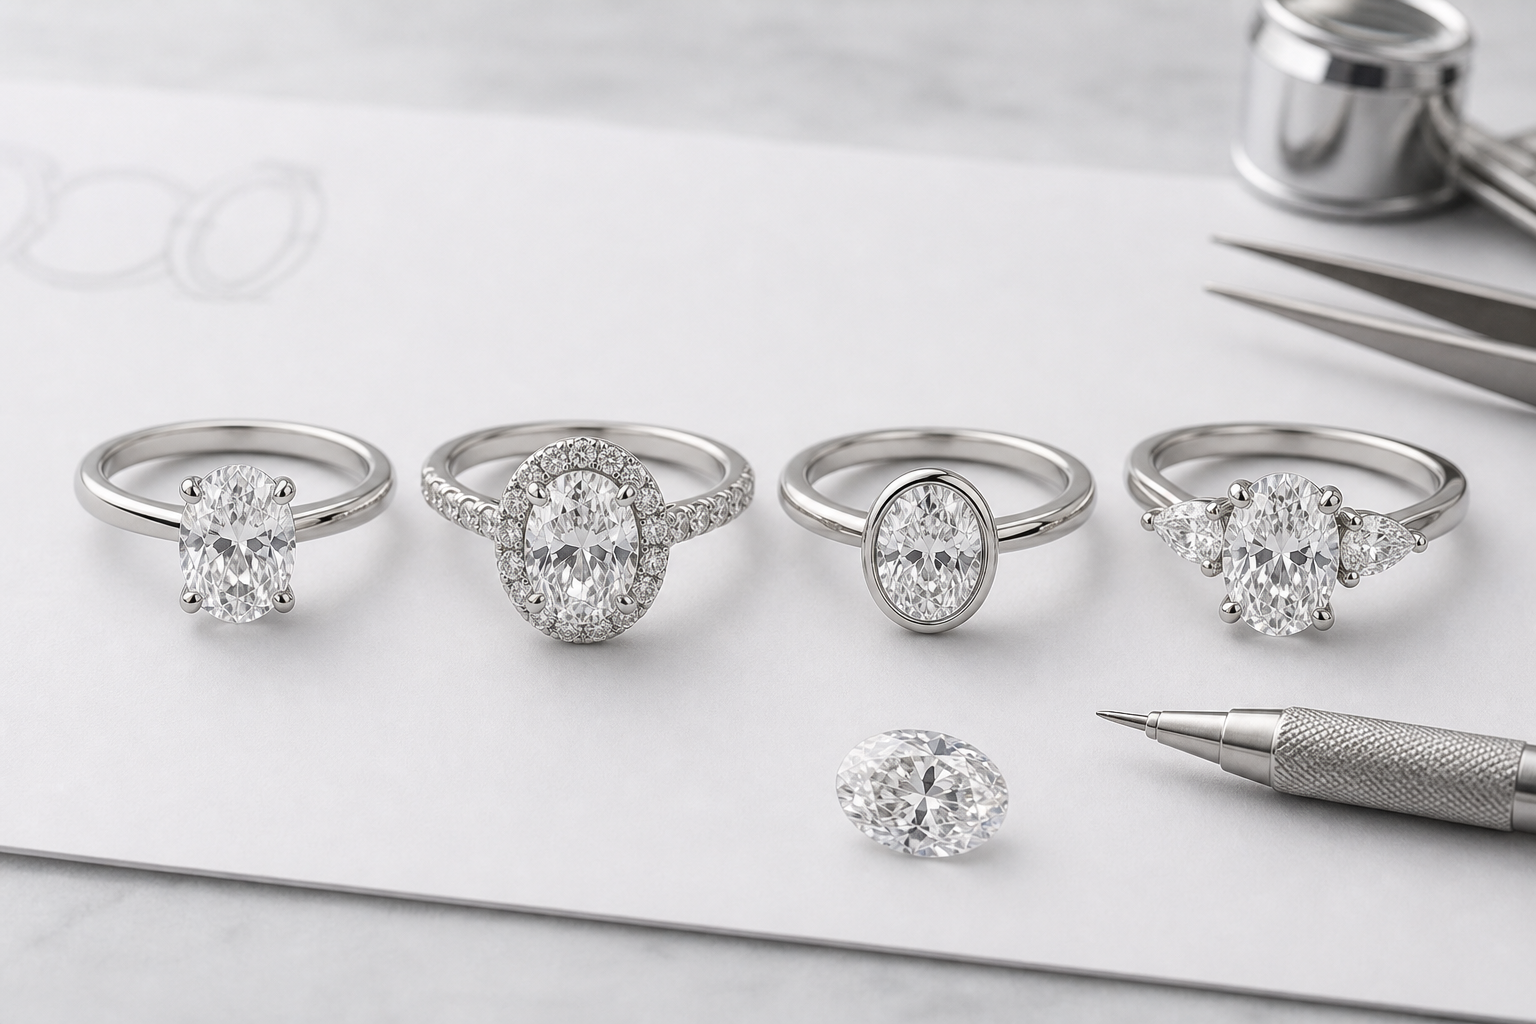
Prong Layout, Basket Design, and Stone Security Should Not Be Afterthoughts
A prong setting is not just the small metal detail that holds the diamond in place. It affects how much of the stone is visible, how protected the edges are, how high the ring sits, and how secure the center stone feels in daily wear. For a custom engagement ring, the diamond prong layout should be decided around the exact loose diamond, not chosen as a generic style after the design is mostly finished.
This matters most with larger lab-grown diamonds, elongated shapes, and stones with pointed tips or sharp corners. A beautiful loose diamond can become a practical problem if the setting leaves vulnerable areas exposed, places the stone too high, or uses prongs that do not match the shape. Custom engagement ring security depends on the relationship between the stone’s outline, girdle, depth, basket design, and the wearer’s lifestyle.
Four-Prong Versus Six-Prong Layouts
A four-prong setting usually shows more of the diamond’s outline and can make the ring feel lighter and more minimal. This can work especially well for shapes where the buyer wants a clean view of the stone, such as oval, cushion, radiant, or emerald cuts. The tradeoff is that each prong carries more responsibility, so the prong placement and workmanship need to be carefully matched to the stone’s measurements.
A six-prong setting adds more contact points around the diamond and can create a rounder visual frame, which is why it is often used for round diamonds. It can also make the center stone feel more protected from multiple angles. The drawback is visual: six prongs may cover slightly more of the diamond’s edge and can make some elongated or angular shapes look busier if the prongs are not scaled well.
Neither layout is automatically better. A four-prong setting may be the cleaner choice for a modern solitaire with a well-proportioned stone, while a six-prong layout may make more sense for a larger round diamond or a ring intended for frequent daily wear. The mistake is choosing based only on appearance without asking whether the prong layout gives the stone enough support for its size, shape, and setting height.
V-Prongs for Pear, Marquise, and Princess-Cut Corners
Pear, marquise, and princess-cut diamonds need more deliberate protection than many buyers expect. Their tips and corners are part of what makes them visually distinctive, but those same points are also the areas most likely to catch, chip, or take impact if the setting is too exposed. For these shapes, the best prong setting for the diamond shape often includes protection at the most vulnerable points.
V-prongs are commonly used to shield pointed ends or sharp corners. On a pear diamond, a V-prong at the tip helps protect the narrow end while standard or claw prongs can hold the rounded side. On a marquise, both pointed ends usually deserve protection. On a princess cut, corner protection is often more important than making the prongs look delicate, because exposed corners can become a long-term weakness in the design.
There is a visual benefit as well. A well-placed V-prong can anchor the shape so the diamond looks intentional in the ring rather than simply sitting on top of the band. Poorly scaled V-prongs, however, can look bulky or cover too much of the stone’s outline. The goal is not the smallest possible prong; it is the smallest prong that still does the job.
Basket Height and Side Profile
The basket setting controls how the diamond sits above the finger. This is where many custom ring designs succeed or fail in daily use. A deep stone or a stone with a pronounced pavilion may require more height under the center stone, while a shallower or better-suited stone may allow a lower profile. If the basket is too high, the ring may snag more often, feel less comfortable, or look top-heavy from the side.
A low setting is not always the better answer. Some designs need height for structural support, light access, cathedral shoulders, or wedding band clearance. A ring that sits too low may prevent a wedding band from sitting flush or may force awkward compromises in the basket design. The right question is not “How low can it go?” but “What height supports this exact diamond while fitting the wearer’s hand and stacking preferences?”
Cathedral settings can add visual support by lifting the center stone with metal shoulders that rise from the band. This can be useful for larger stones because the ring may feel more integrated and less like the diamond is floating above the finger. A simple peg-head style can look clean, but with a large or deep stone it may feel less balanced if the basket is not designed carefully.
Buyer Verification Checklist
Before production starts, ask for a design rendering, CAD preview, or a clear side-profile explanation if the jeweler offers one. The key details to confirm are the prong number, prong style, basket height, and whether the girdle of the diamond is properly supported. This is especially important when using a secure setting for a loose lab-grown diamond with an elongated shape, pointed ends, or a larger carat weight.
- Confirm whether the prong setting is designed for the exact stone measurements, not a standard size range.
- Ask whether four prongs, six prongs, claw prongs, or V-prongs are recommended for the specific diamond shape.
- Check whether pointed tips, corners, or thin areas of the girdle are protected.
- Review the basket setting from the side, not only from the top view.
- Ask whether the setting height supports the wearer’s lifestyle and wedding band plans.
If these details are unclear, the custom ring prong design is not ready for approval. Security should be settled before the ring is made, not corrected after the stone has already been mounted.
Band Width and Metal Choice Affect Balance, Durability, and Color Perception
Engagement ring band width and metal choice do more than finish the look of a custom design. They influence how large the diamond appears, how stable the ring feels, how the color of the stone is perceived, and whether the design makes sense for everyday wear. A band that looks elegant in a close-up rendering may feel too delicate once paired with a large center stone or an active lifestyle.
For custom engagement ring design, the band should be chosen in relation to the loose diamond’s shape, measurements, and setting height. A two-carat elongated oval on a very thin pavé band creates a different set of practical demands than a one-carat round diamond on a plain platinum band. The visual balance and structural support need to be judged together.
How Band Width Changes the Diamond’s Visual Presence
A thinner band can make the center stone look larger by contrast. This is one reason delicate bands are popular with oval, pear, radiant, and emerald-cut diamonds: the narrow metal line emphasizes the diamond’s face-up size. In many designs, a band around 1.6 mm to 2.0 mm can create a refined look, but the lower end of that range should be considered carefully if the ring will be worn every day.
Wider bands can make the ring feel more balanced, especially with larger stones, elongated diamonds, three-stone layouts, or higher basket settings. They may reduce the illusion of maximum diamond size, but they can improve the overall proportions of the ring. For many classic engagement ring designs, a band around 1.8 mm to 2.2 mm offers a practical middle ground between delicacy and presence.
Very thin bands are often overvalued in online inspiration photos because those images prioritize face-up appearance. In real wear, a thin band paired with a large or high-set diamond may rotate more easily, feel top-heavy, or provide less visual support. If the center stone is large, elongated, or set high, choosing band width for diamond size becomes a structural decision, not just an aesthetic one.
Metal Color and Diamond Color Grade
White metals such as platinum and white gold tend to emphasize a colorless or near-colorless appearance. If the buyer has chosen a higher color grade because they want a crisp white look, a white metal setting usually supports that goal. It can also make contrast more noticeable if the diamond shows warmth, especially in certain shapes or lighting conditions.
Yellow gold and rose gold can soften the perception of slight warmth in some diamonds, particularly when the prongs or basket are also made in a warmer metal. This does not mean any color grade will look the same in yellow or rose gold. Shape, cut style, diamond size, and the amount of exposed metal all affect the final impression.
The safest decision is to review the diamond with the intended metal color before finalizing the custom ring metal selection. This matters more for larger stones and step cuts, where body color may be easier to notice. A diamond that looks bright and balanced in yellow gold may feel warmer than expected in platinum, while a very colorless stone may create a sharper, icier look in white metal.
Platinum Versus Gold for Custom Engagement Rings
Platinum has a naturally white appearance and a substantial feel, which makes it a common choice for buyers who want a white-metal custom engagement ring without the look of yellow or rose tones. It can work especially well with clean solitaires, larger center stones, and designs where the metal is meant to feel quiet and structural rather than decorative.
White gold can offer a similar white-metal look with a different feel and price position depending on the design and market conditions. It is often used for pavé bands, classic solitaires, and modern custom rings. Buyers should confirm the specific alloy, finish, and care expectations with the seller rather than assuming all white gold rings will wear or age the same way.
Yellow gold brings warmth and contrast, which can make a lab-grown diamond feel less stark and more traditional or vintage depending on the setting. Rose gold has a softer tone that can be appealing in romantic or contemporary designs, but it should be viewed carefully with the chosen diamond because the combination of pink metal and diamond color can shift the overall impression.
The best metal for a lab-grown diamond ring is the one that supports the design goal, the wearer’s preferences, and the diamond’s visual character. Metal should not be chosen only because it is fashionable in reference photos. It changes the ring’s tone, contrast, and balance in ways that are visible once the diamond is mounted.
What This Means in a Real Purchase
Before approving the design, compare renderings or sample images of the same diamond shape with different band widths and metals. A 2.50 ct oval may look dramatic on a 1.6 mm pavé band, but a 2.0 mm or cathedral-shouldered design may feel more stable and visually balanced. An emerald cut may look sharper in platinum, warmer in yellow gold, and softer in rose gold, even when the diamond itself has not changed.
If the center stone is large, elongated, or set high, the band should visually and structurally support the design. The practical test is simple: the ring should not look as if the diamond and band belong to two different pieces of jewelry.
Budget Should Be Allocated Across the Whole Ring, Not Only the Center Stone
A custom engagement ring budget should account for the whole ring, not just the loose lab-grown diamond price. The center stone is usually the most visible purchase decision, but it is not the only part that affects the finished result. Setting cost, metal choice, side stones, pavé work, design revisions, taxes, sizing, and future wedding band compatibility can all influence the total project cost.
The common mistake is spending as much as possible on the diamond first, then treating the setting as whatever remains. That approach can lead to weaker design choices: a thinner band than the stone deserves, a simpler basket than the shape requires, mismatched side stones, or a setting style that does not match the original vision. A custom lab-grown diamond engagement ring works best when the budget protects both the center stone and the design around it.
Why the Lowest Stone Price Is Not Always the Best Value
A low loose lab-grown diamond price can be appealing, but it should be examined carefully. A less expensive stone may involve tradeoffs in cut quality, face-up dimensions, visual performance, certificate details, or seller support. Some tradeoffs are acceptable if they do not affect the intended design. Others can become expensive mistakes once the stone is mounted.
For example, a diamond that costs less because it is deeper may face up smaller and require a taller setting. A stone with weaker visual performance may look underwhelming in a solitaire, where there is nowhere for it to hide. A diamond with incomplete media or unclear measurements may slow down the custom process because the designer has less reliable information to work from.
Value is not the same as the lowest number on the listing. For a custom ring, better value often means a stone with the right measurements, reliable documentation, strong enough visual performance, and a seller who can communicate clearly about how the diamond will fit the setting.
How Design Complexity Affects the Final Project
Solitaire settings are generally simpler than halos, pavé bands, three-stone rings, or designs with intricate custom details. That does not make solitaires less thoughtful; it means more of the budget is concentrated on the center stone, metal, basket design, and finishing. If the diamond is strong enough visually, a solitaire can be one of the most efficient ways to create a custom engagement ring with a clear design focus.
Halo settings, hidden halos, pavé bands, and three-stone designs add more variables. Melee diamonds must be selected, set, and proportioned correctly. Side stones need to complement the center stone in scale, shape, color impression, and brightness. With elongated center stones, side-stone proportions become especially important because poorly matched side stones can make the ring look crowded or unbalanced.
Design complexity should be chosen because it supports the ring, not because it compensates for uncertainty about the center stone. If the diamond’s shape and measurements already create strong presence, adding more details may not improve the design. It may simply increase cost and make the ring harder to execute cleanly.
A Practical Budget Allocation Framework
Instead of setting aside one amount for the diamond and hoping the rest works, begin with the finished ring concept. Decide whether the design is a simple solitaire, a pavé design, a halo, a three-stone ring, or a more detailed custom piece. Then reserve enough budget for the setting, metal, side stones if any, customization work, taxes, wedding band planning, and future compatibility with a matching band.
If the budget is fixed, the most effective compromise is often to adjust the center stone slightly rather than weaken the setting. Moving from a larger stone with awkward dimensions to a slightly smaller stone with better spread and stronger visual performance can improve the finished ring. Likewise, choosing a cleaner setting that is well built is usually better than forcing complex details into a budget that cannot support them.
Buyers should be cautious with exact lab-grown diamond ring cost estimates unless they are current, specific, and tied to an actual stone and design. Pricing changes with diamond specs, metal, labor, side stones, and seller policies. Directional planning is useful; pretending there is one universal price for a custom ring is not.
Price differences should not be read as a simple quality ranking. A higher price may reflect size, grade combination, availability, design complexity, seller service, or documentation, while a lower price may reflect acceptable tradeoffs or compromises that matter for the intended setting. The useful question is what the price includes and which tradeoffs are visible before approval.
Budget Planning Check
Compare the total ring cost, not only the center stone cost. Before approving the project, ask for a written estimate that separates the loose diamond, setting, side stones, design work, metal choice, and any additional services or policies the seller can verify. This makes it easier to see whether the money is going into the parts of the ring that matter most.
- Confirm the price of the selected loose lab-grown diamond separately from the setting.
- Ask whether side stones, pavé work, halo details, or hidden halos are included in the estimate.
- Check whether the metal choice changes the final cost.
- Ask whether design work, CAD revisions, resizing, engraving, or other services are included or separate.
- Consider whether the engagement ring design will work with the future wedding band.
If the estimate leaves major details vague, the project is not ready for final approval. A good custom engagement ring budget should make the tradeoffs visible before the ring is produced.
Certification, Images, and Seller Communication Reduce Custom Design Risk
A lab-grown diamond certificate is useful because it gives the custom design process a factual starting point. It helps confirm what the stone is supposed to be before a setting is built around it. For a custom engagement ring, that matters because the ring is not being chosen from a finished case; the design depends on the exact loose diamond grading report, measurements, and physical fit.
The mistake is treating certification as the whole decision. A certified loose lab-grown diamond can still be the wrong choice for a specific setting if the proportions, face-up appearance, or setting height do not support the design. Documentation reduces risk, but it does not replace visual review or clear seller communication.
What a Grading Report Helps Confirm
A loose diamond grading report from a recognized lab, such as an IGI report or GIA report, can document the diamond’s carat weight, measurements, color grade, clarity grade, polish, symmetry, and identifying report details. For round diamonds, it may also include more detailed cut grading information. Some reports list fluorescence, growth method, inscription details, or additional comments that may help match the report to the listed stone.
For custom design, the most practical details are often the measurements. Length, width, and depth tell the designer how the stone will physically sit in the setting. A 2.00 carat oval, for example, is not a design instruction by itself. The millimeter dimensions determine basket size, prong placement, height, and visual coverage on the finger.
The report number also matters for diamond verification. When possible, the report number should match the seller listing and, as emphasized in a loose lab diamond buying guide, be checked through the issuing lab’s website. If the diamond has an inscription, that can provide another point of alignment, though buyers should not assume every stone will be easy to inspect personally without magnification.
A grading report can narrow the comparison, but it should be read alongside the stone’s proportions, visual evidence, and intended jewelry use. The report confirms listed characteristics; it does not confirm that the diamond is the right physical or visual match for a specific prong layout, basket height, or band width.
What a Certificate Does Not Replace
A certificate does not show whether a diamond is beautiful in the way the buyer expects. It does not fully reveal bow-tie strength in an oval, pear, or marquise. It does not show how an emerald cut handles light across the center, whether a radiant has the type of sparkle pattern the buyer prefers, or whether a cushion appears crisp or overly crushed-ice in motion.
This is why diamond images and a 360 video are not optional extras for a custom ring decision. The report narrows the field; visual media helps decide whether the stone deserves to be built into a permanent design. A strong grade combination can still disappoint if the face-up appearance looks dark, uneven, or mismatched with the intended setting style.
The setting can also change what the eye notices. A minimalist solitaire exposes the diamond’s outline and light performance more directly. A halo may soften or amplify the shape, depending on melee size and alignment. A bezel can make the outline feel stronger but may change how open the stone appears. The certificate cannot predict those design effects by itself.
Evidence Trail: What to Save Before You Approve
Before production, save the diamond listing, report details, stone measurements, photos, video links or screenshots when available, written quote, design confirmation, metal choice, band width, prong description, ring size, and any policy details the seller provides. This record is not just administrative; it helps make sure everyone is working from the same diamond and the same design expectations.
If the custom process includes a CAD, rendering, sketch, or written design summary, compare it against the diamond measurements and the setting expectations you discussed. The buyer should be able to identify where the document confirms the stone, the setting style, the profile height or side-view expectation, the prong layout, and any side-stone or pavé details. If a key decision is not visible in the approval record, ask for clarification before production begins.
For traceability within the buying process, keep the report number, seller SKU or listing reference, design version, and written approvals in one place. If a stone option changes during the project, update the comparison rather than relying on earlier notes, because even a similar carat weight or shape can require a different basket, prong layout, or side profile.
Questions to Ask Before Approving a Custom Design
Before approving a custom engagement ring, ask whether the setting is being built for the exact stone measurements or adapted from a standard model. This distinction matters. A stock-style setting may work for common size ranges, but a custom ring should account for the selected diamond’s length, width, depth, girdle position, and preferred orientation.
Ask whether the selected diamond can sit at the preferred height. A lower profile may be more practical for daily wear, but some stones need enough clearance for the pavilion, prong structure, or wedding band fit. If a seller cannot explain the side profile clearly, the buyer may not know whether the finished ring will feel sleek, tall, or prone to catching.
Wedding band compatibility should be discussed before production, not after the proposal. Some settings allow a band to sit flush, while others create a gap because of the basket, cathedral shoulders, hidden halo, or center stone structure. A gap is not automatically a problem, but it should be a deliberate design choice.
Prong style and metal choice should also be confirmed in writing. Four prongs, six prongs, claw prongs, rounded prongs, V-prongs, platinum, white gold, yellow gold, and rose gold can all change the final look and wearability. The wrong assumption here can affect both appearance and security.
How to Verify This Before Buying
To check a lab diamond certificate before a custom ring, start by matching the report number, carat weight, shape, measurements, color, clarity, and other listed details against the seller’s listing. If the issuing lab offers online lookup, use it. If there is a visible inscription in the seller’s media, confirm that it aligns with the report information when practical.
Then review the diamond beyond the document. Magnified photos, a 360 video, and side-profile images help reveal the face-up appearance, depth, outline, facet behavior, and any visual issues that may matter once the stone is mounted. For fancy shapes, the video often carries more decision value than a single still image.
Custom design details should be confirmed before payment or production begins. The buyer should have written clarity on the selected diamond, setting design, metal, ring size, band width, prong layout, side stones if any, engraving if any, estimated timeline, final cost, and seller-specific policies. If the information is scattered across messages or assumed verbally, the project is not as controlled as it should be.
At NUVU, this is the kind of point where we treat documentation and design communication as part of the same decision. The safest custom projects are not just based on a good certificate; they are based on a verified stone, clear visuals, and a setting plan that has been checked against the exact diamond.
If a seller makes broad sustainability, sourcing, or production claims, those claims should be supported with documentation rather than treated as automatic benefits of lab-grown diamonds. Lab-grown origin can provide a different sourcing path, but buyers still need transparent information about the specific stone, seller, and supply process behind the ring.
Sustainability claims should be specific and documented. Broad green language is less useful than clear information about production context, energy use where disclosed, supply chain communication, and the seller’s ability to explain what a claim actually covers.
Custom Design Timeline: What to Finalize Before Production Starts
The custom engagement ring process works best when the major decisions are settled before production begins. Revisions are normal during planning, but late changes after approval can create avoidable delays, added cost, or design compromises. A loose diamond custom ring is especially dependent on sequence because the center stone controls the setting’s proportions.
Buyers often ask how long a custom engagement ring takes, but timing is not the first question to solve. The better question is whether the project is ready to enter production. A fast timeline does not help if the ring size, prong style, stone height, or wedding band fit has not been confirmed.
The Decision Points Before CAD or Rendering
Before CAD rendering, sketch review, or production planning, the loose diamond should be selected or at least narrowed to a specific stone with confirmed measurements. A designer cannot accurately plan the basket, prongs, side-stone scale, or profile height around only a preferred carat weight.
The setting style should also be clear. A solitaire, halo, three-stone, bezel, pavé, or hidden halo design will each place different demands on the center stone. If the buyer is still undecided between two very different setting types, it is usually too early to approve detailed production work.
Metal, ring size, band width, prong style, and side-stone preferences should be decided before the design is treated as final. Wedding band considerations belong in this stage as well. If the wearer wants a flush-fitting wedding band, that requirement can affect basket design and ring height from the beginning.
Typical Custom Project Stages
A custom ring design with a lab diamond usually starts with stone selection. The buyer chooses a loose diamond that fits the desired shape, measurements, visual performance, budget, and setting direction. Once the center stone is identified, the design consultation can move from general preference to specific construction.
After that, the seller or designer may provide a CAD rendering, sketch, sample reference, or written design confirmation, depending on the process offered. This stage is where proportions should be checked carefully. The buyer should look at the top view and side profile, not just the most flattering angle.
Revisions, if offered, should be used to correct meaningful issues rather than endlessly fine-tune minor details. The most important adjustments involve stone height, prong layout, band width, side-stone scale, metal choice, and wedding band compatibility. Once the buyer gives production approval, the project generally moves into fabrication, setting, quality review, and delivery or pickup.
Timeline Estimates to Use Carefully
Many custom jewelry projects may take several weeks, but exact timing depends on design complexity, stone sourcing, revision rounds, production capacity, and the seller’s process. A simple solitaire built around an available stone is usually less complex than a three-stone ring with matched side stones, pavé work, engraving, or multiple design revisions.
Buyers should be cautious with any timeline that sounds precise before the details are final. A projected completion window is only meaningful after the loose diamond, design, metal, ring size, and approval process are confirmed. If the proposal date is fixed, build in extra time rather than planning around the shortest possible estimate.
Resizing and final inspection also deserve attention. Some designs are easier to resize than others, and certain pavé or eternity-style bands can be more restrictive. This does not mean those designs should be avoided, but it does mean size accuracy matters more before production starts.
Pre-Production Approval Checklist
Before production begins, confirm the stone report, report number, diamond measurements, setting design, metal, ring size, band width, prong layout, side stones, engraving, final estimate, timeline, and seller policies in writing. If a CAD or rendering is provided, review both the face-up view and side profile.
The strongest checkpoint is simple: every design decision that affects fit, comfort, durability, or appearance should be visible in the approval record. If the buyer cannot point to where the diamond, setting, prongs, metal, band width, and total project cost were confirmed, the approval is premature.
Common Mistakes When Matching a Loose Lab-Grown Diamond With a Custom Setting
Most loose lab-grown diamond mistakes in custom projects are not caused by choosing a “bad” diamond. They usually come from choosing a diamond and setting that were never properly matched. A stone can have appealing specs, a fair price, and a valid certificate while still creating problems in the finished ring.
The goal is not to make the process complicated. It is to catch the few decisions that have the biggest impact before they become permanent: dimensions, setting fit, lifestyle, side profile, wedding band compatibility, and written approval.
Choosing Carat Weight Before Checking Dimensions
Carat weight is one of the easiest numbers to compare and one of the easiest to overvalue. Two diamonds with the same carat weight can create different finished rings because their millimeter measurements, depth, and face-up spread are not identical.
This becomes a real issue when the setting is designed around expectation rather than the actual stone. A buyer may imagine a low-profile 2.00 carat oval, then discover the selected diamond sits higher than expected because of its depth. Another buyer may choose a round diamond that weighs well on paper but faces up smaller than competing stones in the same range.
The better decision is to compare physical dimensions before approving the setting. Carat weight should help define the search, not replace measurement review.
Picking a Delicate Setting Without Considering Lifestyle
A thin band, high basket, exposed tip, or minimal prong layout can look beautiful in photos. The problem is that photos do not show how the ring will handle daily movement, clothing, work habits, gym routines, travel, or frequent hand use.
Very delicate designs are not automatically wrong. They are a poor choice when the wearer needs more structure than the design provides. A large elongated diamond on an extremely thin pavé band, for example, may look dramatic, but it can also feel visually top-heavy or less practical for someone who wants a low-maintenance everyday ring.
The practical question is whether the setting supports the way the ring will be worn. If the wearer is active with their hands, a slightly sturdier band, lower basket, protective prong layout, or bezel-style detail may be a better tradeoff than the most delicate possible version.
Ignoring Wedding Band Compatibility
Wedding band fit is easy to overlook during engagement ring planning because the center stone gets most of the attention. But if the wearer wants to stack both rings later, the engagement ring profile should be reviewed before production.
Some settings allow a wedding band to sit flush against the engagement ring. Others create a gap because the basket, hidden halo, prongs, or center stone structure extends outward. A gap can look intentional and balanced, especially with a contoured band, but it should not be a surprise.
If flush stacking is important, the buyer should ask about it before approving the design. Fixing the issue later may require a custom wedding band rather than a simple off-the-shelf match.
Approving a Design Without Written Details
Custom engagement ring mistakes often come from assumptions. The buyer assumes the prongs will be claw-shaped. The seller assumes rounded prongs are acceptable. The buyer expects a lower profile. The design requires more height. The buyer imagines a certain band width. The final ring is built differently because that detail was never confirmed.
Written approval protects both the buyer and the project. It should include the diamond identity, report details, setting style, metal, ring size, band width, prong style, side stones, engraving if any, estimated timeline, final cost, and seller-specific policies. For custom work, vague confirmation is not enough.
The biggest warning sign is pressure to approve production while important details are still described generally. A custom design should not move forward on phrases like “standard setting,” “similar look,” or “around two millimeters” if those details materially affect the finished ring.
Quick Decision Filter
Use this test before final approval: if the diamond’s measurements, setting height, prong layout, band width, metal, wedding band fit, and total project estimate are not clear, the ring is not ready for production.
A good custom ring decision should feel specific. The buyer should know which diamond is being used, how it will be held, how high it will sit, how the band supports it, what metal frames it, and what the full project includes. If those answers are still uncertain, the next step is not approval; it is clarification.
Recommended FAQ Section for Search and Buyer Confidence
Should I Choose the Loose Diamond or the Setting First?
You should plan the loose diamond and the setting together. If you choose the diamond first without a design direction, you may end up with a stone that looks impressive on its own but feels too wide, too tall, or poorly balanced in the finished ring.
If you need a starting point, begin with the ring style: solitaire, halo, bezel, three-stone, pavé, or a more minimal custom design. Then choose a loose lab-grown diamond with the right shape, millimeter measurements, depth, and visual performance for that setting. This approach is usually safer than buying based on carat size alone.
Can Any Loose Lab-Grown Diamond Fit Any Engagement Ring Setting?
No. A lab diamond setting has to match the stone’s shape, length, width, depth, girdle position, and security needs. A setting made for a round diamond will not properly fit an oval, pear, emerald cut, or radiant cut without design changes.
The biggest mistake is assuming that carat weight determines fit. It does not. Two loose lab-grown diamonds with the same carat size can have different measurements and require different baskets, prong layouts, or setting heights. For a custom engagement ring, the setting should be built or adjusted around the exact stone, not a rough size category.
What Diamond Shape Works Best for a Custom Engagement Ring?
There is no single best diamond shape for every custom engagement ring. Round diamonds are the most flexible across setting styles, ovals and elongated radiants offer strong finger coverage, emerald cuts work well in cleaner architectural designs, and pear or marquise shapes can create a more distinctive outline.
The better question is which shape works best for the wearer’s style, daily habits, and preferred setting. Pointed shapes need more protection. Step cuts need stronger clarity and visual review. Elongated shapes need careful proportion checks. A shape is a good choice only if the setting can support it securely and the final ring looks balanced on the hand.
Is a Certified Lab-Grown Diamond Enough for a Custom Ring?
A certificate is important, but it is not enough by itself. A lab-grown diamond certificate can confirm details such as carat weight, measurements, color, clarity, and grading report information, but it does not fully show how the diamond looks in motion or how it will sit in a specific custom design.
Before approving a custom ring, review the certificate alongside images, video, millimeter measurements, side profile, and setting compatibility. Pay special attention to bow-tie visibility in elongated shapes, the visual openness of step cuts, and whether the prong setting or bezel design protects the stone properly.
Confirm the Design Before Approval
The simplest decision filter is this: if the diamond measurements, setting style, prong layout, metal choice, and finished ring profile are not clear, the project is not ready for approval. A beautiful loose diamond still needs the right physical setting to become a well-designed engagement ring.
Next Steps for Your Custom Ring
Further Reading for Your Design Decision
If you are still comparing options, start by reviewing NUVU loose lab-grown diamonds with the finished ring design in mind. Look beyond carat size and compare shape, measurements, certificate details, and video whenever available.
For design planning, move from the diamond selection into custom lab-grown diamond engagement rings, engagement ring settings, diamond shape education, and lab-grown diamond certification guidance. These pages are most useful when they answer a specific next question, such as whether an oval should be set in a solitaire or halo, whether an emerald cut needs a different clarity target, or whether a selected stone will sit too high for daily wear.
Bring the Stone Measurements to Your Consultation
Compare certified loose diamonds and save the measurements of any stone you like. Those measurements are what a custom ring team needs to evaluate basket design, prong placement, band width, and setting height.
When you are closer to a decision, the stronger next step is to start a custom engagement ring consultation with the exact loose diamond or preferred stone parameters in hand. That makes the conversation more productive because the design can be evaluated around real dimensions instead of general preferences.
Ask for Practical Design Guidance
Ask NUVU or your chosen jeweler to explain whether the loose lab-grown diamond and custom setting work together before production begins. Use that practical comparison to resolve design questions without pressure to commit.
For custom design, the right recommendation is rarely based on one factor. A larger stone is not automatically better if it forces an uncomfortable setting height. A delicate band is not automatically better if it cannot visually or structurally support the center stone. A certificate is valuable, but it does not replace proportion review and design fit.
Choose Your Next Step
If you already know the shape and general style you want, browse loose lab-grown diamonds and compare measurements before committing. If you have a specific stone in mind, request help matching it to an engagement ring setting. If you are still unsure, begin with a custom design conversation and let the ring proportions guide the stone search.
Before a final custom order is placed, the most useful reassurance comes from matching the diamond report, the measured dimensions, and the setting plan to the same exact stone. That process does not replace design judgment, but it reduces the risk of approving a ring that looks right in concept and wrong in execution.
Before purchase, buyers should confirm the seller’s documentation, return policy, resizing terms, production approval process, and after-sales support in writing. If a grading report is provided, compare the report details with the issuing laboratory’s verification tools where available.
Keep the Finished Ring at the Center of the Decision
Apply the 4Cs to Setting Compatibility
Evaluate cut, color, clarity, and carat in relation to the finished custom ring. Carat matters because it influences size and structure, but millimeter measurements usually matter more for setting fit. Color matters most when it interacts with metal choice. Clarity matters more in step cuts than in many brilliant cuts. Cut matters because the setting can expose or emphasize weak visual performance.
For an in-depth explanation of each grading factor, review a full 4Cs guide. Then consider how those grades affect stone-setting compatibility and the final look of your lab-grown diamond engagement ring.
Budget for the Complete Ring
Budget matters here because a custom engagement ring is a complete project, not just a loose diamond purchase. The important decision is how much room to leave for the setting, side stones, metal choice, design work, and future wedding band compatibility.
Do not rely on unsupported market prices or broad claims about what a lab-grown diamond should cost. Ask whether the total project budget supports the ring you actually want. A lower-priced stone can be a poor value if its proportions create design compromises or if seller support is weak during customization.
Match the Style to the Actual Stone
Style matters, but style alone is not enough. A solitaire, halo, bezel, three-stone, or pavé design should be judged by how well it works with the selected loose diamond’s shape, size, depth, and outline.
A ring style that looks strong in a product image may not suit every stone. A halo can overwhelm a wider cushion. A very thin band can look underbuilt with a large elongated diamond. A bezel can protect a pointed or active-wear design, but it also changes the diamond’s outline. The style decision has to come back to the stone.
Use the Report Alongside Visual and Design Evidence
Certification supports confidence, but it does not finish the decision. A grading report can confirm the diamond’s stated specifications, yet it cannot fully show bow-tie strength, face-up personality, sparkle pattern, or how the stone will sit in a custom setting.
The safer custom design process uses the certificate, visual media, measurements, setting plan, and written production details together. If one of those pieces is missing, the buyer is accepting more risk than necessary.
Final Fit and Wearability Check
Prioritize the details that match the loose lab-grown diamond to the custom engagement ring setting: fit, proportion, security, wearability, and the final visual result. Review other buying questions separately when they need more detail.
Disclosure: This article is for general educational purposes only. Diamond grading, pricing, availability, specifications, and seller policies can change, and readers should verify important details through grading reports, official laboratory tools, seller documentation, or qualified professionals before making a purchase decision. Laboratory-grown diamonds should be clearly distinguished from natural diamonds, and environmental or sourcing claims should be supported by specific documentation.