
Choosing the best color grade for a loose lab-grown diamond is less about chasing the whitest letter and more about how the stone will actually look once it is set. The right answer changes with metal, shape, carat size, and how sensitive you are to warmth; in a lab-grown diamond price guide, a D grade can be the most conservative choice, but it is not always the most practical one if the setting or cut already hides color well.
For the full framework, read Loose Lab-Grown Diamonds Buying Guide.
This article helps you decide when to pay for D-F, when G-H may offer a strong balance of appearance and budget, and when warmer grades can still work in yellow or rose gold. It also shows why cut quality, clarity, and grading report details should be weighed together, so you can judge a stone by appearance and context instead of the grading letter alone.
| Buying situation | Color range to consider | What matters most |
|---|---|---|
| White gold or platinum setting | D-F for most caution | Hidden warmth is easier to notice |
| Brilliant cuts in a smaller size | G-H often works well | Sparkle can mask mild color |
| Emerald, Asscher, oval, pear, or marquise | D-F for stricter buyers | These shapes show color more clearly |
| Yellow or rose gold setting | H-J can still look balanced | The metal can soften visible warmth |
| Diamonds around 2 ct and larger | Review more carefully | Larger faces reveal more body color |
| Value-focused purchase | G-H is often a useful comparison range | Protect cut, clarity, and face-up beauty |
Quick Questions Before You Read
Q: Is D always the best color grade?
No. It is the most conservative choice, but G-H often looks excellent in the right setting and cut.
Q: Does the metal change how white a diamond looks?
Yes. White gold and platinum can make warmth easier to see, while yellow and rose gold can make slightly warmer stones look more natural.
Q: Should cut be checked before color?
Usually yes. A well-cut diamond often looks better than a higher-color stone with weaker light performance.
Q: Can a grading report alone tell me the right color grade?
No. The letter helps, but shape, size, setting, and actual appearance matter just as much.
Quick Answer: The Best Color Grade for Most Loose Lab-Grown Diamonds
For most buyers, the best color grade for lab-grown diamonds is not automatically D. A better starting point is G-H for many loose lab-grown diamonds, especially if the diamond will be set in white gold or platinum and the shape does not reveal color easily. Buyers who are highly color-sensitive, choosing a larger stone, or selecting a shape that shows warmth more clearly may prefer D-F. Buyers using yellow gold or rose gold can often consider H-J, depending on the shape, size, and desired look.
The key is to separate the lab diamond color grade from how the diamond will actually appear in jewelry. Color is graded in a controlled environment while the diamond is loose, but most people judge the finished piece face-up, in changing light, next to metal. A near-colorless diamond can look bright and clean in the right setting, while paying for a D color diamond may not create a visible difference that matters to every buyer.
For buyers, the practical point is not just what the report says, but how the stone performs visually and fits the intended design. A grading report gives a consistent starting language for color, clarity, measurements, and identification details, but it does not prove that one diamond will look better than another in a specific ring. Treat the report as a filter, then use images, video, proportions, and setting plans to decide whether the color grade is actually doing useful work.
Laboratory-grown diamonds should be clearly identified as laboratory-grown, and they should not be presented as mined diamonds. Lab-grown diamonds and natural diamonds are both diamonds, but they have different origins, and that origin should be clear in the seller description, grading report, and any supporting documentation. This article focuses on laboratory-grown diamonds, not diamond simulants such as cubic zirconia or moissanite.
Practical Starting Recommendation by Buyer Type
If you want the most conservative white look and do not want to second-guess the choice, start with D-F. This range makes the most sense for buyers who notice small differences in white tones, prefer platinum or white gold, are choosing a larger stone, or are considering shapes like emerald, Asscher, oval, pear, or marquise. D-F is also a strong choice when the goal is a crisp, icy appearance rather than simply a diamond that looks white to most people.
If you want a strong balance of appearance and budget, G-H is usually the practical center. Many G and H lab-grown diamonds appear very white once set, especially in round brilliant, cushion, radiant, and princess cuts. This is often the range to compare first if you are asking what color lab diamond should I buy for an engagement ring without prioritizing a difference you may only notice under close comparison.
If the diamond will be set in yellow gold or rose gold, H-J can be worth considering. Warm metal settings reduce the visual contrast that can make slight warmth stand out. This does not mean every I or J color stone is a practical pick; it means the setting may make those grades more attractive in the right shape and size. A smaller round in yellow gold is a very different decision from a three-carat emerald cut in platinum.
When a grading report is provided, buyers should compare the report details with the issuing laboratory’s verification tools where available.
NUVU’s role in buyer education is to make comparison clearer, especially around grading reports, visual evidence, design fit, and documentation.
Why D Color Is Not Automatically the Strongest Use of Budget
A D color diamond sits at the top of the diamond color scale, and for some buyers that matters. If you want the highest colorless grade for personal confidence, a D can be a satisfying choice. It can also make sense in designs where whiteness is central to the look, such as a large platinum solitaire or a step-cut diamond where body color is easier to see.
The mistake is treating D as the default requirement for a beautiful loose lab-grown diamond. Once a diamond is mounted, the visible difference between D, E, F, and even some G-H stones can be subtle, especially face-up. If the difference only appears when stones are placed side by side under close viewing, the higher grade may be less important than cut quality, shape choice, or how well the diamond fits the setting.
A better way to ask “is D color worth it for lab diamonds” is to ask what the D grade is solving. If it removes a real concern because you are color-sensitive or choosing a color-revealing design, it may be worth it. If you are buying a round brilliant for a warm metal setting and would not notice the difference in daily wear, a near-colorless diamond may be a more balanced use of budget.
Compliance-Aware Buying Boundaries for Color Decisions
Color grade is a useful comparison tool, but it should not be treated as a promise of beauty, resale outcome, or overall quality. A grading report helps document key characteristics, but it should not be treated as a guarantee of beauty, value, or sourcing ethics. The more reliable approach is to combine report details with visual evidence, stone measurements, seller documentation, and the intended jewelry use.
Prices can change with market conditions, report type, seller channel, availability, shape, carat weight, and stone-specific details, so exact comparisons should be verified at the time of purchase. If one diamond appears to be a better deal than another, compare like-for-like specifications before drawing that conclusion. A lower price can reflect color, clarity, cut quality, measurements, report type, visual performance, or inventory differences.
When growth method or post-growth treatment is relevant, buyers should look for clear disclosure in the grading report or seller documentation. HPHT and CVD may refer to laboratory-grown diamond growth methods, while some diamonds may also have comments about treatment or post-growth processing when applicable. Do not assume treatment status from the growth method alone; rely on documented information for the specific stone.
Before purchase, buyers should confirm documentation, return terms, resizing policies, shipping expectations, and after-sales support directly with the seller. These practical details affect the buying experience, but they should be verified in writing rather than assumed from general jewelry advice.
A Simple Decision Rule Before You Compare Stones
Choose color grade in this order: shape first, metal second, size third, personal sensitivity fourth. Shape matters because some cuts hide warmth through sparkle while others reveal it through broad facets or elongated ends. Metal matters because white metals create more contrast, while warm metals can make slight warmth feel more natural. Size matters because larger diamonds give the eye more area to detect body color.
Personal sensitivity should come after those practical factors, not before them. Some buyers can spot warmth quickly and will enjoy the reassurance of D-F. Others will not notice the difference between F and H once the ring is worn on the hand. Neither buyer is wrong, but they should not be shopping from the same starting point.
What to Check Before You Decide
Before choosing a loose lab-grown diamond color, confirm whether the finished piece will use a white metal setting or a warm metal setting. Then consider whether the shape tends to hide or reveal color. A round brilliant in yellow gold gives you more flexibility than an emerald cut in platinum, even if both stones have the same lab diamond color grade.
If photos or 360-degree video are available, compare diamonds face-up rather than relying only on grade letters. The report tells you the grade; the visual review helps you judge whether that grade works for the actual ring or jewelry design. The best color for a loose lab diamond engagement ring is the grade that looks right in the finished context, not the highest letter you can fit into the budget.
How Diamond Color Grades Work in Lab-Grown Diamonds
A lab-grown diamond color grade uses the same D-to-Z diamond color scale used for natural diamonds. D is the most colorless grade, and visible warmth increases gradually as the scale moves down. For buying purposes, the most common decision usually happens between D-F, which is considered colorless, and G-J, which is commonly treated as the near-colorless range.
This scale is useful, but it can also mislead buyers if it is treated as a simple ladder where higher always means better. The grade describes color under controlled grading conditions. It does not automatically tell you how white the diamond will look face-up in a ring, how it will react next to yellow or rose gold, or whether the difference between two grades will be visible without side-by-side comparison.
D-F: Colorless Grades
D, E, and F color diamonds are considered colorless on a grading report. This is the range to consider if you want the cleanest white appearance on paper and the lowest risk of seeing warmth in the finished piece. It is especially relevant for platinum and white gold settings, larger stones, and designs where the diamond is visually exposed from the side.
The practical point is that D, E, and F are not equally meaningful to every buyer. Many people cannot reliably separate them once the diamond is mounted, particularly in brilliant-cut shapes with strong light return. If two diamonds are otherwise similar, choosing F instead of D can sometimes preserve the colorless look while giving you more flexibility in budget. The exception is the buyer who specifically wants the top grade or knows they will notice even small differences in tone.
G-J: Near-Colorless Grades
G, H, I, and J are often grouped as near-colorless, but they should not be treated as one interchangeable category. G-H is frequently a strong comparison zone for buyers who want a white-looking diamond without paying for the highest color grades. In many finished rings, especially with round, cushion, radiant, or princess cuts, G-H can appear bright and clean.
I-J requires more context. These grades can work well in yellow gold or rose gold, in smaller stones, and in shapes that mask color effectively. They become riskier in white metal settings, larger diamonds, and cuts with broad facets or pointed ends where warmth may be easier to detect. If you are asking whether H color is too yellow, the answer is usually no in the right setting; if you are asking the same question about J in a large emerald cut with platinum prongs, the risk is much higher.
Why Loose Grading Can Look Different From a Finished Ring
Loose diamonds are graded under controlled conditions so the color assessment is consistent. Buyers, however, do not usually experience diamonds that way. A ring is seen face-up, in daylight, office lighting, evening light, and shadow. It is also surrounded by metal, skin tone, and setting details that change how color is perceived.
This is why D vs G lab diamond color can look dramatic in a comparison tray but far less obvious in daily wear. The grading environment is designed to detect differences; a finished ring is designed to be worn and viewed naturally. A grading report can tell you where the diamond sits on the scale, but it cannot fully predict whether that difference will matter in your specific design.
Certificate and Visual Review Check
Before making a decision, check the grading report for the stated color grade, report number, shape, measurements, and carat weight. These details should match the diamond being offered. A diamond grading report is useful because it gives you a documented baseline instead of relying only on a seller’s description.
After that, look at the diamond visually if images or video are available. Photos and 360-degree video are not perfect, but they can help you judge face-up color, side profile warmth, and how the stone behaves in motion. At NUVU, we treat the grading report as a starting point rather than the whole decision because color only becomes meaningful when it is considered alongside shape, setting, and the way the stone will actually be worn.
It is also worth checking that the report details are being used for the correct purpose. A report can document the stated grade and measurements, but it does not guarantee beauty, value retention, or whether the diamond will match your preference once mounted. If two stones have similar reports, the more useful comparison may be their videos, millimeter spread, facet pattern, and whether the seller can clearly connect the report to the exact stone being shown.
When a grading report is available, buyers should verify the report details through the issuing laboratory’s official report-check tool where available, then compare those details with the exact stone’s images, video, measurements, and setting plan.
If a GIA report is provided, the report details can usually be checked through GIA’s official report verification system.
Before purchase, buyers should confirm the seller’s documentation, return policy, resizing terms, and after-sales support in writing.
Report Language, Origin Disclosure, and What the Document Does Not Prove
A grading report can document key characteristics such as laboratory-grown origin, shape, measurements, carat weight, color grade, clarity grade, and other report-specific observations. It should be read as a technical document, not as a promise that the diamond will be the right visual choice for every buyer or every setting.
For laboratory-grown diamonds, the report or seller documentation should clearly disclose laboratory-grown origin. That disclosure matters because a lab-grown diamond should not be represented as a natural diamond, and a diamond simulant should not be represented as a lab-grown diamond. Clear origin language helps buyers compare the correct category of stone.
Different grading laboratories may present report details in different formats, and buyers should avoid assuming that a lab name alone settles the whole decision. The more useful question is whether the report details match the exact stone being offered, whether the report can be checked through official tools where available, and whether the visual evidence supports the intended design.
How Diamond Shape Changes the Best Color Grade
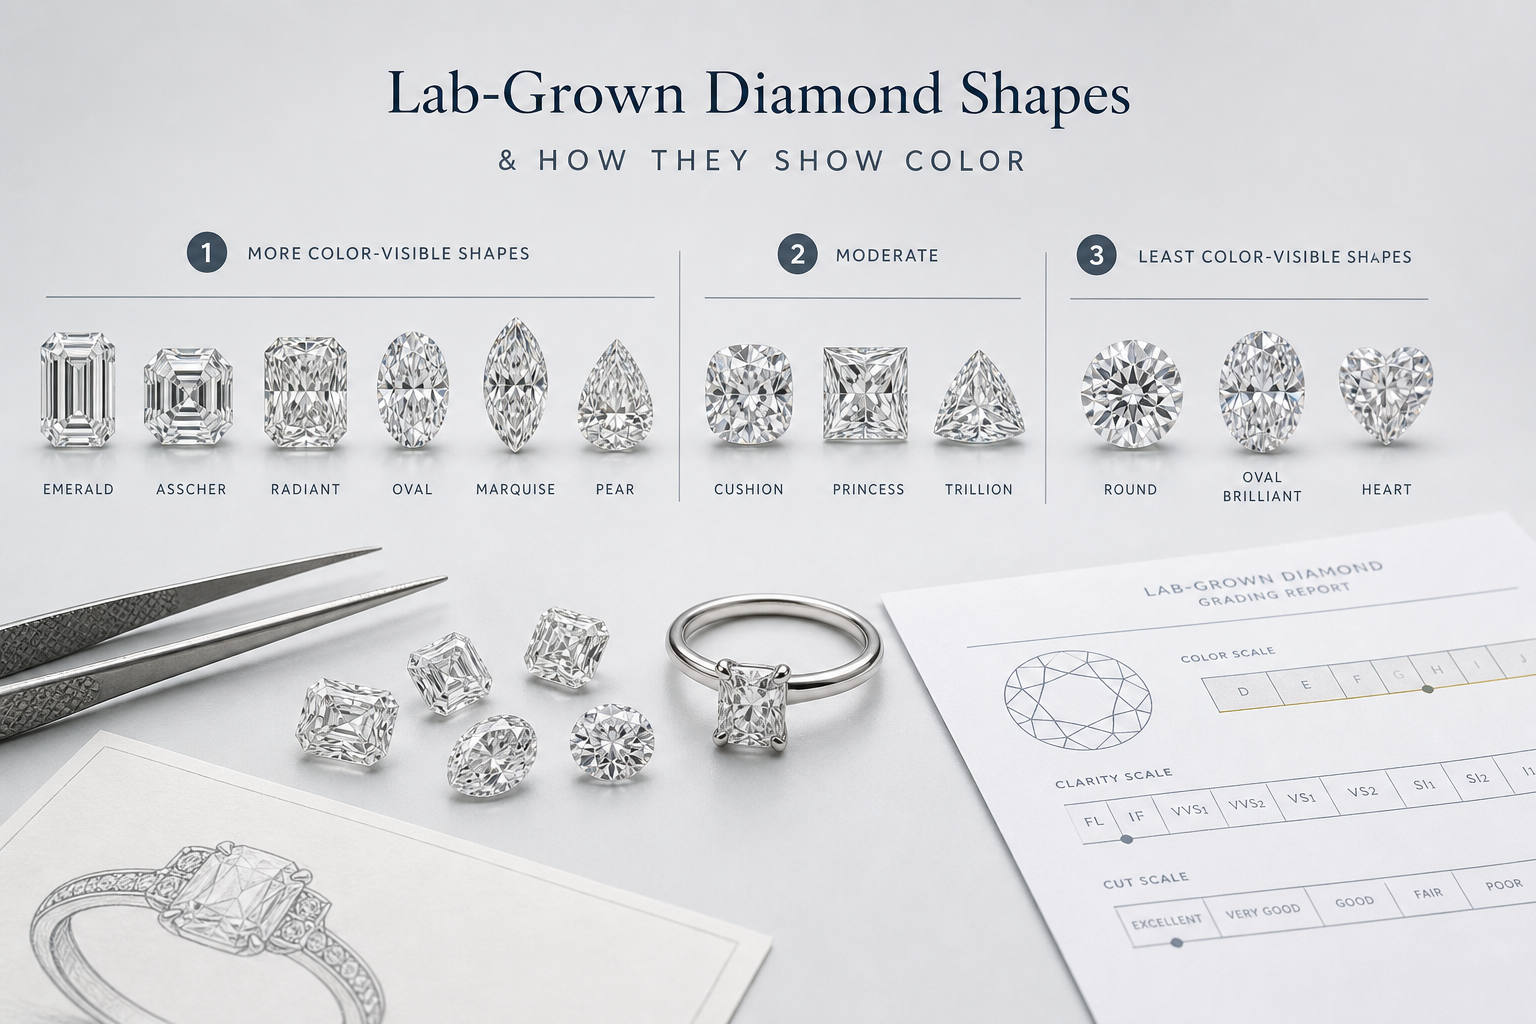
The best color grade by diamond shape depends on how that shape handles light. Some cuts break up body color with sparkle, while others show more of the diamond’s internal tone through larger facets or longer outlines. This is one of the most common reasons two loose lab-grown diamonds with the same color grade do not look equally white.
Shape should be one of the first filters in a loose lab-grown diamond color decision. If you choose the color grade before choosing the shape, you may either prioritize whiteness you do not need or select a grade that looks warmer than expected in the finished piece.
Shapes That Hide Color Better: Round, Radiant, Cushion, and Princess
Round brilliant diamonds are generally the most forgiving for color because their faceting pattern produces strong light return and sparkle. A well-cut round can often make G-H look very white face-up, especially under 2 carats or in a setting that does not create harsh color contrast. This is why H color can be a reasonable consideration for a round lab diamond when the cut is strong and the buyer is not highly color-sensitive.
Radiant, cushion, and princess cuts can also disguise slight warmth better than step cuts because their brilliant-style faceting breaks up visible body color. These shapes do not make color disappear, but they give buyers more flexibility, especially when eye-clean lab diamond clarity is evaluated alongside color rather than treated as a separate upgrade. In many cases, G-H is a practical starting range, and I may be considered in yellow or rose gold if the stone is not large and the buyer likes a softer look.
The warning is that sparkle cannot rescue every stone. A poorly cut diamond may show more dullness, leakage, or uneven color than its grade suggests. If you are choosing a lower color grade in one of these shapes, the stone still needs strong visual performance. Color flexibility works best when the diamond is lively.
Shapes That Show Color More Easily: Emerald, Asscher, Oval, Pear, and Marquise
Emerald and Asscher cuts need more caution. Their step-cut faceting creates broad flashes rather than constant sparkle, so body color can be easier to see. If you want a crisp white appearance in a white metal setting, F-G is often a safer starting point for these shapes than H-I. A G emerald cut may look clean and elegant, but it will not always face up as white as a G round brilliant.
Oval, pear, and marquise diamonds show color differently. They are not step cuts, but their elongated outlines can reveal warmth toward the ends or tips, especially in larger sizes. This does not mean you must choose D-F for every oval or pear. It does mean the best color for an oval lab diamond often depends heavily on size, cut quality, and whether the setting is white, yellow, or rose gold.
For elongated shapes, avoid judging color from a single straight-on image. Look for video or multiple angles if possible. A diamond may look white in the center but show warmth near the tips, and that can become more noticeable once the stone is set with prongs drawing attention to those areas.
Shape-Based Color Starting Points
Use these ranges as starting points, not fixed rules. For a round brilliant in platinum or white gold, G-H is often a strong place to begin, while D-F is better for buyers who want the most conservative colorless look. For radiant, cushion, and princess cuts, G-H usually works well in many designs, with I sometimes worth reviewing in warm metals.
For emerald and Asscher cuts, F-G is often the better comparison range if the goal is a clean white appearance, especially in white metal. H may still work for some buyers, but it should be judged visually rather than assumed safe. For oval and pear shapes, F-H is a practical starting range, with larger stones or highly color-sensitive buyers leaning toward the higher end. Marquise diamonds deserve similar caution because the pointed ends can make color more noticeable.
- Round brilliant: G-H is often a strong starting point for white metals; D-F if you want maximum whiteness.
- Radiant, cushion, and princess: G-H is usually practical; I may work in warm metal settings after visual review.
- Emerald and Asscher: F-G is safer for a crisp white look; H should be evaluated carefully.
- Oval and pear: F-H is a common comparison range, with size and tip color influencing the decision.
- Marquise: F-H is often safer than dropping too low, especially in larger stones or white metals.
What This Means in a Real Purchase
If two diamonds have the same color grade but different shapes, they may not look equally white. A G-color round can appear whiter face-up than a G-color emerald cut because the round’s brilliance breaks up body color more effectively. This is why comparing across shapes can lead to the wrong conclusion.
The more useful comparison is within the same shape, similar size, and similar setting style. If you are choosing between two oval diamonds, compare those ovals directly instead of assuming a color grade behaves the same way it did in a round. Shape changes the color decision enough that the grade letter should be treated as a guide, not a final answer.
How Setting Metal Changes the Color Grade You Can Choose
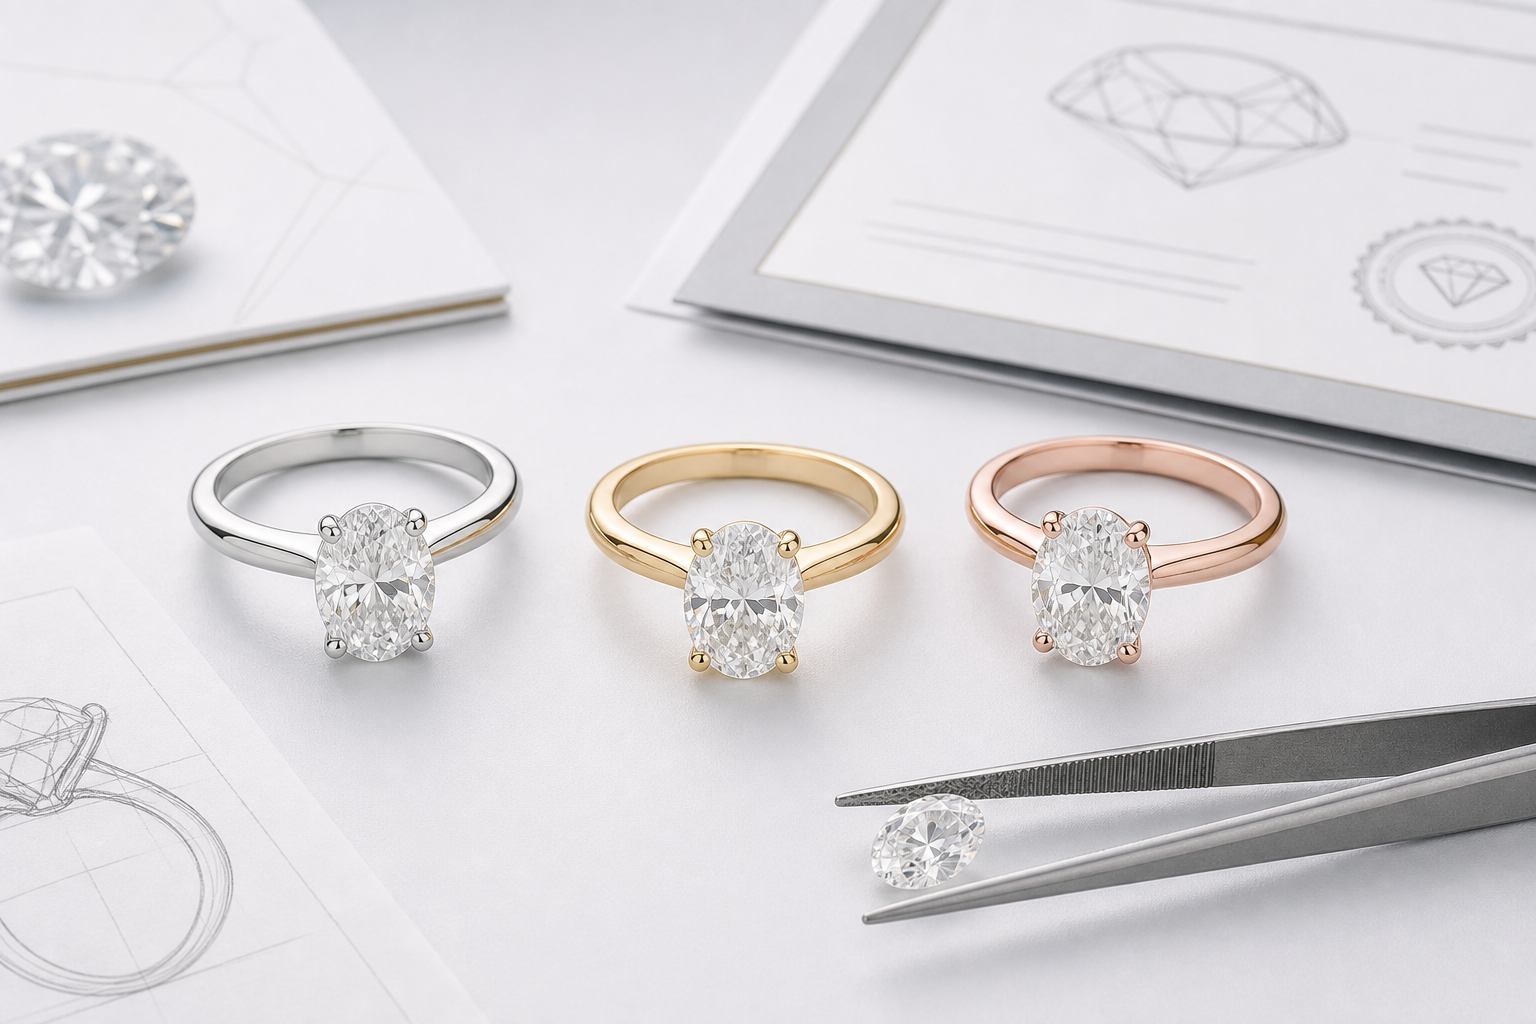
The relationship between diamond color grade and metal is one of the easiest places to avoid unnecessary spending. A lab diamond is graded as a loose stone, but it is worn inside a metal environment that changes how white or warm it appears. The metal closest to the diamond can either highlight warmth or soften it, which means the best color grade for white gold is not always the same as the best diamond color for yellow gold or rose gold.
This does not mean the setting can change a diamond’s color grade. It cannot. But it can change how noticeable that color is in real life. A slightly warm diamond may look more obvious beside icy white metal, while the same stone may look balanced and bright in a warm setting. The practical mistake is choosing color before deciding the ring design.
Platinum and White Gold: When Whiteness Matters More
Platinum and white gold create a cool, bright frame around the diamond. That clean metal contrast can make warmth easier to notice, especially in larger stones, step cuts, and elongated shapes. If the goal is a crisp white engagement ring, D-F and G-H are usually the most cautious comparison ranges.
D-F makes the most sense for buyers who are highly color-sensitive, choosing a large center stone, or selecting a shape that shows color more easily. G-H can still be an excellent choice in many white gold or platinum settings, especially for round brilliant, radiant, cushion, and other brilliant-style cuts that return more light face-up. The key is not whether G or H is “good” in theory. The real question is whether the stone still looks white in the exact size, shape, and setting style you want.
For buyers asking what color diamond for a platinum setting is safest, the answer depends on tolerance. If you want the least possible visible warmth, stay in D-F. If you want a strong balance of whiteness and budget, compare F-H visually before paying for the top letter grade.
Yellow Gold: Why Near-Colorless Can Be a Strong Practical Choice
Yellow gold changes the decision because it surrounds the diamond with warmth. In many yellow gold engagement ring designs, a G, H, or I color diamond can look very white once mounted, particularly if the stone has strong light performance and the shape does not expose body color easily.
This is where near-colorless grades often become more practical. If the basket and prongs are also yellow gold, slight warmth in the diamond may blend with the setting rather than stand out. That can make H color in yellow gold a practical option for many buyers, and I color may be worth considering in smaller stones or brilliant cuts. J can work in some designs, but it should not be treated as automatically safe. It becomes riskier in larger diamonds, emerald cuts, asschers, ovals, pears, and any setting where the diamond is viewed from the side.
The strongest reason to consider G-I in yellow gold is not simply to spend less. It is that the visible difference between those grades and a colorless stone may shrink once the diamond is in its final setting. If you will not view the diamond loose again, the mounted appearance matters more than the letter grade alone.
Rose Gold: How Warmth Can Feel Intentional
Rose gold has a softer warmth than yellow gold, with a pink tone that can make near-colorless diamonds feel harmonious instead of slightly tinted. For buyers looking for the best lab diamond color for a rose gold ring, G-H is often a comfortable starting point, and I may be worth reviewing depending on the shape, carat size, and design style.
The risk with rose gold is assuming every warmer diamond will look romantic or vintage. That is not always true. A stone with visible body color can still look dull or mismatched if the cut does not return light well or if the shape concentrates warmth at the ends. Rose gold can make near-colorless grades more forgiving, but it does not fix a diamond that already looks noticeably tinted face-up.
Rose gold works best when the warmth looks intentional across the whole design. If the ring has a delicate, antique-inspired, or soft-toned look, a slightly warmer diamond may fit beautifully. If the design is sleek, modern, and high-contrast, moving closer to F-G may produce a cleaner result.
Mixed-Metal Settings: The Prongs Matter
Mixed-metal settings can change the color decision more than buyers expect. A yellow gold shank with white gold or platinum prongs frames the diamond in a cooler metal right where the eye focuses. In that case, the stone may need to be judged more like it is going into a white-metal setting, not a fully yellow gold ring.
The opposite is also true. If the prongs, basket, halo, and shank are all yellow or rose gold, the diamond sits in a warmer visual environment. That can make G-H feel very safe in many designs and may make I color reasonable when the shape and size support it. The metal closest to the stone matters more than the metal farther down the band.
For custom design, this is a detail worth deciding before selecting the loose diamond. A buyer may choose an H color stone expecting the forgiveness of yellow gold, then switch to white prongs and suddenly see more contrast than expected. The design choice changed the color tolerance.
In custom work, the diamond should not be evaluated separately from the setting. Prong color, basket height, halo stones, side stones, and the amount of exposed pavilion can all change how much warmth the eye detects. At NUVU, this kind of comparison is treated as a practical selection question: the report narrows the field, but the final decision still depends on visual performance, measurements, and design fit.
For custom design, trust comes from matching the stone to the setting, budget, and wearer’s daily use, not from choosing grades in isolation. Clear communication about prong metal, accent-stone color, side-stone matching, and the amount of visible side profile can prevent a color grade from looking different than expected once the piece is finished.
Stone-to-Setting Fit Check
Before finalizing the loose diamond, confirm the metal used for the prongs, basket, halo, and shank. The prongs and basket usually have the strongest influence because they sit directly against the stone. A yellow gold band with white prongs should be evaluated closer to a white gold setting, while an all-yellow or all-rose design gives the diamond a warmer surrounding context.
If photos or video are available, compare the diamond face-up and from the side. Side views can reveal warmth that is less obvious from the top, especially in solitaire settings where the pavilion remains visible. The right choice is not the highest color grade by default; it is the grade that still looks intentional once the metal, shape, and size are working together.
For custom jewelry, stone measurements and setting compatibility should be confirmed before finalizing a purchase. This includes prong coverage, girdle thickness, stone depth, side-stone alignment, and whether the selected setting can securely accommodate the exact millimeter measurements of the diamond.
How Carat Size Affects Visible Diamond Color
Diamond color and carat size are closely connected because larger stones give the eye more surface area and more depth to read body color. A grade that looks bright and clean in a 1 carat diamond may look warmer in a 2 carat lab diamond, especially in a shape with longer facets or visible ends.
This does not mean every larger diamond needs D color. It means the margin for error gets smaller as size increases. The larger the face-up size, the more carefully you should compare the lab diamond color by carat, shape, and setting metal together.
Why Larger Diamonds Can Show More Color
As a diamond gets larger, there is more material for body color to appear through the stone, particularly from the side and in softer lighting. This is why an H color round under 1.00 ct may look comfortably white in white gold, while an H color 3 carat oval may show more warmth at the ends or along the body.
The difference is not only about carat weight. It is about how much diamond the eye sees. A well-cut brilliant shape can break up color with sparkle, while a step cut or elongated shape may reveal the tone more directly. If you are choosing a larger emerald cut, oval, pear, or marquise for a white-metal setting, moving one grade higher can be more useful than it would be in a smaller round brilliant.
Buyers often ask whether H color is good for a 3 carat diamond. Sometimes it is, especially in warm metal and with the right shape. But in platinum or white gold, and especially in shapes that show color, H should be reviewed carefully rather than assumed safe.
Suggested Color Ranges by Size Category
These ranges are practical starting points, not fixed rules. Shape, cut quality, setting metal, and personal sensitivity can all move the recommendation up or down. Still, they help narrow the search before you compare individual stones.
- Under 1.00 ct: G-H often works well in many brilliant cuts, including white-metal settings. D-F is still appropriate for buyers who want the cleanest possible color, but it is often less necessary at this size unless the design is highly color-sensitive.
- 1.00-1.99 ct: F-H is a strong comparison range for many buyers. G-H can look very white in round, cushion, radiant, and many oval designs, while F-G may be safer for emerald, asscher, pear, or marquise shapes in white metals.
- 2.00-2.99 ct: F-G becomes a more practical target for color-sensitive buyers, especially in platinum or white gold. H can still work well in yellow or rose gold and in shapes that hide color, but it should be compared visually before purchase.
- 3.00 ct and above: Visual review becomes essential. D-F or F-G may be worth considering for white-metal settings, step cuts, and elongated shapes. H-I may still be attractive in warm metal settings, but the stone should be judged in video, side view, and face-up view.
If you are trying to identify the best color for a 2 carat lab diamond, avoid choosing from grade letters alone. A 2.00 ct round in yellow gold and a 2.00 ct emerald cut in platinum do not have the same color demands. The emerald cut in white metal usually deserves the stricter color target.
Face-Up Size Matters More Than Carat Weight Alone
Carat weight tells you how much the diamond weighs, not exactly how large it looks. Two diamonds with the same carat weight can have different millimeter measurements, and that difference affects how much color the eye may notice. Elongated shapes such as oval, pear, marquise, and emerald cut often look larger across the finger than their carat weight suggests.
This is why face-up size should be checked before locking in a color grade for a large lab-grown diamond. A shallow-looking elongated stone may spread wide and show more surface area, while a deeper stone may face up smaller. Neither is automatically better, but the wider-looking diamond may make warmth easier to see across the length of the stone.
Measurements are especially useful when comparing two diamonds in the same shape. If one 2.00 ct oval measures noticeably longer than another, it may have more visible presence and potentially more visible color near the ends. A buyer focused only on carat weight may miss that difference until the stone is mounted.
Useful Numerical Planning Guide
For many buyers, the most efficient approach is to start with a size-based range and then adjust for shape and metal. Under 1.00 ct, G-H is often a reasonable starting point for brilliant cuts, even in many white-metal designs. From 1.00-1.99 ct, F-H gives more room to compare appearance without immediately over-prioritizing D color.
From 2.00-2.99 ct, color becomes more visible, so F-G may be preferred if the diamond is going into platinum or white gold and the buyer wants a crisp white look. At 3.00 ct and above, do not rely on the grading report alone. Compare video, measurements, and side views, and consider D-F or F-G for stones and settings that make warmth easier to notice.
The warning sign is not simply choosing H or I. The warning sign is choosing those grades in a large, color-revealing shape without seeing how the diamond performs in realistic viewing conditions.
When D-F Color Is Worth It and When G-H Is Enough
The D vs G lab diamond decision is not a simple contest between “better” and “worse.” D color is higher on the scale, but G color can still look very white in the right diamond and setting. The more useful question is whether the visible difference matters enough in your specific ring to justify prioritizing color over other selection factors.
For many buyers, G-H is the practical center of loose lab-grown diamond color. For others, D-F is the right choice because it removes doubt, especially in larger stones, white metals, and shapes that reveal warmth. The best decision depends less on the grading scale and more on what you will notice every day.
Choose D-F If You Are Highly Color-Sensitive
D-F is worth serious consideration if you notice small differences between white tones, prefer platinum or white gold, or want the diamond to look as cool and bright as possible. It is also more defensible in large step cuts, large ovals, pears, marquise shapes, and any design where the side of the diamond will be visible.
A D color lab diamond may not look dramatically different from an E or F to every viewer, especially once mounted. But for a buyer who knows they will keep comparing the stone in different lighting, the higher grade can provide confidence. That confidence has value when the ring is emotionally significant and the buyer does not want lingering doubt.
The mistake is assuming D-F is always the most intelligent purchase. It is the most conservative color choice, not automatically the strongest use of budget. If the diamond is small, brilliant-cut, mounted in warm metal, or being chosen by someone who is not color-sensitive, the practical benefit may be limited.
Choose G-H If You Want a Strong Balance of Appearance and Budget
A G color lab diamond or H color diamond is often enough for buyers who want a white-looking stone without paying for a letter grade they may not see in daily wear. This range is especially strong for round brilliant, cushion, radiant, princess, and many oval designs, assuming the cut and light performance are strong.
G-H becomes particularly attractive when the setting is yellow gold or rose gold, or when white prongs are used with a warm metal band. In those cases, the diamond can still appear bright while allowing more flexibility in the rest of the purchase. That flexibility may go toward better cut quality, a preferred shape, a larger face-up size, or more refined setting details.
If you are asking whether G color is good enough for an engagement ring, the answer is often yes in the right context. It is less safe as a blanket answer for large emerald cuts, very color-sensitive buyers, or all-white metal designs where the buyer expects an icy look from every angle.
Consider I-J Carefully in Warm Metals or Specific Shapes
I-J can be a practical choice in some warm metal settings, particularly for smaller stones or shapes that hide color well, and a loose lab grown diamonds buying guide can help frame those tradeoffs more clearly. Yellow gold and rose gold can make these grades feel more integrated, and brilliant-style faceting can reduce visible warmth from the top.
The risk increases when I-J is chosen for a white-metal setting, a larger center stone, or a shape that shows color more easily. Emerald and asscher cuts can reveal body color through broad facets. Ovals, pears, and marquise shapes may show warmth near the ends. In those cases, the budget difference may not be worth it if the diamond looks visibly tinted against the setting.
I-J should be treated as a visual-review range, not a default value range. If the diamond looks white to you in video, fits the setting, and supports the design goal, it may be a good choice. If you are choosing it only because the grading report says “near-colorless” and you have not seen the stone properly, the decision is too thin.
Buyer Scenario: Choosing Between F and H
Maya is choosing a 2.00 ct oval lab-grown diamond for a yellow gold solitaire with white prongs. She compares an F color diamond and an H color diamond in side-by-side video. The F looks slightly cooler, especially when the stones are tilted, but the H still appears white face-up and works well with the warmth of the yellow gold band.
Her real tradeoff is not whether F is “better” than H on paper. It is whether the subtle color difference is more important than using the budget for stronger cut quality, a setting detail she cares about, or a slightly larger stone. Because the prongs are white, she cannot evaluate the H as if it were going into a fully yellow gold setting. The white prongs will create more contrast near the diamond.
If Maya is highly color-sensitive, the F may be worth it because it gives her more confidence in a large oval. If she mainly views the diamond face-up and prefers the warmth of the yellow gold design, the H may be the better balanced choice. The right answer depends on which difference she will actually notice after the ring is finished.
Color Grade Tradeoffs: What Not to Sacrifice for a Whiter Letter Grade
A whiter color grade can be appealing, but it should not become the decision that quietly weakens the diamond. A well-balanced lab-grown diamond is not always the one with the highest color grade; it is the one where color, cut, clarity, proportions, and the intended setting work together. A D-color stone with weaker light performance can look flatter than a G-color stone with better cut quality, especially once both are viewed face-up in normal lighting.
This is where many lab diamond color tradeoffs become expensive. Buyers often compare grade letters because they are easy to understand, while the more important visual factors take more effort to judge. Color matters, but it usually matters after the diamond has enough brightness, contrast, and clean visual appearance to look lively. If moving from G to E forces a compromise on cut quality, proportions, or an eye-clean clarity grade, the upgrade may not improve the finished piece in the way the buyer expects.
Price differences between color grades can reflect more than a simple quality jump. Shape, carat weight, availability, cut precision, clarity, report details, and demand for certain combinations can all influence the final comparison. In practical buying, this is where many comparisons become misleading: a higher-color diamond may look like the better option until you notice weaker measurements, less appealing video, or a setting mismatch that matters more than the color letter.
Do Not Sacrifice Cut Quality Just to Move Up in Color
If the question is “should I choose better color or better cut,” cut should usually come first. Cut quality controls how well the diamond returns light, which affects brightness, sparkle, contrast, and the overall face-up impression. A slightly warmer diamond with strong light performance can look crisp and attractive; a higher-color diamond with poor proportions can appear dull, glassy, or uneven.
This matters most when the budget is fixed. For example, choosing an F-color lab-grown diamond instead of an H may feel like a clear upgrade on paper, but not if the F has a less balanced make, weaker light return, or a noticeably less appealing face-up pattern. In that situation, the whiter letter grade is solving a smaller problem while creating a larger one. The buyer sees the diamond’s performance every time the ring moves; the exact color grade is often less obvious unless stones are compared side by side.
For round brilliants, proportions and cut precision can strongly affect how white the diamond appears face-up. Strong brightness can reduce the visibility of subtle body color, while poor light return may make warmth easier to notice because the stone is not masking it with sparkle. For elongated or step-cut shapes, cut still matters, but the tradeoff becomes more delicate: color may be more visible, yet weak proportions can create bow-tie effects, windowing, or dark areas that no higher color grade will fix.
Clarity should be handled with similar restraint. Paying for a higher color grade while accepting a visible inclusion is usually the wrong order of priorities. The goal is not to chase a flawless-looking grading report; it is to choose an eye-clean diamond that looks good in the real setting. A well-selected VS2 or SI1 may be visually clean in some stones, while a higher clarity grade may be worth considering in step cuts where inclusions are easier to see. The grading report helps narrow the options, but it does not replace checking the actual diamond.
A practical loose diamond buying decision starts by eliminating stones with weak performance or obvious visual issues, then comparing color within the remaining group. If two diamonds are both well cut, eye-clean, properly documented, and suited to the setting, then moving up in color can make sense. If the whiter diamond is only better in one letter grade while worse in how it faces up, it is not the stronger choice.
Do Not Ignore Clarity Just Because Color Feels Easier to Compare
Color grades are easier for many buyers to understand than clarity because the D-to-Z scale feels straightforward. Clarity, however, can have a major effect on how comfortable you feel with the finished diamond. A slightly lower color grade that is eye-clean can be more satisfying than a higher-color diamond with an inclusion that distracts you every time the stone catches light.
This does not mean every buyer needs a very high clarity grade. It means clarity should be judged by actual visibility, not by the label alone. In brilliant cuts, some inclusions are hidden by sparkle and facet reflections. In step cuts, inclusions can be easier to see because the facets act more like windows. If you are already choosing a shape that reveals color more clearly, such as emerald or Asscher, it may also reveal clarity characteristics more clearly. That makes it even more important not to spend the entire upgrade budget on color while leaving too little room for a clean-looking stone.
The best sequence is usually to identify stones with acceptable light performance, then confirm they are visually clean enough for your expectations, and then compare color grades inside that filtered group. If a D color diamond has a visible crystal under the table and an H color diamond looks clean, bright, and balanced in the intended setting, the H may be the more attractive finished choice. The report matters, but the eye still makes the final judgment.
Do Not Overlook Proportions, Spread, and Face-Up Pattern
Two lab-grown diamonds can share the same shape, carat weight, color grade, and clarity grade while looking very different on the hand. Proportions affect the way the diamond returns light, the way it spreads across the finger, and the way it holds color in motion. A stone with awkward depth or a less attractive outline may not become a better choice simply because it has a whiter grade.
For round brilliants, proportion balance can influence brightness and contrast. For ovals, pears, and marquise diamonds, outline, length-to-width ratio, bow-tie visibility, and tip appearance can matter as much as a one-grade color difference. For cushions and radiants, facet pattern can change the look from crushed-ice sparkle to broader flashes, and each style may handle body color differently. For emerald and Asscher cuts, symmetry, windowing, and the look of the steps often determine whether the diamond appears elegant or flat.
This is why video review is so useful when it is available. A still image may show a pleasant white face-up appearance from one angle, but motion can reveal dark zones, uneven return, or warmth that appears only when the stone is tilted. If you are deciding between a higher-color diamond with weaker movement and a slightly warmer diamond with a more attractive pattern, the second stone may give the stronger daily-wear impression.
Do Not Treat the Report as a Substitute for the Finished Design
A grading report is a valuable document, but it is not a rendering of the final ring. It does not show exactly how the diamond will look with a particular prong style, basket height, halo arrangement, side-stone color, or metal tone. It also does not tell you whether the wearer prefers an icy white look, a softer vintage look, or a warmer design that feels intentional.
A grading report can narrow the comparison, but it should be read alongside the stone’s proportions, visual evidence, and intended jewelry use. This is especially important when two stones have similar headline grades but different measurements, facet patterns, fluorescence or growth-related comments, or visual behavior in video.
Side stones deserve special attention. If the center diamond is H color but the side stones or halo are much whiter, the contrast may make the center stone appear warmer than it would in a solitaire. If the side stones are selected to harmonize with the center, the finished ring can look more cohesive. Matching does not always mean every stone must have the exact same grade, but it does mean the visible relationship between stones should be considered before final approval.
The same logic applies to hidden halos, pavé bands, three-stone rings, and two-tone settings. A color grade that works beautifully in a solitaire may need a second look if it is being placed beside a row of very bright accent stones. The more diamonds involved in the design, the more important visual harmony becomes.
Price, Policy, and Documentation Checks Before Comparing Finalists
When two stones look similar on paper, do not assume the lower-priced option is automatically the better choice or that the higher-priced option is automatically higher quality. Prices can vary because of cut precision, report type, seller channel, size, shape, availability, and documentation. Buyers should compare like-for-like specifications before treating one stone as a better value.
Seller policies should be checked directly before purchase. Return terms, resizing options, upgrade programs, warranty coverage, shipping timing, and after-sales support can differ by seller and by order type, especially for custom jewelry. Unless those terms are provided in writing for the specific purchase, they should not be assumed.
Documentation also matters when comparing laboratory-grown diamonds to natural diamonds or to non-diamond simulants. The seller description, grading report, invoice language, and any product page information should consistently identify the stone as laboratory-grown when that is the origin. Consistent language helps prevent category confusion and makes the comparison more trustworthy.
A Practical Step-by-Step Color Selection Process
The simplest way to choose color is to avoid beginning with the highest grade. Instead, start with the finished ring design and work backward. Decide the shape, metal, approximate size, and style of setting first. Then select a reasonable color range for that context. This keeps the color decision tied to how the diamond will actually be worn instead of turning it into an isolated grade comparison.
Once the context is clear, compare a few diamonds in a narrow range rather than jumping across the whole scale. For example, if the ring will be a 1.50 ct round brilliant in white gold, compare F, G, and H examples with strong visual performance. If the ring will be a 2.50 ct emerald cut in platinum, compare E, F, and G more carefully. If the ring will be a smaller cushion in yellow gold, H and I may deserve a look if the stones are lively and the buyer likes the warmer design direction.
Step 1: Lock the Setting Direction Before Final Color
Choosing a loose diamond before knowing the setting metal can lead to unnecessary second-guessing. If the buyer later moves from yellow gold to platinum, a color grade that once felt safe may feel more exposed. If the buyer moves from platinum to rose gold, a higher color grade may still be beautiful, but it may no longer be the best use of budget.
The prong metal is especially important. A yellow gold shank with white prongs behaves differently from a fully yellow gold basket. White prongs place cool metal directly beside the diamond, which can make warmth easier to see near the crown. Yellow or rose gold prongs can soften that contrast, but they may also add a warmer reflection around the stone. Neither choice is wrong; each changes how strict the color target should be.
Step 2: Compare Within the Same Shape and Similar Size
Comparing a G round to a G emerald cut does not tell you much about whether G is the right grade for your ring. The two shapes handle light and color differently. A better comparison is a G oval against an F oval and an H oval of similar size and outline. That kind of comparison shows what the grade difference looks like in the shape you actually plan to wear.
Size should be kept similar during comparison as well. A one-carat H round and a three-carat H oval are not equally demanding. If you compare across very different sizes, you may overestimate or underestimate how visible warmth will be in the final stone. Keep the comparison as close as possible to the actual carat weight and millimeter spread you want.
Step 3: Review Face-Up, Side View, and Tilt
Face-up appearance matters most because that is how a ring is usually seen on the hand. Still, side view and tilt can reveal information that face-up images hide. A diamond may look very white from above but show warmth through the pavilion or near the tips when it moves. This is especially relevant for solitaire settings, open galleries, larger diamonds, and elongated shapes.
Do not reject a diamond just because it shows slightly more warmth from the side than from the top. Most diamonds are not viewed from the side all day. The question is whether the warmth bothers you and whether it conflicts with the design. In a warm metal setting, some side warmth may feel natural. In a platinum setting with a high, exposed profile, the same warmth may be more noticeable.
Step 4: Decide Whether the Upgrade Changes the Finished Look
Before paying more for a whiter grade, ask whether the upgrade changes the finished look enough to matter. If you can only see the difference when two loose diamonds are placed side by side, the upgrade may not be meaningful once the ring is worn alone. If the difference is visible immediately in the intended setting style, then the higher grade may be worthwhile.
This is also where personal sensitivity matters. Some buyers feel happier knowing they chose D-F even if others would not notice. Others prefer to use that budget for a larger stone, a more detailed setting, or stronger cut quality. The right choice is the one that prevents regret for the actual wearer, not the one that sounds most impressive in a grade list.
Step 5: Confirm the Final Stone Against the Final Design
Before final approval, compare the selected lab-grown diamond against the actual setting plan rather than an early design idea. Confirm the metal color, prong style, basket height, accent-stone color range, and whether the center stone will be visually exposed from the side. A color grade that made sense for one design may need a second look if the design changes.
If the ring is custom, confirm that the stone measurements are compatible with the setting structure. Length, width, depth, girdle thickness, and corner or tip protection can affect both appearance and fit. This is especially important for ovals, pears, marquise, emerald cuts, and other shapes where outline and prong placement influence the finished look.
NUVU’s buyer-first approach is to make comparison clearer, especially around report details, visual evidence, setting fit, and documentation. The final decision should be based on the exact stone and design, not on a color grade in isolation.
Common Mistakes When Choosing Lab Diamond Color
One common mistake is buying the highest color grade available and then compromising on the parts of the diamond that create visual life. Colorless does not automatically mean beautiful. If the stone has weak light return, a distracting pattern, or poor proportions, the high color grade will not solve those problems.
Another mistake is assuming all near-colorless grades look the same. G and J can both sit below the colorless range, but they do not carry the same risk in every setting. G-H often works well in many designs. I-J can work, but usually needs more careful evaluation of shape, size, metal, and buyer preference.
A third mistake is forgetting about side stones and accents. A center diamond that looks white by itself can appear warmer if placed next to much whiter accent stones. This is especially relevant for halos, three-stone rings, and pavé settings where many small diamonds sit close to the center. The color relationship across the whole ring matters more than the center grade alone.
A fourth mistake is treating online images as perfectly neutral. Different lighting, camera settings, backgrounds, and screen displays can affect how color appears. Images and videos are useful, but they should be interpreted as comparison tools rather than absolute proof of exact real-world color. When possible, compare stones under similar imaging conditions and rely on consistent documentation rather than isolated beauty shots.
Clear documentation and consistent comparison conditions matter because color decisions are easiest to misjudge when report details, images, videos, and setting assumptions are reviewed separately.
Final Recommendation: Choose the Color Grade That Works in Context
The best color grade for a loose lab-grown diamond is the one that supports the finished jewelry design without forcing unnecessary compromises. D-F is the most conservative route for buyers who want a crisp colorless look, are highly color-sensitive, or are choosing larger stones, white metals, step cuts, and elongated shapes. G-H is often a strong comparison zone for buyers who want a white-looking diamond and are willing to judge the stone by appearance, not just by the top letter grade. H-J can be considered in warm metals and forgiving shapes, but those grades deserve careful visual review rather than automatic selection.
For most buyers, the strongest decision comes from balancing color with cut quality, clarity, proportions, setting metal, and actual face-up performance. If a higher color grade makes the stone look meaningfully better in the ring you want, it may be worth the upgrade. If the difference is subtle and only visible in side-by-side comparison, that budget may be better used elsewhere. A beautiful lab-grown diamond is not defined by color alone; it is defined by how all the visible details work together once the stone is set and worn.
Use the grading report to confirm the diamond’s stated characteristics, but do not stop there. Compare the stone visually, consider the metal and shape, and think about the wearer’s sensitivity to warmth. The most successful color choice is not always the whitest diamond on paper. It is the diamond that looks right in real life, in the finished design, under the conditions where it will actually be enjoyed.
Disclosure: This article is for general educational purposes only. Diamond grading, pricing, availability, specifications, and seller policies can change, and readers should verify important details through grading reports, official laboratory tools, seller documentation, or qualified professionals before making a purchase decision. Laboratory-grown diamonds should be clearly distinguished from natural diamonds, and environmental or sourcing claims should be supported by specific documentation.