
Designing a custom engagement ring gives you complete control over the final piece, but that freedom comes with a series of decisions that can feel overwhelming without a clear roadmap. The process—from sharing an inspiration photo to receiving a finished lab-grown diamond ring—involves several critical handoffs, including CAD design approval, where small misunderstandings can lead to costly mistakes or disappointment. This guide walks through each stage to help you navigate the timeline, communicate effectively with your jeweler, and know exactly what to approve before production begins.
For the full framework, read Custom Lab-Grown Diamond Jewelry Guide.
By the end, you will understand where your attention matters most: selecting the diamond first, verifying the CAD measurements rather than trusting the render, and performing a final inspection that catches fixable issues before you accept the ring.
For any buyer, the practical point is that this process is not about handing off a photo and waiting for a perfect result. It is about knowing which stages are reversible, which decisions are permanent once approved, and where a careful review makes the difference between a ring that fits as intended and one that falls short of expectations. The table below summarizes the key actions and common pitfalls at each stage.
| Stage | Your Key Action | Common Mistake to Avoid |
|---|---|---|
| Inspiration & Design Brief | Provide multiple photos from all angles with specific design terms | Assuming the jeweler can guess details from a single front-facing image |
| Diamond Selection | Choose the lab-grown stone first based on cut quality | Prioritizing color or clarity over cut, which has the biggest impact on sparkle |
| CAD Approval | Verify exact shank width, stone diameter, and basket height on the specs | Relying on how the 3D render looks on screen instead of the numerical values |
| Production | Understand the 1–2 revision limit and casting timeline (3–6 weeks total) | Skipping revisions to save time, then regretting proportions after casting |
| Final Quality Check | Inspect magnification of prongs, stone alignment, and metal finish | Overlooking loose prongs or uneven polish because the ring looks good at arm’s length |
| Delivery Verification | Compare ring to approved CAD under bright light and verify ring size | Assuming everything matches without checking; minor fixes are easy only right away |
Quick Questions Before You Read
Q: Should I design the setting or pick the diamond first?
Always pick the diamond first. The stone’s size and shape determine every critical measurement of the setting—basket width, prong placement, and ring height. Starting with the setting forces you to search for a stone that fits, which limits your options and can compromise quality.
Q: Can I trust the CAD render to look exactly like the finished ring?
No. The CAD shows precise geometry to 0.01 mm, but it does not show surface finish, polish, or how light will interact with the metal and stone. Use the numerical measurements to confirm fit and proportions, not the render’s visual appearance.
Q: What happens if the ring doesn’t match my vision after it’s made?
Minor craftsmanship issues like loose prongs or uneven polish are fixable. However, changes to design decisions you approved in the CAD (shank width, stone height, prong style) are not easily reversible. The buyer controls the outcome at four checkpoints: design brief, diamond selection, CAD approval, and delivery inspection. Use each one.
Q: How long should I expect the entire custom process to take?
Plan for 3 to 6 weeks from initial consultation to delivery. This includes 1–2 weeks for design and CAD revisions, and 2–4 weeks for casting, setting, and finishing. Rushing any stage increases the chance of errors that are expensive or impossible to correct later.
What a Custom Engagement Ring Process Actually Looks Like: From Idea to Finished Ring
Most first-time buyers have never been through a custom jewelry project. The process looks different from walking into a store and picking a ring off a display case. It is more collaborative, more detailed, and built around your specific choices rather than what a manufacturer decided to stock. Understanding the full workflow upfront removes most of the uncertainty.
Why the Standard “Pick a Setting” Path Is Not the Same as Custom
The difference is control. When you buy a preset setting, you choose from a catalog. Metal type, prong count, basket height, shank width, and gallery design are already fixed. You pick a stone that fits the setting, not the other way around.
Custom design reverses that logic. It starts with your idea, your stone, and your preferences. The jeweler opens a blank CAD file and builds the ring around your specifications. You decide the shank profile, the prong style, how the basket supports the stone, and every proportional detail. Nothing is locked in until you approve it. The tradeoff is that you have to make more decisions, but the result is a ring that matches your vision instead of a near match.
The Typical Timeline for a Custom Lab-Grown Diamond Ring
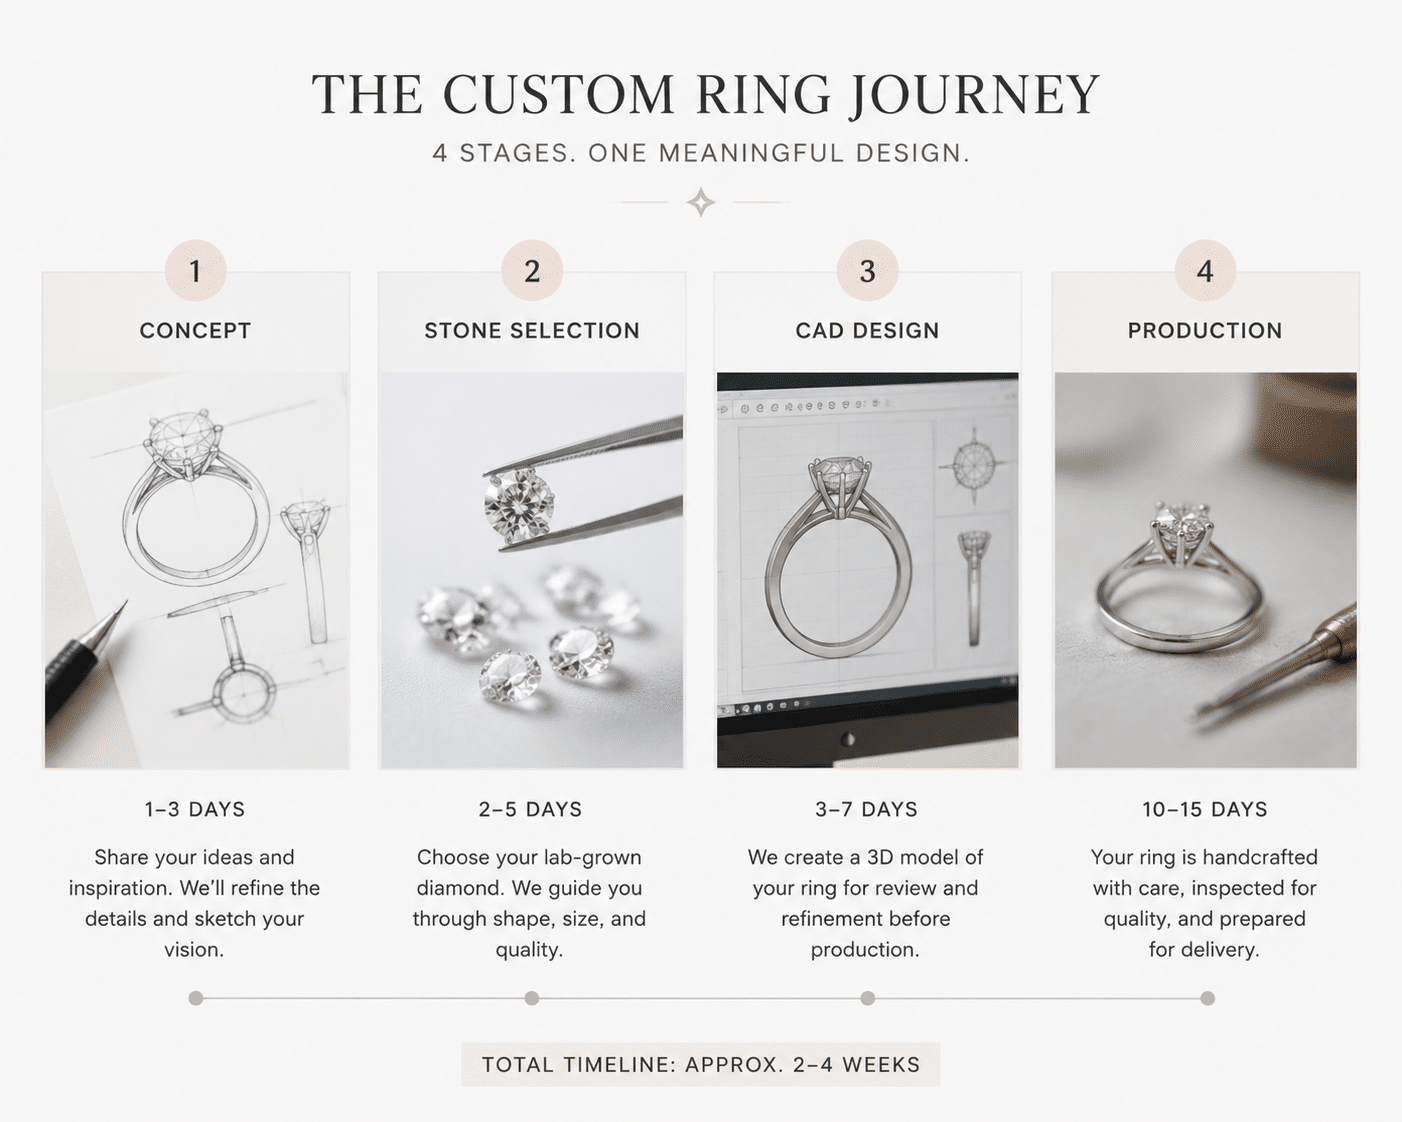
A full custom project from consultation to delivery usually takes 3 to 6 weeks. The range depends on how quickly you make decisions and how many revisions the design needs.
The first phase is concept and reference gathering, which takes 3 to 7 days. This is where you collect inspiration images and communicate your preferences to the jeweler. Stone selection comes next and can take 1 to 7 days depending on whether the jeweler has a suitable loose diamond in inventory or needs to source one. Design and CAD is the most variable phase, lasting 3 to 10 days including revision rounds. Most buyers need 1 to 2 rounds of adjustments before approving the final render. Production takes 7 to 14 days for casting, finishing, and stone setting. The final quality check and photography adds 1 to 3 days before shipping.
A 3-week timeline is realistic for simple designs with a readily available stone. Complex settings, unusual stone shapes, or multiple revision rounds push the schedule toward 6 weeks.
Where First-Time Buyers Usually Hesitate
Two moments cause the most hesitation. The first is choosing a loose lab-grown diamond without seeing it in person. Buyers worry that the stone will look different in real lighting or that the grading report missed something. The solution is straightforward: ask for high-resolution video under different lighting conditions and confirm the exact measurements against the CAD render.
The second hesitation point is approving the CAD render. Buyers see a 3D model and find it hard to translate digital geometry into a physical ring. They worry that changing one detail will throw off the whole design. The fix is to treat the CAD as a measurement tool, not a visual preview. Focus on numbers, not appearance.
What to Check Before You Approve the CAD
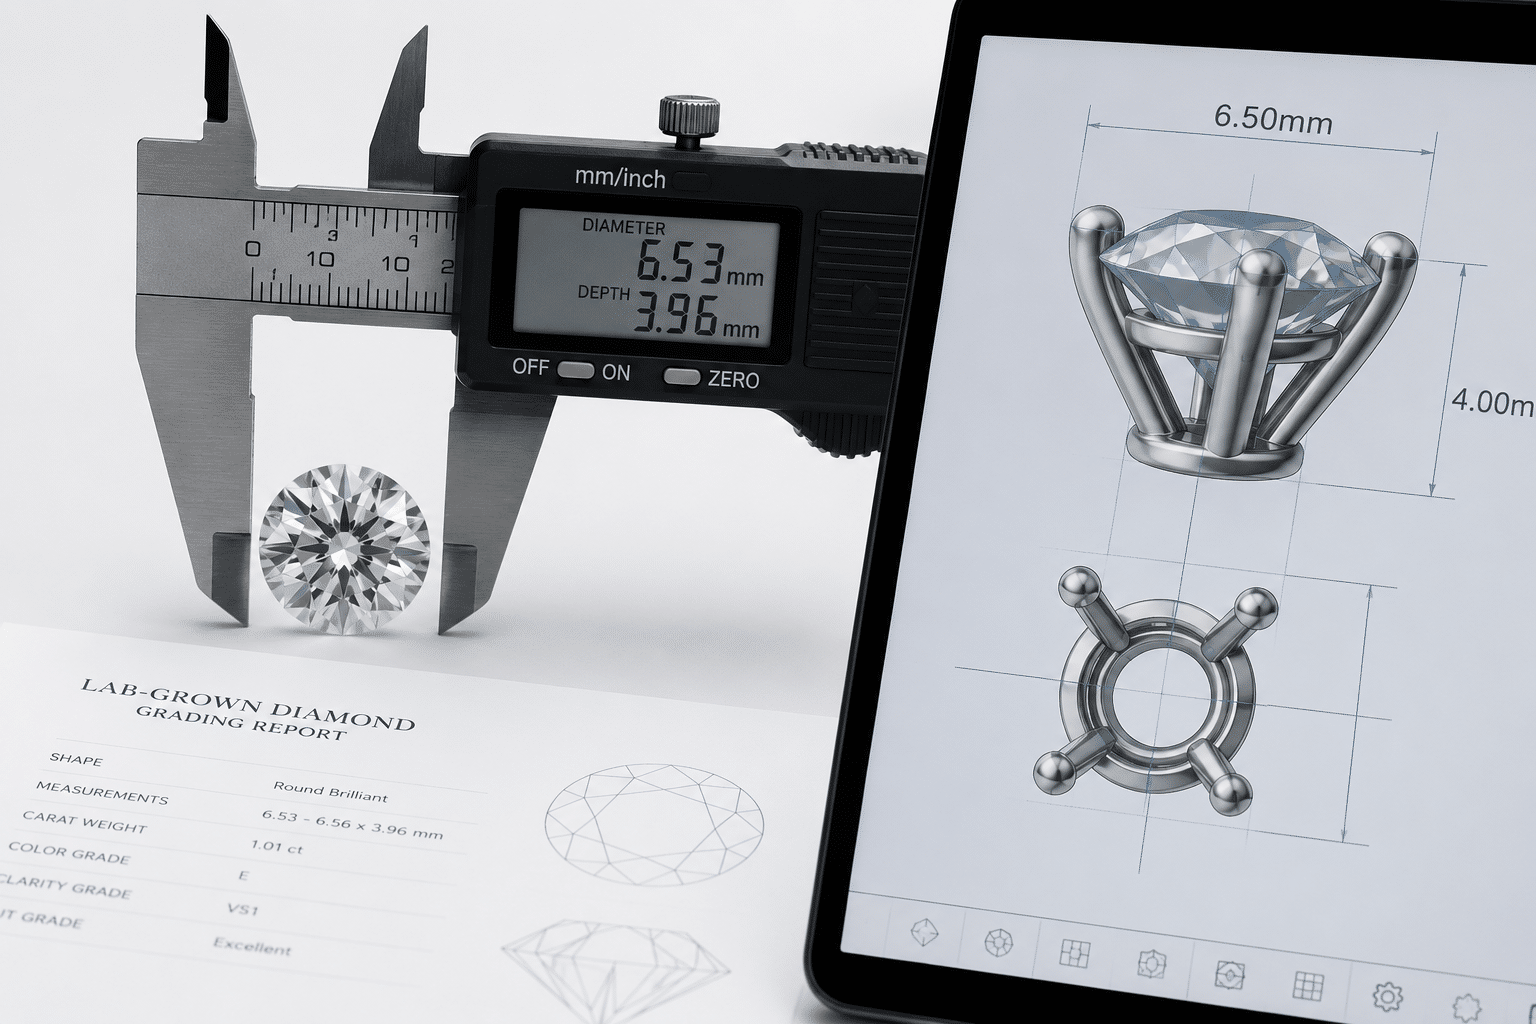
Confirm the shank width and thickness in millimeters, not by whether it looks good on screen. A shank that looks balanced in a render may be too thin once cast in metal. Verify that the stone measurements match the setting dimensions. If the stone diameter is 6.5 mm and the setting shows a 6.7 mm opening, that is correct. A mismatch means the setting will not fit.
Ask for a cross-section view of the shank to check how the prongs will hold the stone. If the stone is tall or tilted, request a side profile view to confirm the basket height and angle. These are the details that determine whether the ring wears well and holds the stone securely.
Step One: Gathering Your Inspiration and Reference Material
Every custom ring starts with ideas, not metal. The quality of your reference material directly determines how accurately the jeweler can translate your vision into a design. Good preparation saves time, reduces revisions, and avoids misunderstandings that slow down the process.
What Makes a Useful Reference Photo
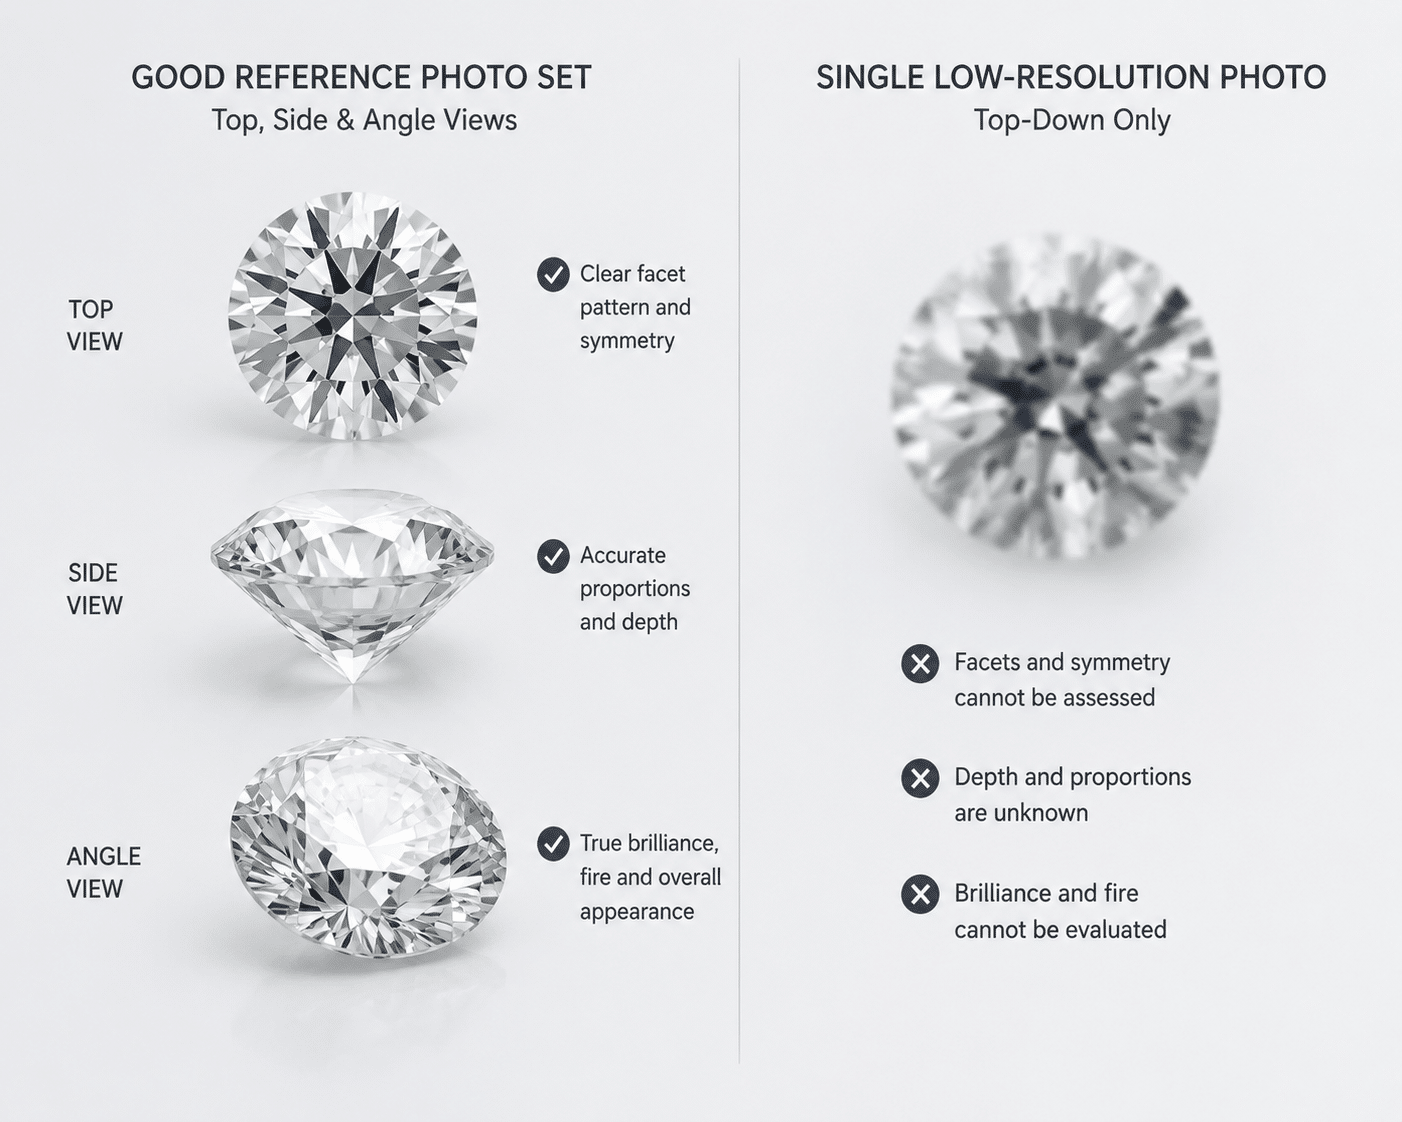
A single top-down photo does not give the jeweler enough information. What looks like a simple solitaire from above may have a cathedral shoulder, a peg head, a tulip basket, or a hidden halo. You cannot tell from one angle.
A useful reference set includes multiple views: a top-down shot showing the stone and prong layout, a side profile showing the basket height and shank curvature, and an angled view showing how the prongs wrap around the stone. Close-ups of the prong style and gallery detail help even more. Pinterest boards, screenshots from brand websites, and photos of rings you have seen in person all work, as long as they show the ring from more than one angle. A single blurry image from a single angle is rarely enough.
How to Describe What You Like Without Using Vague Words
Describing jewelry design in plain English is harder than most people expect. Phrases like “something classic,” “modern but not too trendy,” or “elegant but simple” mean different things to different people. They do not help the jeweler build a precise CAD model.
Replace vague descriptions with specific design terms. Instead of “classic,” say “a peg head setting with a round stone and four claw prongs.” Instead of “modern,” say “a knife-edge shank with a low cathedral basket and a hidden halo.” This short vocabulary list covers the most common elements:
– Setting type: peg head, cathedral, bezel, tension, half-bezel
– Shank profile: knife-edge, flat, comfort fit, court, tapered
– Prong style: claw, round, V-tip, double claw, shared
The basket design phase, with styles like tulip, open basket, closed basket, and trellis, depends heavily on the prior lab grown diamond stone selection for custom jewelry, which in turn affects the overall design approval and CAD design process for personalized jewelry, ensuring that the final piece meets the client’s bespoke requirements.
– Gallery detail: donut, bridge, open gallery, engraved
Using these terms directly tells the jeweler what you want without interpretation.
What the Jeweler Needs from You at This Stage
To begin the design process, the jeweler needs a short list of inputs. Start with your reference images. Follow with a realistic budget range, because budget determines which metal and stone options are viable. Specify your preferred metal type. Common choices are platinum, 14k yellow gold, 14k rose gold, and 18k white or yellow gold. Provide the ring size. If you are unsure, the jeweler can send a sizing kit.
If you already have a wedding band or plan to buy one, mention that. Stackability affects the shank profile and fit. A ring designed to sit flush against a band looks different from a standalone solitaire.
Reference Photo Checklist
Before sending images to the jeweler, confirm that your set includes at least one top-down view, one side view, and one angle showing the basket or prong detail. If you have multiple rings you admire, identify which specific element you prefer from each: the basket from one, the shank profile from another. Avoid submitting more than 5 to 7 total images. Too many references with mixed features cause confusion and slow down the design brief.
Step Two: Selecting Your Lab-Grown Diamond as the Foundation
The diamond you choose determines more than the price. Its shape, diameter, depth, and proportions dictate how the setting must be built. Selecting the stone first is not just convenient. It is the correct sequence for a custom ring.
Why Choosing the Stone Before the Setting Is Better
Every lab-grown diamond has exact physical measurements: diameter, depth, table size, and culet dimensions. A setting designed around a generic stone size will not accommodate every diamond. A stone that is too shallow may sit too low in the basket, exposing the culet. A stone that is too deep may raise the basket height beyond what looks proportional on the finger.
When you select the stone first, the jeweler builds the setting around its exact measurements. The prong height, basket depth, and gallery clearance are calculated from the actual stone, not an average. This eliminates fit issues before production begins.
How Shape Changes Design Possibilities
Round, oval, and cushion shapes offer the widest range of setting options. Their symmetrical outlines fit almost any prong layout, basket style, or accent stone arrangement. If you want a halo, a three-stone setting, or a complex gallery, these shapes give the designer the most freedom.
Elongated shapes like emerald, radiant, marquise, and pear require more care. Prong placement matters more because the stone is longer than it is wide. Misaligned prongs can make the stone look tilted or off-center. The claw angle must match the stone’s corners precisely, especially for emerald and radiant cuts with sharp 90-degree corners. Marquise and pear shapes need V-tip or double-claw prongs at the pointed ends to protect the tips from chipping. These are not deal-breakers, but they mean the design must be more deliberate.
Lab-Grown Diamond Grading: What to Prioritize for a Custom Setting
For a mounted ring, cut quality and measurements matter more than color or clarity. A well-cut stone with good proportions will face up brightly and perform well in any setting. A stone with an excellent or ideal cut grade should be your first priority. Everything else is secondary.
Color and clarity are more forgiving once the stone is set. Prongs, especially in white gold or platinum, reflect light into the stone and can mask slight color tints. Side stones or a halo can further reduce the perceived color difference. Clarity inclusions that are invisible to the naked eye become even harder to see once the stone is mounted and the setting draws focus. The practical order for a custom ring is cut grade first, then carat weight, then color, then clarity.
This ordering is not a universal rule for every buyer, but it works well for most engagement ring purchases where the stone will be worn daily rather than held loose under a loupe. In practical buying, the cut grade and the stone’s face-up appearance tend to drive the overall visual impact far more than a slightly higher color or clarity grade would.
Stone-to-Setting Fit Check
Before approving the design, confirm that the stone’s diameter and depth match the CAD render. Ask the jeweler to show the minimum basket height needed to accommodate the stone. If the stone has a large culet or an off-center table, verify that the prongs will align correctly. Request a video or high-resolution photo of the actual loose stone before approving the design. A grading report gives you the numbers. Visual confirmation gives you confidence. Grading laboratories document key characteristics such as cut grade, measurements, and clarity characteristics, providing a standardized reference for comparing stones. [1] However, the report should be treated as one part of the decision alongside visual inspection. [2] The Federal Trade Commission has also published guidance on how lab-grown diamonds should be described in advertising, which can help buyers understand the terminology used by sellers. [3]
When a grading report is available, buyers should verify the report details through the issuing laboratory’s official report-check tool where available. This step confirms that the report has not been altered and matches the stone’s documented characteristics. For a custom project, the report number and measurements should also be cross-referenced with the jeweler’s listing to ensure consistency before the setting is built.
Step Three: The Design Discussion and Initial Sketch
Once you have your reference images and a chosen diamond, the jeweler translates those inputs into a workable design. This stage bridges your visual ideas and the technical requirements of jewelry fabrication. The goal is not a finished ring yet. It is a design brief that captures exactly what will be built.
What Happens During the Design Consultation
The jeweler reviews your reference photos alongside the stone’s measurements and your metal preference. At this point, they may flag changes for structural or practical reasons. A setting that looks delicate in a photo may need thicker metal to hold a larger diamond securely. A prong style you liked on a different ring may not work with your stone’s shape or girdle thickness. These adjustments are not the jeweler pushing back on your taste — they are corrections for physics and wearability.
The outcome of this conversation is a design brief: a written description that specifies the setting type, shank profile, prong count, metal weight, basket style, and any accent stones or details like a hidden halo or engraved gallery. This brief becomes the instruction set for the CAD model. Without a clear brief, the CAD stage becomes a guessing game.
How the Jeweler Balances Aesthetics, Durability, and Budget
Every design choice involves a tradeoff. A very thin shank — under 1.4 mm — can look elegant but is more likely to bend or warp over time, especially in softer metals like 14k gold. A high basket lifts the diamond for maximum light exposure, but it also makes the ring more likely to snag on clothing or bump into surfaces.
The jeweler’s job is to find the balance that matches your priorities. If durability is most important, the shank will be thicker and the basket lower. If a specific silhouette is non-negotiable, the jeweler may recommend a stronger metal like platinum to compensate for a delicate profile. If budget is tight, they may suggest simpler prong work or fewer accent stones rather than compromising metal quality or stone security. Accepting these tradeoffs early saves time later.
What You Should Ask During the Consultation
Vague questions like “will it look good” do not produce useful answers. Instead, ask directly about measurements and construction:
- How thick will the shank be at the bottom and at the bridge? The standard range is 1.6–2.0 mm for engagement rings.
- Does this setting allow resizing later? Some designs with full bezels or continuous pave make resizing difficult or impossible.
- How are the accent stones secured? Prongs, beads, or channel settings each have different maintenance needs.
- What is the minimum basket height needed for this stone? This affects both durability and how the ring sits against a wedding band.
A good consultation answers these questions clearly and in writing. If the jeweler cannot give you specific numbers or cannot explain why a design choice is necessary, that is a warning sign.
Design Consultation Checklist
- Ask for written confirmation of shank width, metal type, prong style, basket design, and accent stone details.
- Request a visual reference for any term you do not understand — a drawing, a photo, or a previous example.
- Confirm that the design accommodates your stone’s exact diameter and depth measurements.
A common misunderstanding at this stage is that the design brief is just a formality. In reality, it is the single most important document in the entire process. A brief that mentions “a thin band” without specifying a millimeter measurement leaves room for interpretation. A brief that says “1.8 mm shank width, comfort fit, with four claw prongs” leaves none.
Sustainability claims for lab-grown diamonds should be specific and documented. Broad language such as “eco-friendly” or “sustainable” is less useful than clear information about how the stone was grown, the energy source used, and any relevant certifications from the producer or laboratory. For custom design, the decision often depends on matching the stone’s documented origin and production practices to the buyer’s own standards, rather than relying on general promises.
At this stage, it also helps to clarify the difference between laboratory-grown diamonds and natural diamonds when discussing the stone’s origin. Lab-grown diamonds have a different formation path, and buyers should confirm that the seller’s documentation clearly states the growth method or production origin. This distinction is important for anyone comparing options, as it affects documentation, terminology, and buyer expectations.
Step Four: CAD Rendering and Your First 3D Look
The CAD render is where your ring becomes visible for the first time. It is also the moment where buyers make the most avoidable mistakes — approving a render based on how it looks rather than what it measures.
What a CAD Render Can and Cannot Show
A CAD model is geometrically precise. Every angle, curve, and thickness is modeled to 0.01 mm. The render shows you exactly where the prongs will sit, how high the basket will rise, and how the shank tapers. This precision is its strength.
But a CAD render cannot show you how the ring will feel, how light plays across the diamond’s facets, or how the surface finish looks in real life. The polished metal in a render is a simulation, not a photograph. Do not compare the render’s appearance to a finished product photo you have seen elsewhere. Evaluate the geometry. Everything else is finalized after casting and hand finishing.
How to Read a CAD Render: Angles, Views, and Measurements
Your jeweler should provide at least four standard views: top, side, front (facing the finger), and bottom. Each view reveals something different. The side view shows basket height and shank profile as per the custom lab grown diamond jewelry guide. The bottom view reveals the gallery and how the stone is supported underneath.
Ask for the shank cross-section — a slice that shows the actual thickness and shape of the band, not just its width. If your ring has a gallery, request a close-up from underneath the stone. If the stone is elongated, confirm that the prongs are positioned symmetrically at the corners, not shifted to one side.
Common Changes Buyers Request After the First CAD
Most projects require one or two rounds of CAD revisions. Common adjustments include:
- Shank width: Buyers often request a slightly thicker or thinner band after seeing the proportions on-screen.
- Prong shape: Round prongs look different from claw prongs, and the render makes the difference visible.
- Basket height: Raising or lowering the basket changes how the ring wears and how it pairs with a wedding band.
- Milgrain or detailing: Adding or removing decorative elements is easy at the CAD stage and expensive after casting.
Treat revisions as expected. The goal is not to get it perfect on the first try. The goal is to get it right before production begins.
CAD Approval Checklist
- Confirm the shank width and thickness using the cross-section view, not just the top-down image.
- Verify that the basket height matches your stone’s depth. A basket that is too shallow leaves the diamond exposed; one that is too deep creates an awkward gap.
- Check that each prong aligns with the stone’s bezel or girdle. Off-center prongs cannot be corrected after setting.
- For elongated stones — emerald, radiant, marquise, pear — confirm that the prongs sit symmetrically at the four corners.
- Do not approve until every measurement is verified, not just visually judged.
Step Five: Production, Casting, and Setting the Lab-Grown Diamond
Once the CAD is approved, the digital model becomes a physical ring. This stage involves multiple hands and several quality checks. Understanding the process helps you know what to look for when the ring arrives.
How the Ring Is Made: From CAD to Wax to Metal
The jeweler starts by 3D-printing a wax model of your ring. That wax is used to create a plaster mold. Molten metal — platinum, gold, or palladium — is poured into the mold under pressure or centrifugal force. After the metal cools, the plaster is broken away, leaving a raw metal casting.
The raw casting is then cleaned, filed, and polished. Surface roughness from the casting process is removed by hand. The shank is rounded or shaped to match the CAD profile. Once the metal is finished, the lab-grown diamond is set using a microscope. The setter adjusts each prong or bezel edge to hold the stone securely without putting pressure on the girdle.
This is not an automated process. The quality of the final ring depends heavily on the skill of the polisher and setter.
Quality Checks During Production
After casting, the ring is inspected for porosity — small air pockets in the metal — and shrinkage around the thicker sections. After polishing, the surface is checked for scratches or uneven areas. Once the diamond is set, the jeweler verifies alignment, prong tightness, and light performance. The stone must sit perfectly level. Each prong must be torqued evenly. There should be no visible gaps between the diamond and the setting.
If the ring includes accent stones, each one should be checked for alignment and security. A single loose accent stone is a defect, not a minor detail.
What Can Go Wrong and How It Is Fixed
Most issues found during production are correctable by hand. Sharp prongs can be softened. Uneven shank thickness can be re-polished. A slightly off-center stone can be removed and reset. These corrections typically add a day or two.
More serious issues — like significant porosity, a cracked setting, or a shank that was cast too thin — may require recasting the ring entirely. Recasting adds two to four days to the timeline. It is uncommon, but it happens. The important thing is that the jeweler catches these problems during production, not after delivery.
For buyers, the practical question is not whether problems can occur — they can, in any custom process — but whether the jeweler has a clear procedure for identifying and correcting them before the ring ships. Asking about the quality check workflow before production starts is a reasonable verification step. A jeweler who cannot describe their post-casting inspection process may be relying on a less structured approach.
Production Quality Check
- Ask the jeweler to send a photo or video after the stone is set, before the final polish. This is your best chance to confirm the stone’s position and prong alignment.
- Request a magnified photo of the prongs. They should be symmetrical, evenly shaped, and free of chips or tool marks.
- Confirm that the stone is not loose or tilted. A tilted stone cannot be fixed without resetting.
- If the ring includes accent stones, ask for a close-up view of their alignment. Misaligned accent stones are a common quality failure in complex settings.
Step Six: Final Quality Check, Photography, and Delivery
What the Final Inspection Covers
Before the ring leaves the workshop, the jeweler runs a structured quality check. Surface finish is examined under magnification to catch scratches, tool marks, or uneven polish. Stone stability is tested by confirming the diamond sits level and does not shift under light pressure. Each prong is checked for even torque and full contact against the girdle. Metal gauge is measured to confirm the shank width and thickness match the approved CAD. The ring is then cleaned, polished, and inspected a second time. Some jewelers take final product photos under controlled lighting to document exactly how the ring looked before shipment.
How to Receive and Verify Your Custom Ring
When the ring arrives, inspect it under bright, natural light. Check every prong visually and by gently running a fingernail across each one to confirm there are no sharp edges or gaps. Confirm the ring size fits correctly — do not assume it will match an older ring size. Place the finished ring next to the approved CAD render or any final photos the jeweler sent. Look for visible differences in proportion, symmetry, or prong placement. If anything looks different from the render, document it with your own photo and contact the jeweler before wearing the ring.
What to Do If Something Needs Adjustment
Minor issues can happen. A prong that feels slightly loose, a polish that looks dull in one area, or a ring that fits marginally tighter than expected can all be corrected. Contact the jeweler and describe the problem clearly, with photos if possible. Most jewelers will accept adjustments for issues caused by their craftsmanship — a misaligned prong, an uneven surface finish, or a stone that sits off-center. They will not typically cover changes that result from design decisions the buyer approved, such as a shank you knew was thin or a basket height you signed off on. The distinction matters: you are verifying craftsmanship, not revising taste.
Final Delivery Checklist
Check the ring size against a known sizer and confirm the shank width matches the CAD. Gently rock the diamond with a fingertip to verify it is not loose. Examine each prong to confirm it is evenly shaped and fully flush against the stone. Compare the finished ring to the CAD render and any final photos you requested. Keep the CAD approval email and the jeweler’s photos for reference — these documents are useful if a question arises later.
Buyers should also be aware that prices can change with market conditions, report type, seller channel, and stone-specific details. Exact pricing comparisons should be verified at the time of purchase rather than assumed from earlier estimates.
Documentation and Transparency in the Custom Process
Throughout the custom journey, the documentation you collect is as important as the ring itself. Written approvals, reference images, CAD files, grading report details, and final photos form a record that protects both your investment and your design intent. Without clear documentation, misunderstandings can arise between design phases, and resolving post-production issues becomes more difficult.
In sourcing or wholesale conversations, consistency, documentation, and communication often matter as much as the headline specification. For a custom ring buyer, the same principle applies: written confirmation of every measurement, stone detail, and design element ensures that what was approved is what gets made. A grading report, for example, provides the stone’s key characteristics in a standardized format, but it should be read alongside the stone’s proportions, visual evidence, and intended jewelry use. [1] The report number can be cross-referenced with the issuing laboratory’s verification system to confirm authenticity. [2]
For NUVU, the goal is to make diamond comparison easier to understand, especially when buyers are weighing report details, visual performance, setting fit, and budget together. A transparent process — where each stage has a clear document, a specific checklist, and a defined approval step — makes the entire workflow more predictable and reduces the risk of surprises.
Decision Points Map: Where You Control the Outcome
Before You Start: Budget and Style Direction
Your budget sets the ceiling for stone size, metal type, and setting complexity. A clear style direction from reference images saves time and reduces costly revisions. These two decisions are fully in your hands and determine how smooth the rest of the process will be. The more specific you are upfront, the less guesswork your jeweler has to do.
Stone Selection: The Single Most Influential Decision
The stone’s shape, carat weight, and proportions dictate the entire setting — the basket height, shank width, prong placement, and overall ring geometry. Changing the stone after the setting is made is expensive and risks damaging the ring. Choose carefully at this stage. If you are unsure, ask the jeweler how a different stone shape or size would change the design before committing. For custom design, trust comes from matching the stone to the setting, budget, and wearer’s daily use—not from choosing grades in isolation.
CAD Approval: The Last Point for Easy Changes
CAD approval is the last moment to adjust shank width, basket height, prong design, or metal type at minimal cost. Once the design moves to production, changes require recasting and resetting, which adds days and significant expense. Take your time reviewing the CAD. Request a cross-section view. Confirm every measurement. Do not approve until you are satisfied.
Final Delivery: The Buyer’s Right to Verify
You have the right to inspect the finished ring and request corrections for craftsmanship issues. This is not a return for design regret — it is a quality check. Verify that the ring matches what was approved. If a prong is uneven, the polish is inconsistent, or the stone sits off-center, contact the jeweler immediately. Be thorough. The ring should match the design you approved.
Your Custom Journey Summary
Follow the checklist at each stage. Keep all communication, approvals, and reference images in writing. Listen to the jeweler’s structural recommendations — they know what will hold up over time — but verify measurements yourself. The custom process is a collaboration, not a hand-off. Your attention at the right moments is what turns a design idea into a ring that fits, lasts, and looks exactly as intended. Before committing to production, buyers should confirm the seller’s documentation, return policy, resizing terms, and after-sales support in writing. These details, when established early, provide clarity and reduce the risk of misaligned expectations after the ring is completed.
[1] GIA, “Diamond Grading Report: The 4Cs,” GIA, accessed via gia.edu/gia-report.
[2] GIA, “Lab-Grown Diamonds,” GIA, accessed via gia.edu/lab-grown-diamond.
[3] FTC, “Jewelry, Precious Metals, and Pewter Industries Guides,” Federal Trade Commission, 16 CFR Part 23, accessed via ftc.gov.
Disclosure: This article is for general educational purposes only. Diamond grading, pricing, availability, specifications, and seller policies can change, and readers should verify important details through grading reports, official laboratory tools, seller documentation, or qualified professionals before making a purchase decision. Laboratory-grown diamonds should be clearly distinguished from natural diamonds, and environmental or sourcing claims should be supported by specific documentation.