
Buying a lab-grown diamond often starts with the grading report—a document listing carat weight, color grade, clarity grade, and cut quality. The problem is that two diamonds with identical reports can look completely different in real life. Subtle proportion differences, light leakage, a visible bow-tie effect in fancy shapes, or transparency issues—factors often compared in certified vs non-certified lab-grown diamonds—go unrecorded on even the most reputable certificates. Relying solely on the report can lead to disappointment when the stone arrives.
For the full framework, read Lab-Grown Diamond Certification Guide.
This article clarifies exactly what a certificate tells you and what it doesn’t. It explains why a diamond’s appearance can shift when mounted, how different lighting changes what you see, and which visual checks matter far more than the printed grade. Instead of treating the report as a verdict, you will learn to use it as a practical filter, then evaluate the stone itself through videos, angles, and eye-cleanliness. The goal is to help you make a confident final decision based on actual appearance, not just paper.
| What the Certificate Tells You | What the Certificate Misses | What You Should Check Visually |
|---|---|---|
| Carat weight and exact measurements | How light performs inside the stone | 360-degree video for brightness and contrast |
| Color grade (e.g., D, E, F) | How color shifts under different jewelry metals | Real-world hue against white and yellow metal |
| Clarity grade and plotted inclusions | Whether inclusions are visible face-up | Eye-cleanliness under normal indoor lighting |
| Cut grade for round brilliants | Actual crown and pavilion angle details | Proportions, not just the grade label |
| Polish and symmetry ratings | Bow-tie effect in fancy shapes | Videos in multiple lighting environments |
| Laser inscription number | Appearance once prongs or bezels are added | How light entry changes with mounting style |
Quick Questions Before You Read
Q: Can I trust a lab-grown diamond with an ideal cut grade to look beautiful?
An ideal grade is a strong starting point, but it does not guarantee perfect light performance. Two stones with the same grade can have different crown angles or pavilion depths, leading to noticeable differences in brightness and sparkle. Always request a video to confirm.
Q: Does the certificate tell me if a fancy-shaped diamond will have a dark bow-tie?
No. Grading reports for fancy shapes like oval, pear, or marquise do not evaluate the bow-tie effect. The dark shadow across the middle varies from stone to stone. You must examine a high-resolution video under different angles and lighting to judge it.
Q: Will a D-color diamond look exactly D-color once it is set in a ring?
Not necessarily. The metal color changes how the diamond appears. Yellow gold can warm a D-color stone, while white metal can make a near-colorless G look whiter. The certificate gives the loose stone color, but final perception is influenced by the setting.
Q: Should I buy a diamond based only on its grading report?
No. Use the report to filter candidates, but base your final purchase decision on visual evidence: 360-degree videos, real-world lighting footage, and clear answers about proportions and eye-cleanliness. The certificate is a starting guide, not the full story.
Why a Lab-Grown Diamond with a Strong Certificate Can Look Disappointing in Real Life
A grading report gives you a useful set of numbers. It tells you the carat weight, color grade, clarity grade, and for round stones, a cut grade. These measurements help you narrow your search and compare diamonds on paper. But the report does not tell you how the diamond actually looks when light hits it. Two diamonds with nearly identical certificates can perform completely differently in real life. The report is a starting point, not a guarantee of beauty.
The Certificate Tells You About Potential, Not Performance
A grading report records what can be measured and categorized. It captures weight, color against a master set, inclusion size and location, and for rounds, a cut grade based on proportion ranges. What it does not measure is light return, contrast, brilliance, or how the stone behaves under different lighting conditions. A diamond can fall well within GIA Excellent or AGS Ideal parameters and still leak light or look flat. Small proportion deviations — a crown angle a degree too steep combined with a pavilion depth that sits at the edge of the acceptable range — can mute the diamond’s performance. The stone qualifies on paper, but the visual result is uninspiring.
For round brilliants, the cut grade provides a useful filter. But a diamond that barely qualifies as Excellent can look noticeably less lively than one with proportions that sit squarely in the ideal performance zone. The certificate does not distinguish between a minimally passing cut and an optimized one. That difference is something you can only see.
Why Two Diamonds with the Same Report Can Look Completely Different
The grading report uses tolerance ranges, not precise optical measurements. Two round diamonds with the same color, clarity, and cut grade can vary noticeably in brightness, fire, and scintillation. A stone with a 34.5° crown angle and 40.8° pavilion angle will handle light differently than one with 35.0° crown and 40.6° pavilion, even though both combinations fall within the Excellent range. One may produce sharp contrast and bright return. The other may appear washed out or dark in certain angles. The certificate cannot capture this.
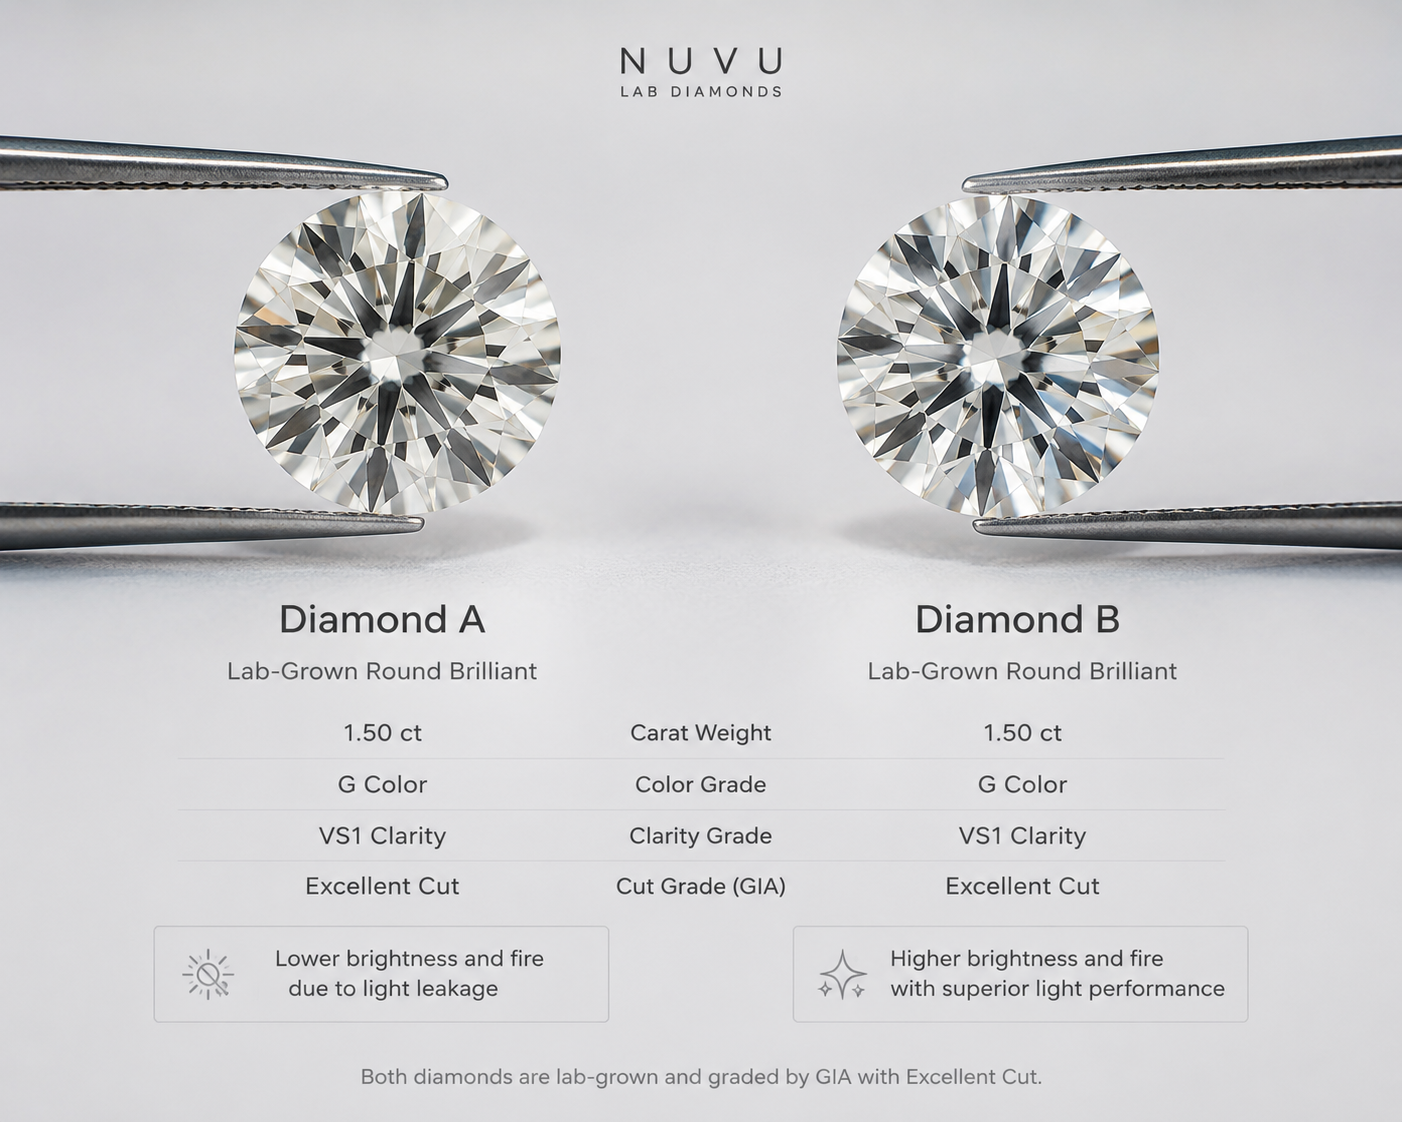
Only visual inspection or a light performance scan reveals the real difference. A buyer relying solely on the report has no way to know which stone performs better.
What to Check Before You Decide
Before purchasing, request a 360-degree video of the stone in multiple lighting environments — spotlight, diffuse, and overhead. Ask the seller for the exact crown angle, pavilion angle, and pavilion depth percentage. Do not rely on the cut grade alone. For rounds, the most common performance risk is a combination where the crown is too steep and the pavilion is too shallow, causing light leakage that creates a dull or fish-eye appearance. For fancy shapes, ask for actual measurements and video rather than depending on the report alone.
What the Certificate Does Not Measure: Light Performance and the Limits of Grading Tolerances
Grading laboratories operate within defined tolerance ranges for each cut parameter. A round brilliant graded Excellent by GIA, for example, may have a crown angle between 31.5° and 37.5°, a pavilion angle between 39.5° and 42.0°, and a table percentage between 53% and 66%. Within this range, some proportion combinations yield outstanding light return and contrast, while others produce noticeable light leakage or reduced fire. The report assigns the grade but does not rank the stone’s position within the tolerance band. A buyer who relies only on the grade may choose a stone that falls at the weaker edge of the acceptable range, without being warned. The certificate captures that the stone meets the standard; it does not capture how well the stone performs against the best examples within that same grade.
For fancy shapes such as ovals, pears, or cushions, the situation is less structured. These stones receive a polish and symmetry grade but no cut grade. The proportion parameters — crown height, pavilion depth, table size — are listed but not evaluated against a performance standard. A fancy-shaped diamond with acceptable grades on paper can have a pavilion that is too deep, causing light to escape through the bottom, or a crown that is too shallow, reducing brilliance. The certificate provides the measurements, but it does not interpret them for visual performance. This makes the buyer’s own review of angles and light behavior far more important for non-round stones.
The Bow-Tie Effect in Fancy Shapes: What the Certificate Will Not Show You
For non-round diamonds, the certificate is even less revealing. One of the most common visual issues in fancy-shaped lab-grown diamonds — oval, pear, marquise, and elongated cushion — is the bow-tie effect. This is a dark, butterfly-shaped shadow that appears across the center of the stone. The report and lab grown diamond certificate fields do not measure it, rate it, or warn you about it. You have to assess it yourself.
Bow-Tie Severity Varies Even Within the Same Grading Report
The bow-tie effect occurs because of how light travels through an elongated shape. A well-cut oval can have a minimal, bright bow-tie that is barely noticeable. A poorly proportioned one can have a dark, distracting band that significantly reduces the stone’s beauty. Both stones may carry the same color, clarity, and carat weight on their certificates. The report will not tell you which one you are looking at. Only visual inspection can determine whether the stone looks clean or muddy.
How to Evaluate Bow-Tie Before Buying
Look for a video where the stone is slowly rotated under overhead lighting. A good bow-tie should appear faint, small, and partially bright — not a solid dark band. Avoid stones where the bow-tie covers more than 20-30% of the stone’s width. Ask the seller directly: “Can you show me the stone under direct overhead light and under a ceiling light source?” If the bow-tie darkens significantly under one lighting condition but not the other, the issue is likely the stone’s cut, not the lighting.
Buyer Verification Checklist
- Request a 360-degree video and watch for bow-tie darkness at the center during rotation.
- Ask for the stone’s length-to-width ratio. Elongated ratios, such as 1.45:1 and above, can increase bow-tie risk.
- For ovals, a ratio between 1.30:1 and 1.45:1 is generally safer for bow-tie control.
- If possible, ask whether the seller uses an ASET or Ideal-Scope image to show light return in fancy shapes.
Growth Method and Potential Impact on Appearance
Lab-grown diamonds are typically created through one of two processes: High Pressure High Temperature (HPHT) or Chemical Vapor Deposition (CVD).[1] While both methods produce chemically genuine diamonds, the growth process can influence certain visual characteristics in ways that do not appear on a standard grading report. HPHT stones may exhibit phosphorescence or residual metallic flux inclusions, while certain CVD stones may display strain patterns or banding under magnification.[2] These traits do not necessarily affect beauty, but they are not captured as separate performance factors on most certificates. The report documents the stone’s identity as lab-grown and its basic grades, but it does not comment on how the specific growth history affects light behavior or overall clarity perception. This is another reason to verify the stone’s appearance visually, especially when comparing diamonds synthesized by different methods.
Transparency and Clarity: When a High Grade Does Not Mean a Clean Look
Clarity grade measures the size, number, and location of inclusions under 10x magnification. But clarity grade alone does not guarantee that a stone looks clean to the naked eye. Two issues not captured by the report — transparency and inclusion placement — can make a high-clarity stone appear hazy or dull.
Transparency vs. Clarity Grade
A lab-grown diamond can receive a VS1 or VS2 clarity grade and still show slight haziness or milkiness when viewed face-up. This is often caused by tiny, evenly dispersed internal graining or growth remnants that do not qualify as clearly defined inclusions but still scatter light. The grading report does not measure transparency as a separate attribute. A stone with excellent clarity but poor transparency will look foggy or dull compared to a stone with similar clarity and better transparency. You cannot catch this from the report alone.
Inclusion Placement Matters More Than Grade
A VS2 clarity stone with a small crystal near the edge of the diamond may be completely eye-clean and perform beautifully. A different VS2 stone with a feather or needle cluster directly under the table may be visible to the naked eye and hurt the stone’s appearance. The report includes a plot of inclusions, but that plot does not tell you how visible the inclusion is in real life. A small dot on the diagram can be either invisible or distracting depending on its position, size, and color contrast with the diamond. The buyer must rely on high-resolution photos and video, not just the clarity grade.
How to Verify This Before Buying
- Request a high-resolution face-up photo at 10x or more, with the stone resting on a white surface. Look for any dark spots or cloudy patches, especially near the center.
- Ask the seller directly: “Is the stone eye-clean under normal room lighting?” A reliable seller will answer honestly.
- For VS2 and SI1 clarity stones, specifically ask whether the inclusion is visible face-up, not just from the side.
- If the stone is from a brand like NUVU that provides detailed imaging, use that imaging to check for haziness in the center, not just at the edges.
For buyers, the practical point is that the clarity grade provides a useful shorthand for inclusion size, but it does not indicate whether the stone looks clean in everyday viewing. The difference between a stone that appears flawless to the eye and one that shows a visible flaw is often a matter of inclusion placement and the stone’s overall transparency — none of which is captured by the letter grade itself.
Why Clarity Grade Alone Is Not a Reliable Indicator of “Clean” Appearance
The clarity grade is assigned based on inclusion size, number, type, and position as seen under 10x magnification. This is a useful tool for comparing stones, but it does not evaluate how the stone will look at arm’s length in normal indoor lighting. A VS1 stone with a small inclusion row hidden near the girdle edge may be completely invisible to the naked eye. A different VS1 stone with a single pinpoint inclusion directly under the table — which meets the grade criteria — can appear as a tiny dark spot when the stone is face-up. The report’s inclusion plot uses abstract symbols that do not convey size or visual prominence. Buyers should treat the clarity grade as a starting point and confirm actual visual appearance through high-resolution face-up images rather than assuming the grade guarantees a clean look.
How the Setting Changes Everything: A Beautiful Diamond Can Look Different Once Mounted
A loose diamond viewed in a seller’s display tray is not the same stone you will see on your hand. Once set into a ring, the metal holding the diamond affects how light enters and exits the stone. The grading report does not account for this, and many buyers are surprised when a diamond that looked brilliant in a tray appears darker or less lively after mounting.
Prongs, Bezel, and Light Obstruction
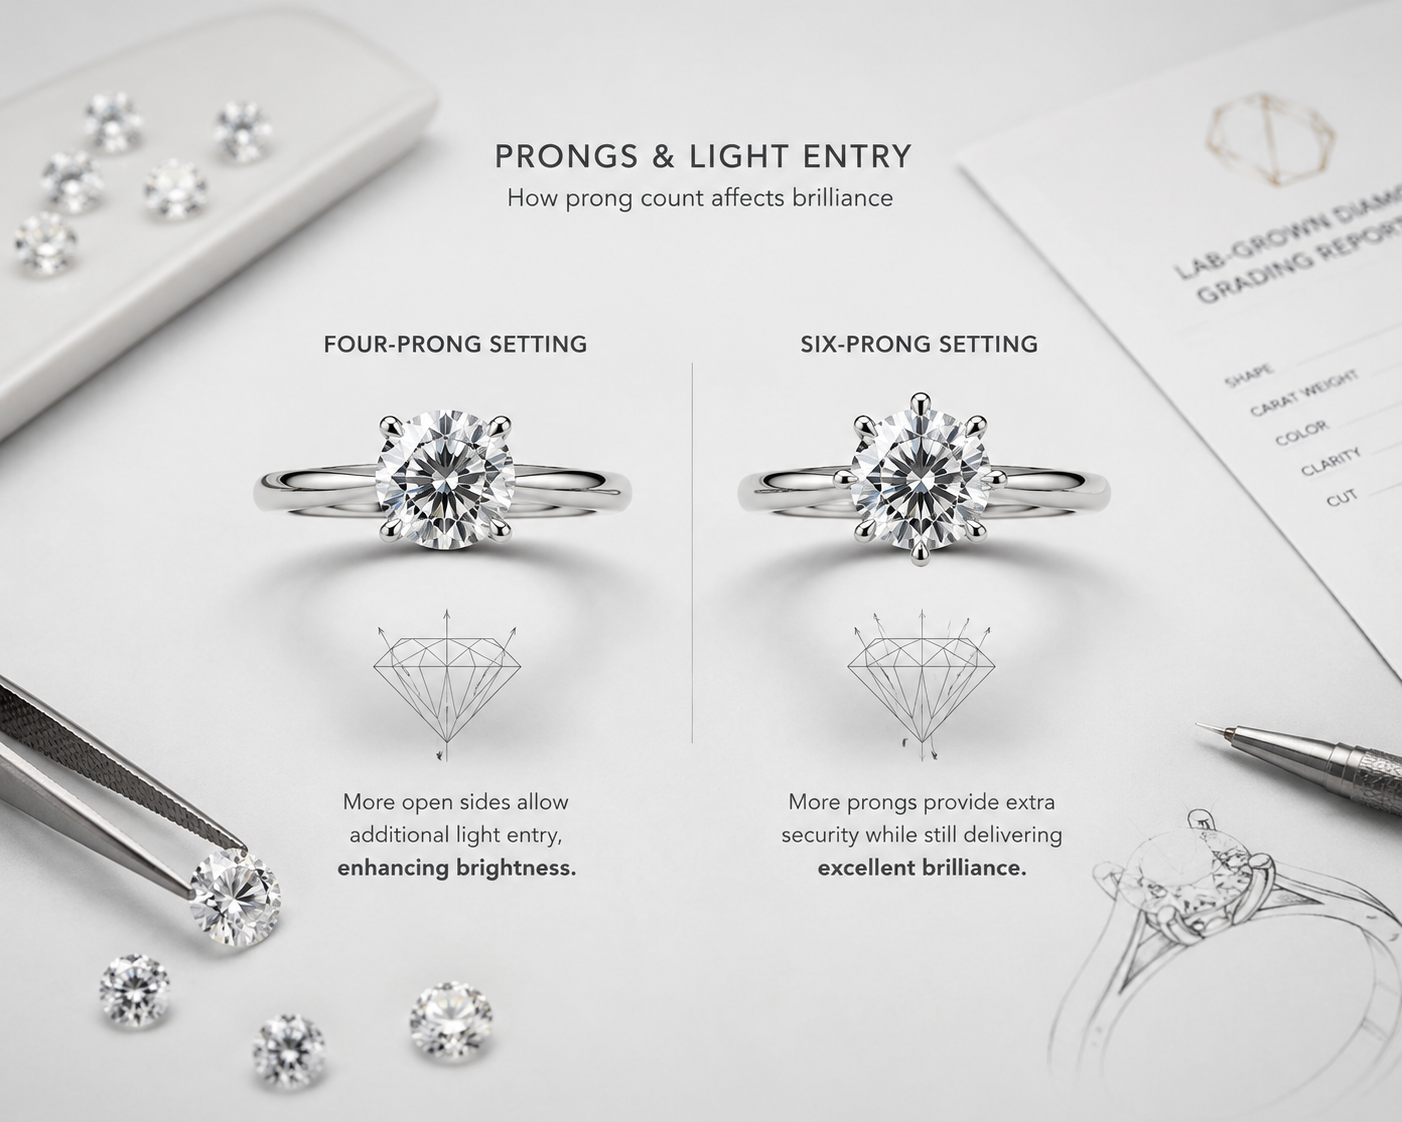
Every setting introduces some degree of light obstruction. The prongs or bezel that secure the diamond physically cover portions of the stone, blocking light from entering through the sides. A round diamond in a four-prong setting loses more side light entry than a six-prong open basket, which distributes coverage more evenly. For fancy shapes, the effect can be more pronounced. A thick bezel that wraps around an oval or pear-shaped diamond may significantly reduce brightness by covering the edges where light typically enters. The certificate cannot predict this. A diamond that performs well on paper may look noticeably different depending on how much of its surface the setting covers.
Metal Color and Diamond Color Interaction
The metal color of the setting also changes how the diamond’s color grade reads in real life. A D-color diamond, the highest colorless grade, set in yellow or rose gold will reflect warm tones from the metal, making the stone appear slightly warmer or more yellow than its grade suggests. The opposite is also true. An F-color diamond set in white gold or platinum may appear cooler and brighter because the metal does not introduce warm reflection. The certificate gives you a baseline color grade, but it cannot predict how the stone will look once the metal color and daily lighting interact with it.
Stone-to-Setting Fit Check
When choosing a setting, consider how it will physically interact with the diamond. If you are working with NUVU on a custom design, confirm the stone’s exact measurements — diameter for round stones, length and width for fancy shapes — and ask about prong placement to minimize light obstruction. For round diamonds, a six-prong or four-prong open basket generally preserves better light performance than a full bezel. For color, the metal choice matters. If the stone is a near-colorless grade (G, H, or I), a white or platinum setting prevents a warm or yellowish appearance. If the stone is a lower color grade (J or K), a yellow or rose setting can actually improve the overall look by making the warmth feel intentional.
Lighting Conditions Reveal What the Certificate Hides
A diamond that sparkles brilliantly under a single bright spotlight in a showroom may look completely different in normal indoor lighting. The certificate does not test this. It records dimensions and grades, but it cannot tell you how the stone performs across the lighting environments where you will actually wear it.
How Different Lighting Exposes Tradeoffs
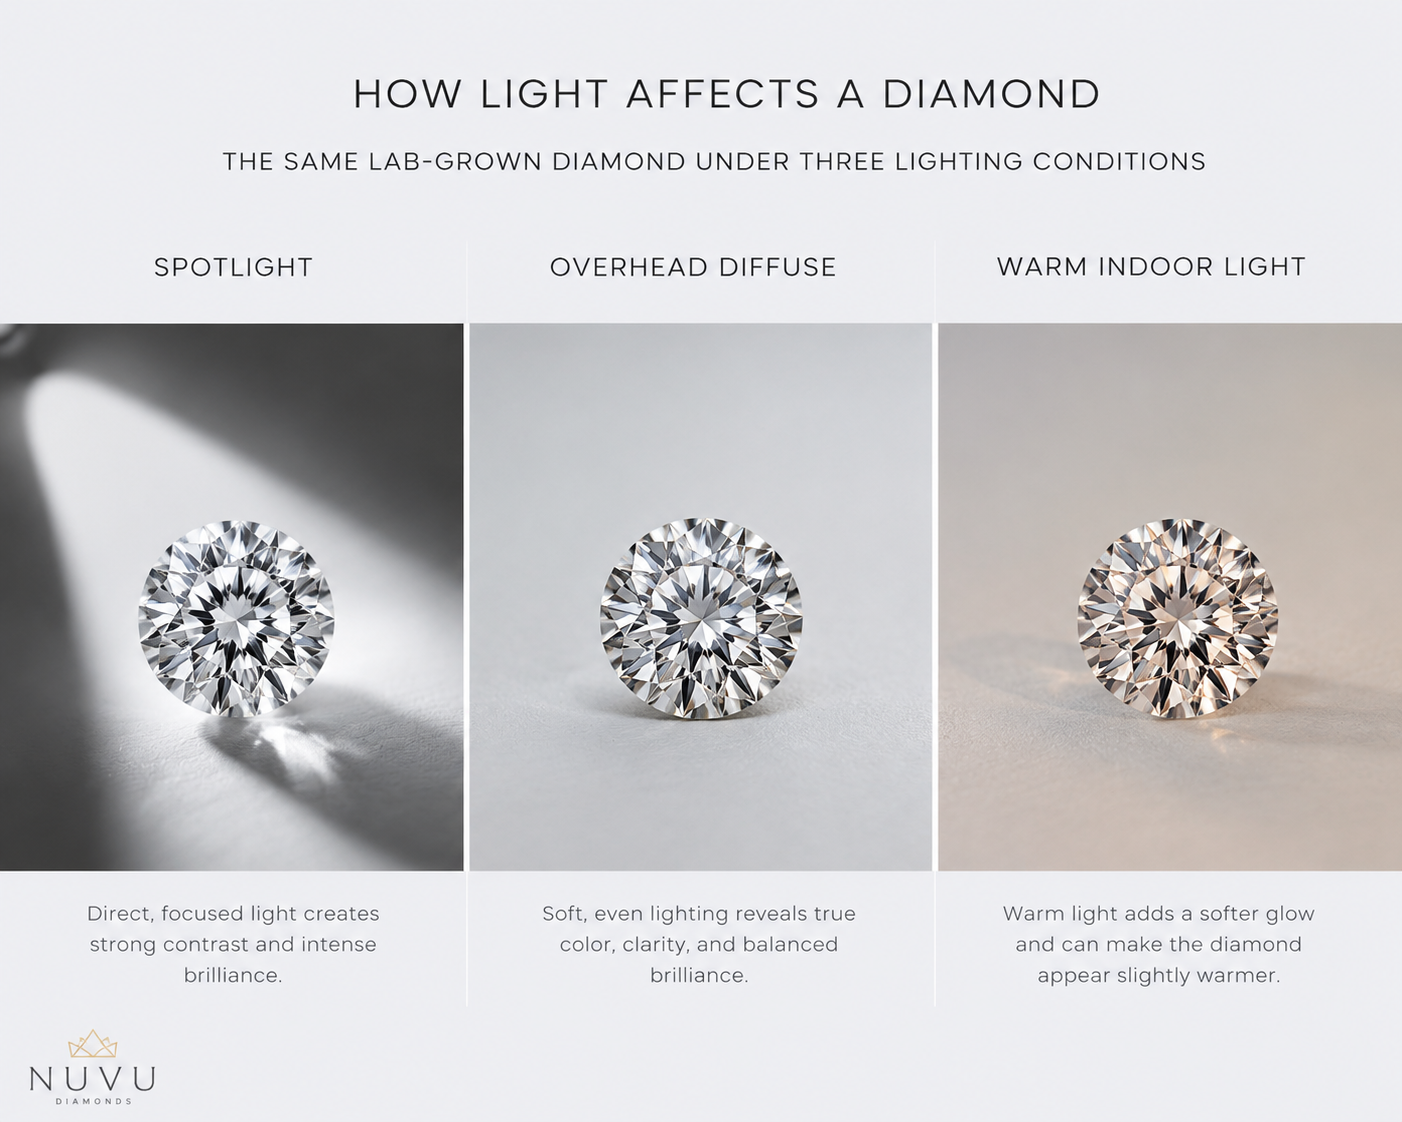
Cut quality determines how a diamond handles different lighting types. Three common lighting conditions matter most: spotlight (a single bright directional source), diffuse light (overhead room lighting or cloudy outdoor light), and warm ambient light (incandescent bulbs or candlelight). A diamond with strong brightness in spotlight may have poor contrast in diffuse light, causing it to look flat or lifeless. Another stone may perform well across all three. The certificate does not measure this. Only visual review under different lighting reveals which category a stone falls into.
What to Look for When Reviewing Videos
Before buying, ask the seller for videos in at least two lighting environments. A direct spotlight shows brilliance and fire. An overhead diffuse light shows how the stone performs in normal indoor conditions, which is where you will see it most often. If the stone looks dark or dull in the overhead video, that is a red flag. A well-cut diamond should maintain brightness and contrast in both types of lighting. If a seller can only provide a single video under ideal showroom lighting, that may be hiding how the stone performs in real-world conditions.
Why Lab-Grown Diamond Reports Are Still Useful (and Where They Fall Short)
After reviewing the gaps between certificate data and visual performance, it is fair to ask whether grading reports are still worth using. The answer is yes — but only if you understand what they actually do and do not tell you.
What the Report Helps You Confirm
A grading report verifies that the diamond is lab-grown, not natural, and provides an independent baseline for color, clarity, and carat weight. For round diamonds, the cut grade gives a general performance range that helps narrow the field. For fancy shapes, the report confirms the stone is a genuine lab-grown product and provides the exact dimensions needed for setting compatibility. These are practical uses. The report is especially useful for insurance documentation, resale verification, and establishing a minimum standard of trust before moving to visual evaluation.
What the Report Cannot Do
What the report cannot do is show you the stone’s visual personality. It cannot predict how the diamond will look once set in your ring, under your home lighting, or on your hand. It cannot tell you whether the stone has lively light return when viewed at a slight tilt. It cannot tell you if a fancy shape has a distracting bow-tie. The report is a starting point, not the final answer; use diamond certification guide to filter out stones that do not meet your minimum requirements, but always base your final decision on visual review and realistic expectations.
Disclosure and Terminology: What the Certificate Confirms About Origin
One area where grading reports provide clear value is in confirming the diamond’s origin. Major laboratories such as GIA, IGI, and GCAL explicitly identify on the report whether a diamond is laboratory-grown, using standardized terminology.[3] In the United States, the Federal Trade Commission has issued guidance emphasizing that sellers should clearly disclose diamonds synthesized in a laboratory rather than describing them as “cultured” or using terms that could confuse consumers about natural origin.[4] A proper grading report removes ambiguity: the stone is documented as lab-grown, with a distinct inscription number that can be verified through the issuing lab’s online database. This provides a reliable foundation for purchase, insurance, and record-keeping. The report’s value in this area is high, even as its ability to predict visual performance remains limited.
Understanding the Report’s Limits Through Documentation and Traceability
Beyond grades and origin, a grading report also serves as a traceability document. The inscription number, laboratory logo, and security features on a physical or digital report allow a buyer to connect a specific stone to a specific set of measurements and grades. This traceability is valuable for insurance, inheritance planning, and future upgrades. However, traceability does not equal performance. A report confirms that a stone with a given inscription number has certain grades, but it does not trace how the stone was cut, how it responds to different light sources, or how its appearance might change after mounting. For buyers who need documentation for valuation or record-keeping, the report is essential. For buyers who want to know whether the stone will look beautiful in a specific setting worn daily, the report is only the first piece of evidence.
When a grading report is available, buyers should verify the report details through the issuing laboratory’s official report-check tool where available. This step confirms that the report has not been altered and that the inscription number matches the laboratory’s database. It is a quick check that adds a layer of verification before moving to visual evaluation. NUVU’s buyer-first approach is to make the comparison clearer: what the report shows, what the visuals reveal, and whether the stone fits the intended piece. Documentation and visual evidence together give a more complete picture than either alone.
When a grading report is provided, buyers should compare the report details with the issuing laboratory’s verification tools where available. This allows you to confirm the inscription number and report details independently, providing an additional layer of trust beyond the seller’s own documentation. The report confirms origin and basic grades, but the final decision should rest on visual evidence and how the stone fits your intended design.
All diamonds discussed in this article with grading reports should be verified by the buyer against the issuing laboratory’s official database. GIA, IGI, and HRD Antwerp reports provide reliable documentation of a stone’s origin and basic characteristics, forming a consistent baseline for buyer confidence. While this article explains the gap between certificate data and visual appearance, the report itself remains a valuable tool for establishing the stone’s identity and minimum quality parameters.
For any diamond discussed in this article, buyers should confirm the inscription number and report details independently through the issuing laboratory’s online report check service. This provides a transparent verification step beyond the seller’s own documentation.
Practical Implications for the Buyer: Balancing Certificate Data with Visual Assessment
The relationship between certificate data and visual performance is not a contradiction—it is a sequence. A grading report gives you the facts about origin, size, color, clarity, and, for round stones, a cut quality range. These facts are reliable for what they measure. But they do not measure the experience of seeing the stone face-up in real light. A smart buying process uses the report to eliminate diamonds that fall below acceptable thresholds—for example, a color grade too low for the intended setting metal or a clarity grade with an inclusion plotted under the table. After that filter, the selection should shift to visual assessment. The certificate ensures you are not starting with a bad candidate. The video and in-person inspection tell you which candidate is the best performer. Thinking of the report as a pre-qualification tool rather than a final judgment helps avoid the trap of choosing based on paper alone.
Final Recommendation: Use the Certificate as Your Filter, Not Your Verdict
How to Combine Certificate Data with Visual Review
Start with the certificate to narrow your options, not to make a final pick. Use it to set your parameters: target a specific color and clarity range, and for round stones, look for a cut grade of Excellent from GIA or Ideal from AGS. That gets you to a shortlist of stones that meet your baseline on paper.
From there, the real evaluation begins. Request high-resolution images and videos from the seller. Watch for brightness and contrast under different lighting — not just a single showroom shot. For fancy shapes, ask directly about bow-tie severity. Confirm the stone is eye-clean in a face-up view, not just on the clarity plot. Price and final appearance should only enter the comparison after you have visually vetted the stone. A certificate helps you find candidates. Visual evidence tells you which one to choose.
When to Trust the Seller’s Visual Evidence
A seller who provides detailed imaging across multiple lighting conditions and answers specific questions about proportion and performance is more reliable than one who offers only a certificate and a single generic photo. Transparent documentation — high-magnification face-up images, 360-degree video, and honest answers about visible inclusions or bow-tie — shows the seller understands the gap between grades and real-world appearance.
If a seller cannot or will not provide this level of detail, consider that a warning sign. At NUVU, we treat the grading report as the starting point for a conversation, not the final answer. The stone you choose should be one you have seen clearly, under conditions that matter. Your decision should rest on what you see, not just what the report says. Use the certificate to filter. Use your eyes to decide.
One final distinction worth considering: the usefulness of the certificate depends on the buyer’s goal. A buyer selecting a loose stone for a simple solitaire setting may need very different information than someone designing a complex halo ring with side stones. In the first case, the certificate provides a baseline, but the visual performance still decides the outcome. In the second, the exact measurements and proportions matter even more, because the stone must fit precisely into a custom layout. The certificate helps in both cases, but the weight given to each data point should shift depending on the design. Asking the simple question — “What role will this stone play in the final piece?” — can help determine how much to rely on the report and how much weight to give the visual evidence.
Putting It All Together: A Practical Buying Sequence
To move from theory to action, here is a sequence that balances certificate data with visual review. Start by defining your budget and design goal. Then set your certificate parameters: color range, clarity threshold, carat weight, and for rounds, an Excellent or Ideal cut grade. Use these to generate a shortlist of candidate stones from sellers who provide detailed imaging. For each candidate, request a 360-degree video in spotlight and diffuse lighting, a high-resolution face-up photo for eye-cleanliness, and the exact crown and pavilion angles for rounds or length-to-width ratio for fancy shapes. Compare the stones side by side by watching the videos in full-screen, normal room lighting, without zooming into the clarity plot. The stone that looks best across multiple lighting conditions and has proportion details that align with your design needs is the one to choose. The certificate ensured you started with quality candidates. The video tells you which one looks best.
[1] GIA, “Lab-Grown Diamonds: HPHT and CVD,” GIA.edu, accessed 2024.
[2] GIA, “Identifying Lab-Grown Diamonds,” GIA.edu, 2018.
[3] GIA, “Lab-Grown Diamond Grading Reports,” GIA.edu, accessed 2024.
[4] Federal Trade Commission, “Guides for the Jewelry, Precious Metals, and Pewter Industries,” FTC.gov, 16 CFR Part 23, revised 2018.
Disclosure: This article is for general educational purposes only. Diamond grading, pricing, availability, specifications, and seller policies can change, and readers should verify important details through grading reports, official laboratory tools, seller documentation, or qualified professionals before making a purchase decision. Laboratory-grown diamonds should be clearly distinguished from natural diamonds, and environmental or sourcing claims should be supported by specific documentation. A grading report helps document key characteristics, but it should not be treated as a guarantee of beauty, value, or sourcing ethics.