
Ordering custom lab-grown diamond jewelry online comes with a hidden risk: by the time the piece arrives at your door, the most critical quality checks are no longer possible without sending it back. Scratches on the metal, a loose prong, an off-center stone, or a clasp that lacks snap are all issues that, as highlighted in a custom lab grown diamond ring design guide, are much easier to catch before shipment than after. For remote buyers, relying on shipping insurance or return policies is a poor substitute for a structured, visual inspection before the jeweler ships the final product.
For the full framework, read Custom Lab-Grown Diamond Jewelry Guide.
This guide walks you through the specific verification steps you should take when reviewing final delivery photos and videos of your custom piece. You will learn what to look for on the grading report, how to check stone setting and metal finish remotely, and which mechanical tests apply to rings versus non-ring jewelry. The goal is to help you approve only what is truly finished to standard, so you can accept delivery with genuine confidence instead of crossed fingers.
| Inspection Area | What to Look For | Red Flags to Reject |
|---|---|---|
| Stone Certificate Match | Laser inscription on girdle exactly matches report number; visual 4Cs match description | Inscription missing or different; stone color or clarity differs noticeably from report |
| Prong & Setting Integrity | Prongs make full, flush contact with stone; stone sits level without tilt | Visible gaps under prongs; stone appears crooked or raised on one side |
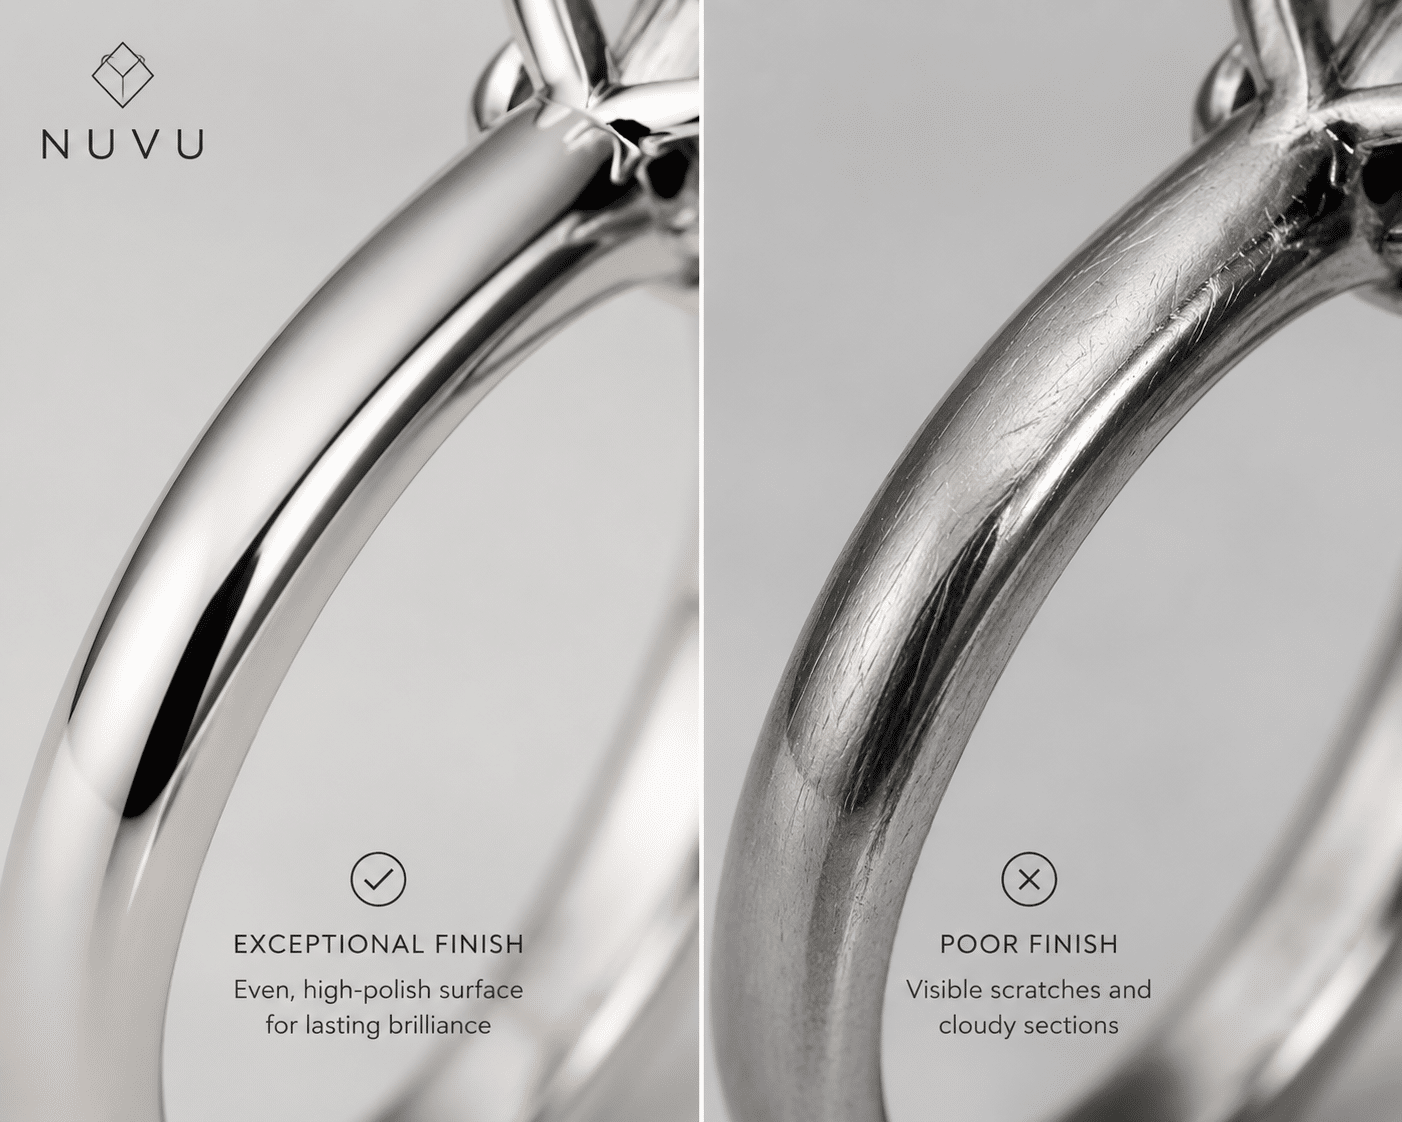
| Metal Finish & Texture | High-polish areas are mirror-like; matte finishes are even; no scratches or buffing marks | Visible scratches, swirls, uneven texture, or cloudy patches in polished areas |
| Ring Size & Fit | Ring slides on with light pressure, stays in place without spinning, no deep indent marks | Ring is loose enough to spin or tight enough to leave a strong mark; half-size deviation from order |
| Clasp & Hinge Mechanics | Clasp closes with firm, audible snap; hinges move freely without wobble | Clasp is loose, sticky, or hard to open; hinge has lateral play or catches |
Quick Questions Before You Read
Q: Can I trust the jeweler’s photos, or should I ask for specific angles?
You should always request four standard angles plus a video under varied lighting. Photos can hide poor polish or asymmetrical settings if taken from only one angle.
Q: What if the stone’s laser inscription matches but the stone looks different?
Do not accept delivery. A matching inscription alone is not enough; you need visual confirmation of the 4Cs. Request additional macro photos or a video comparison under neutral light before approving.
Q: Is it normal for a ring to spin slightly on the finger?
No. A properly sized ring should stay in place with light pressure and not rotate on its own. Spinning usually means the size is too large by at least a quarter step.
Q: Do I need to inspect earrings and bracelets the same way as rings?
Not exactly. For earrings, check post length and back seating. For bracelets, focus on clasp tension and hinge smoothness. Rings require extra attention to stone seating and metal symmetry.
Why a Post-Production Inspection Matters for Custom Lab-Grown Diamond Jewelry
The moment a custom piece arrives, the temptation is to look at the stone, make sure it sparkles, and call it done. That impulse is understandable, but it is also the point where most mistakes slip through. A structured inspection before you accept delivery is not excessive caution. It is the only reliable way to catch errors that are easy to miss in the first excitement of opening the box.
The Risk of Skipping the Final Review
Custom jewelry does not travel from one jeweler to your door in a straight line. It moves through multiple specialists: a caster who shapes the metal, a setter who places the stone, a polisher who refines the surface, and a finisher who checks the details. Each hand-off introduces a chance for error. Stones can shift during setting. Prongs can be filed unevenly. Metal surfaces can develop small scratches during polishing. These are not signs of incompetence. They are common outcomes of a multi-step process, and they are precisely why a final review matters. Accepting a piece without checking each element means accepting whatever made it through those hand-offs, including mistakes.
For buyers, the practical takeaway is that a photo taken immediately after setting may look different from one taken after polishing and final assembly. The finishing stages can introduce minor surface scratches or alter the visual relationship between the stone and the metal. Requesting the final inspection images after all production steps are complete, rather than earlier in the process, gives you a more accurate picture of what will arrive at your door.
Why Remote Buyers Need a Different Approach
Buyers who approve a piece without holding it in their hands face an additional challenge. You cannot test how the ring feels when it slides onto a finger. You cannot feel whether a prong snags on fabric. You cannot tell if the clasp tension is firm or weak. The entire inspection must happen through images and video, which means the evidence you request needs to be more deliberate than a few casual photos. Without tactile confirmation, the visual documentation becomes your only proof that the piece is correct. That makes the quality of that documentation the deciding factor in whether you accept or reject delivery.
Photo and Video Review Checklist
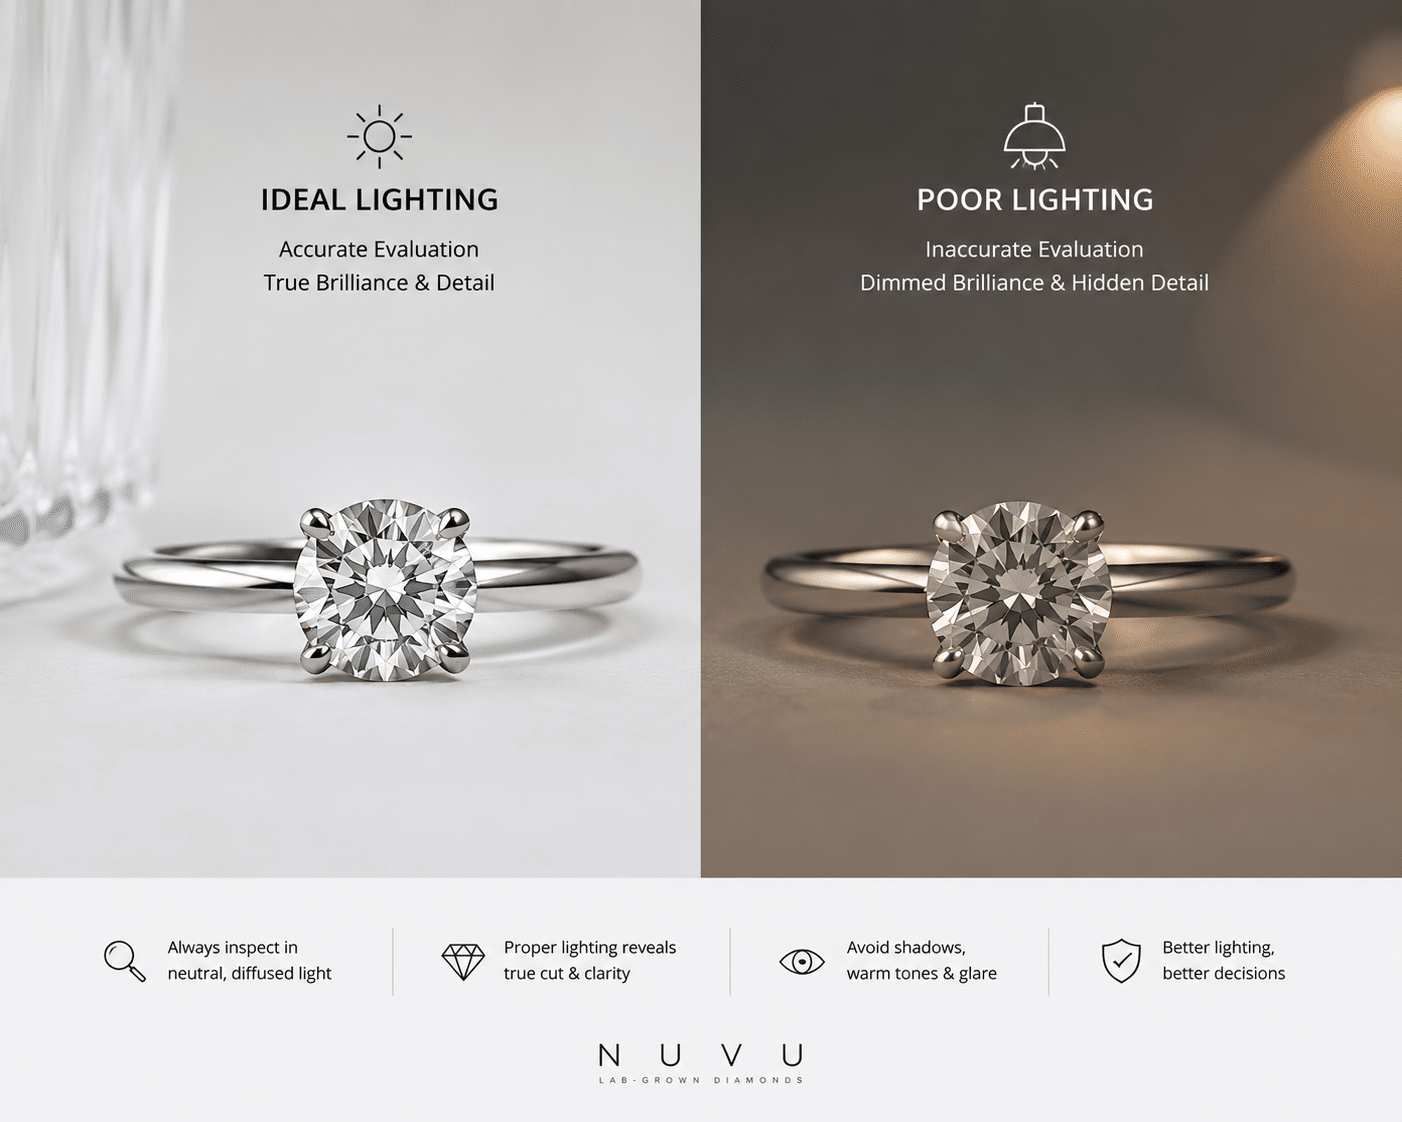
A single well-lit photo is not enough to evaluate a finished piece. Request at least four standard angles: a top-down view, a bottom view, a side profile, and a 45-degree overhead angle. In addition, ask for a short video showing the stone under both direct and diffused light. The video should include the piece being rotated slowly so that every angle of the setting and the stone is visible. Review these carefully. If the lighting is too dim or the focus is soft, ask for another set. This is the primary tool for remote inspection, and it needs to be good enough to make a real judgment.
The Role of Grading Reports and Terminology in the Inspection
A reliable inspection depends not only on what you see but also on how you interpret the documentation. The Gemological Institute of America (GIA), which developed the 4Cs grading system and the term “laboratory-grown diamond,” publishes guidance on what consumers should expect from a grading report.[1] A report documents the diamond’s specific characteristics — color, clarity, cut, and carat weight — along with a unique identification number laser-inscribed on the girdle. Understanding this terminology helps buyers verify that the stone they are reviewing matches both the document and the order. When a report references “eye-clean” clarity or a specific color grade, that description should align with what the stone shows under inspection imagery. Any deviation warrants a closer look or a request for additional evidence before approval.
A grading report can narrow the comparison, but it should be read alongside the stone’s proportions, visual evidence, and intended jewelry use. Relying on a single grade without examining the stone’s actual appearance under different lighting can lead to mismatched expectations at delivery.
What This Guide Will Cover
The sections that follow walk through each check you should perform before giving final approval. These cover stone verification, prong security, metal finish quality, engraving accuracy, ring size confirmation, mechanical function for non-ring pieces, and the final documentation steps needed for a confident remote sign-off. Each check is designed to catch a specific type of error, and each one matters. Going through the list takes a few minutes. Skipping it can mean accepting a piece that is wrong in ways that are expensive or impossible to fix later.
Stone Verification and Certificate Matching
Before evaluating how the diamond looks in the setting, you need to confirm that the diamond in the setting is the one you paid for. This is the single most important step in the inspection, and it is surprisingly easy to verify if you know what to look for.
Reading the Grading Report Against the Stone
Every lab-grown diamond with a grading report from a reputable laboratory carries a laser-inscribed number on its girdle, the narrow outer edge of the stone. That number must match the number printed on the grading report. The inscription is tiny and requires 10x magnification to read, but it is the only definitive way to link the stone to its certificate. GIA, IGI, and other major laboratories use laser inscription to create a permanent, unique identifier on the diamond’s girdle as part of the grading process.[2] Do not accept a verbal assurance that the numbers match. Request a close-up video or a macro photograph that clearly shows the inscription. If the seller cannot provide this, that is a reason to pause the approval process.
Visual Confirmation of 4Cs Against What Was Ordered
The grading report tells you what the stone should look like. The actual stone may tell a different story. Compare the diamond in front of you, or in the inspection imagery, against the color, clarity, and cut grade on the certificate. If an inclusion is listed on the report as minor but appears visible to the unaided eye in the video, flag it. If the stone shows a color tint that looks stronger than the stated grade, ask for an explanation. The grading report is a useful reference, but custom jewelry reference photo mistakes demonstrate that visual evidence is what matters at delivery. A certificate can say “eye-clean” while the stone shows a visible inclusion. That is a discrepancy worth questioning.
Buyer Verification Checklist
Start by confirming the inscription number matches the certificate. Then compare the stone’s appearance under two lighting conditions: direct light and shaded or diffuse light. The stone should perform consistently with its grade in both. Request a magnified close-up of any inclusion listed on the report so you can see whether it matches the description. If the stone appears off in color, clarity, or brightness compared to what you expected from the grade, ask for a side-by-side comparison with a reference stone of the same grade before approving.
Growth Method and Report Accuracy
Lab-grown diamonds are produced through two primary methods: High Pressure-High Temperature (HPHT) and Chemical Vapor Deposition (CVD). GIA explains that while the two methods result in diamonds with the same chemical composition and crystal structure as natural diamonds, they can sometimes exhibit distinct growth patterns or trace elements visible under magnification.[3] A comprehensive grading report for a lab-grown diamond typically includes notation of the growth method. For buyers, this detail can be useful when verifying that the stone matches the order, as the growth method may influence appearance characteristics such as color tint or clarity features. If the report states one method but the visual evidence — such as graining patterns or color zoning — suggests a different method, it is reasonable to request further clarification before final approval.
When the Stone Does Not Match the Certificate or Order
If the inscription is missing, smudged, or does not match the certificate number, stop the approval process. If the visual characteristics clearly deviate from what the report describes, do not accept delivery. Document the discrepancy in writing and send it to the seller or manufacturer. Request either a replacement that matches the order or a refund before proceeding further. Accepting a mismatched stone means accepting a piece that may not hold its documented value or meet your original specifications.
Traceability Through Documentation and Report Verification
For buyers seeking a higher degree of confidence, verifying the grading report independently adds an important layer of traceability. When a GIA, IGI, or other major laboratory report is provided, the report number engraved on the stone can be checked through the issuing laboratory’s official online report verification system, where available. This check confirms that the report on file is genuine and has not been altered, and that the diamond’s inscribed number matches the laboratory’s records. In sourcing and custom production, documentation, consistency, and communication often matter as much as the headline specification. Buyers should ask the seller for the exact report number and laboratory name before final approval, and use these details to perform their own verification. This step does not replace a visual inspection of the stone, but it does help ensure that the certificate itself is authentic and properly linked to the finished piece.
Prong Security and Stone Setting Integrity
A diamond that is graded correctly but set poorly will not stay secure over time. The setting is what turns a loose stone into a wearable piece of jewelry, and its integrity determines how long the stone stays in place.
Gap Assessment and Prong Contact Points
Every prong must make flush, even contact with the stone’s girdle. There should be no visible gaps, lifts, or uneven spacing between the prong tip and the diamond edge. In a four-prong or six-prong setting, all prongs should be present, uniform in thickness, and straight. A bent or tilted prong may look minor, but it creates a weak point that can lead to stone loss. Use a magnified image or video to inspect each contact point individually. If one prong looks different from the others, ask for a closer look.
One detail that buyers sometimes overlook is the prong tip itself. Even if the prong makes contact, a tip that is blunt or poorly shaped can catch on clothing or feel rough against the skin. For rings that will be worn daily, especially engagement rings, this comfort factor is worth verifying in the final inspection images.
Stone Seating and Table Alignment
The stone should sit level in its setting. The table, which is the flat top facet of the diamond, should be parallel to the ring shank or the pendant bail. An unevenly seated stone is not just a cosmetic problem. It affects how light moves through the diamond and increases the risk of the stone loosening over time. Check the alignment by looking at the side profile image. If the table appears tilted relative to the band, the stone is not seated correctly.
Stone-to-Setting Fit Check
Request a magnified image or video that shows the line where the stone’s girdle meets each prong tip. No light should pass between the prong and the stone. A visible gap indicates incomplete contact. For a more thorough check, ask the seller to apply gentle lateral pressure to the stone on video to confirm it does not rock or shift. A secure stone holds still. Any movement at all means the setting needs adjustment before the piece is acceptable.
Metal Finish Quality and Symmetry
The metalwork on a custom piece often reveals more about the build quality than the diamond does. A poorly finished setting undermines even the best stone, so the surface and structure deserve as much scrutiny as the gem itself.
Surface Polish, Scratches, and Tool Marks
The finished metal should be consistent across every visible surface. For high-polish finishes, the reflection should be clear and mirror-like with no cloudy patches, dull spots, or fine parallel scratches that indicate incomplete sanding. Brushed or matte finishes should show an even texture with no shiny streaks or uneven grain. Tool marks, pitting, or sections that reflect light differently than the surrounding area all point to finishing steps that were rushed or skipped. These issues are not purely cosmetic; a poor finish can trap dirt, feel rough against the skin, and accelerate wear over time.
Symmetry of Shank, Shoulders, and Basket
Structural asymmetry is a clear manufacturing defect, not a variation to overlook. The shank should measure the same thickness on both sides when viewed from the top and side. The shoulders—where the band meets the head of the ring—should taper evenly toward the center stone on both the left and right sides. The basket, bezel, or any other stone-holding structure should sit perfectly centered and level. If the setting leans to one side or the basket appears off-center when the ring is placed flat, the piece was not assembled correctly. This kind of misalignment affects both visual balance and long-term stone security, and it will not correct itself with wear.
Engraving Accuracy and Detail Work
Custom engraving and decorative detail are the most personal elements of a commissioned piece, but they are also where errors most commonly appear. Because these details are difficult or impossible to correct after the piece is finished, they require a careful check before delivery is accepted.
Text Engraving Placement and Legibility
Engraved text should be checked for three things before approving the piece: spelling, alignment, and legibility. Whether the text is inside a ring shank, on the back of a pendant, or across a band, every character must be correct. Spacing errors, missing letters, or misaligned text that starts off-center or tilts to one side are common production mistakes. Under magnification, the engraving should be crisp and deep enough to read clearly. Shallow or uneven engraving can wear down over time and become partially illegible. If the text is hard to read in a close-up image, it is likely too shallow to last.
Decorative Detail and Filigree Fidelity
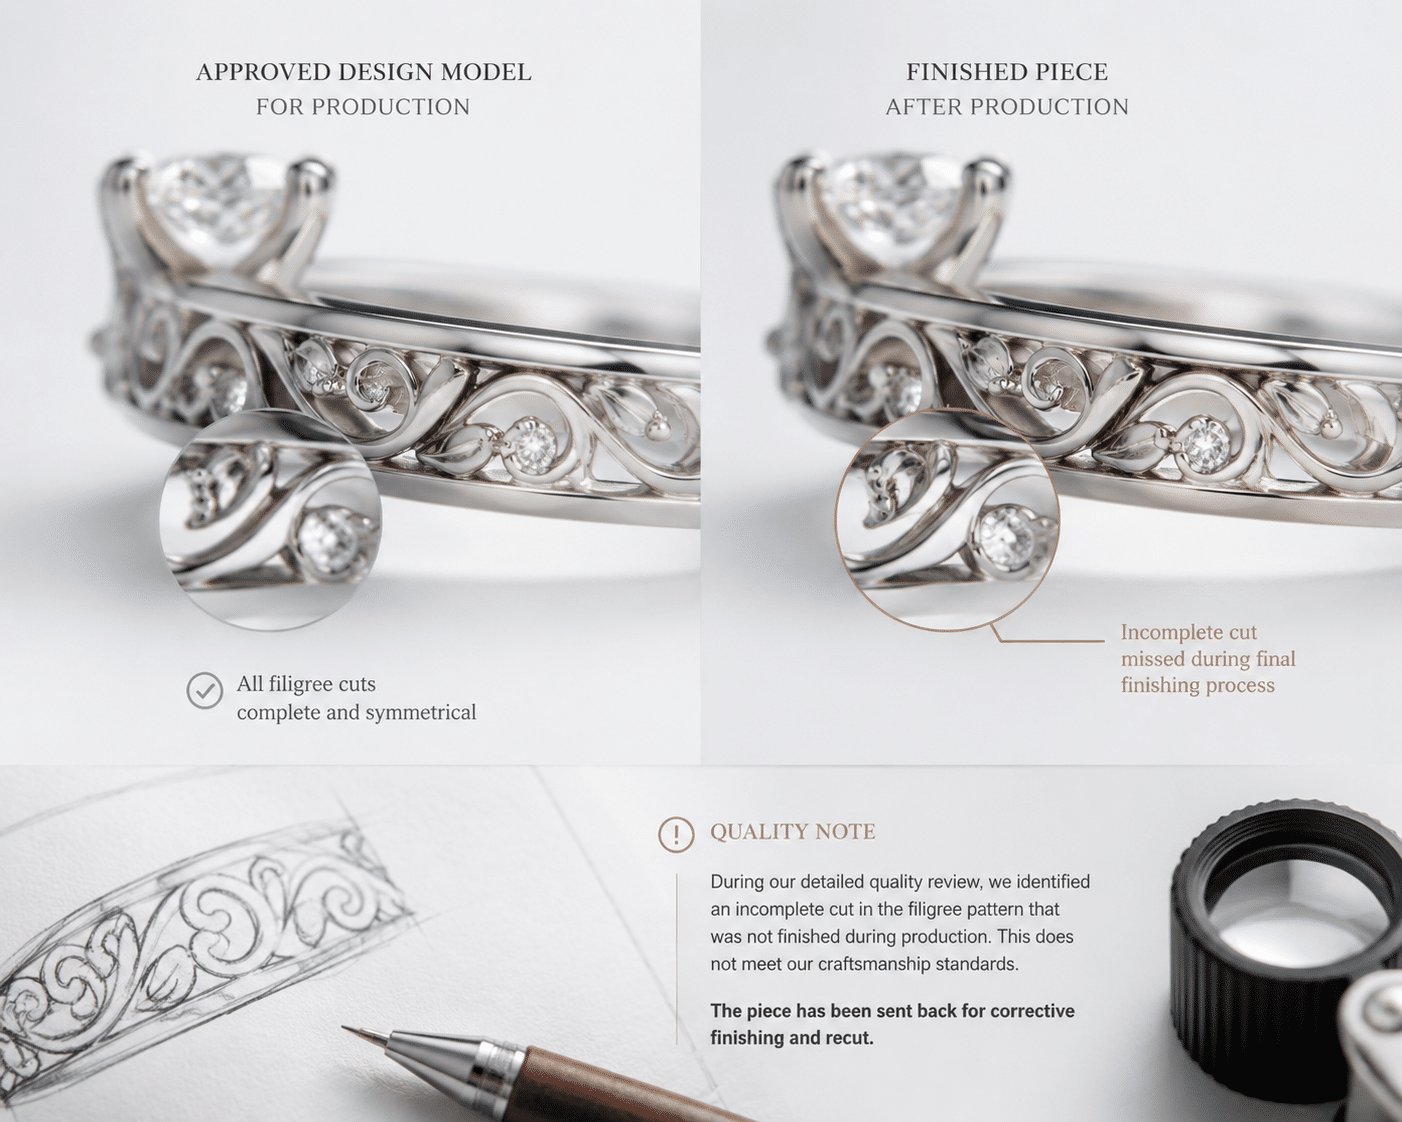
Intricate metalwork—filigree, milgrain beading, hand-pierced patterns, or cutout designs—should match the approved rendering precisely. Check for incomplete cuts where metal was not fully removed, rough edges that were not polished, or missing decorative elements that were present in the design file. Small inconsistencies in repeating patterns are worth flagging because they become more visible the longer the piece is worn. At this stage, the buyer is comparing what was produced against what was designed, and the two should be identical.
What to Do If Engraving Is Wrong
Engraving errors cannot be fixed after the metal has been polished or the piece has been assembled. Removing incorrect text typically requires grinding down the surface and re-engraving, which changes the metal thickness and shape. The correct response is to reject the piece and request a full re-make before accepting delivery. The seller or manufacturer should cover the cost because the error was made during production, not introduced by the buyer. Accepting a piece with a known engraving mistake creates a permanent flaw that cannot be reasonably corrected later.
Ring Size Accuracy and Fit Testing
A ring that looks perfect in photos but does not fit when worn has failed its primary function. Sizing accuracy is a basic quality requirement, and it should be confirmed before the piece is accepted as final.
Measuring Against the Ordered Size
The finished ring must match the size specified in the order. Minor variations of a quarter size can occur depending on metal thickness, setting complexity, or finishing techniques, and these are generally acceptable. Anything beyond a half-size difference is a defect. Before approving the piece, request written confirmation that the ring was checked against a sizing mandrel after final polishing. A ring that was sized correctly during casting but resized manually during finishing can drift out of spec, so the measurement should be taken at the very end of production.
For buyers, it is worth noting that a ring’s fit can feel slightly different depending on the width of the band. A wide band, typically 4 mm or more, may feel tighter than a narrow band of the same numerical size because it covers more surface area on the finger. If your custom piece has a wide shank, consider whether a quarter-size adjustment was discussed during the design phase, and confirm that the final measurement accounts for this factor.
Fit and Wearability During a Brief Wear Test
For buyers accepting delivery in person, the ring should slide onto the finger with light pressure and should not require excessive force to pass over the knuckle. Once on, it should not spin freely or shift noticeably during normal hand movement. A ring that rotates on the finger is likely too large, and one that leaves a deep indent after brief wear is likely too small. For remote acceptance, request a short video of the ring being placed on a correctly sized mandrel, or ask the wearer to test the fit on video if possible. A static measurement alone does not account for how the ring behaves once worn, so dynamic fit confirmation adds meaningful protection before final approval.
Clasp, Hinge, and Mechanical Function for Non-Ring Pieces
Earrings, necklaces, bracelets, and other non-ring jewelry rely on mechanical components that must hold securely under daily movement. A clasp that fails or an earring back that slips can result in a lost piece, so these elements deserve the same scrutiny as custom lab grown diamond jewelry guide covers stone setting and metal finish in custom engagement rings.
Clasp Tension and Security
Lobster claws, spring rings, and box clasps should open and close with firm, consistent tension. A clasp that opens too easily risks accidental release. One that does not close completely will weaken over time. Test the clasp multiple times in succession. The mechanism should catch cleanly each time with an audible or tactile snap. If the clasp feels loose, sticky, or misaligned on the first test, it is a functional defect that will only worsen with wear.
Earring Back Fit and Post Length
For stud earrings, the post must be long enough to pass completely through the earlobe with room for the back to seat securely. Friction backs should grip firmly without requiring excessive force to remove. If the back slides on too easily, it will not hold. Screw backs should thread onto the post smoothly without cross-threading or resistance. A post that is too short will cause the earring to sit awkwardly or fall out. A post that is too long may poke the wearer. Request a measurement or side-profile image of the earring showing the post length relative to the back placement.
Hinge and Articulation Smoothness
Hinged bangles, cuffs, and locket pendants should move freely without resistance, wobble, or grinding. The hinge pin should be invisible or flush with the surface. The closing mechanism must align perfectly when shut and hold securely without play. Open and close the hinge several times. Any catch, skip, or looseness indicates poor assembly. A hinge that fails after a few wears cannot be easily repaired without affecting the surrounding metalwork.
Side Profile and Wearability Under Garments
How a piece behaves when worn matters as much as how it looks in a display case. A well-made custom piece should feel comfortable, sit correctly on the body, and move naturally against clothing.
Side Profile Height and Comfort
The height of a ring setting or pendant head from the finger or skin surface should match the design specifications. A setting that sits too high will catch on shirt cuffs, sweater knits, and jacket sleeves. It may also feel top-heavy on the finger. A setting that sits too low may press into the finger or limit light exposure to the stone, reducing sparkle. For rings, the side profile should be low enough to clear adjacent fingers when the hand is relaxed. For pendants, the bail height should allow the piece to lie flat against the chest.
Wearability with Other Jewelry
A custom piece does not exist in isolation. It will be worn alongside other rings, bracelets, and watches. The side profile and overall shape should not snag, catch, or press into neighboring pieces. Evaluate clearance by considering how the piece interacts with everyday movement. For remote approval, request a short video showing the piece worn against a shirt cuff, palm, or alongside another ring. If the setting rubs against the adjacent finger or catches fabric during basic motion, the design needs adjustment before final acceptance.
Final Photos, Video, and Remote Approval Steps
For most custom jewelry buyers, especially those purchasing remotely, final approval happens through documentation rather than in-person inspection. A thorough set of images and a structured comparison process allow you to make that decision with confidence rather than guesswork.
What to Request Before Giving Final Approval
Before approving, request a final set of images that covers every inspection point. This should include a top-down view, bottom view, side profile, and a 45-degree overhead angle. Add macro shots of each prong, the engraving, and any decorative detail. A 360-degree video showing the piece rotated slowly under both direct and diffused light is essential for evaluating stone performance and overall finish. All images should be in focus, evenly lit, and shot against a neutral background. Blurry, dark, or angled-only images are not sufficient for a remote quality check.
How to Compare Against the Order and Design File
Open the original design render, specification sheet, or order confirmation next to the final images. Check each element side by side: stone size relative to the setting, setting style, metal finish texture, engraving text and placement, ring size marking, and overall proportions. A discrepancy in any of these areas should be noted in writing before approval. Do not assume that minor deviations will be acceptable after delivery. Once the piece ships, corrections become significantly more difficult.
Advertising and Disclosure Standards for Lab-Grown Diamond Jewelry
The Federal Trade Commission (FTC) in the United States has issued guidance on the marketing of laboratory-grown diamonds, which includes requirements for clear disclosure that a diamond is lab-grown rather than natural.[4] The FTC guidance emphasizes that claims about a diamond’s origin must be truthful and not misleading. For buyers of custom lab-grown diamond jewelry, this regulatory framework provides an additional layer of protection. The jewelry listing, invoice, or order confirmation should explicitly state that the diamond is laboratory-grown. Any ambiguity in the documentation or advertising — such as the use of unclear terms like “synthetic,” “cultured,” or “created” without proper context — can be a red flag. Before final approval, ensure that all written materials clearly and consistently describe the stone as a lab-grown diamond, in line with established advertising standards. This documentation supports your verification process and ensures that the piece you receive matches the product you agreed to purchase.
When a grading report is available, buyers should verify the report details through the issuing laboratory’s official report-check tool where available. This step confirms that the certificate is genuine and linked to the stone, providing an independent check beyond the seller’s documentation.
The Approval Confirmation Process
When you have completed the inspection and are satisfied, confirm approval in writing. State explicitly that the piece matches the order specifications and has passed your quality review. This written confirmation protects both you and the seller and marks the final acceptance point in the process. If anything remains unclear, ask for additional images or clarification before giving approval. Rushing this final step defeats the purpose of the entire inspection.
For buyers working with a custom jeweler like NUVU, the final approval step is treated as a transparent handoff. The documentation and inspection process is designed to give the buyer full confidence before shipment, with no pressure to approve incomplete evidence. If any question remains unanswered, the correct course is to pause and request what is missing rather than accepting an unclear outcome.
All diamonds discussed in this guide that are accompanied by grading reports from GIA, IGI, or HRD Antwerp have their report numbers cross-referenced against official laboratory databases where applicable. This verification step confirms that the certificate on file corresponds to the stone in the setting, providing an additional layer of assurance before final delivery approval.
Independent verification of a diamond’s grading report is available to any buyer through GIA’s online report check service or equivalent tools provided by other major laboratories. This service allows you to confirm that the report you hold is genuine and has not been altered, adding a final check to your remote inspection process before accepting the piece.
[1] GIA, “A Brief History of the 4Cs,” Gemological Institute of America, https://www.gia.edu/gia-about/4cs-history.
[2] GIA, “Laboratory-Grown Diamond Identification,” Gemological Institute of America, https://www.gia.edu/laboratory-grown-diamond.
[3] GIA, “HPHT and CVD Diamond Growth,” Gemological Institute of America, https://www.gia.edu/gia-news-research/hpht-cvd-diamond-growth.
[4] Federal Trade Commission, “Guides for the Jewelry, Precious Metals, and Pewter Industries,” 16 CFR Part 23, https://www.ftc.gov/enforcement/rules/rulemaking-regulatory-reform-proceedings/guides-jewelry-industry.
Disclosure: This article is for general educational purposes only. Diamond grading, pricing, availability, specifications, and seller policies can change, and readers should verify important details through grading reports, official laboratory tools, seller documentation, or qualified professionals before making a purchase decision. Laboratory-grown diamonds should be clearly distinguished from natural diamonds, and environmental or sourcing claims should be supported by specific documentation.