
Choosing a lab-grown diamond necklace is not the same as picking an engagement ring, and treating them the same way can lead to disappointment. A stone that looks brilliant in a ring box may appear dull or lifeless when worn on a chain, because movement and distance change how light interacts with the diamond. The cut, face-up size, and setting all matter more at necklace length, while color and clarity differences that are obvious up close become nearly invisible. This article helps you navigate those distinct priorities for necklaces, and the lab-grown diamond tennis bracelet guide provides parallel insights for tennis bracelets, from matching stone size to bracelet length to selecting a setting that balances sparkle with everyday durability. It also explains how to read grading reports for necklace-specific value, where to save without visible compromise, and what to verify before buying—so you end up with a piece that looks exactly as good on your neck as it did in the display case.
For the full framework, read Lab-Grown Diamond Jewelry Guide.
| Purchasing Factor | Engagement Ring Logic | Necklace Logic |
|---|---|---|
| Cut Priority | Excellent cut is very important | Excellent cut is critical; motion amplifies poor cut |
| Color Grade | D-F often preferred for white appearance | G-I is optimal; warmth invisible at necklace distance |
| Clarity Grade | VS2 or higher often recommended | SI1 with clean eye appeal is smart savings |
| Carat Weight | Primary size indicator | Face-up dimensions (mm) matter more than weight |
| Setting Type | Prongs are standard choice | Bezel offers durability; prongs snag; halo adds visual size |
| Budget Allocation | 60-70% to stone | 50-60% to stone; invest in solid chain and quality setting |
| Certificate Need | Strongly recommended | Essential; an independent grading report is non-negotiable |
Quick Questions Before You Read
Q: Will a lower color grade look yellow in a necklace?
No. At the distance a necklace is worn, G through I color grades appear colorless to most people. The chain and setting metal have a larger visible impact on the overall look than a one-grade color difference.
Q: Is a bezel setting always the safest choice for daily wear?
A bezel setting offers the best protection against chips and snagging for an everyday pendant. Prongs provide more sparkle but catch on fabrics. Bezel is recommended if the necklace will be worn frequently without removal.
Q: How much can I save with a lab-grown diamond necklace compared to a natural one?
Lab-grown diamonds typically cost less than natural diamonds of the same size and quality, though the exact difference depends on current market conditions, the specific stone, and the seller. The sparkle and appearance are identical to the naked eye. Buyers should be aware that long-term resale value differs between lab-grown and natural diamonds.
Q: Do I need to see the diamond in person before buying a necklace?
Not necessarily. A reliable seller provides an independent grading report, exact millimeter dimensions, and a 360-degree video. These tools let you assess face-up size, cut quality, and visible clarity from your screen without in-person viewing.
Why Necklace Design Is Different from Ring Design
Most diamond buying advice starts with engagement rings. That creates a problem when you shop for a necklace. The priorities shift. The way a stone performs changes. And the features that matter most on a finger are not always the same ones that matter around the neck.
How Movement and Distance Change What You See
An engagement ring sits roughly 12 inches from your eyes in direct, controlled light. You can tilt it, inspect it, and hold it still. A pendant sits farther away—16 to 20 inches depending on chain length—and it moves. Every step, turn, or breath shifts the stone.
This distance and motion mean you perceive sparkle differently. A stone that looks brilliant under a jeweler’s loupe can appear flat when it is not catching light from the right angle during movement. Visibility depends more on contrast between the stone and the setting, the precision of the cut, and how high the stone is lifted off the chest. Carat weight becomes less important than how effectively the diamond performs while in motion. A well-cut 0.75ct stone can easily outshine a poorly cut 1.5ct stone in a pendant.
Why Engagement Ring Logic Creates Necklace Problems
Most 4Cs education is built around ring buying. That education tells you to prioritize high clarity and an ideal cut, then pay a premium for D or E color. When you carry those same standards into a necklace purchase, you often overpay for qualities you cannot see.
A ring is inspected closely, often in direct sunlight or bright indoor light. A pendant is viewed from 12 to 18 inches away while the wearer is moving. At that distance and under those conditions, the difference between an SI1 and a VS1 clarity grade disappears. The same is true for color. A G or H stone looks colorless in a pendant setting. Even an I can look white next to a white gold or platinum chain. The extra money spent on D-E-F color and VVS clarity buys nothing visible.
The real mistake is treating a necklace like a smaller version of an engagement ring. It is not. The buying logic must change to match how the piece is actually worn.
For buyers, the practical question is not whether the stone has the highest possible grades, but whether those grades translate into any visible difference at the distance and motion a necklace is worn. In most cases, they do not.
The Three Wear Tests: Elegance, Security, Comfort
A ring sits securely on your finger with minimal movement. A necklace has to survive a completely different set of conditions. It moves against clothing, swings during activity, and gets caught on hair, zippers, and bag straps. A pendant that looks beautiful in a display case may flip upside down during wear, snag on a sweater, or feel too heavy against the collarbone.
Three things determine whether a pendant works in real life. Elegance means the stone sits properly on the chest, does not twist, and catches light naturally. Security means the setting holds the stone firmly against chain contact and occasional snags. Comfort means the piece does not pull on the chain, irritate the skin, or feel unbalanced.
Setting choice is the variable that controls all three. A prong setting offers maximum light exposure but more snag risk. A bezel setting sacrifices a small amount of sparkle for significantly better security and a smoother profile. A low-set stone lies comfortably against the skin but may not catch light from as many angles. There is no perfect setting. Every choice involves a tradeoff. Knowing which tradeoff matters most for how the necklace will be worn is what separates a good purchase from a disappointing one.
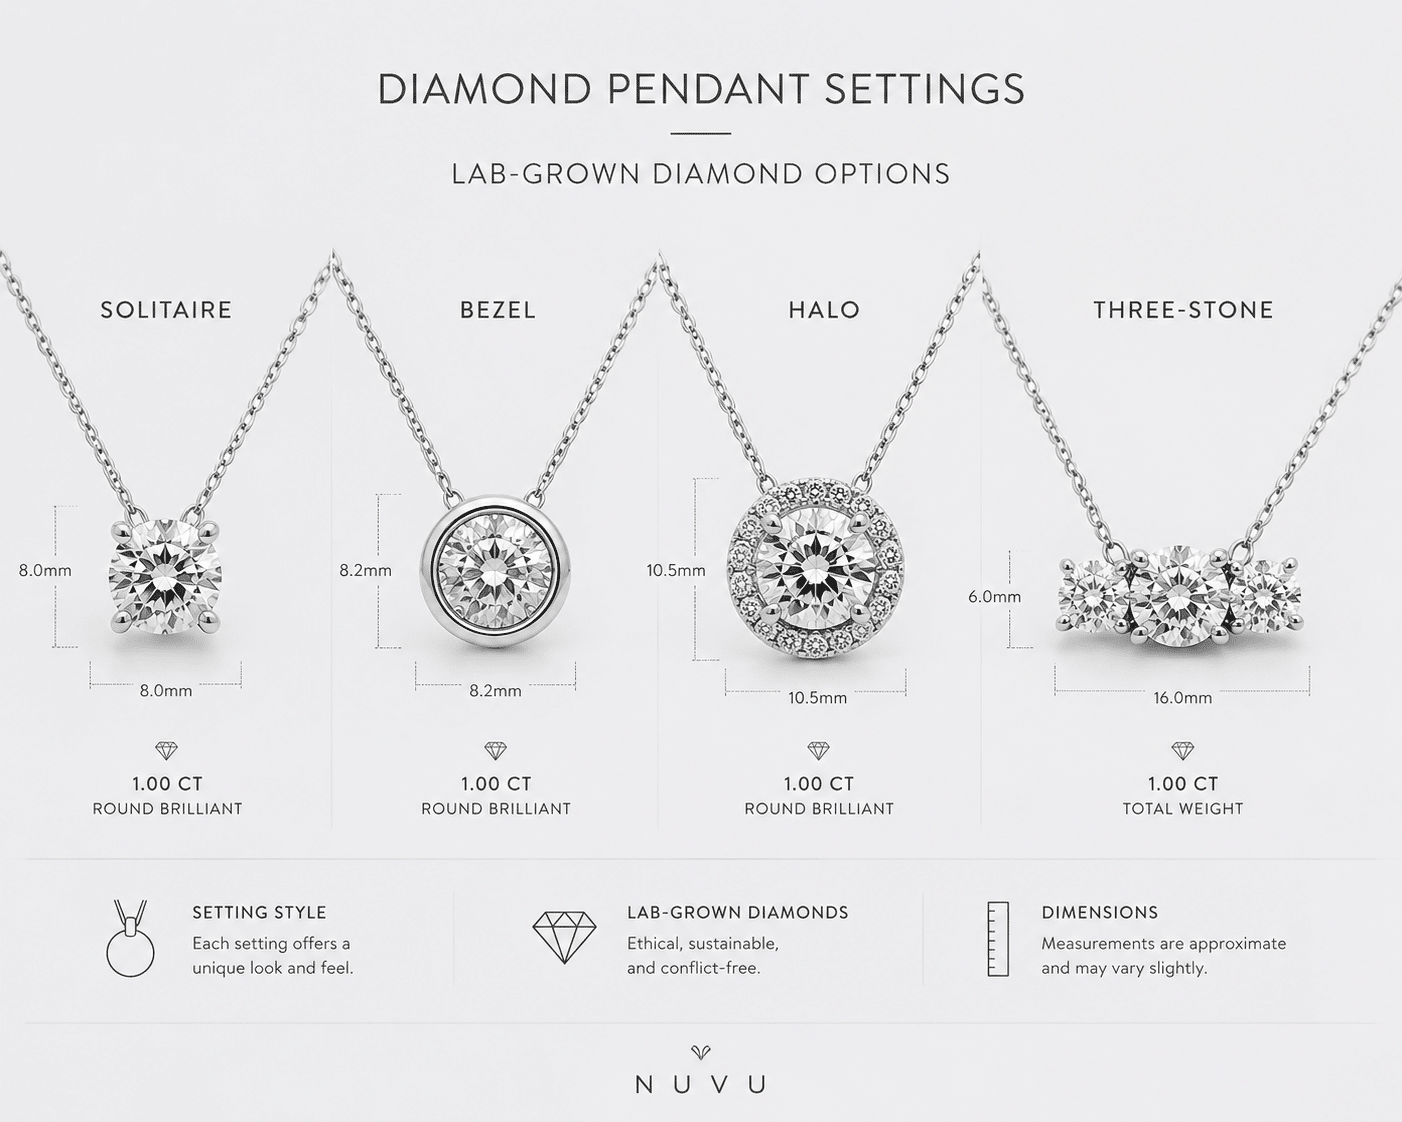
Pendant Setting Types and Their Tradeoffs
The setting determines how the diamond looks, how it behaves during wear, and how much maintenance the piece will need. Each setting type solves a different problem. Choosing the right one means understanding what you are trading away.
Solitaire Pendant: The Universal Benchmark
A single diamond held by four or six prongs. This is the most common pendant setting for a reason. It allows maximum light to enter the stone from all angles, producing the strongest sparkle of any setting type. The prongs hold the stone securely while leaving most of the diamond surface exposed.
The variable that matters most is prong height. A higher prong lifts the stone away from the chain and the chest, allowing light to enter from below and creating more visible brilliance from the sides. The tradeoff is snag risk. A raised solitaire catches on knitwear, scarves, and hair more easily. A lower prong keeps the stone closer to the body, reducing snagging but slightly reducing side sparkle.
This setting works best for stones between 0.5 and 2 carats. Below that range, the stone may look too small to justify the prong structure. Above it, the prongs may need reinforcement or a thicker gauge to hold the stone securely. The solitaire is a safe, versatile choice for someone who wants the diamond itself to be the focus.
Bezel Setting: Maximum Security, Different Light
A metal rim surrounds the diamond completely. The bezel protects the girdle—the thin edge around the middle of the stone that is most vulnerable to chipping. It also eliminates snag points entirely. No prongs means nothing catches on clothing or hair.
The tradeoff is optical. The metal rim blocks some light from entering the sides of the stone. This reduces the total sparkle compared to a prong setting of the same carat weight. The diamond also appears slightly smaller face-up because the bezel hides the outer edge of the stone. A 1-carat diamond in a bezel can look closer to a 0.85-carat stone in a prong setting.
Where this setting wins is daily wear. A bezel-set pendant can be worn with active clothing, during travel, and in situations where a prong-set stone would be at risk. It is also the best choice for smaller stones between 0.3 and 1.5 carats because the bezel rim adds visual structure that makes the diamond look more substantial.
Halo Pendant: Visual Size Without Extra Carat Weight
A center stone surrounded by a ring of smaller lab-grown diamonds. The halo adds approximately 0.25 to 0.5 carats of visual size to the center stone without increasing the center stone’s weight. It also reflects additional light around the center, creating a brighter overall appearance.
The halo works best for buyers who want a larger-looking pendant without paying for a larger center stone. A 0.75-carat center stone in a halo setting can look the same size as a 1.25-carat solitaire. The halo also helps stones with slightly lower color grades appear whiter because the surrounding diamonds reflect white light into the center.
The downsides are practical. More diamonds mean more prongs and more surfaces to clean. Dirt and skin oils accumulate between the center stone and the halo, reducing sparkle more quickly than a solitaire. The wider face-up area also means more surface to snag on fabric. Halo pendants require more frequent cleaning and more careful wear than solitaires or bezels.
Three-Stone and Cluster Designs
Multiple lab-grown diamonds arranged in a line or a cluster. Three-stone pendants use a center stone with two smaller side stones, creating horizontal spread that works well with V-necklines and décolletage. The horizontal shape elongates the neck and draws the eye downward.
Cluster designs use several smaller lab-grown diamonds grouped together to form a larger shape, such as a flower, a star, or an abstract arrangement. The advantage is visual size at a lower total cost. A cluster pendant may cover the same surface area as a 2-carat single stone but cost significantly less because it uses smaller diamonds that are more affordable per carat.
The critical factor for both designs is setting height. The entire structure must sit low enough to lie flat against the chest. A multi-stone pendant that tilts or lifts away from the body looks awkward and wears poorly. A low profile solves this, but it also limits the amount of light reaching the stones. Cluster designs, in particular, can appear dim if the diamonds are recessed too deeply into the setting.
Chain Length and Stone Size: The Proportion Logic
Chain length and stone size must be considered together. The wrong combination makes a pendant look either too small to notice or oddly dominant against the body. The goal is balance, and balance depends on where the pendant rests and how large the stone appears at that distance.
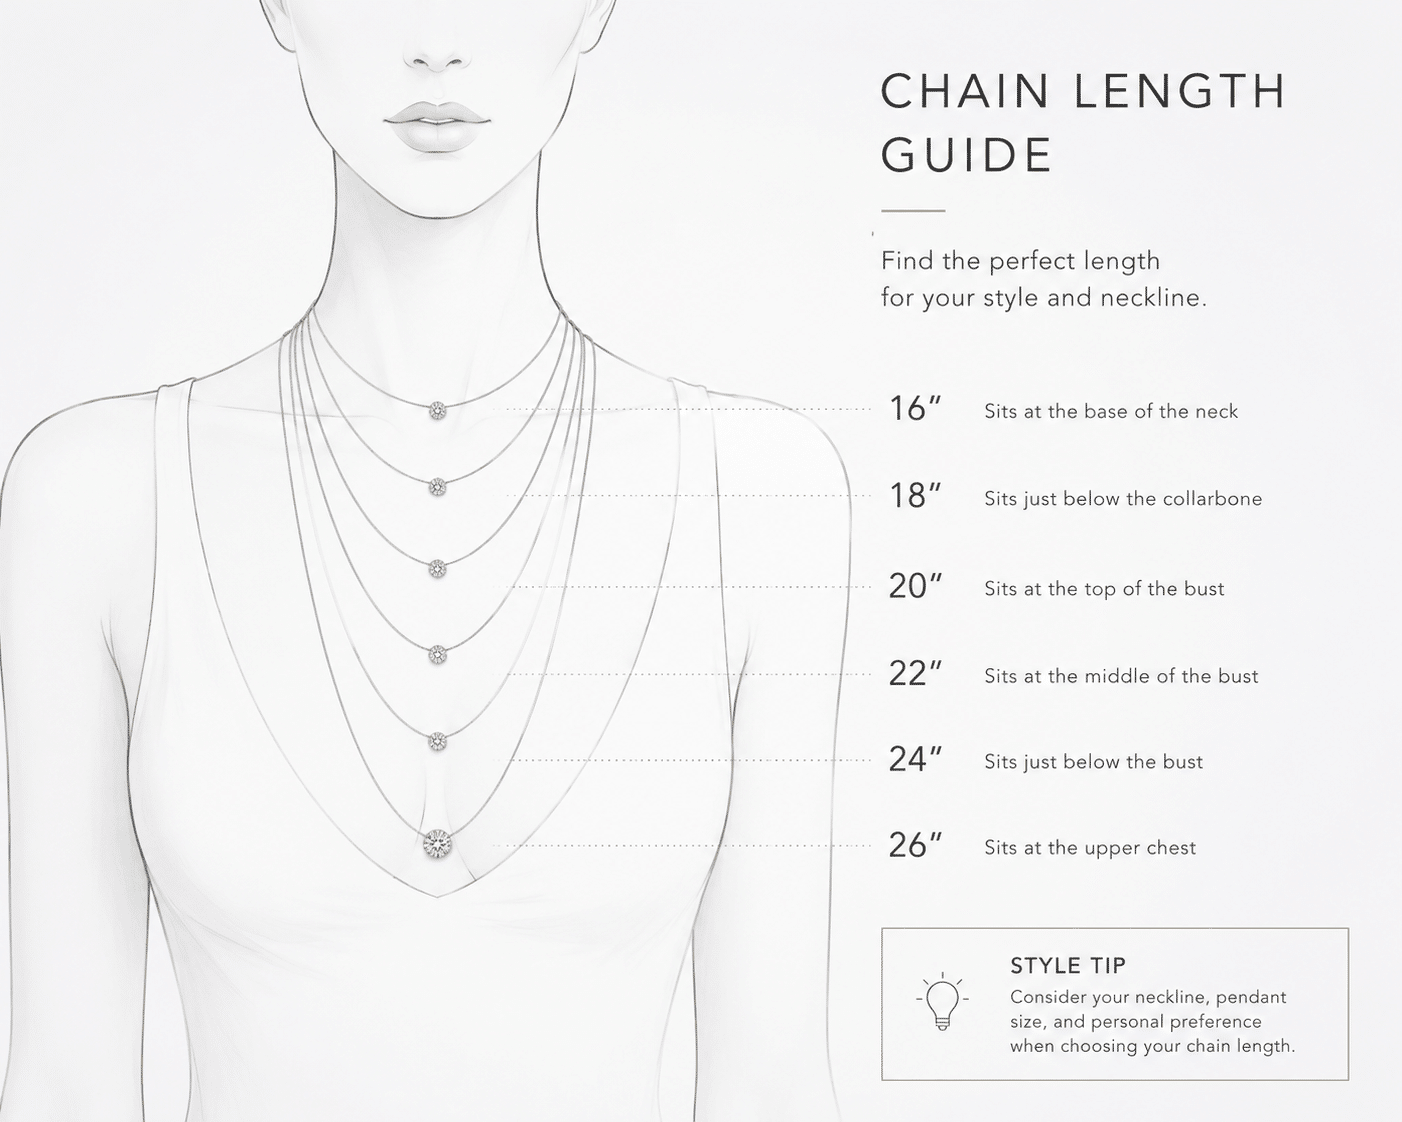
Standard Chain Lengths and Where the Pendant Falls
A 16-inch chain sits at the collarbone. This is the shortest standard length and works best for delicate pendants and lighter stones. An 18-inch chain falls just below the collarbone, which is the most common and versatile length for everyday wear. A 20-inch chain reaches the upper chest and works well with larger stones and deeper necklines.
The pendant’s resting position changes how the stone reads visually. A 2-carat stone on a 16-inch chain dominates a petite frame and can crowd the neckline. The same 2-carat stone on a 20-inch chain looks proportional on a broader frame because it sits farther from the face and spreads its visual weight across more vertical space.
Stone Size Guidelines by Chain Length
For a 16-inch chain, stones between 0.3 and 1 carat are typical. Anything larger risks overwhelming the collarbone area. For an 18-inch chain, 0.5 to 1.5 carats is the most balanced range. The pendant sits low enough to breathe but close enough to remain the focal point. For a 20-inch chain, 1 to 2.5 carats works without looking oversized because the distance between the pendant and the face reduces the apparent size.
Above 2.5 carats, the stone’s weight and visual mass require a setting that distributes the load. A bezel or hidden-prong setting helps keep the stone close to the chest and prevents the pendant from tilting or flipping. These are directional guidelines. Body frame, personal style, and the specific shape of the stone all shift the comfortable range.
Why Carat Weight Alone Is a Poor Guide for Necklaces
Two 1-carat stones can look very different in a pendant. Carat weight measures mass, not surface area. A stone with a wider table—the flat top facet—and a shallower crown, as detailed in the lab grown diamond stud earrings guide, will appear larger face-up than a deeper stone of the same weight.
A round brilliant with a table between 60 and 65 percent and a shallow crown angle spreads its weight across a wider surface. A deeper stone with a smaller table concentrates the same mass into a smaller silhouette. In a pendant, where the stone is viewed from a distance, the wider stone wins every time.
Always check the face-up dimensions—length and width in millimeters—before choosing a pendant stone. A stone that looks small on paper can look perfect in the setting, and a stone that sounds big by carat weight can disappoint when it is smaller than expected face-up. This is one of the most common buying mistakes, and it is entirely avoidable by asking for the measurements.
Lab-Grown Diamond Selection for Necklace Performance
The 4Cs change meaning once a diamond leaves the ring box and hangs from a chain. Distance, motion, and setting type redistribute what matters and what does not. A buying strategy that works for an engagement ring wastes money on a necklace. The right approach prioritizes what the eye actually sees in motion and lets the rest go.
Cut Quality: The Most Visible Factor in Motion
Cut quality determines how a diamond performs under the one condition that matters most for a necklace: movement. A well-cut stone with an Excellent or Ideal grade on its grading report catches light consistently as the pendant swings, turns, and settles. The sparkle is not static. It changes with the wearer, which is the entire point of a necklace diamond.
A stone with Poor or Fair cut may pass as acceptable under a ring’s stationary viewing position. Suspended from a chain, it fails. The same motion that makes a well-cut stone come alive makes a poorly cut one look flat, dark, or lifeless. This is the one factor where spending less creates a visible penalty. No amount of high color or flawless clarity rescues a diamond that does not return light well. Cut is the only C that cannot be compensated, and for necklaces, it is the only C worth prioritizing above all others.
Color: The Range That Works for Necklaces
Color behaves differently in pendant settings because the stone sits farther from the eye and often against metal, fabric, or skin. A D, E, or F stone is technically colorless and catches the most light. These grades perform well in any setting, but they are rarely necessary for necklaces.
G, H, and I color stones appear colorless in most pendant configurations, especially when set in white gold or platinum. The metal reflects into the diamond and masks any faint warmth. J and K color stones may show a slight yellow or warm tint in an open solitaire pendant with white metal, but the same stones look neutral in a bezel setting or against yellow gold. The color is effectively hidden. For most buyers, G through I is the optimal range. It saves money without creating any visible difference at necklace viewing distance.
Clarity: Where You Can Comfortably Save
Clarity is the most over-specified C in necklace diamond buying. A pendant stone is viewed from 12 to 18 inches away, and it is almost always in motion. Inclusions that are visible under 10x magnification at SI1 or SI2 grade are frequently invisible to the naked eye when the stone is suspended and moving. The combination of distance and motion hides what a jeweler’s loupe would reveal.
Paying for VS1, VVS, or flawless clarity on a pendant stone below 1.5 carats is rarely money well spent unless the buyer actively prioritizes absolute perfection as a personal value. For most buyers, SI1 clarity with a clean eye appeal — meaning no visible inclusions from a normal viewing distance — delivers the same visual result at a significantly lower price. The savings are better directed toward cut quality or a larger stone.
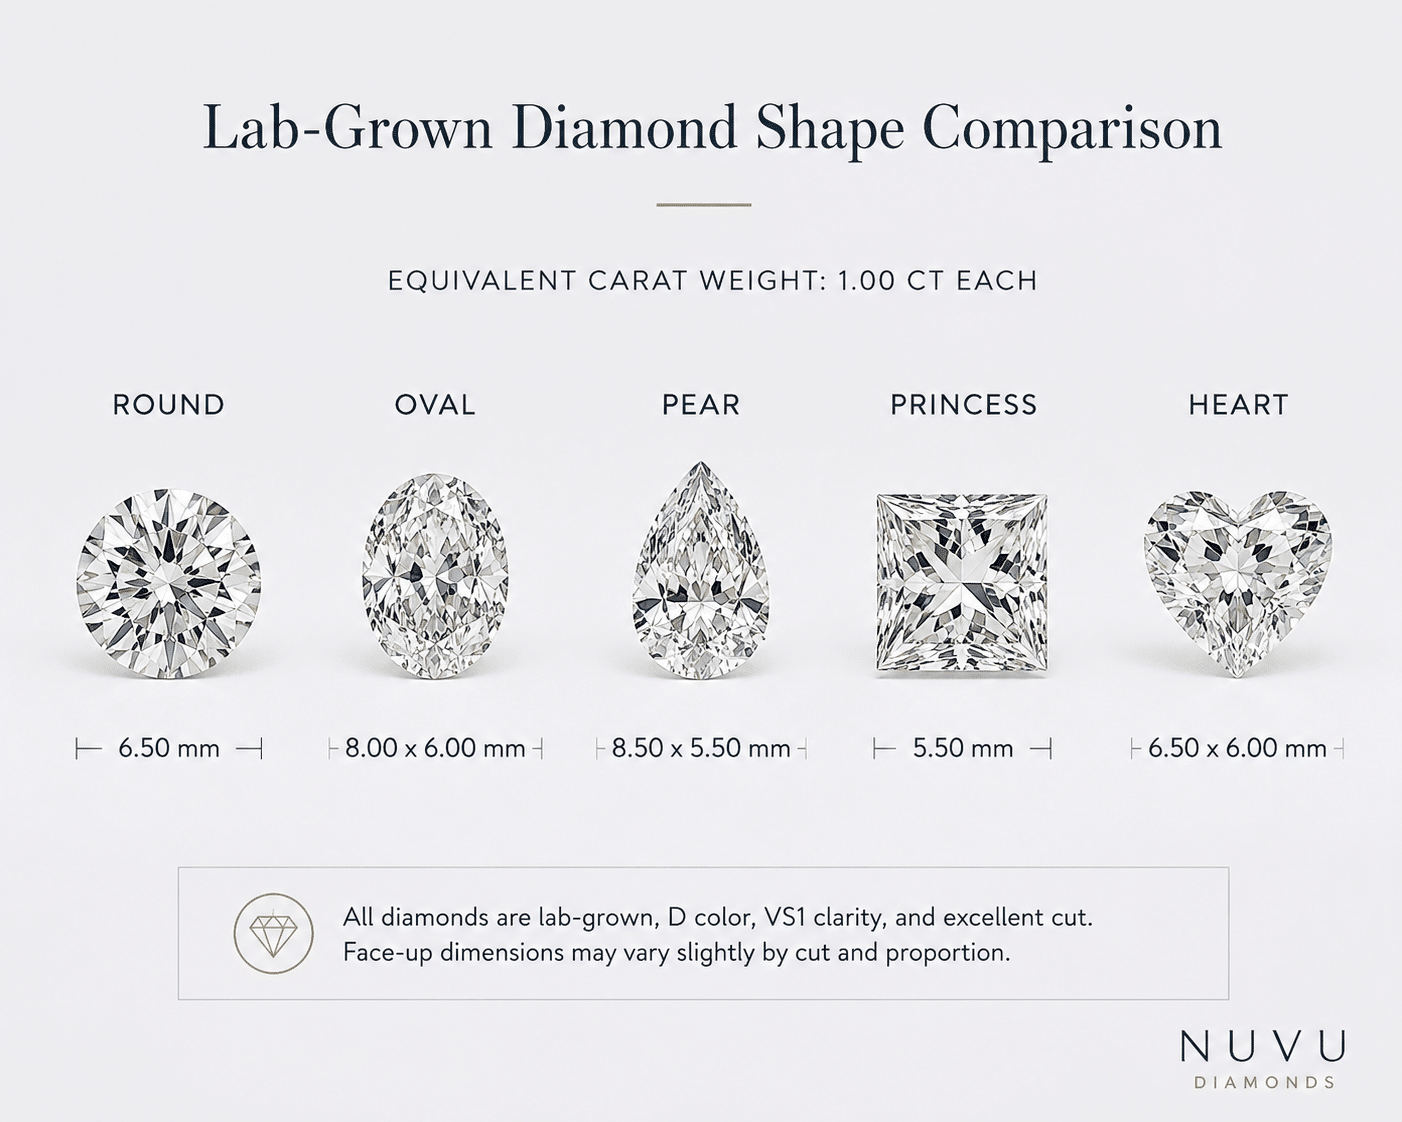
Shape Selection: Round, Princess, Oval, Pear, and Heart
Shape affects both how the diamond looks on the neck and how the setting must be built around it. Round brilliant remains the safest and most consistently brilliant choice for solitaire and halo pendants. Its symmetrical cut pattern produces maximum sparkle from every angle, which matters when the pendant rotates during wear.
Oval and pear shapes elongate the neckline because their longer face-up profile draws the eye vertically. They are particularly effective with V-necklines and deeper necklines where the shape mirrors the opening of the garment. Princess cut diamonds work well in bezel settings, where the metal protects the sharp corners that are vulnerable to chipping in prong settings. Heart-shaped diamonds are popular for pendant gifts, but only a clean, symmetrical cut prevents the shape from looking misshapen or uneven in motion.
Each shape also has different face-up dimensions for the same carat weight. A 1-carat round measures roughly 6.5mm in diameter. A 1-carat oval may measure 7.5mm by 5.5mm, appearing larger in one direction. A 1-carat marquise can reach 10mm in length. Always compare the actual millimeter dimensions, not just the carat weight, when choosing a shape for a pendant.
Using the Grading Report as a Necklace Buyer
A grading report is essential for verifying the stone’s specifications, but it is not a complete buying tool. The report documents measurable characteristics such as cut quality, color grade, clarity grade, carat weight, and proportions. It does not evaluate how the stone will look in motion at necklace length, how it performs under varied lighting, or how it interacts with a specific setting. Those factors depend on visual inspection and setting design, which a report alone cannot capture.
For necklace buying, the report is most useful when used alongside other information. The cut grade helps predict light performance during movement. The color and clarity grades tell you where the stone falls on the grading scale, but the visual effect at necklace distance depends on the setting, chain metal, and viewing conditions. A GIA or IGI report showing Excellent cut, G color, and SI1 clarity is a strong starting point, but the decision should also include millimeter dimensions, a video of the actual stone, and confirmation of setting compatibility.
Buyers should also be aware that a grading report from one laboratory may differ slightly from a report on the same stone from another laboratory. Grading involves human judgment within established parameters, and minor variations in color or clarity grades between labs are not uncommon. The report is a reliable document of a stone’s characteristics, but it should be read as a descriptive tool, not an absolute final verdict. The stone itself, viewed in motion and in the intended setting, is the ultimate test.
Context on lab-grown diamond identification and terminology: The Gemological Institute of America (GIA) has published specific guidelines for describing lab-grown diamonds, including the use of terms like “laboratory-grown” rather than “synthetic” in consumer-facing communication to ensure clarity and avoid confusion with simulants.[1] This distinction is foundational for understanding why lab-grown diamonds behave identically to natural diamonds in a pendant setting — they share the same optical and physical properties — yet require transparent labeling so buyers know exactly what they are purchasing.[2]
Neckline Matching: How the Pendant Interacts with Clothing
The same pendant that looks elegant on a stand can look awkward when worn with the wrong neckline. Chain length, stone size, and setting style all interact with the cut of a shirt, dress, or sweater. Matching them deliberately prevents the pendant from competing with the clothing rather than complementing it.
Round and Crew Necklines
A round or crew neckline frames the collarbone and lower throat. A 16- to 18-inch chain that places the pendant at or just below the collarbone works naturally with this cut. The pendant fills the open space without crowding the neckline edge.
Stones larger than 1.5 carats tend to overwhelm round necklines, especially on smaller frames. The stone sits too close to the fabric boundary and creates visual clutter. Solitaire and bezel settings are cleaner choices here because they do not add extra width or visual weight. Halo and cluster designs spread horizontally and often clash with the curved line of a crew neck.
V-Neck and Deep Plunge
V-necklines and deep plunges create an open triangle that draws the eye downward. A longer chain of 18 to 20 inches allows the pendant to rest at the opening of the V, following its natural line rather than crossing it.
Pear and oval shapes mirror the V shape and extend the vertical line of the neckline. Three-stone pendants and drop designs also work well because their horizontal element is minimal and their vertical emphasis is strong. Round halos are the one design to avoid here. A circular halo fills the V opening rather than following it, making the pendant look like it is fighting the neckline rather than working with it.
Turtleneck and High Neck
Turtlenecks and high necklines cover the collarbone and throat entirely. A pendant worn against solid fabric needs to create contrast. A longer chain of 20 to 24 inches lets the pendant rest below the collar, where it stands out against the fabric rather than disappearing into it.
Single larger stones in the 1.5- to 2.5-carat range work best here because they provide enough visual weight to register against the clothing. Bezel settings are practical for turtlenecks because the smooth metal rim does not catch on knitwear the way prongs can. Small or delicate pendants should be avoided. Against a solid high neckline, they vanish.
Ordering a Lab-Grown Diamond Necklace: What to Confirm Before Purchase
Whether buying a ready-made piece or commissioning a custom design, a few specific confirmations separate a smooth purchase from a disappointing one. These checks focus on the stone’s actual physical dimensions, the setting’s construction, the security of the attachment, and the documentation behind the product.
Confirm the Stone’s Face-Up Dimensions, Not Just Carat Weight
Carat weight tells you how much the diamond weighs. It does not tell you how large it will look. A 1-carat round brilliant measures approximately 6.5mm in diameter. An oval of the same weight can measure 7.5mm by 5.5mm. A marquise may reach 10mm in length. These differences mean the same carat weight produces very different visual sizes depending on shape.
Always request the stone’s length and width in millimeters before purchase. Compare these dimensions against the setting’s prong opening or bezel frame to confirm the fit. A stone that fits comfortably within the setting looks intentional. A stone that barely fits or leaves excessive gap looks wrong.
Verify the Setting Type and Metal Thickness
For prong settings, confirm the number of prongs, the metal gauge, and the prong tip style. Four prongs are standard for pendant stones up to 1.5 carats. Six prongs provide additional security for larger stones. The metal gauge should be between 1.2mm and 1.5mm for a pendant — thinner than this risks bending, and thicker than this looks bulky on a necklace. Round prong tips reduce snagging on clothing.
For bezel settings, confirm the wall thickness. A full bezel should have a wall thickness between 0.8mm and 1.2mm. Partial bezels, which leave part of the stone exposed, require slightly thicker walls for structural integrity. The bezel should be high enough to protect the girdle but not so high that it hides the diamond’s crown.
Check the Chain Attachment Point
The bail or jump ring that connects the pendant to the chain is the most common failure point in a necklace. It must be soldered closed, not tension-closed or crimped. A tension-closed jump ring can open under the weight of the stone over time. A soldered joint is permanent.
The attachment point must also be centered on the pendant. An off-center bail causes the pendant to tilt forward or to one side during wear. This is a common problem with custom settings where the bail was positioned before the stone was set. For stones above 2 carats, the bail requires reinforcement with a thicker wire gauge of at least 1.5mm. Standard bails bend or pull open under the weight of a heavy diamond.
Request Certification and Visual Review
A grading report from an independent laboratory such as IGI, GIA, or GCAL can help confirm the stone’s cut, color, clarity, and carat weight, along with the report number that links back to the stone. Buyers should verify the report details through the issuing laboratory’s official verification tools where available.
Request a 360-degree video or real photographs of the actual stone, not generic lab stock photos or renderings. The video should show the stone in motion under varied lighting so you can evaluate its sparkle and cut performance. Confirm the report number on the lab’s website before completing the purchase. This single step eliminates the most common source of fraud and misrepresentation in diamond buying.
All diamonds discussed in this article with grading reports have been verified against official lab records where applicable. Independent verification is available through GIA’s online report check service, IGI’s report lookup, or GCAL’s certification verification page. This allows any buyer to confirm the stone’s documented characteristics directly with the issuing laboratory before committing to a purchase.
Before purchase, buyers should confirm documentation, return terms, resizing policies, and after-sales support directly with the seller.
For buyers, it is worth noting that a grading report documents the stone’s measurable characteristics, but it does not guarantee how the stone will look in motion against the chest. The report narrows the selection; the visual media and setting compatibility confirm the decision.
Understanding the Limits of a Grading Report
While a grading report is an important tool, it is helpful to understand exactly what it can and cannot tell you. The report documents the stone’s measurable characteristics under controlled laboratory conditions — its cut quality, color grade, clarity grade, carat weight, and certain proportions. What it does not capture is how the stone interacts with a specific setting, how it performs under the varied lighting conditions of daily wear, or how the chain length and pendant angle affect its appearance. These are factors the buyer or seller must evaluate through images, video, and direct comparison with the intended setting.
When a grading report is provided, buyers should verify the report details through the issuing laboratory’s official verification tools where available. GIA, IGI, and GCAL all maintain online databases that allow the report number, stone weight, and key measurements to be cross-checked against the laboratory’s original records, a resource outlined in a lab grown diamond jewelry guide. This verification step confirms that the document matches the physical stone and has not been altered or misattributed. It is a straightforward check that takes only a few minutes and adds a layer of assurance before any purchase is finalized.
A grading report can narrow the comparison, but it should be read alongside the stone’s proportions, visual evidence, and intended jewelry use. The report is a starting point, not the final verdict on how the piece will look when worn.
Footnote on disclosure and FTC guidance: The Federal Trade Commission (FTC) has issued guidance on how lab-grown diamonds should be disclosed in advertising — the term “diamond” alone is insufficient; the origin must be clearly and conspicuously stated, and claims about environmental or ethical benefits must be supported by competent and reliable evidence.[3] This regulatory backdrop reinforces the importance of relying on third-party grading reports and specific seller documentation rather than unverified marketing claims when selecting a lab-grown diamond necklace.
Everyday Durability: Cleaning, Storage, and Wear Considerations
A lab-grown diamond necklace is meant to be worn often, not stored away. But daily wear introduces conditions that affect both the stone and the setting over time. Understanding how to manage them keeps the piece looking as good as the day you bought it.
How Daily Wear Affects Lab-Grown Diamonds
Lab-grown diamonds measure 10 on the Mohs hardness scale, the same as natural diamonds. They resist scratching from metal, dust, and most hard surfaces. What they do not resist is impact. A sharp blow at the right angle can chip a diamond, particularly along the girdle (the widest edge) or at the culet (the bottom tip). This is rare with normal wear, but a necklace is more exposed to swinging, snagging, and bumping than a ring.
A bezel setting significantly reduces this risk because the metal rim covers the girdle entirely. Prong settings leave the girdle exposed, so a misdirected hit has a direct path to the stone. If you wear your necklace during physical activity or while working with your hands, the bezel is the safer structural choice.
The more common problem is not damage but dullness. Skin oils, lotion, sunscreen, and dust accumulate on the diamond’s surface and in the crevices around the setting. The stone does not lose its properties, but the layer of film blocks light entry, reducing brilliance and fire. A pendant that looked brilliant in the jewelry box can look flat after a few weeks of wear without any cleaning.
Cleaning Routine for Maximum Sparkle
The simplest and safest cleaning method requires nothing more than warm water, mild dish soap, and a soft-bristled brush. A small toothbrush or a dedicated jewelry brush works well. Soak the pendant for a few minutes, gently scrub the diamond and the setting, rinse with clean water, and dry with a lint-free cloth. Doing this once a week keeps oil buildup from becoming visible.
Avoid ultrasonic cleaners if the stone contains visible inclusions or if it is a treated diamond. The vibration can widen existing fractures in included stones. For most lab-grown diamonds with clean clarity grades, an ultrasonic cleaner is safe, but the gentle brush method is always sufficient and carries zero risk.
Pay extra attention to bezel and halo settings. Oils and dirt collect under the bezel rim and between the small stones in a halo. A soft brush angled under the rim and between the diamonds removes buildup that a simple rinse will not reach. Neglecting these areas leads to a clouded appearance that no amount of surface wiping can fix.
Storage and Travel Tips
Store the necklace in a soft pouch or a lined jewelry box with separate compartments. The goal is to prevent the pendant and chain from contacting other metal pieces or harder stones. Diamonds can scratch gold and platinum, and other jewelry can scuff the chain. Loose storage in a drawer or handbag invites tangling, scratching, and damage to the setting.
For travel, a foldable jewelry roll with padded slots or a hard case with foam inserts offers solid protection. Do not toss the necklace into a toiletry bag or carry-on pocket. Chain knots, bent prongs, and snapped bails are almost always the result of casual handling during transit.
Make it a habit to remove the necklace before swimming, showering, sleeping, or applying perfumes, lotions, and hair products. Chlorine and salt water can weaken gold alloys over time. Sleeping in a necklace adds unnecessary stress to the chain and the bail connection. Lotions and sprays accelerate the buildup that dims the stone. These are simple habits, but they are the difference between a piece that lasts decades and one that needs repairs within a year.
Budget Allocation: Where to Spend and Where to Save
A lab-grown diamond necklace does not require the same budget logic as an engagement ring. The priorities shift because the stone is viewed from farther away, in motion, and often against fabric rather than skin. Understanding where the money actually makes a visible difference helps you avoid overspending on characteristics that will never be noticed.
Stone vs. Setting vs. Chain: Typical Budget Split
For a lab-grown diamond necklace, a reasonable breakdown is 50 to 60 percent for the stone, 20 to 30 percent for the setting and chain combined, and 10 to 20 percent for craftsmanship and design. This differs from an engagement ring, where the stone typically takes 60 to 70 percent of the total.
The reason is simple. In a necklace, the setting, chain, and construction quality affect how the piece wears, how secure the stone is, and how the pendant sits against the body. A thin chain or a flimsy bail undermines even the most beautiful diamond. The budget should reflect that the necklace functions as a complete piece, not just a stone with some metal attached.
Where to Spend More
The highest-impact investment is cut quality. A lab-grown diamond graded Excellent or Ideal in cut will produce consistent sparkle when the pendant moves. That movement is the main event in a necklace. No other factor, not carat weight, not color, not clarity, compensates for a stone that does not return light well in motion. Cut is the one variable you should not compromise on.
Spend on the setting and chain construction as well. A well-made setting uses thicker metal, typically 1.2 to 1.5 millimeters for prongs and 0.8 to 1.2 millimeters for a bezel wall. The bail should be soldered closed, not tension-closed. The chain should be solid 14k or 18k gold. Gold-filled or plated chains wear through at contact points within months, and a broken chain means a lost pendant. These are not places to cut corners.
Where to Save
Color and clarity are the two categories where most necklace buyers can comfortably save. A stone graded G, H, or I (near-colorless) looks white in nearly every pendant setting, especially against white gold or platinum. The difference between a D-color stone and a G-color stone is essentially invisible at necklace viewing distance, but the price gap can be significant.
Clarity follows the same logic. Inclusions visible at SI1 or SI2 under 10x magnification are rarely visible to the naked eye when the stone is suspended, in motion, and 12 to 18 inches away. Paying for VS1 or VVS clarity in a pendant under 1.5 carats is almost always unnecessary. The money saved by moving from D-F color and VS clarity down to G-H color and SI1 clarity can fund a larger stone, a better setting, or a higher-quality chain.
Setting complexity is another area where restraint pays off. A simple solitaire or bezel setting costs less than a halo or three-stone design, requires less maintenance, and leaves fewer places for dirt to accumulate. If your priority is a clean, timeless look that stays easy to clean, the simpler setting is both cheaper and more practical.
How to Approach Price Comparisons
Prices for lab-grown diamond necklaces vary significantly depending on the stone’s cut quality, carat weight, color and clarity grades, report type, setting complexity, metal type, and seller channel. A direct comparison between two necklaces should account for all of these factors. A lower price for one stone may reflect a lower cut grade or a thinner setting, not necessarily better value.
Buyers should compare like-for-like specifications before treating one option as a better deal. The most useful comparison points are the stone’s millimeter dimensions, cut grade, and the setting’s metal weight and construction quality. Prices can change with market conditions, report type, and stone-specific details, so exact comparisons should be verified at the time of purchase. The goal is not to find the absolute lowest price, but to find the piece where the specifications match the intended use and the price reflects the quality of the stone and setting together.
Frequently Asked Questions
Can I Use an Engagement Ring Stone for a Pendant?
Yes, but the setting must be designed for pendant wear, not repurposed from a ring mount. An engagement ring stone may have a girdle thickness, pavilion angle, or culet size that was optimized for a ring setting. Those same proportions can cause the stone to sit poorly in a pendant setting, tilt forward, or catch on clothing. Have the stone measured and evaluated by a jeweler who understands pendant geometry before ordering a custom setting.
Is a Lab-Grown Diamond Necklace Less Valuable Than a Natural One?
Lab-grown diamonds generally have a different resale dynamic than natural diamonds, similar to how a new car depreciates more than a classic car. The purchase price is often lower for the same carat weight, color, clarity, and cut quality. Most buyers choose lab-grown for affordability and transparency, not as an investment. If long-term resale value is a primary concern, it is worth understanding that the market for lab-grown diamonds differs from that for natural diamonds. If you want a beautiful diamond necklace at a more accessible price point, lab-grown makes clear sense.
How Do I Know If a Lab-Grown Diamond Pendant Is High Quality?
Start with the grading report. Cut should be Excellent or Ideal. Color should be D through H. Clarity should be SI1 or better. These three grades define the stone’s baseline quality. Then request a video or photograph of the actual stone, not a stock image. Verify the report number on the lab’s website to confirm it matches. Finally, inspect the setting. Even prongs, a securely soldered bail, and a smooth finish without rough edges are signs of competent craftsmanship. If any of these are missing, the piece is not high quality regardless of what the stone report says.
It is worth adding that a high-quality piece is not defined solely by the stone’s grades. The way the setting and chain are constructed, the precision of the bail attachment, and the overall finishing all contribute to how the necklace performs and lasts. A stone with impressive grades in a poorly made setting will not wear well.
Do Lab-Grown Diamonds Sparkle Differently Than Natural Diamonds?
No. Lab-grown diamonds have the same refractive index, dispersion, and crystal structure as natural diamonds. A well-cut lab-grown stone produces the same fire, scintillation, and brilliance as a well-cut natural stone of the same cut quality. The only difference is origin. If a viewer cannot tell the two apart under a loupe, they certainly cannot tell them apart from a foot away on a moving pendant.
How Do Growth Methods (HPHT vs. CVD) Affect Necklace Performance?
Both HPHT (high-pressure high-temperature) and CVD (chemical vapor deposition) produce diamonds with identical crystal structure and optical properties to natural diamonds. The GIA notes that both methods create real diamond, not imitations, and that telling them apart requires advanced laboratory equipment.[4] From a pendant-wear perspective, the growth method has no visible effect on sparkle, fire, or durability — those qualities depend on cut precision, not the growth process. Some CVD-grown diamonds may undergo post-growth treatment to enhance color, which the grading report will mention. Buyers should check the report for any treatment notation, but the growth method itself does not determine necklace quality.
NUVU’s Approach to Lab-Grown Diamond Necklaces
The information in this guide is useful only if it translates into a better buying experience. That is the starting point for how we approach lab-grown diamond necklaces at NUVU. The goal is to give buyers the data, the visual confirmation, and the design flexibility to make a decision they feel good about, without guesswork or pressure.
Stone Selection and Setting Guidance
Choosing a lab-grown diamond for a pendant is straightforward when you have the right information. At NUVU, every loose stone is offered with a full grading report from an independent lab such as IGI or GCAL, along with face-up dimensions in millimeters and a 360-degree video of the actual diamond, not a generic image. This matters for necklaces more than many buyers realize, because a 1-carat round and a 1-carat oval have very different surface areas and will behave differently in the same setting. Before locking in a purchase, our team reviews the setting compatibility, prong or bezel opening, and chain attachment to confirm the stone fits the design physically, not just on paper.
Custom Design Support
If the ready-made options do not match the intended look, a custom pendant removes the compromise. The process is structured: choose the diamond shape and grade, select the setting style and metal type, decide on the chain length and finish, and refine the details. For a buyer who wants a bezel-set pear on an 18-inch rose gold chain at a specific carat weight, that is not a special request. It is a standard custom path we walk through regularly. The same design logic from this guide—proportion, setting tradeoffs, necklace performance—applies to every custom piece. The difference is that every variable is chosen by the buyer rather than pre-assembled.
Transparency Before Purchase
No purchase should depend on trust alone when the information exists to verify it. Before committing, every buyer receives the grading report, real photographs or video of the actual stone, written confirmation of the setting and chain specifications, and the face-up dimensions. There are no stock photos, no ambiguous descriptions, and no hidden decisions made after the order is placed. The goal is to let the buyer review everything ahead of time, ask whatever questions remain, and confirm that the necklace matches what was agreed upon. That is the standard that makes a modern buying process reliable.
[1] Gemological Institute of America, “Lab-Grown Diamonds,” GIA.edu, accessed 2025. Learn more about lab-grown diamond identification and terminology at GIA.
[2] Gemological Institute of America, “The Difference Between Lab-Grown and Natural Diamonds,” GIA.edu, accessed 2025. Read the basics of lab-grown diamond identification at GIA.
[3] Federal Trade Commission, “Guides for the Jewelry, Precious Metals, and Pewter Industries,” FTC.gov, 16 CFR Part 23, revised 2018. View the FTC Jewelry Guides on disclosure and environmental claims.
[4] Gemological Institute of America, “HPHT and CVD Diamond Growth Processes,” GIA.edu, accessed 2025. Read about HPHT and CVD diamond growth processes at GIA.
Disclosure: This article is for general educational purposes only. Diamond grading, pricing, availability, specifications, and seller policies can change, and readers should verify important details through grading reports, official laboratory tools, seller documentation, or qualified professionals before making a purchase decision. Laboratory-grown diamonds should be clearly distinguished from natural diamonds, and environmental or sourcing claims should be supported by specific documentation.