
Setting a budget for a lab-grown diamond engagement ring means making real tradeoffs between the center stone, the setting, and the finishing details. If you put too much toward carat weight, you might end up with a stone that looks dull or a setting that feels cheap. If you overspend on platinum or intricate pave, best metal for lab grown diamonds, the diamond itself may look smaller than you hoped. This guide helps you see exactly where your money goes and how to balance size, quality, and setting cost so your ring looks its best without waste.
For the full framework, read Lab-Grown Diamond Engagement Rings Guide.
You’ll learn how to allocate across the three cost categories, which 4Cs you can relax without visible loss, and how to keep your ring durable within your spending limit. The focus is on practical decisions for real buyers.
| Budget Priority | Best Approach | Common Mistake |
|---|---|---|
| Stone vs. Setting Balance | Spend 60–70% on the diamond, 25–30% on the setting | Over-spending on setting leaves the stone undersized |
| Cut Quality | Always choose Ideal or Excellent cut first | Saving on cut makes the stone look smaller and duller |
| Color and Clarity Tradeoff | Drop to G–H color and VS2–SI1 clarity | Paying for D color or VVS clarity with no visible gain |
| Setting Style | Solitaire for best budget efficiency; micro-pave at $5,000+ | Complex settings that eat budget without improving durability |
| Hidden Costs | Budget 5–10% extra for grading reports, shipping, and appraisal | Ignoring these fees and going over budget |
| Stone-to-Setting Ratio | Aim for a 2.0–2.5 cost ratio (stone to setting) | Buying a stone more than 3x the setting cost, making it look mismatched |
Quick Questions Before You Read
Q: Can I get a 2-carat lab-grown diamond on a $3,000 budget?
Yes, but you would have to compromise on cut quality or setting durability, which often results in a ring that doesn’t look good in person. Most buyers get better visual results with a well-cut 1.5- to 1.8-carat stone.
Q: Is it safe to buy the stone and setting from different sellers?
It is possible, but it adds risk with returns, delays, and fit. Buying both from one seller usually balances selection, cost, and peace of mind better for first-time buyers.
Q: Do I need a platinum setting to protect the diamond?
No. Platinum costs $300–$800 more than 14k or 18k gold and requires regular polishing. For most buyers, a well-made gold setting with a secure head is just as durable and more budget-friendly.
Q: How much should I save for hidden fees?
Plan for about 5–10% of your total budget for costs like an IGI grading report, insured shipping, and a local appraisal. These are easy to overlook but can add $200–$500.
Why Most Engagement Ring Budgets Are Misallocated
Most first-time buyers approach an engagement ring budget in the wrong order. They decide on a total number, then spend as much as possible on the diamond, often treating the setting as whatever is left over. This sounds logical until the ring is finished. A top-heavy allocation frequently produces a ring that looks smaller than expected, because the setting lacks the structural presence or design quality to present the stone well. In some cases, an underbuilt setting can even put the diamond at risk.
The mistake is not spending on the diamond. The mistake is treating the budget as a single variable when it should be treated as three separate ones: the stone, the setting, and the remaining costs that make the ring wearable.
The Typical Buyer’s Mistake: Over-Investing in the Diamond, Under-Investing in the Setting
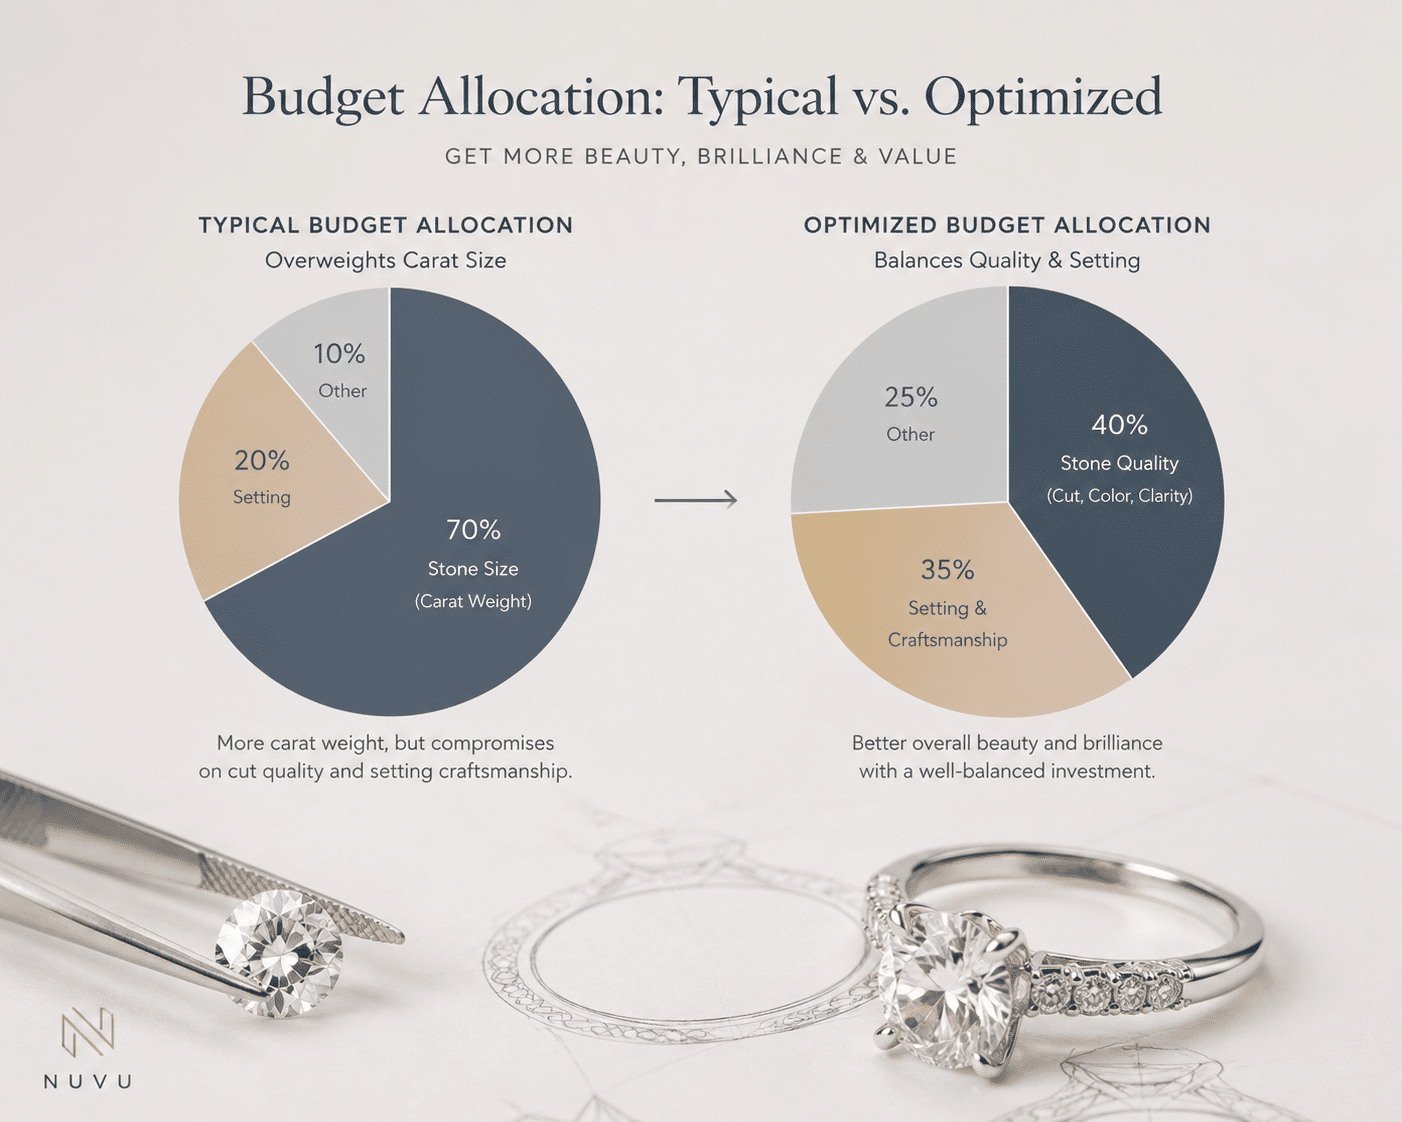
Buyers naturally gravitate toward the most visible number: carat weight. A larger number feels like a better outcome. But a diamond that takes up most of the budget often forces compromises in the setting. The result is a ring with a thin shank, simple prongs, and no design detail around the stone. That combination actually makes the diamond look smaller and less impressive than a well-proportioned stone in a properly built setting.
This is a tradeoff, not a rule. A larger stone in a minimal setting can work if the wearer prefers a clean, modern look. But when buyers choose a large stone and a cheap setting purely to maximize size on paper, the final ring usually underperforms visually. The setting is not just a holder for the diamond. It frames the stone, protects it, and determines how light moves through it from every angle.
The NUVU Allocation Framework: Stone First, Setting Second, But Proportioned Correctly
A more reliable approach starts with a clear split. For most engagement rings, a reasonable allocation is 60–70% of the total budget on the lab-grown diamond, 25–30% on the setting, and 5–10% reserved for craftsmanship, taxes, shipping, and any adjustments after delivery. This split changes depending on the shape of the diamond, the complexity of the setting, and the metal chosen. A round brilliant in a simple solitaire setting leans toward the lower end of the setting budget. An oval or pear in a micro-pave or hidden-halo setting pulls more money toward the setting side because the labor and material costs are higher.
The point is not to spend a fixed percentage. The point is to decide the allocation consciously before you start comparing stones. If you begin with a clear split, you avoid the trap of choosing a stone first and then discovering the remaining budget is too small for a setting that will actually support it well.
What to Check Before You Decide
- Confirm whether the setting cost is quoted as a base price or includes all labor, head, and prong work.
- Ask whether the stone price includes loose diamond certification or is charged as an additional fee.
- Verify whether metal upgrades (e.g., platinum over 14K white gold) are priced per gram or as a flat surcharge.
What the Lab-Grown Diamond Market Actually Costs at Each Quality Level
Lab-grown diamond pricing follows its own logic, which differs from natural diamond pricing in ways that matter for budget planning. Understanding the real price ranges at each quality level allows you to set realistic expectations before you start looking at settings.
How Carat Weight Changes Price Efficiently in Lab-Grown Diamonds
Lab-grown diamond prices scale more gently with carat weight than natural diamonds. The price jump from 1.0 carat to 1.5 carats is noticeable but not dramatic. The real value sweet spot falls between 1.5 and 2.5 carats, where you get a visibly substantial stone without paying a premium for crossing an arbitrary weight threshold.
Typical per-carat pricing varies by shape. Rounds tend to cost slightly more due to cutting complexity and rough yield loss. Ovals and cushions generally fall into a lower per-carat range because they retain more rough material. Pears sit somewhere in the middle. A 1.5 carat round, for example, might cost $600–$900 per carat depending on cut and color, while a comparable oval may run $500–$750 per carat. These ranges shift with market supply, but the shape-based hierarchy remains consistent.
Cut Quality as the Highest-Return Investment in the Stone
Cut quality is the single most important factor in how a lab-grown diamond looks. A well-cut stone reflects light efficiently, producing the brightness and sparkle that people notice first. A poorly cut stone, even if it is large and colorless, will appear dull and lifeless. This is not a subtle difference. Side by side, an Excellent cut one-carat round will outperform a Very Good cut 1.5 carat round in visual performance every time.
For round brilliants, the relevant proportion ranges are well established: a table between 54% and 57%, depth between 60% and 62.5%, crown angle between 34 and 35 degrees, and pavilion angle between 40.6 and 41 degrees. Fancy shapes require a different approach. For ovals, the length-to-width ratio and bow-tie effect matter more than any single proportion number. For cushions, the depth and the size of the culet affect how light exits the stone. Cut grading systems for fancy shapes are less standardized, which means visual inspection and video review become more important than a single grade.
What to Check Before You Decide
- Confirm the lab-grown diamond’s cut grade is explicitly stated on the grading report, not just listed as “Good” or “Very Good.”
- For fancy shapes, ask for the actual measurements (length, width, depth) rather than relying on carat weight alone.
- Verify that the seller provides a 360-degree video or high-resolution image under natural and LED lighting.
When a grading report is provided, buyers should verify the report details through the issuing laboratory’s official report-check tools, where available. Comparing the report with visual evidence such as high-resolution video or in-person inspection helps confirm the stone’s actual appearance before purchase.
Color and Clarity: Where to Save and Where Not to Compromise
Color and clarity are the two areas where most buyers can save without noticeably affecting the ring’s appearance. The reason is simple: the setting metal and the lighting environment influence how these grades are perceived.
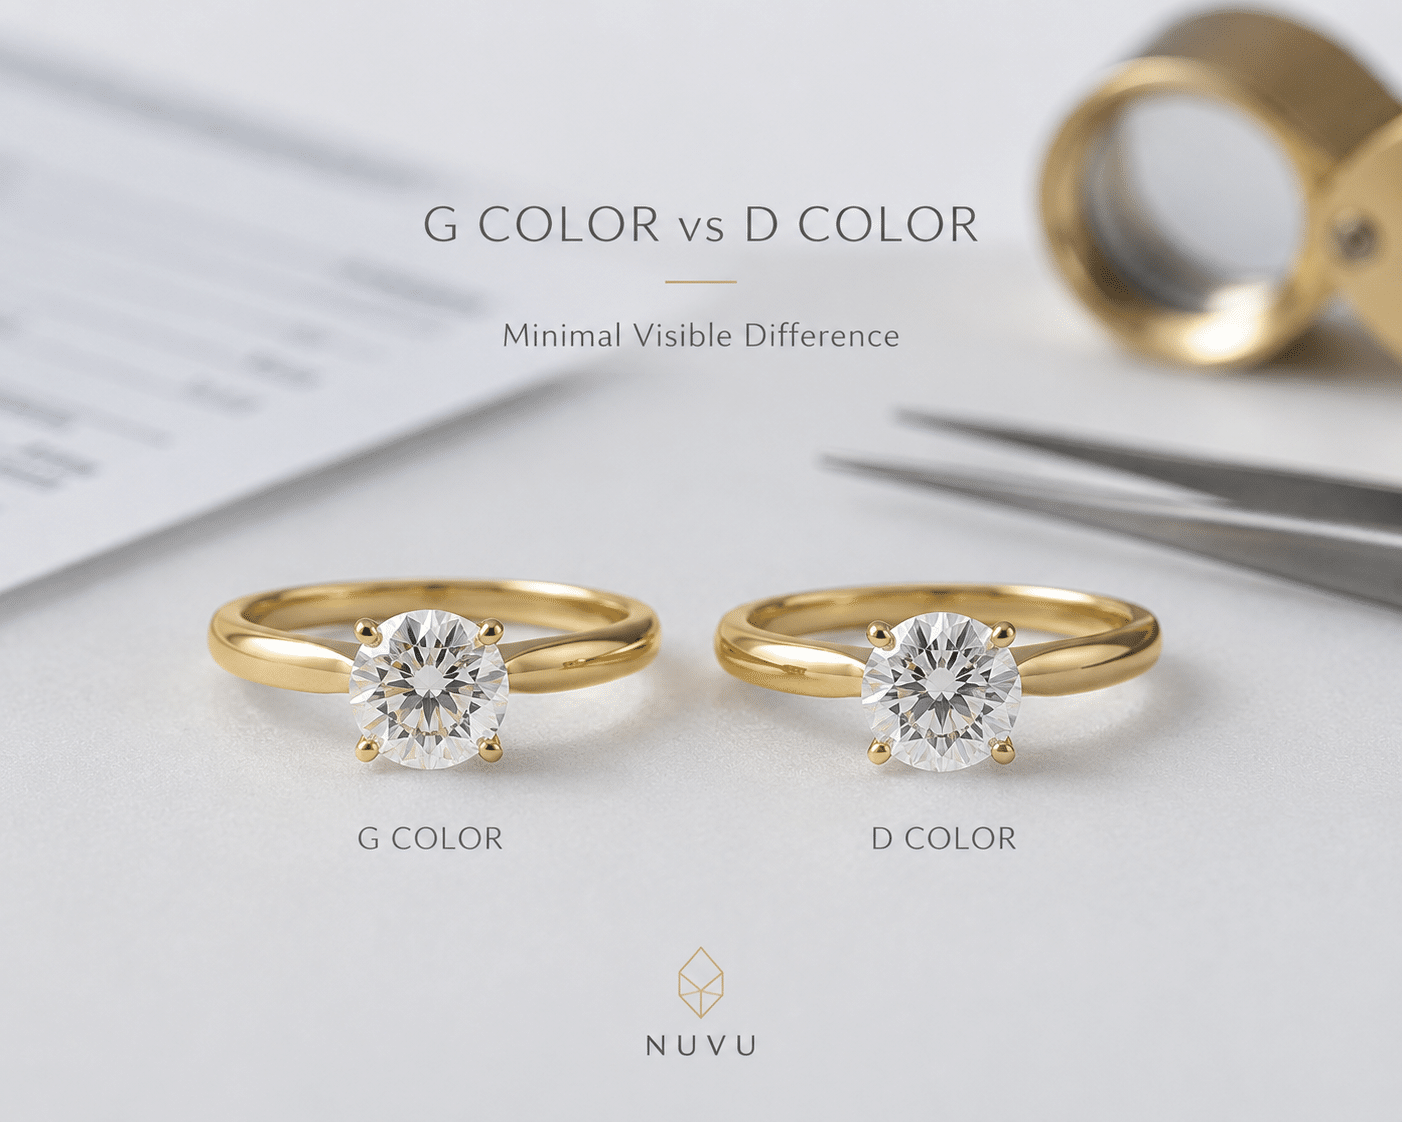
In yellow or rose gold settings, a G or H color lab-grown diamond looks visually identical to a D or E color stone. The warm metal absorbs the slight tint, and the difference disappears. In white gold or platinum, G–H still performs well, especially in daylight or mixed indoor lighting. Only under direct, cool overhead light is a subtle warmth sometimes visible, and even then, most observers will not notice without a direct comparison.
For clarity, VS2 and SI1 are the practical sweet spots. Lab-grown diamonds typically have fewer and smaller inclusions than natural diamonds at equivalent clarity grades, so an SI1 stone is often eye-clean. SI2 requires caution. Inclusions at this grade can be visible to the naked eye, depending on their location and color. If you are considering SI2, verify the stone is clean in person or through high-resolution video before committing.
How the Setting Cost Changes the Budget Equation
The setting is not a secondary detail. It determines how the diamond sits on the finger, how much light reaches the stone, and how the ring holds up over years of daily wear. Setting costs vary significantly based on construction, metal, and whether the setting is custom or ready-made.
How Setting Construction Affects Total Cost: Solitaire, Halo, Three-Stone, and Pave
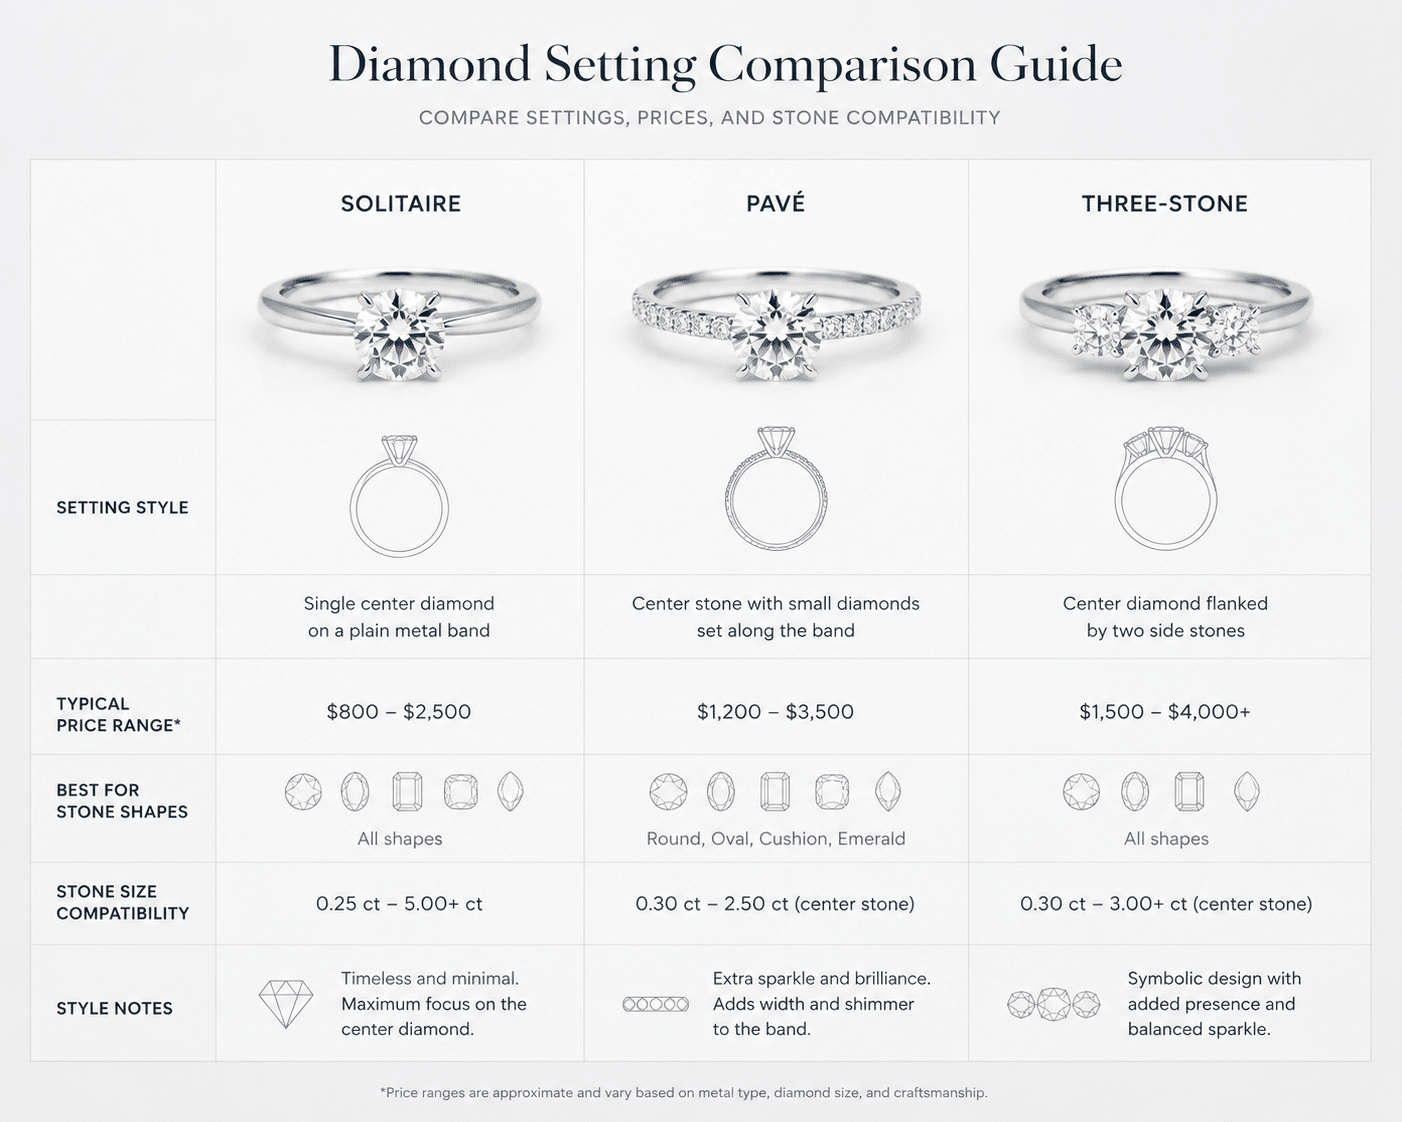
A solitaire setting with a simple four-prong or six-prong head is the most budget-efficient option. In 14K white gold, a well-made solitaire typically costs $300–$600. The construction is straightforward: a head, a shank, and a small amount of labor to set the stone. There are no extra details to drive up time or material cost.
Pave and micro-pave settings introduce small diamonds along the shank. Every stone requires individual setting work, which adds labor time and precision requirements. A pave setting in 14K white gold usually ranges from $600–$1,200, depending on the number and quality of the accent stones.
Channel-set and hidden-halo settings fall into a similar labor-intensive category. Channel setting requires precise groove cutting and stone alignment. Hidden halos require a separate ring of small diamonds beneath the center stone, which adds both material and assembly cost. These settings typically run $800–$1,500. Three-stone settings vary widely depending on the size of the side stones, but expect $700–$1,400 for a well-built version in 14K white gold.
For buyers, it is useful to understand that a setting’s price tag reflects not just the metal weight but also the jeweler’s bench time. A complex setting may cost more in labor than in materials, which is worth knowing when comparing quotes from different sellers. A slightly higher setting price sometimes indicates better craftsmanship rather than simply more gold or more small diamonds.
Metal Selection: Platinum vs Gold and the Real Price Difference
Platinum costs roughly two to three times more than 14K white gold per gram. For a typical engagement ring setting, this difference translates to $300–$800 in added cost. Platinum is denser and more durable, which makes it a practical choice for thin-band settings where the shank needs extra strength without appearing bulky. It also develops a natural patina over time, which some buyers prefer and others dislike.
18K yellow and rose gold sit between 14K white gold and platinum in price. The higher gold content gives the metal a richer color but makes it slightly softer, which matters for settings with delicate pave work and for effective engagement ring combinations, as metal properties influence both. 14K white gold is harder and more scratch-resistant but requires periodic rhodium plating to maintain its bright white finish. The choice between metals is partly aesthetic and partly practical, and the price difference should be weighed against how the ring will be worn.
Stone-to-Setting Fit Check
- Confirm that the setting head is specifically designed for the stone’s exact measurements (depth and width), not just its carat weight.
- For thin-shank settings under 2.0mm, verify that the shank width can support the stone weight without bending.
- Ask whether the setting price includes prong tipping (for security) and a final polish after stone setting.
Custom vs Ready-Made Settings: When the Extra Cost Is Worth It
Custom settings add $300–$1,000 or more in design and CAD/CAM costs. The premium is justified when the stone has unusual proportions, when the design requires a specific shared band or matching wedding ring, or when the buyer wants a look that simply does not exist in catalog offerings. For these cases, the extra cost is a necessary investment in fit and finish.
Ready-made or catalog settings are produced in standard sizes and configurations. They cost less because the design, tooling, and production process are already established. The main limitation is selection. If a buyer wants a specific prong style, band profile, or stone orientation that is not offered, a catalog setting will not work. For standard round or oval stones in common sizes, ready-made settings offer reliable quality at a predictable price.
Balancing Stone Size and Setting Quality: The Real Tradeoffs
The most difficult part of planning an engagement ring budget is the moment you realize you cannot maximize everything at once. A bigger stone pulls dollars away from the setting. A more elaborate setting pulls dollars away from the stone. The question is not which option is universally better, but which option suits your priorities, your ring size, and how the ring will actually be worn.
Two scenarios illustrate how this tradeoff plays out at different budget levels.
Scenario 1: Maximum Visual Impact on a $3,000 Total Budget
At $3,000 total, every dollar must work hard. The most effective allocation puts roughly $2,000 into the lab-grown diamond itself. That buys a 1.5 to 1.8 carat round brilliant in the G–H color range, VS2 clarity, with an Ideal cut grade. This is not the highest color or the highest clarity available at this price, but it is the combination that delivers the most visual return.
The remaining $700 to $800 goes into a solitaire or simple pave setting in 14K white or yellow gold. A solitaire with a four-prong or six-prong head is the most budget-efficient setting because it requires less labor, less metal, and fewer small diamonds. A simple pave band adds some extra sparkle without the cost of a full halo or micro-pave build.
The remaining $200 to $300 covers craftsmanship, insured shipping, and applicable taxes.
Why this allocation works: the Ideal cut grade ensures the diamond produces strong brilliance and fire, which makes the stone look lively even in lower light. The G–H color is visually indistinguishable from higher grades in a yellow gold setting, and nearly indistinguishable in white gold. The 1.5 to 1.8 carat size reads clearly as a substantial diamond on most finger sizes. Meanwhile, the simple setting does not compete for attention, it frames the stone cleanly. The end result looks like a ring that cost more than $3,000, because the money went into the stone’s actual performance rather than into decorative metalwork.
Scenario 2: Prioritizing Setting Complexity on a $5,000 Total Budget
At $5,000, the buyer has more room to allocate toward the setting without shrinking the stone to an unsatisfying size. A good split puts $3,000 to $3,500 into a 1.8 to 2.2 carat lab-grown diamond, again in the G–H color range, VS1 to SI1 clarity, with an Excellent cut grade. This is slightly larger and slightly higher in clarity than the first scenario, but the real shift is in the setting budget.
The setting allocation of $1,200 to $1,500 opens the door to a micro-pave or hidden-halo setting in platinum or 18K gold. These setting styles require significantly more bench time. Micro-pave involves setting multiple small diamonds into precision-cut channels, and hidden halos add a ring of diamonds beneath the center stone that creates a floating effect. Both styles add labor cost, metal cost, and small diamond cost. Platinum adds another premium because it is denser and heavier than gold, and it requires more skill to work with.
The remaining $300 to $500 covers craftsmanship, taxes, and any upgrades such as a comfort-fit shank or engraved detail.
Why this allocation works: at 1.8 to 2.2 carats, the diamond is large enough to hold its own visually even in a complex setting. The micro-pave or hidden halo adds brilliance around the stone, which can make the center diamond appear slightly larger and more luminous. The platinum or 18K metal choice adds weight and durability, which matters for a setting with many small stones that need a stable foundation. The tradeoff is real: a simpler setting could have allowed a 2.5 carat stone at this budget, but the visual impact of a well-constructed halo or pave ring with a 2.0 carat center stone often beats a larger stone in a bare-bones setting.
What This Means in a Real Purchase
A smaller stone in a high-quality setting can look more polished and more intentional than a larger stone dropped into a thin, simple head. The setting is what the eye registers first in many lighting conditions, especially at arm’s length.
A 0.3 carat difference between two stones is rarely noticeable once the ring is on the finger. The difference between a well-built setting and a poorly constructed one is immediately visible, and it affects durability.
The real decision comes down to whether you value size-per-dollar or finish-per-dollar as the primary metric. Neither is wrong, but knowing which one matters more to you will determine whether the ring feels like a smart buy or a compromise.
Certification Costs and Hidden Fees in a Lab-Grown Diamond Ring
Most buyers focus entirely on the stone price and the setting price, then discover at checkout that the total is $200 to $500 higher than expected. These additional costs are not hidden for deceptive reasons, they are simply line items that inexperienced buyers do not think to ask about. Knowing them in advance prevents the unpleasant surprise of a budget that no longer works.
Grading Reports: Included Cost or Add-On?
A grading report, often called a certificate, is not always included in the stone price. Some sellers include IGI or GCAL certification as a standard part of the sale. Others charge $75 to $150 separately for the same report. GIA reports for lab-grown diamonds are much less common and may add $200 to $400 when available.
IGI is the most widely used and most practical standard for lab-grown diamonds. IGI reports are consistent, widely accepted by jewelers and insurers, and generally included in the stone price by reputable sellers. GCAL is another reliable option, particularly for stones where cut precision and light performance are emphasized. GIA entry into lab-grown grading is relatively recent, and while GIA carries strong brand recognition from the natural diamond world, the practical advantage for a lab-grown stone is minimal compared to the cost difference.
The key point: before you compare stone prices between sellers, confirm whether the quoted price includes a grading report. A stone listed at $2,000 with a free IGI report is effectively a better deal than a stone listed at $1,900 with a $150 certification fee added at checkout.
For the buyer, the practical value of a grading report lies not in its brand but in its accuracy and completeness. The report documents the stone’s defining characteristics, but it does not guarantee the stone’s beauty or its suitability for a specific setting. A certificate narrows the field of candidates, but the final decision should still be based on visual performance and fit.
Shipping, Insurance, Resizing, and Appraisal: The Hidden 5–10%
The small costs add up quickly. Insured shipping for a loose stone typically runs $20 to $50. Shipping for a finished ring costs $30 to $80, depending on the carrier and insurance level. If the ring needs resizing after delivery, that is another $50 to $150, depending on the metal and the amount of size adjustment.
A professional appraisal for insurance purposes costs $75 to $150. This is not optional if you want the ring covered under a homeowners or renters policy. Some sellers provide an appraisal document as part of the purchase, others do not. Confirm this before buying.
On a mid-budget ring in the $3,000 to $5,000 range, these line items total roughly $200 to $400. That is 5 to 10 percent of the budget that should be accounted for before you commit to a stone and setting.
Buying Path Comparison: Custom Ring vs Pre-Set Ring vs Stone + Setting from One Seller
How you buy matters as much as what you buy. The same stone and setting can cost different amounts and carry different levels of risk depending on whether the purchase is handled by one seller or split across multiple vendors.
Buying Stone and Setting from One Seller (NUVU Model)
Buying both the loose stone and the setting from a single seller eliminates most coordination problems. The seller is responsible for ensuring the stone measurements match the setting head, that the prongs are correctly positioned, and that the final assembly is done correctly. If something goes wrong, there is one point of contact. There are no disputes between vendors about who caused a fit issue or who should cover the cost of a fix.
This path typically avoids separate coordination fees. The seller absorbs the assembly cost into the total price. The buyer sees one quote, one shipping charge, and one return policy. For most buyers, this is the cleanest path, especially in the $3,000 to $7,000 range where selection is broad but coordination mistakes can be expensive.
Buying Loose Stone and Setting Separately
Buying a loose stone from one source and a setting from another introduces unavoidable coordination costs. The stone must be shipped to the setting maker or to an independent bench jeweler for assembly. That adds $100 to $300 in bench fees. An appraisal will likely be needed, adding another $75 to $150. Shipping both ways adds more.
The bigger risk is fit. Even when a setting is listed as compatible with a certain carat weight range, the actual fit depends on the stone’s exact measurements: depth, width, and girdle thickness. If the stone does not seat correctly, the setting may need to be modified or rebuilt, which adds time and money.
This path can add $200 to $500 in total cost compared to a single-seller purchase. It makes sense only when the buyer needs a very specific stone and a very specific setting that no single seller offers together. For most buyers, the extra cost and risk are not worth it.
Buying a Pre-Set Lab-Grown Diamond Ring
A pre-set ring is one where the stone and setting are already assembled and sold as a finished unit. This is the most cost-efficient path because there is no separate sourcing, no assembly fee, and no coordination risk. The seller buys the stone and setting as a package and passes the savings along.
The tradeoff is selection. Pre-set rings are available only in the shapes, sizes, and setting styles the seller has already produced, as detailed in the lab grown diamond engagement rings guide. If you want a specific carat weight, a non-standard shape, or a particular metal finish, a pre-set ring may not offer it. The setting quality and stone quality are also fixed; you cannot upgrade the cut grade or swap the metal without moving to a custom path.
For buyers with a total budget under $2,500, a pre-set ring is often the best value. For buyers who have a clear preference for a standard design, it is also a strong option.
What This Means in a Real Purchase
If your total budget is under $2,500, a pre-set ring will generally deliver the best ring for the money. There is simply not enough budget left after separate sourcing to match the value of a pre-assembled unit.
If your budget falls between $3,000 and $7,000, buying the stone and setting from one seller offers the best balance of selection, cost, and risk control. You get to choose the specific stone and the specific setting, but the coordination burden stays with the seller.
If you require a very specific shape, an unusual carat weight, or a fully custom setting design, separate sourcing may be necessary. Just be prepared for the extra cost, the longer timeline, and the need to verify fit yourself.
How to Prioritize When You Have to Compromise
Every engagement ring budget requires tradeoffs. The question is which tradeoffs hurt the final result least. Most first-time buyers compress the wrong variable first, usually carat size, and only later realize that a smaller diamond with better proportions and a solid setting looks more impressive than a larger stone that performs poorly or sits in a flimsy mount.
Decision Ladder: What to Compromise First, Second, and Third
The following priority list assumes you want the best visual outcome for a fixed total budget. Steps earlier in the ladder should be adjusted only after later steps have been fully exhausted.
1. Cut quality — never compromise. Cut determines how much light returns to the eye. A well-cut lab-grown diamond hides minor color and clarity imperfections. A poorly cut stone looks dull and lifeless regardless of its other grades. For round brilliants, insist on Excellent or Ideal. For fancy shapes, verify actual proportions and light return rather than relying on the cut grade alone.
2. Setting solidity — resist the urge to save here. A thin shank (under 1.8mm) or weak prongs risk bending, stone loss, or long-term damage. This is not a place to cut cost. If the budget is tight, simplify the setting style before reducing shank thickness or switching to a less durable metal. A plain solitaire in solid 14K gold will outlast a pave setting in thin 10K gold.
3. Color — safe to drop from D–E to G–H. This move typically saves 10–20% on the stone cost. In yellow or rose gold, G–H is visually indistinguishable from higher grades. In white gold or platinum, G–H still performs well against the metal. Only drop to I–J if the setting is yellow gold and you accept a very faint warmth.
4. Carat weight — reduce by 0.2–0.3 carats. Dropping from 2.0 to 1.7 carats is rarely noticeable on the finger but can free $300–$600 for better cut quality or a stronger setting. Most buyers overestimate how much difference a few tenths of a carat makes in the finished ring.
5. Clarity — compromise from VS1 to SI1 if eye-clean is verified. Eye-clean SI1 lab-grown diamonds cost significantly less than VS1 and look identical to an untrained observer under normal viewing conditions. Never accept SI2 without confirming it is completely clean to the naked eye from all angles.
6. Setting complexity — simplify before lowering metal quality. A solitaire or classic six-prong setting costs roughly half what a micro-pave or hidden-halo design costs. Switching from pave to solitaire frees $400–$800 without affecting the durability of the ring. If you still want detail, upgrade the metal afterward.
The Quick Budget Calculator Formula
Before committing to a purchase, calculate your stone-to-setting ratio as a simple sanity check.
Ratio = Stone Price ÷ Setting Price
For most mid-range engagement rings, a ratio between 2.0 and 2.5 is reasonable. This means the diamond costs roughly twice what the setting costs. For a ring with a more elaborate setting, such as a full pave or three-stone design, a ratio of 1.5 to 2.0 is more appropriate because the setting itself consumes a larger share of the total.
If your ratio exceeds 3.0, you are heavily skewed toward the stone. This can work for a very simple solitaire, but the setting may end up feeling like an afterthought. If the ratio is below 1.5, you are spending more on the setting than the diamond, which may indicate underspending on stone quality or overspending on decorative elements that do not improve the ring’s long-term value.
This ratio is a directional guide, not a fixed rule. A buyer who prefers an elaborate setting with a modest stone should not be discouraged by a ratio below 1.5 if the stone performs well visually and the setting is built to last. The ratio’s main value is flagging extreme imbalances that often lead to buyer regret.
Use this formula as a quick directional check before you review the final quote. It does not replace judgment, but it catches the most common allocation mistakes.
How Traceability and Documentation Support Buyer Confidence
In an engagement ring purchase, traceability refers to the buyer’s ability to understand where a stone came from, how it was produced, and what documentation supports its characteristics. For lab-grown diamonds, traceability is built primarily through the grading report and the seller’s transparency about the stone’s origin and growth method. A clear documentation trail helps buyers verify what they are paying for and reduces the risk of misunderstanding.
What a Grading Report Can and Cannot Tell You About a Stone’s Origin
A grading report from a recognized laboratory such as IGI, GCAL, or GIA documents the stone’s specific characteristics: carat weight, color grade, clarity grade, cut grade (for round brilliants), and a plot of any inclusions. Some reports also indicate the growth method — HPHT or CVD — based on the lab’s analysis of the stone’s internal features. This information is useful because it confirms that the stone has been examined by an independent third party, and that the characteristics you are paying for have been documented.
However, a grading report does not serve as a comprehensive traceability document. It does not typically disclose the specific facility where the stone was grown, the energy sources used during production, or the chain of custody from the grower to the cutter to the seller. For buyers who want more detailed provenance information, the next step is to ask the seller directly about the stone’s source and any available documentation beyond the grading report. A seller who can provide clear, written information about the stone’s origin and growth method is likely to be more transparent overall.
When a grading report is available, buyers should verify the report details through the issuing laboratory’s official verification tools where available. This step confirms that the report has not been altered and that the stone’s documented characteristics match the seller’s listing.
Why Documentation Matters for Custom Design and Setting Fit
For custom design projects, documentation plays a practical role beyond traceability. The stone’s exact measurements, which are listed on the grading report, are needed to design a setting head that will hold the stone securely. A stone with a deep pavilion, for example, may require a taller setting head, which affects the ring’s profile and the overall design. A stone with a very shallow pavilion may need a different type of setting to prevent the stone from sitting too low.
Buying a stone without a grading report, or without receiving the actual measurements from the seller, creates unnecessary risk in a custom design project. The setting may need to be modified after it is made, which adds time and cost. For this reason, NUVU’s approach to custom design includes confirming the stone’s measurements and report details before beginning the setting design work. This upfront step helps the buyer and the jeweler align on what is possible within the chosen budget and design direction.
Documentation Checklist Before You Buy
- Does the stone’s listing include a grading report from IGI, GCAL, or GIA?
- Does the report indicate the stone’s growth method (HPHT or CVD)?
- Do you have access to the stone’s exact measurements (length, width, depth) from the report?
- Is the seller willing to provide a high-resolution video or image of the actual stone?
- If you are planning a custom setting, have you shared the stone’s measurements with the person who will make the setting?
Understanding the Distinction: Lab-Grown vs. Natural Diamonds
A foundational element of buyer confidence is understanding what a lab-grown diamond is and is not. Laboratory-grown diamonds are real diamonds with the same chemical composition, crystal structure, and optical properties as natural diamonds. The key difference lies in their origin: lab-grown diamonds are created in controlled laboratory environments, while natural diamonds are formed over geological timescales beneath the earth’s surface.
This distinction matters for budget planning and documentation. A grading report for a lab-grown diamond should clearly state its laboratory-grown origin. Buyers should not encounter a lab-grown diamond presented without this disclosure. Similarly, a lab-grown diamond should never be confused with a diamond simulant such as cubic zirconia or moissanite — simulants are different materials that resemble diamonds but lack diamond’s chemical and physical properties.
For engagement ring buyers, this clarity helps ensure that the stone purchased matches the description. A seller who transparently identifies a diamond as laboratory-grown and provides a grading report that confirms the same is operating with the level of candor that supports informed buying.
Next Steps: How to Start Building Your Budget Plan
By this point, you have the framework. The next step is turning it into an actual purchase plan. Most of the work happens before you contact a seller.
Pre-Purchase Checklist
Run through this list in order before requesting any quotes.
- Define your total budget including all applicable taxes, shipping, and fees. Do not set a stone-only budget and then discover hidden costs later.
- Decide on stone shape and a preferred carat weight range. Shape affects both pricing and the type of setting that works best.
- Research setting style. Solitaire, pave, three-stone, and halo each affect the budget differently and require different amounts of metal and labor.
- Choose a metal. 14K white gold offers the best balance of cost and durability for most buyers. Consider platinum for very thin bands or if the wearer has metal sensitivities.
- Compare stone price ranges for your chosen shape and size. Use this to calibrate realistic expectations before looking at settings.
- Set an allocation ratio. Start with roughly 65% stone, 30% setting, and 5% for fees and adjustments.
- Request a written quote for both stone and setting before committing. Verbal estimates often omit assembly labor, shipping, and applicable taxes.
Before purchasing, buyers should confirm the seller’s documentation practices, return policy, and resizing terms in writing. A clear understanding of what is included in the price — and what is not — helps avoid unexpected costs after the ring is completed.
Related Articles to Read Next
- Lab-Grown Diamond Cut Quality Guide — If you want to understand why cut drives visual performance more than any other factor, this article explains the specific proportions and light behavior that matter.
- Oval vs Round Engagement Ring Comparison — Shape choice directly affects budget allocation. This comparison covers price differences, finger coverage, and setting compatibility for two of the most popular shapes.
- Lab-Grown Diamond Grading Report Guide — Certification costs vary by lab and grade. Understanding what each report covers helps you decide whether paying more for a specific certificate is worth it.
What to Check Before You Decide
- Verify that any written quote includes all applicable taxes, shipping, and assembly labor. Some sellers quote the stone and setting separately and add coordination fees at the end.
- Confirm the return policy for both stone and setting separately. If the final ring does not meet expectations, you need to know whether you can return the stone, the setting, or the assembled ring.
- Ask for a timeline. Stone sourcing can take days or weeks depending on availability. Setting construction typically takes 2–4 weeks. Final assembly and polish usually require an additional 3–7 days. A clear timeline prevents pressure-driven decisions.
Disclosure: This article is for general educational purposes only. Diamond grading, pricing, availability, specifications, and seller policies can change, and readers should verify important details through grading reports, official laboratory tools, seller documentation, or qualified professionals before making a purchase decision. Laboratory-grown diamonds should be clearly distinguished from natural diamonds, and environmental or sourcing claims should be supported by specific documentation.