
Most lab-grown diamond buyers focus heavily on the 4Cs of the stone itself, but the setting you choose, particularly diamond shape and ring setting, has a far greater impact on how that diamond looks on your finger—often more than the grading report suggests. Prong placement, metal color, and the openness of the setting’s base directly control how light enters and returns from the diamond, altering its perceived size, brilliance, and even color.
For the full framework, read Lab-Grown Diamond Engagement Rings Guide.
This article moves beyond generic setting names to explain how each ring style—solitaire, halo, hidden halo, three-stone, bezel, and tension—changes the visual and practical performance of your lab-grown diamond. You will learn which settings maximize brilliance versus protection, how side-stone proportions affect finger appearance, and what specific measurements or design details to verify before making a commitment.
| Setting Type | Light Performance & Visual Effect | Key Practical Consideration |
|---|---|---|
| Solitaire (open basket) | Maximizes brilliance; full light entry from all angles | Requires sturdy prongs; diamond sits higher, more exposed |
| Halo | Enlarges visual area; side diamonds add sparkle | Traps debris between stones; needs gentler, more frequent cleaning |
| Hidden Halo | Adds sparkle from profile view without increasing top surface area | Basket must be low enough to hide the halo effectively from above |
| Three-Stone | Side-stone shape and proportion visually elongate the finger | Requires color-matching side stones within one grade; total side carat should be 50–75% of center |
| Full Bezel | Reduces light entry by 15–25%; can make lower-color diamonds appear whiter | Best for active lifestyles; offers maximum protection for the diamond |
| Tension | Exposes maximum diamond surface for light performance | Only works with diamonds having thick girdles (above 2.0% of diameter); limits resizing |
Quick Questions Before You Read
Q: Is a solitaire always the best choice for maximum diamond brilliance?
Yes, if the setting has an open basket. A solid or closed-back base blocks light from entering the diamond’s pavilion, reducing brilliance regardless of center stone quality.
Q: Does a halo setting make a lab-grown diamond look bigger than it actually is?
It increases the overall visual area, but the surrounding melee stones can distract from the center diamond’s own fire and scintillation. The ring appears larger, not the diamond itself.
Q: Can any diamond shape go into any setting style?
No. Round brilliants fit any setting, but fancy shapes like pears, ovals, and marquises require specific length-to-width ratios to avoid tipping or unbalanced visuals in certain settings.
Q: How important is the setting when buying a lab-grown diamond for daily wear?
Extremely. The setting determines long-term security, cleaning ease, and resizing limits. A bezel or low-profile cathedral setting provides more durability than a tall peg head or pavé band.
How Ring Settings Change the Look and Performance of a Lab-Grown Diamond
Most buyers begin by choosing a diamond and then look for a setting that fits it. That order is natural, but it often leads to an overlooked fact: the setting is not just a frame. It is a structural component that changes how the diamond interacts with light, how large it appears on the finger, and how it holds up to daily wear.
For lab-grown diamonds, this matters just as much as it does for natural stones. A lab-grown diamond has the same optical properties—the same refractive index, the same dispersion, the same ability to return light. But the way that light behaves once the diamond is mounted depends entirely on the setting. Prong placement, metal reflection, and whether the base is open or enclosed all determine how much brilliance and fire the eye actually sees.
Why Setting Choice Matters More Than You Think for Lab-Grown Diamonds
A loose diamond on a grading report can look like a completely different stone once it is set. The reason is mechanical, not magical. Light enters a diamond through the crown and the sides. A setting that blocks side light entry, covers part of the crown, or surrounds the diamond with metal will change the volume of light the stone receives and returns.
Prong placement is the most obvious variable. A thick prong that sits high on the crown casts a shadow across the facet it covers, which reduces brilliance in that zone. A prong that sits lower, or a claw prong that angles away from the crown, exposes more surface area to light. The same principle applies to the base of the setting. An open basket allows light to pass through the pavilion and back up through the crown. A closed base, or a setting that sits flush against the finger, blocks that return path.
Metal color also plays a role. White metals like platinum and white gold reflect neutral light back into the diamond, which keeps color appearance stable. Yellow or rose gold can warm the light entering the stone, which shifts how a lower-color diamond reads. None of this is visible on a certificate, but all of it is visible to the wearer.
The Four Ways a Setting Changes Your Diamond’s Visual Impact
A setting performs four mechanical roles that directly affect what the eye sees.
Elevation. A diamond set high above the band allows light to enter from the sides and underneath. This maximizes brilliance but also exposes the stone to more contact with surfaces. A low-set diamond sits closer to the finger, which protects the stone but reduces the light path from below.
Light blocking and redirection. Every element of the setting—prongs, bezel walls, halo melee, cathedral shoulders—either blocks light or redirects it. A full bezel blocks 15–25 percent of incoming light compared to a prong setting. A halo of melee diamonds reflects light into the center stone from the sides, but also covers the area around the girdle where side light would normally enter.
Perceived face-up size. The setting determines how large the diamond looks from above. A thin prong solitaire makes the diamond look exactly its size. A halo adds a ring of small stones that expand the total face-up area. A three-stone setting creates a visual zone that can make the center diamond appear larger by comparison, or smaller, depending on the side-stone proportions.
Daily maintenance. Settings trap debris differently. A solitaire with an open basket can be cleaned in seconds. A halo or pavé setting collects dust, lotion, and soap residue in the gaps between melee stones, requiring more frequent and careful cleaning. If the center diamond is difficult to access for cleaning, its brilliance will degrade faster between professional cleanings.
A concrete comparison makes this clearer. Take the same 1.5-carat lab-grown round brilliant, graded GIA Ex/Ex, G color, VS1 clarity. Set it in a four-prong solitaire with an open basket, and the stone returns maximum light from all angles. The same stone in a full bezel loses measurable light entry from the sides and below, but gains a flatter profile that protects the girdle. The face-up size appears slightly smaller because the bezel wall covers the outermost edge of the diamond. Both are valid choices, but they produce different visual results from the same stone.
What to Check Before You Decide
When comparing settings, focus on three things that are easy to verify but often overlooked.
First, look at the open surface area beneath the stone. An open basket or gallery allows light to pass through the pavilion. A solid base blocks it. If the setting has a hidden halo or a solid donut beneath the stone, ask how much light entry is reduced.
Second, evaluate the metal-to-stone ratio at the top of the ring. A heavy cathedral shoulder or thick split-shank design adds metal volume near the diamond, which can make the stone look smaller relative to the ring. A thin solitaire setting with minimal metal keeps the diamond as the dominant visual element.
Third, check how the setting affects cleaning access. Can you see through the gallery? Can a soft brush reach the underside of the diamond? If the setting has tight spaces between melee stones, expect to clean it more often.
Always request a side-profile photo of the setting before purchase. The top-down view does not show how high the diamond sits, how thick the bezel wall is, or how much metal surrounds the stone. The side view reveals the true relationship between the setting and the diamond.
Three-Stone Settings: Symbolism, Finger Balance, and Side-Stone Selection Logic
A three-stone setting is not simply a decorative arrangement. It is a structural and visual decision that changes how the center diamond reads on the hand. The two side stones frame the center, extend the ring’s visual width, and affect finger proportion. The logic behind side-stone selection matters as much as the center stone itself.
How Side Stone Carat Weight and Shape Affect the Center Diamond’s Impact
Side stones should not compete with the center diamond. As a general guideline, the total carat weight of both side stones should fall between 50 and 75 percent of the center stone’s weight. At 50 percent, the side stones support without distracting. At 75 percent, the ring begins to look like a three-stone statement piece rather than a center-focused design.
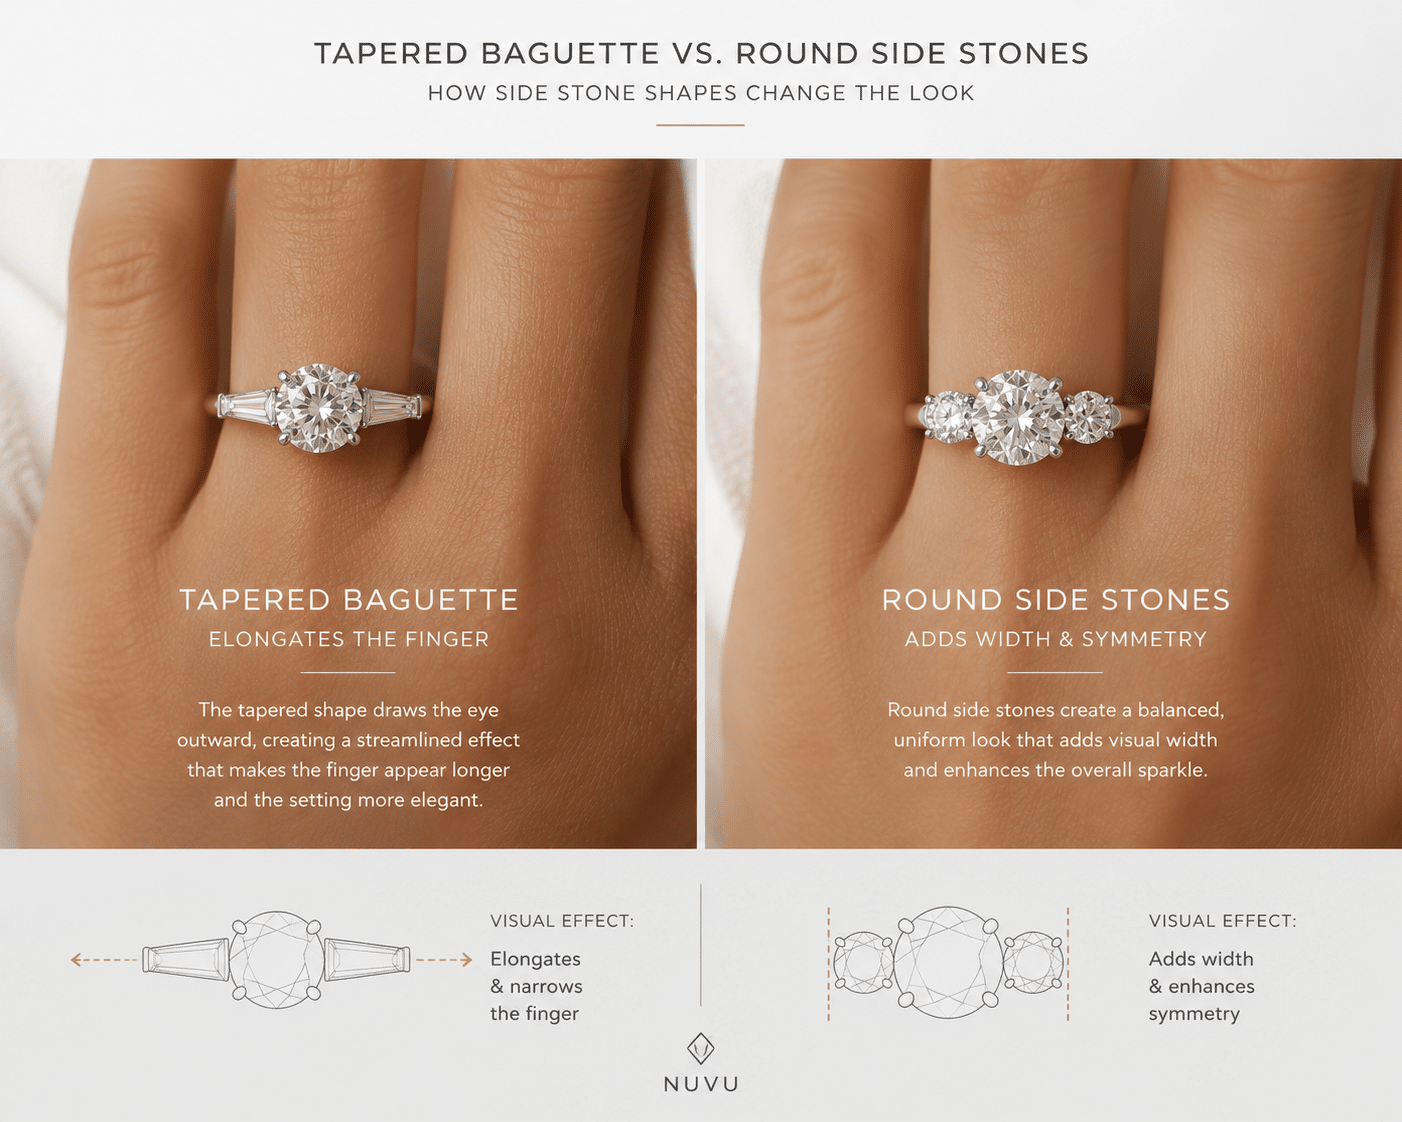
Shape changes the visual effect even more than carat weight. Tapered baguettes elongate the finger by drawing the eye vertically along the band. Round side stones create a balanced, symmetrical frame that reinforces the round shape of the center diamond.
Consider two options on the same 2-carat round brilliant center. With 0.5-carat tapered baguettes on each side, the ring reads as elongated and modern. The total face-up width increases without making the center look smaller. With 1-carat round side stones, the ring becomes more symmetrical and substantial. The center diamond still leads, but the overall visual weight shifts toward a wider, bolder silhouette. The first option suits a narrower finger or a more understated look. The second works for buyers who want maximum finger coverage.
Color and Clarity Matching Between Center and Side Stones
Visible color mismatch between center and side stones is a common mistake. Side stones should be within one color grade of the center stone. A G-color center paired with J-color side stones will show a clear warmth difference under direct light, and the center will appear cooler by contrast, which can look unintentional.
Clarity differences are less visible in smaller side stones. Side stones cut from the same rough or batch will appear more uniform, but VS clarity is sufficient for most side stones up to 0.5 carats. SI1 is acceptable if the inclusions are not visible to the naked eye in the smaller stone size, though VS is safer.
For most buyers, a G–H center stone with G-color side stones provides an invisible match. The side stones will read as colorless beside the center, and the overall ring looks intentionally coordinated rather than assembled from available pieces.
For buyers considering a three-stone ring, it is worth noting, best lab grown diamond shapes, that grading reports for individual side stones are rarely provided. The practical check is to view the assembled ring in daylight and under direct light to confirm that the color difference is not noticeable. A visual side-by-side comparison is more useful here than relying on stated grades alone.
Stone-to-Setting Fit Check
A three-stone ring changes proportion depending on finger size. On a size 4 finger, the same 2-carat center with 0.5-carat side stones covers significantly more finger surface area than on a size 7 finger. What looks balanced on a display hand may look oversized or crowded on a smaller finger.
Ask the jeweler for the total millimeter width of the assembled three-stone setting. Compare that measurement against your finger width. If the setting spans more than two-thirds of your finger width from top view, the ring will feel visually heavy. If possible, view the setting on a similar finger size before committing to the design.
Bezel and Semi-Bezel Settings: Maximum Protection, Reduced Light Entry
A bezel setting prioritizes security over brilliance. The tradeoff is real, and it matters depending on how and when the ring will be worn. Understanding the exact performance change helps buyers decide whether the protection is worth the light loss.
Full Bezel: When Protection Is the Priority and How Light Performance Changes
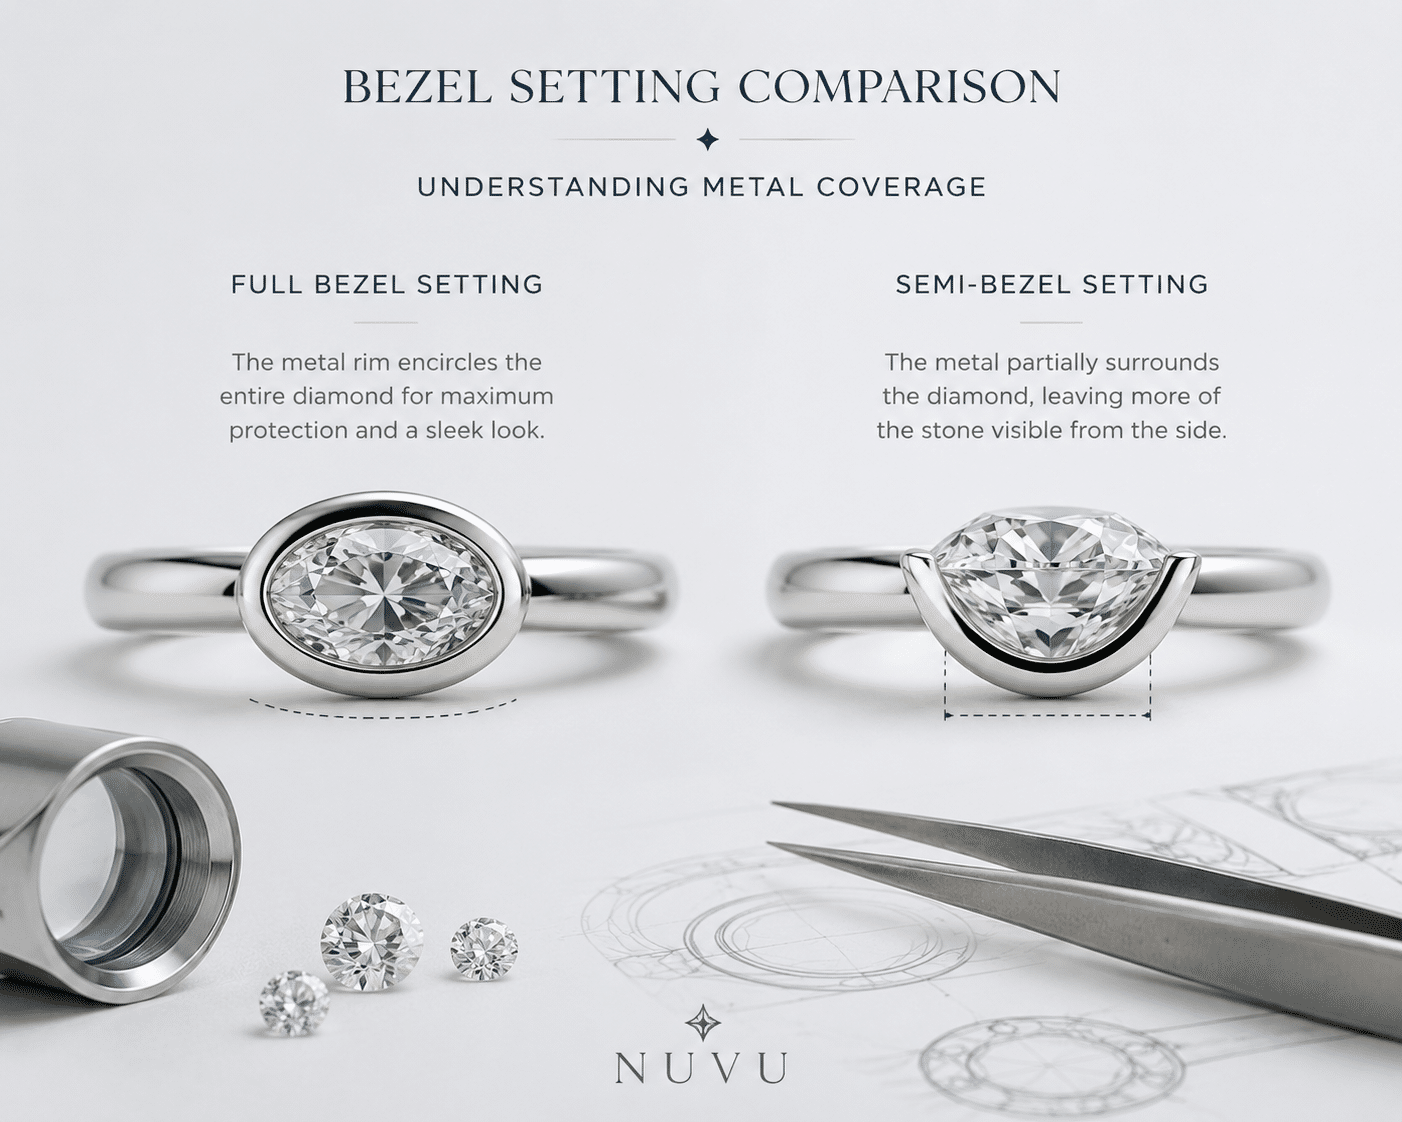
In a full bezel, metal wraps completely around the diamond’s girdle. This eliminates exposed edges, prevents prong snagging, and protects the stone from lateral impact. The tradeoff is measurable. A full bezel reduces light entry by roughly 15 to 25 percent compared to a standard four-prong solitaire setting. Light that would normally enter the diamond from the side is blocked by the metal wall.
This setting is best suited for active lifestyles, daily wear, or buyers who are concerned about catching a prong on clothing or damaging the stone during manual work. It is also a strong choice for children’s jewelry or any ring that will experience more impact than average.
One advantage that is less obvious: a bezel can make a lower-color diamond appear whiter. The surrounding metal reflects light back into the stone, and the continuous metal frame reduces the visual contrast between the diamond and its environment. A J-color diamond set in a white gold or platinum bezel can read closer to H-color because of this reflection effect.
When selecting a full bezel, it is worth asking the jeweler how the metal thickness around the girdle compares to the diamond’s own proportions. A bezel that closely follows the diamond’s outline without excessive metal bulk preserves more of the stone’s face-up size. If the bezel wall extends significantly past the girdle, the diamond can appear smaller than its actual carat weight. Requesting the millimeter width of the assembled ring alongside the diamond’s width gives a clear measure of how much metal diminishes the stone’s visible surface area.
Semi-Bezel and Partial-Edge Settings: A Middle Path for Light and Security
A semi-bezel leaves part of the diamond’s crown exposed, typically the top half. This allows significantly more light entry than a full bezel while still protecting the girdle from most side impacts. The diamond is partially framed by metal on the lower portion or sides, but the crown remains open to ambient light.
This middle path works for buyers who want the durability and clean look of a bezel but are unwilling to accept the full brilliance tradeoff. The security is still high, and the visual difference from a prong setting is less dramatic than a full bezel. It is also easier to clean since debris cannot trap as easily against complete metal coverage.
For a lab-grown diamond with strong cut grades, a semi-bezel preserves enough light performance that most wearers will not notice a difference in daily wear, while still gaining the practical benefit of edge protection.
How to Verify This Before Buying
Bezel wall thickness is the single most important measurement. A bezel that is too thick makes the diamond look smaller from face-up view because the metal extends past the girdle and covers part of the crown. A bezel that is too thin may not provide adequate protection.
Request the exact wall thickness from the jeweler before purchasing. A balanced profile falls between 0.6 mm and 1.0 mm. Below 0.6 mm, the bezel may feel fragile and offer little protection. Above 1.0 mm, the diamond will begin to look recessed and smaller than its actual carat weight. On a 1.5-carat round, a 0.8 mm bezel wall provides a clean frame without shrinking the visible diamond size.
It is also useful to compare how the bezel finish affects maintenance. A polished bezel shows scratches more easily than a brushed or matte finish, which may be a consideration for daily wear. For buyers who plan to wear the ring without removing it for manual tasks, a brushed bezel surface can help maintain a clean appearance for longer.
Tension and Channel Settings: Modern Minimalism and Side-Stone Placement
Tension and channel settings serve different purposes, but both appeal to buyers who want clean lines and minimal metal visibility. Each has specific requirements that determine whether the setting will work for a given diamond.
Tension Settings: How the Diamond Is Held by Metal Compression Alone
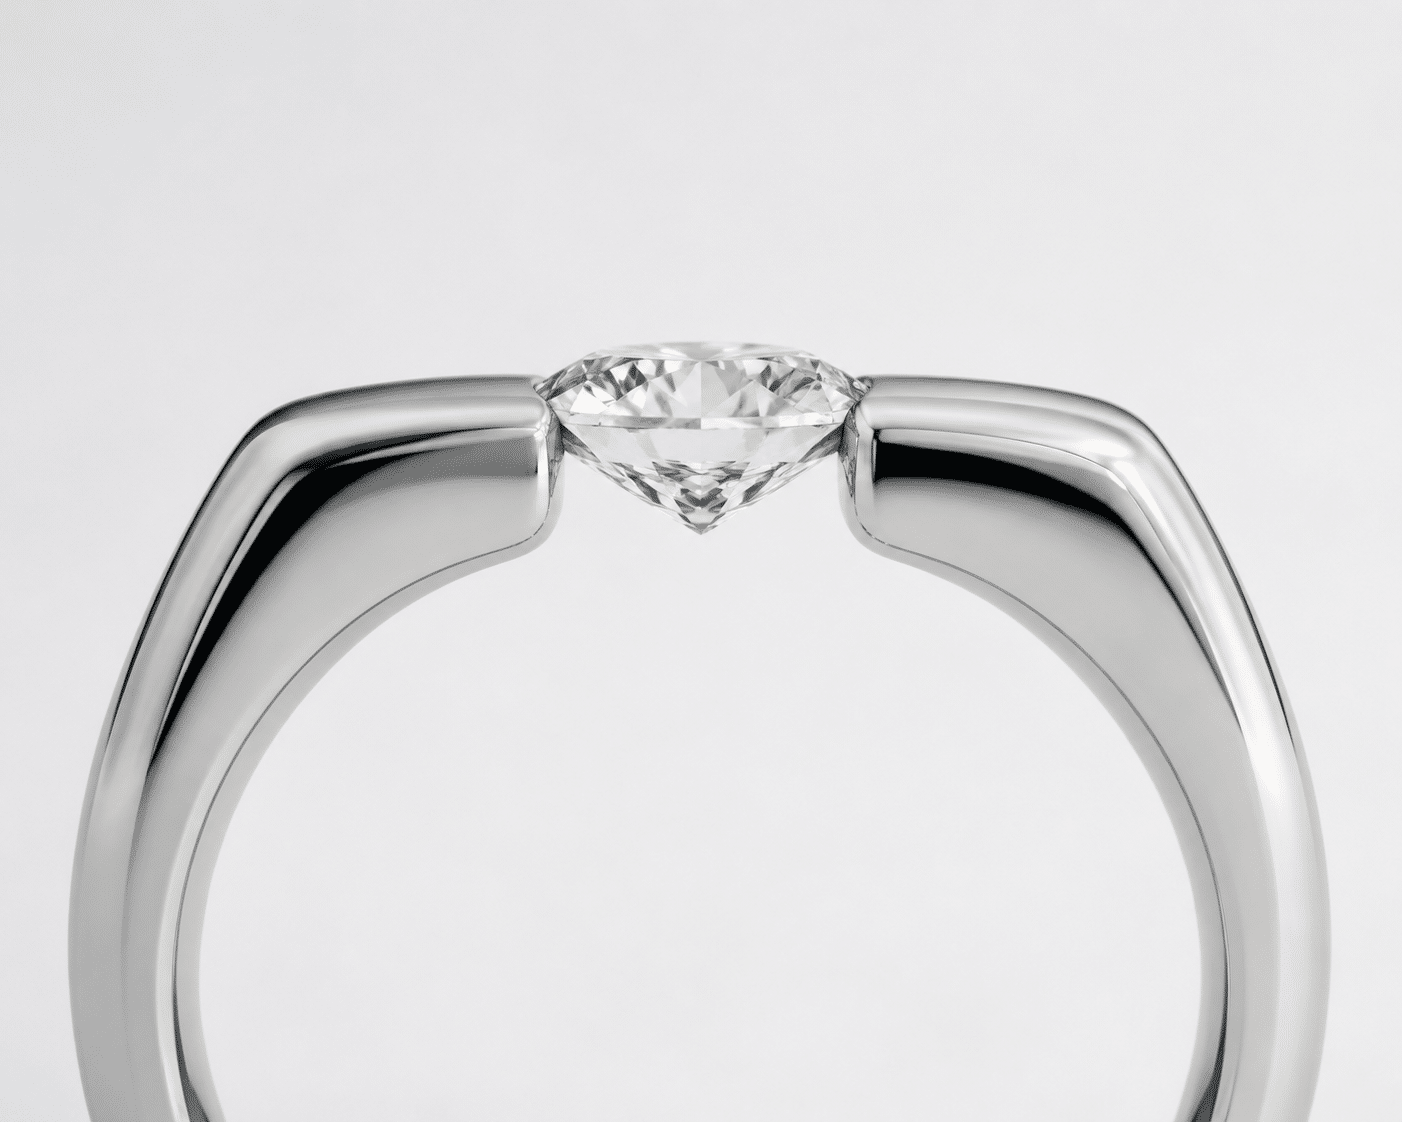
A true tension setting does not use prongs or a bezel. The diamond is held in place by the compressive force of the band metal pressing against the girdle. This requires precise engineering. The band is cut slightly narrower than the diamond’s width, then flexed open to insert the stone. The metal tension holds the diamond securely.
This setting exposes more of the diamond than any other style. No prongs block light entry, and no bezel covers the crown. The result is maximum brilliance from the top view. But the requirement is strict. The diamond must have a thicker girdle to withstand the compression without fracturing. For lab-grown diamonds, the girdle thickness should be above 2.0 percent of the diamond’s diameter. A 1-carat round with a 6.5 mm diameter would need a girdle thickness of at least 0.13 mm.
Not every diamond qualifies. Many well-cut stones have a thinner girdle to improve light performance, and those stones will not work in a tension mount. This setting should only be chosen after confirming the diamond’s proportion data and ideally after reviewing a video of the same stone in a tension mount.
Buyers should also consider that a tension setting limits future design options. If the diamond is ever remounted, the tension band cannot be reused for a different stone. The ring is essentially a one-stone system. This is worth factoring in if there is any possibility of upgrading or repurposing the diamond later.
Channel Settings: Continuous Melee Without Prongs for a Clean Finger Band
Channel settings hold side stones in a groove between two metal walls. No prongs touch the stones, so the band surface remains smooth. This creates a clean, continuous line of melee diamonds that runs along the finger without interruption.
One advantage for lab-grown diamonds is consistency. Manufactured melee stones can be produced with uniform size and shape, which makes channel setting easier and more reliable. Natural melee diamonds often require more sorting to achieve the same fit. For a channel-set band, lab-grown melee generally provides a cleaner result with less visible variation.
Channel settings are best for side stones in the 0.01 to 0.10 carat range. Larger stones become difficult to align consistently in a channel groove. The setting also makes cleaning more difficult because debris can lodge between the stones in the channel, but the smooth outer surface reduces snagging compared to prongs.
Certificate and Visual Review Check
Before selecting a tension setting, verify two things on the diamond’s grading report: the girdle thickness and the length-to-width ratio (for fancy shapes). A thin or very thin girdle is a disqualifying factor. A round diamond with a faceted or polished girdle at medium thickness is generally safe. For fancy shapes, a symmetrical outline is important, because an irregular shape will not seat evenly under compression.
Request a short video of the diamond in a tension mount before committing. The video should show the stone from the side to confirm that the girdle is fully seated in the band channel and that no gaps are visible. If the jeweler cannot provide a video of the actual diamond in that setting style, consider a different setting.
Matching a Setting to a Specific Lab-Grown Diamond Shape
The shape of a lab-grown diamond is not just a visual preference. It determines which settings will work structurally and which will create problems. A round brilliant is forgiving. A pear or marquise is not. Matching the diamond’s geometry to the setting is one of the most overlooked steps in the buying process.
Round vs. Fancy Shapes: Why Setting Flexibility Differs
A round brilliant has symmetrical proportions and no vulnerable corners or pointy tips. It fits almost any setting without adjustment. Solitaire, halo, bezel, three-stone — a well-cut round will perform in any of them because light entry is consistent from every angle.
Fancy shapes are different. Ovals, pears, and marquise cuts have a length-to-width ratio that changes how the stone sits in the setting. An oval that is too elongated in a three-stone setting may look unbalanced next to side stones. A pear with a low ratio can appear squat; one with a high ratio can tilt in the mount. For ovals in a three-stone setting, a ratio between 1.38 and 1.45 usually aligns well with the side stones. For pears in a solitaire, a ratio between 1.45 and 1.55 reduces the risk of the pointed tip lifting or catching.
The practical takeaway is this: with a round diamond, you can choose the setting first. With a fancy shape, you should choose the diamond first, then confirm the setting fits its specific dimensions.
For fancy shapes in particular, the grading report alone does not tell the full story. The same length-to-width ratio can look different depending on the stone’s outline symmetry and facet alignment. Requesting high-resolution images from multiple angles helps confirm that the setting will match the stone’s actual silhouette.
Shape-Specific Setting Recommendations Based on Pointy Ends and Open Culet
Certain shapes have physical vulnerabilities that require specific setting features. A princess cut has sharp corners that are prone to chipping if left exposed. These corners need protection from V-prongs or a partial bezel. A standard four-prong solitaire that grips the middle of each side may leave the corners exposed. A bezel or a modified prong layout is safer.
Pear and marquise shapes have a single pointed tip that must be covered by a prong or enclosed in a bezel. An unprotected tip is the most common point of damage on these shapes. If the setting allows the tip to sit flush against the band or a side stone, that can provide protection, but as per the lab grown diamond engagement rings guide, a prong over the tip is more reliable.
Emerald and Asscher cuts have an open table and broad step-cut facets. A busy setting — multiple side stones, intricate metalwork, or a wide halo — competes with the diamond’s visual surface. These shapes benefit from a simpler setting that lets the step-cut pattern speak. A clean solitaire or a minimal three-stone with straight baguettes is usually a better match than a complex halo or pavé band.
Radiant and cushion cuts are more forgiving because they have trimmed corners and a mixed-cut facet pattern. They work in most settings but still benefit from V-prong protection at the corners.
Stone-to-Setting Fit Check
The most common mistake in this area is assuming that carat weight equals a fixed size. A 1.5-carat round brilliant has a different width than a 1.5-carat oval. A 1.5-carat emerald cut is longer and narrower than either. Settings are built around millimeter measurements, not carat weight.
Before ordering, provide the jeweler with the diamond’s exact width and depth in millimeters. Ask whether the setting is designed for that specific measurement range. A setting made for a 6.5 mm round will not safely hold a 7.0 mm round. A setting made for a 7.5 mm oval may leave gaps around a 7.0 mm oval. Confirming the physical fit before production saves costly rework.
Understanding Growth Methods and Their Role in Setting Compatibility
For lab-grown diamonds, the growth method—commonly HPHT (high pressure, high temperature) or CVD (chemical vapor deposition)—can be relevant to setting selection, but primarily in the context of the stone’s specific physical properties rather than as a direct compatibility factor. A grading report from recognized laboratories such as GIA or IGI will specify the growth method, which some buyers may consider when evaluating documentation. However, when it comes to setting fit, what matters are the measured proportions—girdle thickness, crown angle, depth percentage—not the growth technique itself. Both HPHT and CVD lab-grown diamonds share the same hardness, refractive index, and durability as natural diamonds, so they are equally suited to any well-constructed setting. The key is to verify the stone’s specific measurements against the setting requirements, regardless of how the diamond was grown.
Some buyers may encounter claims that one growth method is inherently better for certain settings. These claims are not supported by the available technical data. The setting’s performance depends on the diamond’s cut dimensions and the jewelry design, not on whether the stone was created through HPHT or CVD. Buyers should evaluate the diamond’s grading report for the measurements relevant to their chosen setting, and treat growth method as a documentation detail rather than a performance indicator.
Lab-Grown Diamond Grading Reports: Verifying the Stone Behind the Setting
Because the setting controls how the diamond is seen, knowing exactly what was graded before the stone was mounted is important for any buyer. Grading reports for lab-grown diamonds provide a fixed record of the stone’s characteristics, including its 4Cs and growth method. The GIA, for example, issues grading reports specifically for lab-grown diamonds and states on the report that the stone is laboratory-grown.[1] Similarly, IGI includes clear identification of the origin on its reports, documenting the diamond’s color, clarity, and cut alongside the growth method.[2] The Federal Trade Commission (FTC) also provides guidance in its Jewelry Guides, stating that a lab-grown diamond must be clearly disclosed as such and cannot be described simply as a “diamond” without the qualifier in advertising and labeling.[3]
This documentation is what allows a buyer to compare the stone’s official measurements—like girdle thickness, crown angle, and polish—against the requirements of a specific setting. For a tension setting, the report confirms girdle thickness. For a three-stone ring, it provides the color grade needed for side-stone matching. The report does not define the ring’s overall look or emotional impact, but it does provide the foundation for an informed technical decision.
It is also useful to consider what a grading report cannot tell you. The report does not record how the diamond’s pavilion interacts with a specific basket height, nor does it measure how much side light the setting allows. A stone with an excellent cut grade on paper may still perform differently depending on the prong placement and metal thickness of the chosen setting. For this reason, a grading report should be treated as a starting point for comparison rather than a guarantee of the final appearance. The visual review of the mounted stone remains the decisive factor.
When a grading report is available, buyers should verify the report details through the issuing laboratory’s official report-check tool where available. GIA and IGI both offer online verification services that allow a buyer to confirm that the stone’s measurements, clarity, and color match the original document. This step is available before purchase and helps ensure that the diamond specifications guiding your setting choice are accurate.
After the Setting: What Changes After You Set the Diamond
A ring does not behave the same way after the diamond is set. The setting changes how you wear it, how often you clean it, and whether it can be adjusted later. These are not hypothetical concerns. They affect the ring’s condition over years of daily use.
How the Setting Changes Cleaning Frequency and Method
Not all settings collect debris at the same rate. A solitaire with an open basket allows air and water to pass through freely. Debris rarely accumulates under the diamond. A halo or three-stone setting has more crevices between melee stones, the center stone, and the metal walls. Oils, lotion, and dust settle into these gaps and dull the ring’s sparkle over time.
Cleaning method also depends on the setting. Ultrasonic cleaners work well for solitaires and bezel-set rings because the stones are securely held and less likely to loosen. For halo settings with many small melee diamonds, ultrasonic vibration can weaken the prongs over time. Steam cleaning or a gentle soak in warm water with a soft brush is safer for multi-stone rings. Avoid aggressive brushing near the melee stones to prevent loosening.
For buyers who plan to wear the ring daily, it is worth considering how easily the setting allows routine inspection of the stone. A setting that hides the girdle or the underside of the diamond makes it harder to spot a loose stone or damaged prong during a quick visual check. This is especially relevant for tension and full bezel settings, where part of the stone is not visible from standard angles.
Resizing Limitations Based on Setting Style
A plain-band solitaire can usually be resized up or down by multiple sizes without issue. The shank is simple, and the setting sits above the resizing zone. Once you add stones to the band, resizing becomes limited.
Full pavé bands have diamonds set into the shank. Resizing by more than half a size distorts the spacing between stones and may loosen them. Channel settings face the same problem — the metal walls that hold the stones shift during resizing. Tension settings are essentially non-resizable because the band’s compression is calibrated to the diamond’s exact dimensions at production.
If there is a reasonable chance your finger size may change — from weight fluctuation, pregnancy, or other factors — a solitaire with a plain band is the most practical choice. If you prefer a pavé or channel band, plan for the possibility that resizing may not be an option later.
What to Ask Before You Buy
Before committing to a setting, ask the jeweler three questions and get the answers in writing.
First: Can this setting be resized by more than one full size? If the answer is no, and your finger size may change, you need to know now.
Second: How is the melee diamond quality verified? Small diamonds in halos and pavé bands are often sold without individual grading reports. Ask what color and clarity grade the melee stones meet, and whether they are matched to the center stone.
Third: What is the setting warranty for loose prongs, channel misalignment, or melee loss? Some jewelers cover these issues for a limited time. Others treat them as normal wear. A written confirmation protects you from unexpected repair costs.
For lab-grown diamonds specifically, the metal choice and setting style can also affect how the stone’s growth origin documentation is stored or displayed. Some buyers prefer a setting that allows easy access to the diamond for removal and re-certification if needed. While not a common concern, it is worth confirming with the jeweler whether the setting design allows the stone to be removed without damage for future inspection or upgrading.
Investment Perspective and Long-Term Considerations for Lab-Grown Diamond Settings
While a lab-grown diamond engagement ring is primarily a personal and aesthetic purchase, some buyers consider the long-term financial aspects of their choice. The relationship between a lab-grown diamond and its setting has implications for future flexibility, though it is important to frame this discussion realistically rather than as an investment guarantee. Buyers should understand that lab-grown diamonds do not typically hold value in the same way as natural diamonds, and treating either category as an investment carries significant risk due to fluctuating market conditions, resale market limitations, and the personal nature of the purchase.
A well-crafted setting in a precious metal like platinum or 18k gold retains material value, but the diamond itself generally does not appreciate over time. For a lab-grown diamond, the setting’s metal and craftsmanship represent the portion of the ring that has enduring material worth, and may be more easily recovered through recycling or design updates. Buyers who prioritize long-term flexibility may prefer a solitaire or a setting that allows the center diamond to be easily removed and replaced, as this allows for future stone upgrades or repurposing of the ring, though these modifications still depend on the jeweler’s capabilities and costs.
The soundest approach is to view the ring as a durable good intended for long-term enjoyment rather than a financial asset. Choosing a setting that accommodates potential future changes—such as resizing or stone replacement—can provide practical flexibility, but specific returns, resale values, or investment outcomes cannot be predicted or guaranteed.
[1] GIA, “GIA Lab-Grown Diamond Report,” Gemological Institute of America, 2025. https://www.gia.edu/report-check-landing
[2] IGI, “Diamond Report,” International Gemological Institute, 2025. https://www.igi.org/report-check
[3] Federal Trade Commission, “Guides for the Jewelry, Precious Metals, and Pewter Industries,” 16 CFR Part 23, 2018. https://www.ftc.gov/policy/federal-register-notices/guides-jewelry-precious-metals-pewter-industries
Disclosure: This article is for general educational purposes only. Diamond grading, pricing, availability, specifications, and seller policies can change, and readers should verify important details through grading reports, official laboratory tools, seller documentation, or qualified professionals before making a purchase decision. Laboratory-grown diamonds should be clearly distinguished from natural diamonds, and environmental or sourcing claims should be supported by specific documentation. A grading report documents key characteristics but should not be treated as a guarantee of beauty, value, or sourcing ethics. Prices can change with market conditions, report type, seller channel, and stone-specific details, so exact comparisons should be verified at the time of purchase. For custom jewelry, stone measurements and setting compatibility should be confirmed before finalizing a purchase.