
Budgeting for lab-grown diamond jewelry—whether earrings, necklaces, or bracelets—is fundamentally different from planning an engagement ring purchase. Each piece type introduces specific cost factors that most buyers overlook: matched pairs for studs can add a notable premium, chain quality for pendants can consume a significant portion of your total budget, and bracelet durability demands thicker settings and secure clasps. Overspending on stone color while underbudgeting craftsmanship is, lab grown diamond jewelry quality check guide, the most common mistake, and it directly affects how long your jewelry lasts and how it looks on.
For the full framework, read Lab-Grown Diamond Jewelry Guide.
This guide breaks down the real allocation decisions by piece type, explains how to read 4Cs trade-offs for jewelry rather than rings, and gives you a practical framework for building a versatile wardrobe on a fixed budget. By the end, you will know exactly where to spend more, where to cut strategically, and how to avoid the hidden costs that derail a smart purchase.
| Piece Type | Where Budget Goes | Common Mistake to Avoid |
|---|---|---|
| Stud Earrings | Pair-matching premium (often 10–20% extra); prioritize cut above carat weight | Buying singles and assuming they will match visually |
| Necklace / Pendant | Chain quality can be 15–25% of total; spend on a solid 14k–18k gold chain 1.5–2.0mm thick | Cutting chain budget to afford a larger stone, causing premature breakage |
| Diamond Bracelet | Stone consistency within color/clarity grade (often 15–30% premium); thicker settings (at least 2.0mm) | Mismatched stones that are visually obvious in a ten-stone row |
| Custom Piece | Design fees (often 5–10% of project); prototyping cost to avoid revisions | Skipping prototyping and paying for expensive casting mistakes |
| Budget Optimization | Strategic color/clarity drops (K-L in yellow gold, I1 for bracelet accents) | Paying for D color and VVS clarity when the setting hides inclusions |
Quick Questions Before You Read
Q: Should I spend more on the diamond or the setting for a pendant?
Spend 15–25% of your total on a quality gold chain (14k or 18k, 1.5–2.0mm thick). For the diamond, cut quality matters most because a pendant moves and catches light from every angle. SI1–SI2 clarity is usually sufficient for many buyers.
Q: Is it worth paying extra for matched stones in a tennis bracelet?
For a cohesive look, matched stones are often essential. Mismatched stones can be immediately visible when side-by-side, and a premium for consistency is common. Side-by-side visual inspection is the best way to verify the match beyond what a report shows.
Q: What is the most common mistake people make with a fixed jewelry budget?
Overspending on high color/clarity specs for every stone, then leaving too little for craftsmanship, chain quality, and secure clasps. This can cause durability issues and a less polished final piece.
Q: How can I stretch my budget without sacrificing quality?
Drop color grade to K-L if setting in yellow gold, use I-J/SI2 for small studs, and I1 for bracelet accent stones that are not the focal point. Buy during January/February or August/September when pricing adjustments are more common.
Why a Diamond Jewelry Budget Should Be Different From an Engagement Ring Budget
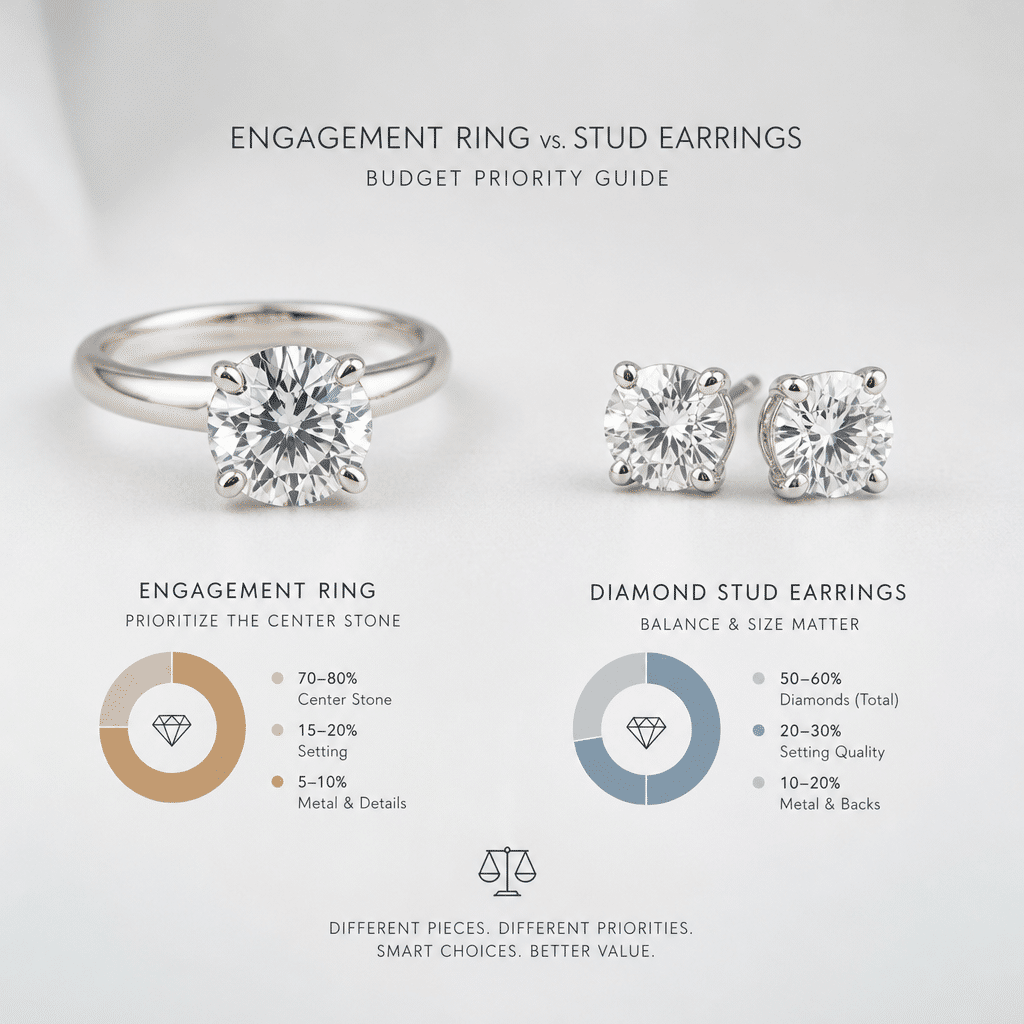
Most people learn how to budget for a diamond through engagement rings. That single-stone framework is useful, but it does not transfer cleanly to earrings, necklaces, or bracelets. When the buying goal shifts from one hero stone to multiple diamonds worn together, the budget logic has to change with it.
The Single-Stone Mindset vs. the Multi-Stone Reality
An engagement ring budget centers on one decision: finding the best possible stone for a given dollar amount. The entire allocation goes to cut, color, clarity, and carat weight for a single diamond, with the setting playing a secondary role.
Jewelry pieces rarely work that way. A pair of stud earrings requires two visually identical stones. A tennis bracelet may need a dozen or more matched diamonds. A necklace splits its budget between the pendant stone and the chain, two components that must work together. The setting complexity, metal weight, clasp or post quality, and stone consistency across multiple diamonds all become real cost factors. The mental model needs to reset from maximizing one stone to balancing several interdependent priorities.
Where Engagement Ring Buyers Overspend When Applying the Same Logic to Jewelry
The most common mistake is carrying over a color-grade obsession from ring buying. An engagement ring buyer often targets D-F color because the stone sits alone in direct comparison to a white metal setting. That same instinct leads jewelry buyers to overspend on high color grades for small earring stones where the visual difference between E and G is often negligible at normal viewing distance. The money would be better spent on pair matching or a higher-quality chain.
The reverse mistake also happens. Buyers who carefully evaluate an engagement ring setting often under-scrutinize a necklace clasp or an earring post, treating those components as afterthoughts. A weak clasp on a necklace worn daily is a bigger functional risk than a slightly lower color grade in the pendant.
The Core Budget Allocation Principle: Visual Return on Investment
A simple rule applies across all diamond jewelry: the budget should follow the visual impact. A stone worn near the face, such as a stud earring or a pendant, gets more scrutiny from closer distances and under direct light. Cut quality and clarity matter more here because the eye can pick up subtle differences in brightness and transparency.
Stones worn farther from the face, like those on a bracelet, are seen at glancing angles and in motion. Color and clarity differences that would be obvious on a pendant can become negligible on a wrist. The money saved on those specs can go toward structural durability, better metal, or larger overall carat weight. Visual return on investment is not about buying the highest grades everywhere. It is about putting the budget where the viewer’s eye actually lands.
Budget Rebalancing Checklist Before You Start Shopping
Before setting a total budget for a jewelry piece, confirm these priorities first. Decide whether matching is required across multiple stones in the same piece. Check the chain or setting metal type and its weight, since this affects both cost and longevity. Confirm whether the piece will be worn daily or occasionally, because wear frequency changes where durability matters most. Verify whether the setting can be resized or serviced later, especially for bracelets and necklaces where repair access may be limited.
Budgeting for Diamond Stud Earrings: Pair Matching Is the Priority
For stud earrings, the most important budget decision has nothing to do with the individual stone grades. It comes down to whether the two diamonds actually look like a pair when worn. Buyers who focus only on maximizing one stone’s specs often end up with mismatched earrings that diminish the overall effect.
How Pair Matching Changes the Cost Equation
Two diamonds graded identically by a lab report can look visibly different when placed side by side. Slight variations in crystal structure, fluorescence, or internal grain patterns that are invisible in a single stone become obvious in a pair. Sourcing a matched pair from the same rough crystal or from carefully sorted production batches helps ensure visual uniformity, and that can add to the stone cost compared to buying two random diamonds of the same grade.
This additional cost reflects the labor of sorting through dozens or hundreds of stones to find two that align in brightness, body color, and transparency beyond what a report captures. Skipping pair matching to save money is a common way to end up with earrings that look uneven. The Gemological Institute of America notes that fluorescence, which is graded separately from color and clarity, can also cause two stones with identical reports to appear different in daylight, further underscoring the importance of a side-by-side visual check before purchase.[1]
The Visual Size Threshold for Earrings: Carat Weight vs. Face-Up Appearance
Carat weight alone does not determine how large a stud looks on the ear. A pair of 0.50-carat stones with excellent cut and ideal proportions can appear larger and brighter than a pair of 0.60-carat stones with poor cut that leaks light through the pavilion. The difference in face-up size can be dramatic enough that the smaller stone actually wins on visual impact.
For studs under 1.00 carat total weight, prioritize cut and proportions over raw carat weight. A well-cut stone makes the most of its size. A poorly cut stone wastes it, and that waste is visible at every distance.
Metal Budget for Stud Settings: Why Post Quality Matters
The post and back of a stud earring determine how the piece wears over time, not the diamond itself. Friction-back, push-back, and screw-back settings have different metal costs and durability profiles. Screw-back posts are more secure and usually use more gold, which raises the setting cost but reduces the risk of losing an earring during daily wear.
Budget for 14k or 18k gold posts, not plated base metal. Plated posts can bend under repeated use and may cause skin reactions once the plating wears through. The extra cost for solid gold is often small relative to the cost of replacing or repairing a failed post on a diamond earring.
Earring Budget Verification Check
Confirm that both stones are graded by the same lab and that the individual report numbers are available for both diamonds. Request side-by-side photos or video of the actual pair, not just stock images. Verify the post metal type and its thickness, especially for larger stones where a thin post may not support the weight. Check whether the backs are included in the price or sold separately, since some settings and brands unbundle these components.
Additional Consideration for Earrings: The Trade-off Between Carat Size and Practical Wear
When setting a budget for stud earrings, it is also worth considering how the carat size affects daily comfort and practicality. A pair of 1.00-carat studs will sit securely on most earlobes without pulling, but stones above 1.50 carats per ear may require larger or heavier settings. A heavier post can cause the earlobe to droop over time, and larger studs are more likely to snag on hair, hats, or clothing. Budgeting for a screw-back or a reinforced post is a practical step that can extend the earring’s lifespan. The visual return from a slightly smaller but more securely set stone often exceeds the perceived advantage of a larger stone that shifts or feels heavy during extended wear. This consideration is especially relevant for buyers who plan to wear studs daily.
Budgeting for Diamond Necklaces: Visible Proportion and Chain Quality Drive the Value
Necklace budgeting requires balancing two components that buyers rarely evaluate together: the pendant stone’s visual performance and the chain’s durability. A mismatch between the two reduces the value of both.
Pendant Stone Budget: Clarity Grade Matters Less Than Cut and Optical Performance
A pendant stone is typically viewed from 12 to 24 inches away, often while the wearer is moving. At that distance, small inclusions that would be noticeable under magnification are simply invisible. SI1 to SI2 clarity is often perfectly sufficient for pendants over 0.50 carats, even in bright daylight.
The priority should be excellent cut and ideal proportions. A well-cut pendant catches light at the varied angles created by natural movement, producing the flashes of brilliance that make a necklace piece feel lively. Cut performance matters more here than in any other jewelry category because the stone is never viewed from the same angle twice in a row. GIA elaborates that cut quality affects a diamond’s ability to channel light, with the most brilliant stones returning the highest degree of light back to the viewer’s eye, which is precisely the effect that makes a pendant feel luminous in motion.[2]
The Real-World Consideration: How Setting Type Affects Light Performance in a Pendant
Beyond the cut grade of the diamond itself, the setting design plays a direct role in how much light reaches the stone. A bezel setting, for example, wraps metal around the girdle and can reduce the light entering from the sides, potentially muting brilliance compared to a prong setting that leaves the crown more exposed. For a pendant that moves constantly, this difference in light intake can be noticeable, especially in lower ambient lighting.
It is worth verifying not just the stone’s cut quality, but also whether the proposed setting style works with the stone’s proportions. A deep pavilion in a high-prong setting may create a different visual effect than the same stone in a flush mount. The budget spent on an excellent-cut diamond can be partially undermined by a setting that restricts its optical performance. Asking to see the stone in the proposed setting style, or at least reviewing proportionate measurements, is a practical step that many pendant buyers skip.
Chain Quality: The Most Overlooked Budget Item in Necklace Purchases
A high-quality diamond pendant on a thin, cheap chain creates a mismatch that undermines the entire piece. The pendant may tug on a weak chain link, causing wear or breakage over time. Visually, the chain should be substantial enough to balance the pendant without competing with it.
Budget 15-25% of the total necklace cost for the chain. Choose 14k or 18k gold for durability. For pendants under 2 carats, chain thickness should fall between 1.5mm and 2.0mm, according to the lab-grown diamond fashion jewelry guide. Clasp type matters too: spring ring clasps work for chains under 2mm, but thicker chains should use lobster claw clasps, which are more secure and easier to fasten independently.
When to Pay More for a Bale or Pendant Setting vs. a Simple Prong Setting
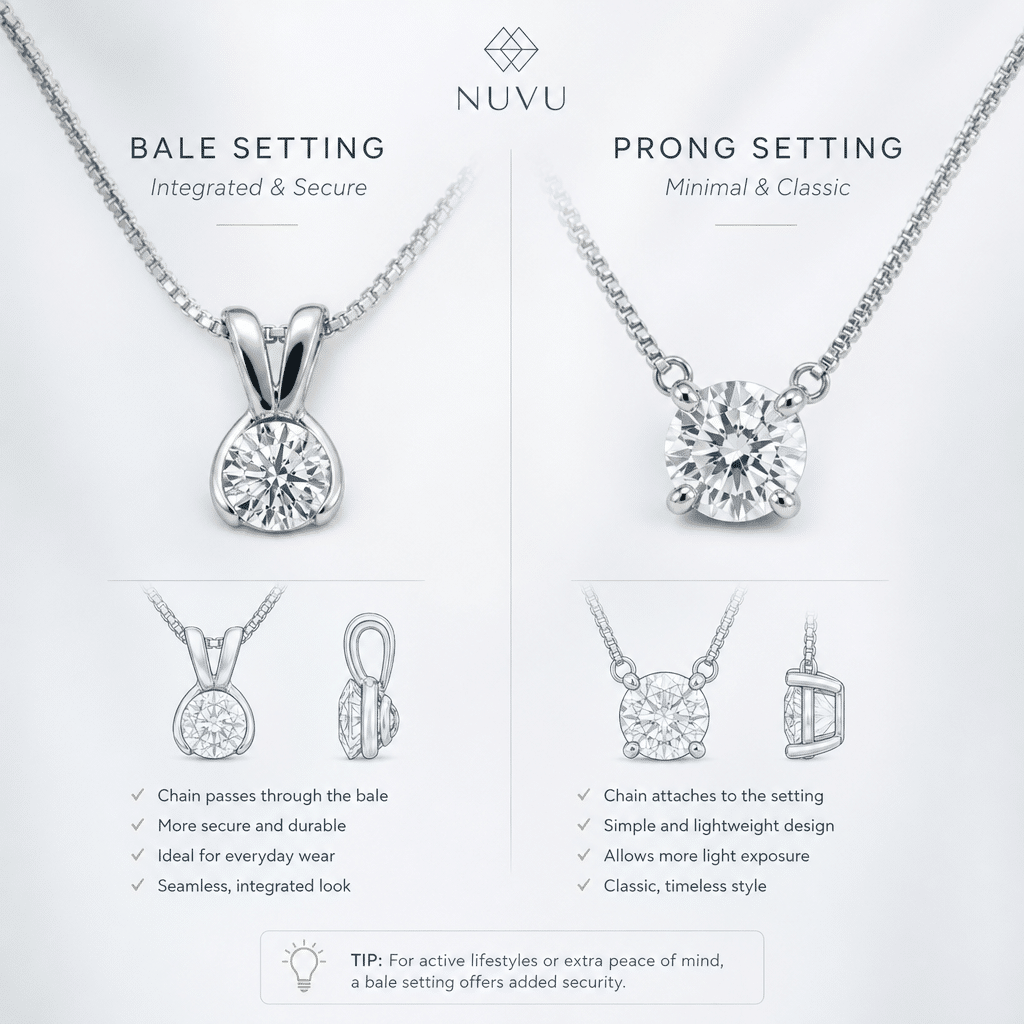
An integrated bale setting adds metal weight and labor but solves a common problem: pendant flipping. A simple prong setting on a round stone may rotate or flip backward as the wearer moves, showing the back of the stone instead of the face. An integrated bale anchors the pendant orientation so it stays facing forward consistently.
The added cost typically ranges depending on gold weight and design complexity. For pendants worn daily, especially those with larger stones, the premium is often worth it. The better visual experience every time the necklace is worn can outweigh the one-time cost difference.
Necklace Budget Confirmation Steps
Confirm the chain metal karat and its weight in grams, not just the length. Verify the clasp type and whether a strength rating is available. Check whether the pendant bale is integrated into the setting or soldered on afterward, since soldered bales can loosen over time. Ask for a photo of the pendant next to a ruler so you can judge actual visual size, not just carat weight. Confirm whether the chain length is adjustable or fixed, because a chain that is too short or too long changes how the pendant sits.
Additional Consideration for Necklaces: Choosing Between HPHT and CVD Diamonds for Pendants
For buyers of lab-grown diamonds, the growth method — High Pressure High Temperature (HPHT) or Chemical Vapor Deposition (CVD) — can affect both cost and visual performance, particularly in a pendant that moves constantly. HPHT diamonds often exhibit a more uniform crystal structure and may be less likely to show graining, while CVD diamonds can be produced with excellent clarity and have their own advantages in color consistency. GIA provides educational resources explaining that both HPHT and CVD are scientifically recognized methods for creating diamonds with the same physical and optical properties as natural diamonds.[3] For a pendant, where the stone’s light performance is paramount, choosing a diamond with a strong cut grade and consistent clarity is more significant than the growth method itself. However, buyers who are particularly sensitive to the potential for strain patterns or graining under certain lighting may prefer to review the diamond under direct light before purchase. The growth method does not inherently change the way the diamond performs, but awareness of it can inform a more confident buying decision.
Budgeting for Diamond Bracelets: Stone Consistency and Structural Integrity Come First
Bracelets present a different set of budget priorities than earrings or necklaces. A bracelet holds multiple stones in a line, and the eye compares them constantly. One stone that is visibly warmer, darker, or slightly smaller than its neighbors can detract from the uniformity of the entire piece. At the same time, a bracelet endures more physical stress than almost any other jewelry category. The budget needs to reflect both realities.
Stone Consistency Across Multiple Diamond Bracelets: Color and Clarity Grading Range
When a bracelet contains ten stones of 0.20 carats each, all ten need to sit within a tight visual range. A grading report that says “G-H color” means the stones fall within that band, but the actual difference between a G and an H can be visible when two stones sit side by side. The safest approach is to require stones from a single production batch or a pre-sorted matched set, with all stones within one color grade and one clarity grade.
This consistency often comes with a cost premium. Buying ten random stones of the same nominal grade typically adds a premium when you require them to be matched. That premium is worth considering for a bracelet. The eye will catch a single mismatched stone every time the bracelet moves. The budget should include the cost of uniformity. The Federal Trade Commission, in its guides for the jewelry industry, emphasizes that descriptions of gemstone quality must be accurate and not misleading, which is especially relevant when multiple stones are advertised under a single grade.[4]
When a grading report is provided for a multi-stone bracelet, the buyer should verify the report details through the issuing laboratory’s official report-check tool where available, and compare those details with side-by-side visual evidence of the stones before setting.
Setting Structure and Metal Budget for Bracelet Durability
A bracelet hits surfaces, bends during movement, and catches on clothing and bags far more often than earrings or a necklace. The setting has to absorb that abuse. A thin gold setting with standard prongs may fail within months of daily wear. Stones can loosen, prongs can bend, and the structural cost of repair can exceed what you saved on the original setting.
Budget for thicker metal — at least 2.0mm for gold settings — and reinforced prongs. The clasp also matters more on a bracelet than on a necklace. Snap-style clasps with a safety catch are the minimum for a piece worn on the wrist. Push-button or lobster claw clasps with a secondary locking mechanism add durability and reduce the risk of the bracelet opening unexpectedly. A cheap clasp is not just annoying; it is the most common cause of lost bracelets.
The Role of Grading Reports in Bracelet Buying: A Practical Check
For a multi-stone bracelet, a grading report for the entire piece—if available—is a useful starting point, but it has a significant limitation. A report stating “G-H color, VS clarity for all stones” does not capture whether those stones are visually consistent with each other. Two VS stones can appear different under side-by-side comparison if one has a different type of inclusion located in a more visible spot.
In practice, this means the buyer cannot rely on the report alone. Requesting images of the stones laid out flat before setting, or asking for a video showing the full bracelet in motion under natural light, can reveal inconsistencies that the paperwork does not show. The grading document narrows the field, but the final decision on consistency depends on visual evidence. This is especially important for bracelets where the stones are arrayed in a single row and compared constantly by the eye.
Carat Weight Budget Allocation for Tennis and Semi-Mount Bracelets
In a full tennis bracelet, every stone is equally visible, and the total carat weight should be distributed as evenly as possible. Stones should match within ±0.01 carat per stone. A bracelet advertised as 5.00 carats total with 50 stones should average 0.10 carats per stone, but if the stones vary by 0.02 or 0.03 carats, the difference can become visible in the setting. Consistency in individual stone size matters more than the total carat number on the tag.
For semi-mount bracelets, where stones sit only on the top half, the budget should shift toward the visible center stones. The side and shoulder stones are seen less directly, and you can drop color and clarity on those without compromising the overall look. An I-J color and SI2 clarity for side stones often works well if the top center stones are G-H and VS2 or better. Allocating stone budget by visibility is how you get the maximum bracelet for the money.
Bracelet Purchase Due Diligence
Before you commit to a diamond bracelet, confirm that all stones are graded within a consistent color range — G-H is a reasonable standard for value, while D-F is only worth the premium if you plan to wear the bracelet against white gold or platinum. Request the total carat weight and the individual stone count so you can verify the per-stone average. Ask about the clasp type and whether it includes a safety mechanism. Clarify whether the bracelet can be sized or if links can be removed. Finally, check the policy regarding stone loss or setting damage after purchase.
—
Budgeting for Custom Diamond Jewelry: Design and Craftsmanship Are the Main Cost Drivers
Custom jewelry flips the usual budget logic. When you buy finished jewelry, most of the cost sits in the stones and the brand markup. When you commission a custom piece, the design, craftsmanship, and prototyping often matter more than a marginal upgrade in diamond specs. The budget should reflect that shift.
Design and Consultation Fees: What You Are Paying For and Why It Matters
A reputable custom jeweler charges a design fee that covers CAD rendering, stone sourcing, and revisions. Expect this to vary depending on complexity. This fee is often misunderstood. You are not paying for a drawing. You are paying for the jeweler to translate your idea into a buildable structure — one where the stone fits the setting, the metal can support the design, and the proportions will look right on the hand or wrist.
Budget 5–10% of the total project cost for design and consultation. If you skip this step or try to get it for free from a less experienced jeweler, you risk ending up with a piece that needs post-casting corrections, which can cost more than the original design fee.
Prototyping and Wax Model Costs in the Budget
Before metal is cast, the jeweler should produce a physical prototype — either a wax model or a 3D-printed resin version. This lets you see the proportions, check the fit, and confirm stone placement before anything is made permanent. The prototype stage typically costs a few hundred dollars.
This is not optional. A prototype is the cheapest insurance against a finished piece that does not fit properly or looks different than you imagined. Correcting a mistake after casting can cost multiples of what the prototype would have cost. Treat the prototype fee as a fixed part of the budget, not an extra you can skip.
Stone Selection for Custom Projects: Why You Should Not Over-Budget for the Stone Alone
A common mistake in custom jewelry is overspending on stone specs while underbudgeting the setting and craftsmanship. The diamond matters, but in a custom piece, the design defines how the stone is seen. If the design includes pave or small side stones, those can be lower color (I-J) and lower clarity (SI2-I1) without any visible difference. The eye does not evaluate each small stone individually. It sees the overall sparkle.
Put most of the stone budget into the center or hero stone. That is the stone that will draw attention. The side stones should be functional-grade diamonds at a lower cost. This rebalancing frees up budget for better metal, more detailed finishing, or a higher-quality center stone — all of which affect the final piece more than upgrading the clarity of a side stone from SI2 to VS2.
Craftsmanship Budget vs. Finished Retail Price: What the Difference Covers
Custom labor is expensive because it is skilled and slow. Bench jewelers charge varying hourly rates depending on experience and location. A multi-hour custom ring project might cost significantly in labor alone. That is more than a mass-produced piece, but the money goes toward things a production line cannot do: unique proportions, better surface finishing, proper stone seating, and the ability to adjust the piece to the wearer’s exact dimensions.
The difference between a custom piece and a retail piece is not just exclusivity. It is that a custom piece can often be resized, repaired, or modified later because the jeweler knows exactly how it was built. A production piece may not have the structural flexibility for those changes. The craftsmanship budget can buy longevity and serviceability.
Documentation and Communication in Custom Projects
For custom jewelry, trust comes from matching the stone to the setting, budget, and wearer’s daily use—not from choosing grades in isolation. Documentation plays an important role: buyers should ask for a written breakdown of the stone’s grading report, a 3D rendering of the final design, and a clear description of the metal type and weight. This helps ensure the project can be accurately evaluated at each stage. In sourcing or wholesale conversations, documentation, consistency, and communication often matter as much as the headline specification. For a custom piece, verifying each documented step against the jeweler’s promises helps prevent misunderstandings that can lead to costly revisions later.
Custom Jewelry Budget Review Before Commitment
Before you authorize a custom project, get the total budget broken into four parts: stone, metal, design, and labor. Ask for a written estimate that includes the number of CAD revisions covered. Confirm whether the prototype fee is refundable or credited toward the final piece. Verify the timeline for stone sourcing, CAD development, casting, and finishing. A custom piece that takes eight weeks may be reasonable for a complex design. A four-week timeline on a complex piece should raise questions about whether prototyping and quality checks are being skipped.
—
How to Allocate Your Total Budget Across an Entire Jewelry Wardrobe
If you are building a collection of diamond jewelry rather than buying a single piece, the way you distribute your total budget across categories determines the overall impact more than any individual piece. Most buyers overspend on one category and underinvest in others. A simple allocation framework helps avoid that imbalance.
The 50-30-20 Rule for Jewelry Wardrobe Planning
A practical rule of thumb: allocate 50% of your total budget to the most visible, daily-wear pieces. These are typically diamond stud earrings and a pendant necklace — pieces that sit near the face and are worn most often. They will generate the highest visual return per dollar spent.
Allocate 30% to statement pieces. These are larger or more dramatic items you wear less frequently but want to make an impression — a substantial tennis bracelet, a longer necklace with a larger pendant, or a cocktail ring. The lower frequency of wear means you can accept slightly less everyday practicality, but the piece should still be structurally sound.
The remaining 20% goes to accent or occasional pieces. This could be a pair of smaller diamond studs, stackable rings, a chain bracelet, or a second pendant. These pieces fill out the wardrobe without requiring the same budget commitment as the core items. The 20% category is also where you can experiment with lower color or clarity grades most safely.
Where to Spend More vs. Where to Save Across Categories
The body location of a piece dictates where your money does the most work. Pieces worn at eye level — earrings and necklace pendants — should get the best cut quality and the most precise proportions because they are seen directly and often at close range. Paying a premium for excellent cut on a pair of studs is often money well spent.
Pieces worn lower on the body, like bracelets and rings, are seen at more glancing angles. The viewer is usually at arm’s length or farther, and the piece is in motion. You can save on color and clarity here. A G-H color range with SI1-SI2 clarity often works well for a tennis bracelet. Going up to D color and VS clarity adds cost but may offer little visible benefit at normal viewing distance.
The most common mistake is reversing this logic according to lab grown diamond jewelry guide: buying D-F, VVS stones for a bracelet while accepting average cut on a pendant. That puts the money where the eye is not looking.
When to Buy Loose Stones vs. Finished Jewelry Within a Budget
Loose stones give you control over the setting and metal. This can save a portion of the total cost because you are not paying for the jeweler’s markup on a finished piece. The tradeoff is time and design complexity. You need to select the stone, choose a setting, and manage two separate processes.
Finished jewelry saves time and design costs, but it locks you into a specific setting. If you want to change the setting later, you are buying a whole new piece.
The smart approach for a wardrobe budget is to mix both. Buy loose stones for the hero pieces — the pendant, the studs, the main ring — where you care most about the stone and want to control the setting. Buy finished jewelry for support pieces like stacking bands, chain bracelets, or simple diamond hoops, where the design is standardized and the cost of customizing does not add enough value.
Final Budget Allocation Checklist
Start by listing all the pieces you want in priority order. For each piece, assign a percentage of your total budget based on the 50-30-20 framework. Then decide for each piece whether loose stone plus custom setting or finished jewelry is the better path. Finally, reserve 10% of the total budget for unexpected costs — sizing adjustments, clasp upgrades, chain length corrections, or future repairs. A budget that does not leave room for the last 10% is a budget that may cut corners on finishing or force a compromise you will regret.
Budget-Friendly Diamond Jewelry Buying Strategies That Work
Using Lower Color and Clarity Strategically by Jewelry Type
One of the fastest ways to stretch a budget is to stop applying the same color and clarity standards to every piece of jewelry. The threshold for what is visible changes significantly depending on the metal, the stone size, and where the jewelry sits on the body.
Yellow gold settings absorb warmth, which means a K-L color stone will not look off in the way it would in white gold or platinum. The slight tint blends into the metal rather than standing out. For stud earrings under 0.50 carats per pair, I-J color and SI2 clarity are often visually clean at a normal viewing distance. Inclusions in small stones are harder to see with the naked eye, and the color difference between a G and an I stone at that size is often negligible in most lighting.
Bracelets offer the biggest opportunity to save, particularly when stones are used as accents. Side stones or shoulder stones in a tennis or semi-mount bracelet can drop to I1 clarity without any visible compromise during normal wear. These stones catch light at glancing angles and are rarely inspected up close. The savings on lower clarity across multiple small stones can be substantial.
The Size-Sweet-Spot Strategy: Where Carat Weight Performs Best for Each Category
Every jewelry category has a carat weight range where visual impact per dollar peaks. Buying outside that range means either paying for minimal visible difference or spending more than necessary to reach the next perceived size level.
For stud earrings, 0.50 to 1.00 carat total weight per pair delivers the strongest return. Below 0.50 carats, the stones start to look small on most earlobes. Above 1.00 carats, the price often jumps faster than the visual size gain. For pendant necklaces, 0.75 to 1.50 carats is the everyday-wear sweet spot. A stone in this range hangs naturally against most necklines without looking heavy or overwhelming the chain. For tennis bracelets, 3.00 to 5.00 carats total weight offers proportionate coverage across the wrist without reaching into the cost surge that can come above 5.00 carats.
Staying within these ranges means the stone budget goes toward better cut quality and setting durability rather than marginal carat weight that makes little difference in how the piece is perceived.
Buying During Sales and Seasonal Discounts: When Timing Helps
Lab-grown diamond prices do not move exactly like natural diamond prices. They are more influenced by production capacity, technology improvements, and inventory cycles rather than long-term scarcity. This can create periods where price adjustments are more common.
January and February typically see post-holiday inventory reduction as jewelers clear stock that did not sell during the fourth quarter. August and September bring pre-holiday restocking, which can lead to competitive pricing as suppliers make room for new production. These months are worth targeting if your timeline is flexible.
The key is to have your specifications ready before the buying window opens. If you already know you want a pair of 0.60-carat studs in G-H color with VS2 clarity, you can move fast when a price dip hits. Waiting until you see a sale to start researching usually means missing the best options.
The Tradeoff Between Number of Pieces vs. Quality of Each Piece
When the total budget is fixed, the instinct is often to buy more pieces. That instinct usually leads to lower quality across the board. A single well-made piece worn daily can deliver more satisfaction than three pieces of lesser quality that spend most of their time in a drawer.
A diamond stud pair with solid settings, matching stones, and good cut quality will hold up for years and look better every time it is worn. Three pairs at a lower price point may involve compromises on post quality, stone matching, or metal thickness. The visual and structural difference often becomes noticeable over time.
For a limited budget, consider buying fewer but better pieces. Each one should be durable enough for regular wear without needing repairs beyond routine maintenance. That durability comes from spending on cut quality, setting integrity, and metal weight — not from having more pieces.
Budget Optimization Review Before Final Purchase
Before committing to a purchase, run through a brief checklist to confirm the piece is built to last. Confirm that the piece can be serviced — prongs can be retipped, chains repaired, and clasps replaced. Verify what is covered after purchase, particularly for bracelets that take more impact. Ask for a written appraisal or grading certificate so you have a record of what was purchased. Confirm the delivery timeline and whether sizing or chain adjustment is included in the price, not added afterward.
Additional Consideration: Understanding Lab-Grown vs. Natural Distinctions
Throughout this guide, the discussion focuses on laboratory-grown diamonds, which are created through controlled technological processes rather than mined from the earth. Laboratory-grown diamonds should be clearly identified as such, and they should not be presented as mined diamonds. When reviewing any grading report or seller description, buyers should verify that the origin of the diamond is clearly stated. The physical and optical properties of lab-grown diamonds are the same as those of natural diamonds, but the origin and market factors differ. For budget-conscious buyers, understanding this distinction helps in making an informed choice about which type of diamond aligns with their priorities and documentation needs.
NUVU’s Approach to Smart Diamond Jewelry Budgeting
How Direct Sourcing and Transparent Pricing Remove Budget Waste
The price you see for a lab-grown diamond includes more than just the stone and the setting. Between the grower and the final buyer, there are often multiple layers of markup — wholesalers, distributors, showrooms, and retailers each adding their margin. NUVU operates with a direct sourcing model that removes most of those intermediate layers.
This means a larger share of every dollar goes toward the diamond itself and the craftsmanship required to set it well. There is no markup padding from a distribution chain that adds cost without adding value. The budget allocation decisions you make — spending more on cut here, saving on clarity there — are not diluted by hidden margins.
Why NUVU Supports Custom Budget Allocation, Not One-Size-Fits-All Packages
Most jewelry buyers do not need a package. They need a piece that reflects their specific priorities. A buyer focused on diamond stud earrings should be able to put more budget toward pair matching. A buyer choosing a pendant necklace should be able to allocate more to chain quality. A bracelet buyer should be able to prioritize stone consistency across multiple diamonds.
NUVU’s custom design workflow supports this kind of targeted allocation because there are no predefined packages that force tradeoffs. You decide where the money goes. If a particular piece calls for a higher-grade center stone and lower-grade side stones, that is a straightforward choice rather than an exception to a prebuilt structure.
Education-First Support for Budget-Conscious Buyers
Knowing where to spend and where to save is the difference between a smart purchase and one that looks right on paper but disappoints in person. NUVU’s educational content is designed to help buyers understand those tradeoffs before they talk to a sales consultant, not after.
This can help reduce buyer’s remorse and improve long-term satisfaction. When a buyer understands why SI2 clarity may work for small earring stones or why a higher-gauge chain matters more than a higher color grade for a pendant, they make decisions they are confident about. The goal is not to sell the most expensive option. It is to sell the option that aligns with what the piece actually needs.
Understanding the Limits of Grading Reports in Jewelry Buying
Grading reports from established laboratories provide an important foundation for comparing diamonds, but they have inherent limitations that buyers should understand. A report captures a stone’s characteristics under standardized conditions, but it does not predict how the diamond performs in a specific setting, under mixed lighting, or when paired with other stones. For NUVU, the goal is to make diamond comparison easier to understand, especially when buyers are weighing report details, visual evidence, design fit, and budget together. A grading report can narrow the comparison, but it should be read alongside the stone’s proportions, visual evidence, and intended jewelry use. When a grading report is available, buyers should verify the report details through the issuing laboratory’s official report-check tool where available, and compare those details with their own visual inspection of the actual stones.
Next Step: Build Your Budget-Based Jewelry Plan
Review the budget allocation principles in this guide against your own priorities. Create a list of the pieces you want, ranked in order of importance. For each piece, decide the stone size, color and clarity grade, setting type, and metal. Then contact NUVU for a transparent project estimate that follows the same logic: money goes where it creates the most visual and structural value for each piece.
[1] GIA, “Fluorescence in Diamonds,” Gemological Institute of America, accessed 2025.
[2] GIA, “Diamond Cut: The Most Important of the 4Cs,” Gemological Institute of America, accessed 2025.
[3] GIA, “Lab-Grown Diamonds: What to Know,” Gemological Institute of America, accessed 2025.
[4] Federal Trade Commission, “Guides for the Jewelry, Precious Metals, and Pewter Industries,” 16 CFR Part 23, FTC, 2018.
Disclosure: This article is for general educational purposes only. Diamond grading, pricing, availability, specifications, and seller policies can change, and readers should verify important details through grading reports, official laboratory tools, seller documentation, or qualified professionals before making a purchase decision. Laboratory-grown diamonds should be clearly distinguished from natural diamonds, and environmental or sourcing claims should be supported by specific documentation. For custom jewelry, stone measurements and setting compatibility should be confirmed before finalizing a purchase.