
Buying a pair of lab-grown diamond stud earrings is not the same as picking a single diamond. When two stones sit side by side, subtle differences in size, brightness, and shape become obvious. Many buyers discover too late that two diamonds with identical 4C grades look mismatched on the ear; to prevent such issues, the lab-grown diamond pendant guide provides essential criteria for selecting pendants with consistent proportions, because certificates don’t capture face-up diameter, optical symmetry, or proportion consistency.
For the full framework, read Lab-Grown Diamond Jewelry Guide.
This guide shifts your focus from generic specs to the specific criteria that matter for matching pairs. You will learn how to compare diameter measurements, verify length-to-width ratios for fancy shapes, and identify which color and clarity thresholds actually affect appearance in studs. The goal is to help you evaluate pictures, certificates, and matched sets with the same eye a jeweler would use.
| Decision Point | Advice for Studs | What to Look For |
|---|---|---|
| Carat weight vs. face-up size | Prioritize diameter over carat when comparing stones | Round 1.00ct is ~6.4mm; princess 1.00ct is ~5.5mm |
| Cut grade matching | Don’t rely on grade alone; check specific angles | Crown angle and pavilion depth within 0.5% between stones |
| Color grade for metal type | Match color grade to your setting | G-H for white gold; H-J for yellow or rose gold |
| Clarity grade threshold | Spend where it’s visible; VS2 or SI1 is sufficient | No visible inclusions at arm’s length |
| Setting for visual size | Martini settings maximize perceived size | Bezel reduces apparent diameter |
| Backing security over 1.00ct | Screw-back provides the highest security | La Pousette is a practical alternative |
| Pre-matched vs. matching from singles | Opt for pre-matched pairs from a single seller | Verification via side-by-side photos and rotation videos |
Quick Questions Before You Read
Q: Do two diamonds with the same 4C grade always look the same in studs?
No. Grade sheets don’t capture crown angle, pavilion depth, or diameter exactness. Two GIA Excellent stones can differ enough in proportions that one appears dull or larger than the other.
Q: Is it worth paying more for D-color or IF-clarity in studs?
Not typically. The ear setting and viewing distance make D-F overpricing unnecessary. G-H in white metal or H-J in yellow gold paired with VS2-SI1 clarity looks nearly identical at a fraction of the cost.
Q: Can I easily return a mismatched pair of studs?
Return policies vary. Most sellers accept returns on unworn, unaltered pairs, but verifying matching before purchase saves hassle. Always request side-by-side photos and rotation videos.
Q: Do lab-grown diamond studs hold any resale value?
Resale value is generally lower than for many other jewelry categories. Treat studs primarily as a jewelry purchase. Buyers should review market conditions and seller policies rather than assuming future value retention.
Why Lab-Grown Diamond Studs Deserve a Different Buying Approach
If you have already shopped for a single lab-grown diamond, you might assume buying a pair of studs follows the same logic. It does not. Choosing two diamonds that need to sit side by side on your ears introduces a set of priorities that barely matter when selecting a single ring stone. Applying the wrong framework is the most common reason buyers end up with studs that do not look or feel like a matched pair.
The Difference Between a Single Diamond and a Pair
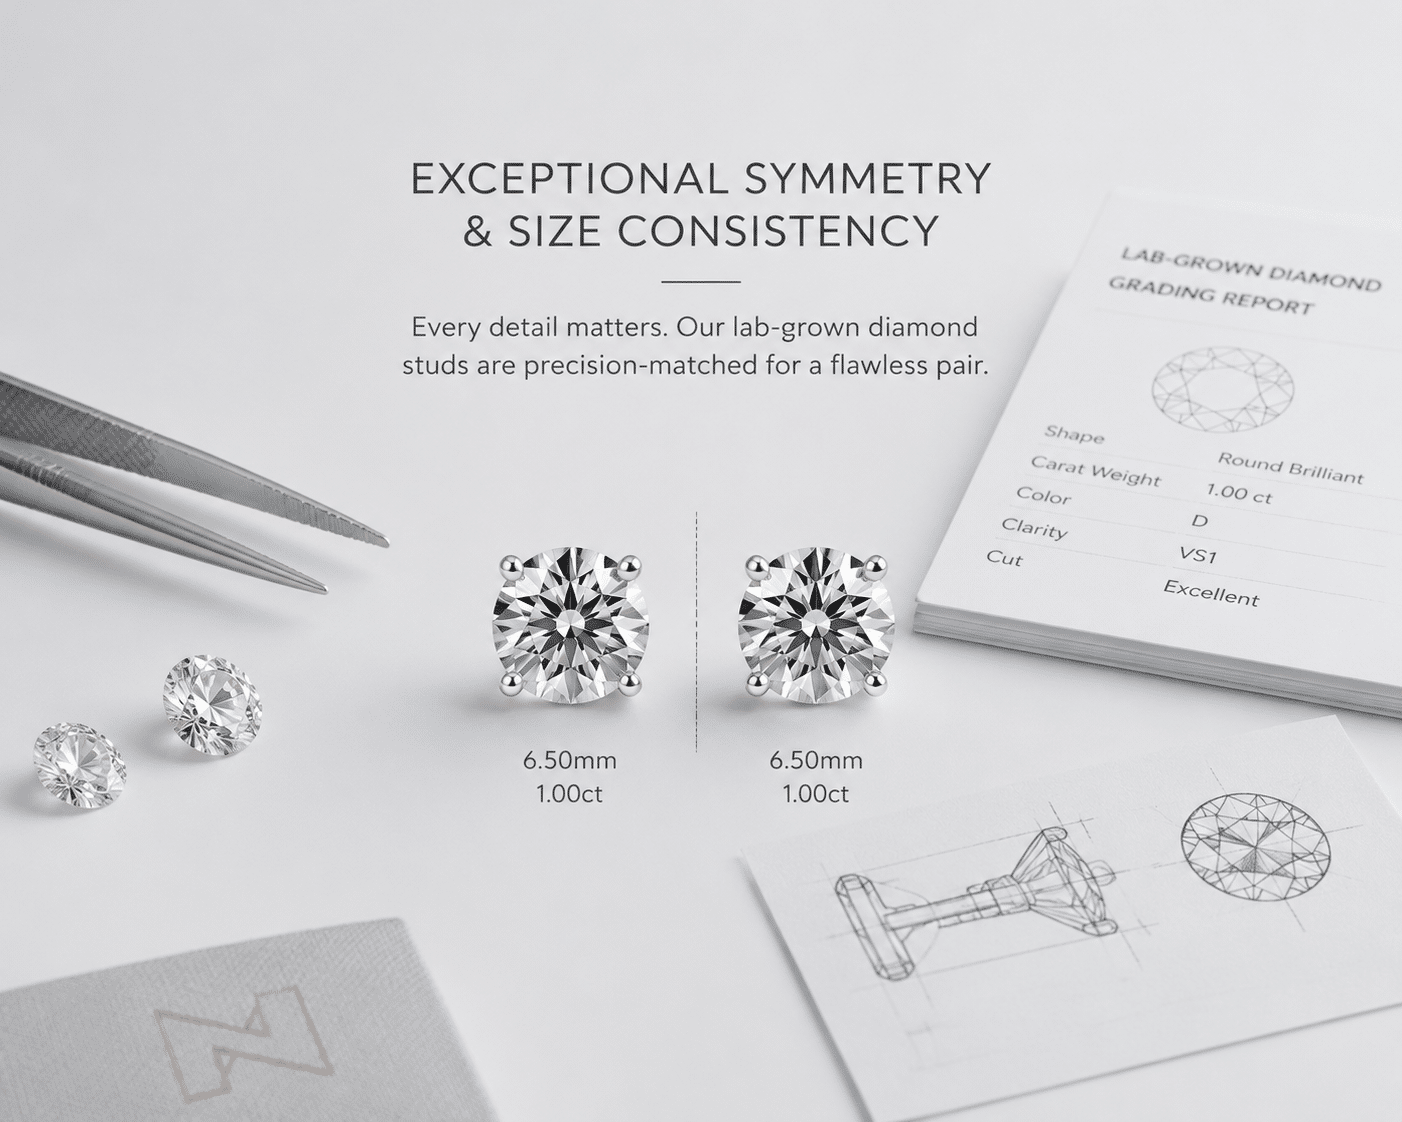
A single diamond is judged entirely on its own merits. How it sparkles, how its proportions perform, and whether its color grade suits the setting are all evaluated in isolation. A pair of studs introduces a second dimension: how the two diamonds compare to each other. Visual symmetry, face-up size consistency, and how both stones perform together under the same light become the actual criteria. Two diamonds with identical grading reports from the same laboratory can still look noticeably different on the ear because their proportions, light return, or internal grain patterns differ in ways that certificates do not capture.
What Most Buyers Get Wrong When Shopping for Studs
The most frequent mistake is treating carat weight as the primary measure of size. Two diamonds can share the same carat weight but have different face-up diameters, meaning one stone looks visibly larger on the ear. The second common error is assuming that identical color and clarity grades guarantee identical appearance. A pair of G-color, VS2-clarity stones can still be mismatched if their crown angles differ or if one stone has a fluorescence that affects its brightness. The third mistake is choosing a shape without accounting for how its face-up dimensions compare to a round brilliant. A 0.50-carat princess cut measures noticeably smaller than a 0.50-carat round, which can lead to disappointment if the buyer expected ear presence based on carat weight alone.
Buyer Verification Checklist
Compare the face-up diameters of both stones, not just their carat weights. Request side-by-side photos or videos taken under the same lighting conditions. Confirm that the two diamonds have similar crown angles and depth percentages, not just matching color and clarity grades.
For many buyers, the practical takeaway is that a grading report tells part of the story, but side-by-side visual comparison tells the rest. A report that lists identical grades on paper does not erase the possibility of visible mismatch once the stones are mounted.
How the Lab-Grown Diamond Category Shapes Buyer Expectations
Laboratory-grown diamonds are produced through two primary methods: high-pressure, high-temperature (HPHT) and chemical vapor deposition (CVD).[1] Both methods produce optically, physically, and chemically identical diamonds. What differs from natural diamonds is the origin story, not the material itself. The Federal Trade Commission (FTC) has clarified that the term “diamond” is broad enough to include both mined and laboratory-created diamonds, reinforcing that terminology matters in advertising and disclosure.[2] For stud buyers, this means the same terminology, grading standards, and buyer protections apply regardless of origin. Understanding this context helps when evaluating claims about quality, certification, and pricing in the lab-grown market.
Total Carat Weight vs. Face-Up Size: What Actually Matters for Studs
Carat weight is a useful starting point, but it tells you very little about how large a diamond will actually look when worn. For stud earrings, face-up diameter is the metric that determines visual presence. Two pairs of studs with the same total carat weight can look completely different in size depending on how each diamond distributes its weight across its surface area.
How Carat Weight Distributes Differently Across Shapes
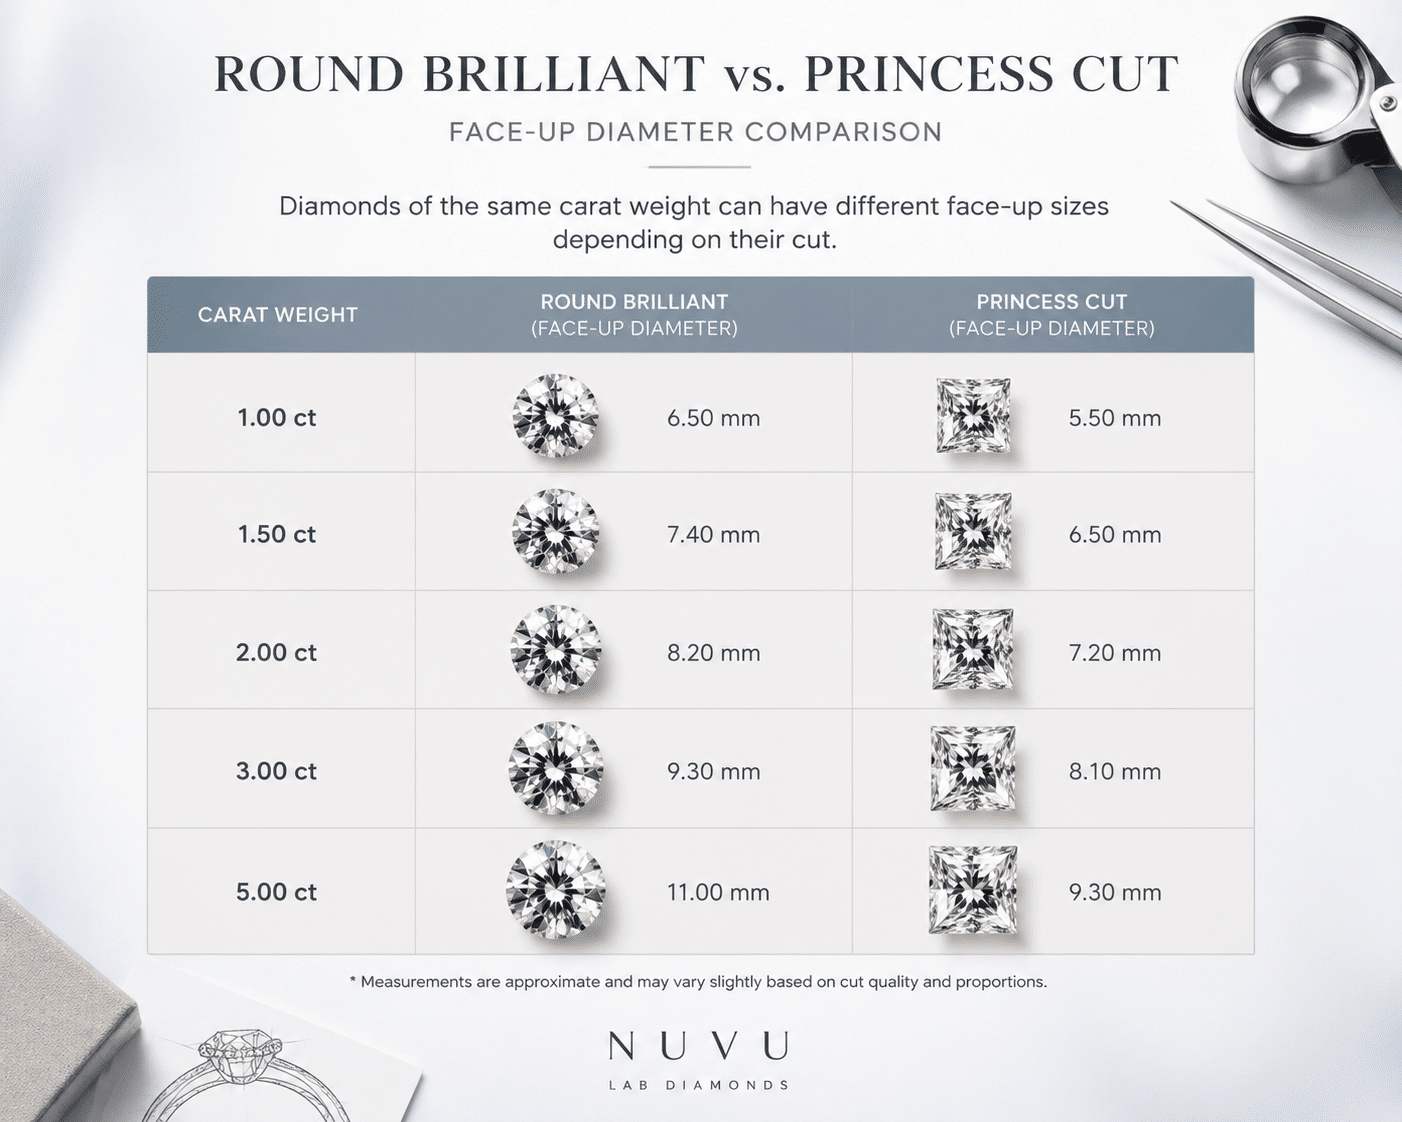
A 1.00-carat round brilliant has an average face-up diameter of approximately 6.4 millimeters. A 1.00-carat princess cut may measure only 5.5 millimeters across at its widest point. That 0.9-millimeter difference is substantial enough to make the princess cut studs appear significantly smaller on the ear, even though both pairs contain the same total diamond weight. The same logic applies to other shapes. Oval and pear cuts can appear larger than their carat weight suggests if their length-to-width ratios are favorable, while emerald and asscher cuts tend to look smaller because their stepped facets and deeper proportions keep more weight below the girdle.
Why Diameter Charts Are More Useful Than Weight Alone
Many buyers compare studs by total carat weight without ever checking the actual spread of each stone. Two pairs of 1.00-carat total weight studs can differ by 0.4 millimeters or more in face-up diameter, creating a clearly noticeable size difference when worn. A diameter chart breaks down the typical spread for each shape and carat weight, giving you a number to compare rather than guessing based on weight alone. This is especially important for studs because the human eye is very good at detecting small differences in size when two objects sit symmetrically on opposite ears.
What This Means in a Real Purchase
A buyer comparing a 1.00-carat pair with a favorable 0.5-millimeter larger diameter to a 1.20-carat pair with tight proportions may find that the smaller carat weight looks larger on the ear. Request diameter measurements for both stones before comparing price per carat. The stone that looks bigger is the one that delivers more visual value, regardless of what the scale says.
Shape Selection for Stud Earrings: Visual Presence, Matching, and Wear
Shape is not just an aesthetic preference for stud earrings. It directly affects how large the diamonds appear, how difficult they are to match as a pair, and how they interact with the ear setting. Choosing a shape without understanding these tradeoffs is one of the most common reasons buyers end up with a set that does not look uniform.
How Shape Affects Visual Size and Symmetry Matching
Round brilliants offer the most consistent face-up appearance and are the easiest shape to match for symmetry. Their uniform outline and predictable facet pattern mean that two round stones with similar proportions will look nearly identical side by side. Fancy shapes demand more careful selection. Oval, pear, and marquise cuts each have a length-to-width ratio that can vary from stone to stone. Two ovals with the same carat weight but different length-to-width ratios will look noticeably different in silhouette, making the set appear mismatched even if the grades match perfectly.
Which Shapes Show Bow-Tie and Asymmetry Issues
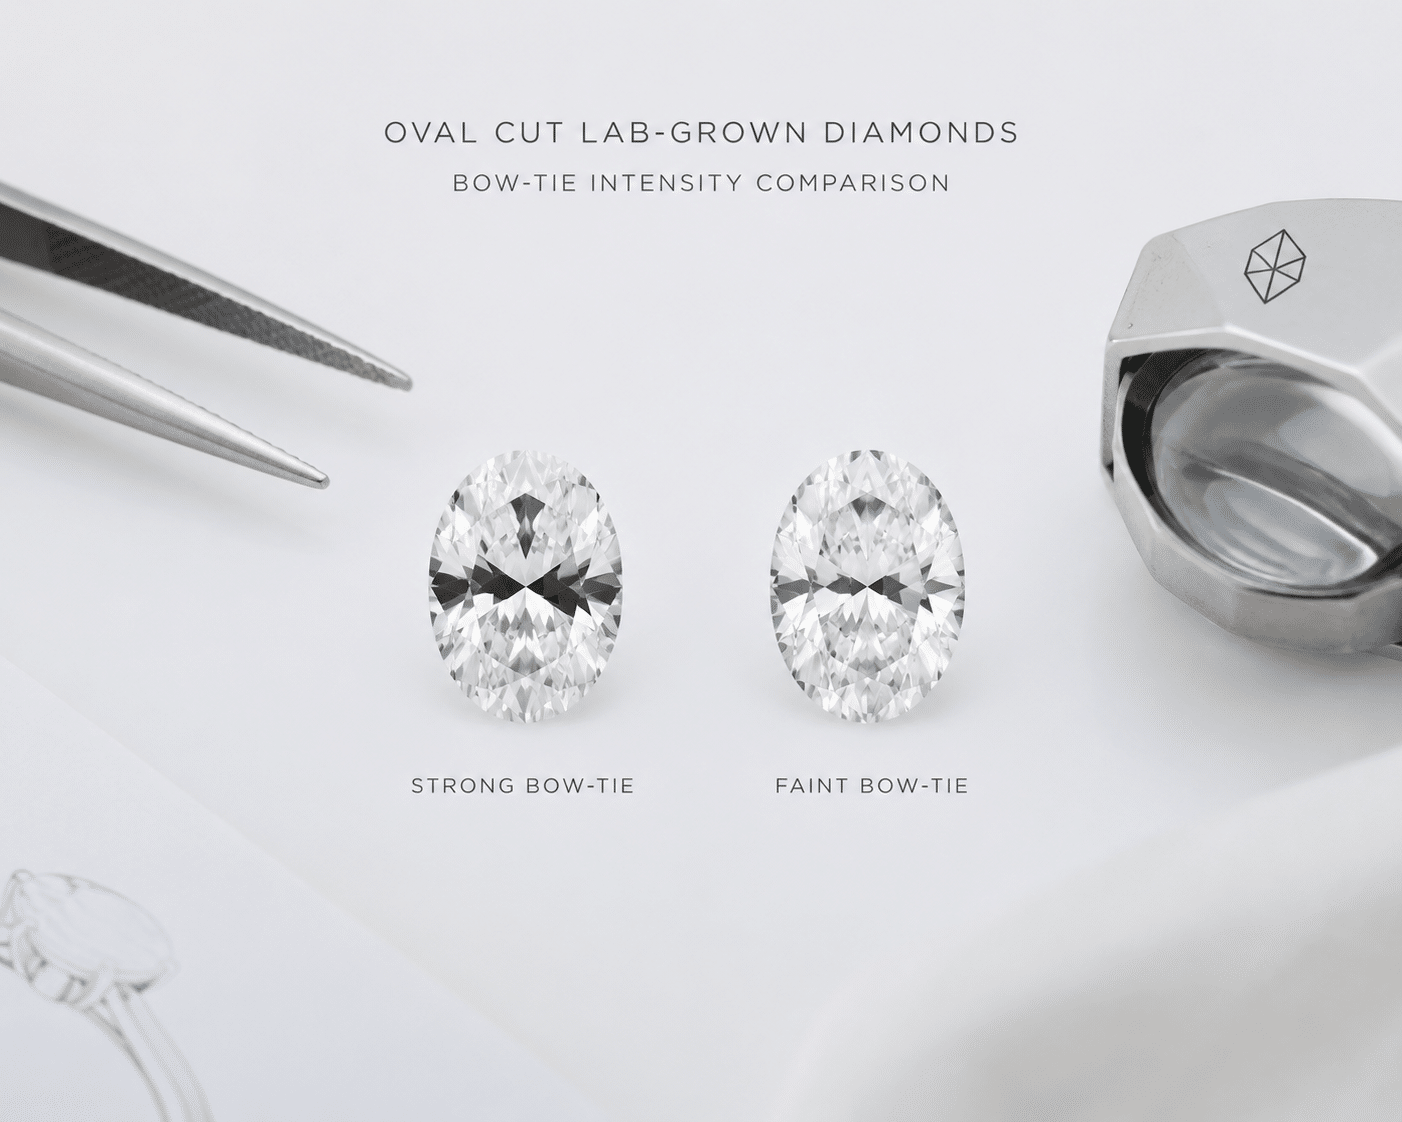
Oval, pear, and marquise cuts are more likely to show a dark bow-tie pattern across the center of the stone. The bow-tie is a result of how light moves through the elongated shape, and its intensity varies from one diamond to the next. Two stones with identical color and clarity grades can have very different bow-tie visibility, meaning one stud may appear darker or more shadowed than its partner under the same light. Emerald and asscher cuts show less bow-tie effect, but they require precise step-cut alignment for side-by-side symmetry. If the step facets do not line up visually, the pair can look mismatched despite having identical measurements on paper.
Stone-to-Setting Fit Check
For fancy shapes, confirm that both diamonds have matching length-to-width ratios within a 0.05 difference. Review a 360-degree video for bow-tie presence on both stones. Ask for images of both diamonds placed side by side on a white surface rather than relying on individual product photos taken in isolation.
For buyers considering fancy shapes, the practical challenge is that bow-tie intensity is subjective and varies widely between stones. A video comparison under the same light is more informative than any certificate notation, because no grading report assigns a numerical value to bow-tie visibility.
Cut Quality: The Most Underrated Factor in Stud Matching
When you place two diamonds side by side on the ear, the difference that jumps out first is rarely color or clarity. It is brightness. One stone catches the light, and the other looks slightly flat. That difference comes down to cut quality, and it is the most common reason two identically graded diamonds fail as a pair.
Most buyers assume that a GIA Excellent grade guarantees consistent light performance. In reality, that grade covers a range of proportions. Two diamonds can both be rated Excellent and still have crown angles that differ by 1.5° or pavilion depths that differ by 1.0°. Those differences change how light enters the crown, reflects off the pavilion facets, and exits back to the eye. One stone may look crisp and brilliant while its partner looks slightly dim, even though both carry the same paper grade.
How Proportions Affect Light Performance in Pairs
The critical measurements for light performance are crown angle, pavilion depth, and table percentage. Within the GIA Excellent range, a diamond with a crown angle of 34.0° will return light differently than one with a crown angle of 35.5°. The difference is invisible when you look at each stone alone. When you place them next to each other in a pair of studs, one will appear brighter and the other noticeably darker under the same bulb.
The same problem occurs with pavilion depth. A difference of 0.5° in pavilion angle can shift how the diamond handles light leakage from the side. In a single stone, the eye compensates. In a pair, the asymmetry becomes obvious. The studs no longer look like they belong together, even though both fall within the same cut grade on paper.
Why Two Identically Graded Stones Can Look Different on the Ear
The human eye is exceptionally sensitive to small brightness differences when two objects sit directly next to each other. A brightness difference as small as 2% becomes noticeable when the diamonds are mounted in studs and viewed at arm’s length. That 2% gap can easily come from a 1.0° mismatch in crown angle or a 0.5° mismatch in pavilion depth. The result is one stud that sparkles and one that looks like it needs cleaning.
Color and clarity grades will not fix this. Two stones can both be D color and VVS1 clarity, but if their cut proportions are mismatched, they will look different on the ear. Cut quality is the primary driver of perceived brightness, and brightness consistency is what makes a pair of studs look matched.
Using Videos to Confirm Brightness Consistency
Because proportion differences are invisible in static photos, a rotation video under a single light source is the most reliable way to assess brightness matching. When both diamonds rotate together, any difference in light return—whether from crown angle variation or internal grain—becomes immediately visible. If one stone appears consistently darker or shows more contrast in the same orientation, the pair is not matched. A seller who provides such a video is offering the clearest evidence of cut consistency available outside of a physical inspection. Buyers should treat the absence of this evidence as a gap that needs to be filled before committing.
Certificate and Visual Review Check
Before confirming your purchase, compare the crown angle, pavilion angle, and depth percentage for both stones. If the crown angles differ by more than 1.0°, or the pavilion depths differ by more than 0.5°, request to see the pair side-by-side before you commit. Ask the seller for a video of both diamonds rotating together under the same light source. The video will reveal brightness differences that the grading report cannot show. If the seller cannot provide this, consider it a red flag. Matching studs require matched light performance, not just matched grades.
Color and Clarity: How High Is High Enough for Studs
The most expensive mistake in stud buying is paying for color and clarity grades that make no visible difference once the diamonds are mounted. For studs, the threshold for both color and clarity is lower than most buyers assume, and the savings can be redirected toward larger carat weight or a better setting.
Color Grade Thresholds That Actually Matter in Studs
Color grade matters, but only up to a point that depends on your setting metal. For studs set in white gold or platinum, the metal reflects cool tones that mask any slight body color in the diamond. A G-H color pair looks visually identical to a D-F pair once mounted. You are paying for a difference that the setting neutralizes.
For yellow gold or rose gold settings, the threshold is even wider. The warm metal reflects yellow and pink tones that offset any faint body color in the diamond, a factor that makes lab grown diamond earrings ideal for daily wear. A G-J color pair will look the same as a D-F pair when set in yellow gold. The metal does the work of whitening the stone for you.
The practical takeaway is straightforward. If you are setting your studs in white gold or platinum, stop at G-H color. If you are using yellow or rose gold, G-J color is visually equivalent to higher grades. Anything above these thresholds is spending on a difference you cannot see in the finished pair.
Clarity Grade Thresholds That Matter in Studs
Clarity follows the same logic. Studs are viewed at arm’s length, not under a loupe. At that distance, VS2 and SI1 clarity grades show no visible inclusions to the naked eye. The difference between VS1 and FL is invisible in a mounted stud. You are paying for a laboratory distinction that has zero effect on how the diamonds look when worn.
The only clarity risk worth paying attention to is an SI2 stone with a large inclusion near the center of the table. That type of inclusion can be visible at arm’s length, especially in bright light. For SI1 and above, the risk is negligible. For VS2 and above, the risk is effectively zero.
What to Check Before You Decide
If you are considering an SI1 or SI2 stone, ask the seller for a loupe image or magnification photo to confirm that the inclusion is not center-table or heavily visible. For VS2 and above, rely on the grading report and a 360-degree video. Paying for higher clarity than VS2 in a stud is spending money on a difference that will never be noticed. The savings from dropping from VVS1 to VS2 can often pay for upgrading to a larger carat weight, which will actually be visible.
For buyers, the practical distinction is between a grade that looks clean on paper and a stone that looks clean on the ear. A VS2 diamond with strong brightness will outperform a VVS1 diamond with average cut in side-by-side comparison, because the eye registers light return before it registers microscopic clarity.
Disclosure and Terminology in the Lab-Grown Market
The FTC has issued guidance on how laboratory-grown diamonds should be described in advertising and sales, emphasizing that terms like “eco-friendly” or “sustainable” require substantiation to avoid misleading consumers.[2] For stud buyers, this matters because claims attached to the diamond’s origin should not be confused with claims about the diamond’s quality or appearance. A laboratory-grown diamond with G-H color, VS2 clarity, and an excellent cut is evaluated by the same 4C standards as any other diamond, regardless of how it was created.[3] By centering the buying decision on documented grading reports, visual verification, and transparent seller practices, you avoid the kind of promotional framing that can obscure what you are actually purchasing.
Certificate Matching: What to Look for in Paired Grading Reports
A grading report is useful, but it does not guarantee a matched pair. The report gives you the raw measurements, but matching studs requires comparing those measurements across two stones and understanding what the report cannot tell you.
How to Compare Two Reports for a True Pair
Start by confirming that both stones have matching or near-matching color, clarity, and cut grade. That is the baseline. The real verification comes from the measurements. The face-up diameter should be within 0.05mm between the two stones. The depth percentage should be within 0.5%. The crown angle should be within 0.5°. GIA and IGI reports provide all of these numbers.[4] If the seller cannot provide them for both stones, you cannot verify the match.
Do not rely on carat weight alone. Two stones with identical carat weight can have different diameters because of shape and cut differences. The diameter measurement is the number that determines whether the studs look the same size on the ear. Compare it directly.
What a Certificate Does Not Tell You About a Pair
A certificate reports grades, not visual performance. It does not measure bow-tie intensity in fancy shapes. It does not report brightness uniformity or scintillation pattern. It does not capture internal grain, fluorescence, or polish variations that can make two identically graded diamonds look different side by side.
This is where visual verification becomes essential. Two diamonds with identical GIA reports can still look mismatched because of factors that no report captures. The only way to confirm a true match is to see both stones together under consistent lighting.
How to Use Report Numbers for Independent Verification
Each grading report issued by GIA, IGI, or GCAL carries a unique number that can be cross-referenced through the issuing laboratory’s online verification tool.[5] For stud pairs, this step is more than a formality. Confirming both report numbers independently ensures that the diamonds you are comparing on paper are the same stones the seller is showing you in side-by-side images. A mismatch between the report number and the seller’s listing is rare but can happen, and catching it before the studs are shipped eliminates a potential documentation discrepancy. Buyers should treat this verification as a standard part of comparing two reports, not as an afterthought reserved for high-value purchases.
Buyer Verification Checklist
Request photos or video of both stones together in natural light and under LED light. Ask the seller to confirm whether both stones were cut from the same rough crystal, which improves the chance of matched optical performance. Avoid buying two individual stones from different sources and assuming they will match. The safest approach is to buy a pre-matched pair from the same seller who has already verified the visual match. Certificate verification is the starting point, not the final step.
For buyers, the practical point is that a certificate is most useful when treated as a screening tool rather than a guarantee. It helps narrow the field, but the final decision still depends on how the stones perform visually together. At NUVU, this kind of comparison is treated as a practical selection question: the report provides the data, but the pair is confirmed by side-by-side review.
All diamonds discussed in this article with grading reports have been verified against official lab records where applicable. For added confidence, independent verification is available through GIA’s online report check service or IGI’s equivalent database.
Setting and Backing Choices for Lab-Grown Studs
The best diamond in the world won’t look right if the setting works against it. And the best setting offers no comfort if the backing fails. For stud earrings, the metal, the mount, and the backing type all affect how the diamonds appear on the ear and how securely they stay there.
Metal Selection and Its Effect on Diamond Appearance
White metals and warm metals behave differently with diamond color. White gold and platinum settings reflect cool, neutral tones back through the stone. This means a G or H color diamond mounted in white gold will look visually whiter than its grade suggests. Buyers who choose white gold or platinum can comfortably select G or H color without any visible difference from D or E.
Yellow and rose gold settings do the opposite. They cast warm reflections into the diamond, which means any faint yellow body color in the stone is masked rather than emphasized. A diamond graded I or J color set in yellow gold looks perfectly white to the naked eye because the metal absorbs the warm tone rather than amplifying it. Paying for D-F color in a yellow gold setting is mostly wasted money.
The practical takeaway is straightforward. Choose your metal first, then select your color grade accordingly. Platinum or white gold buyers should target G-H color for the best balance of appearance and price. Yellow or rose gold buyers can comfortably select H-J color and see no difference.
Prong, Bezel, and Martini Settings Compared
The setting type changes how the diamond looks on the ear and how protected it is during daily wear.
Four-prong basket settings are the most common choice for studs. They expose the diamond fully to light, which maximizes brightness and fire. The trade-off is that the girdle is more exposed to impact, and the prongs can snag on hair or clothing if not finished smoothly. For studs worn daily, check that the prongs are rounded and not sharp.
Bezel settings wrap a metal rim around the entire diamond. This protects the girdle completely and reduces the chance of snagging or stone loss. The downside is that the metal rim covers part of the diamond’s edge, making the stone appear slightly smaller than its actual diameter. A bezel-set 0.50ct round will face up smaller than a prong-set 0.50ct round. This matters if visual size is your priority.
Martini settings hold the diamond at a forward tilt from the earlobe. This angled presentation increases face-up visibility without requiring a larger stone. A 0.75ct diamond in a martini setting can look as prominent as a 1.00ct diamond in a flat prong setting. Martini settings also reduce metal coverage on the crown, keeping the stone the focal point. They are a strong option for buyers who want noticeable ear presence without moving up to a higher carat weight.
Backing Types: Screw-Back, Push-Back, and La Pousette
The backing is the part most buyers ignore until a stud falls off. For lab-grown diamond studs, the backing type should match the weight of the diamonds and the frequency of wear.
Screw-back posts are the most secure option. The backing threads onto the post and requires deliberate rotation to remove. This makes accidental loss nearly impossible. The downside is that putting on and removing screw-back studs takes more time and dexterity. They are best for valuable studs above 1.00ct total weight or for buyers who want maximum peace of mind.
Push-back or friction backings are the standard for most stud earrings. They are easy to put on and remove, which makes them convenient for daily wear. The problem is that friction backings can loosen over time as the metal post wears down. For studs above 1.00ct total weight, standard push-backs may not hold securely enough, especially if the diamonds are heavy or the wearer is active.
La Pousette backings use a clutch mechanism with a locking click. They offer better security than standard push-backs without the full effort of screw-backs. The locking mechanism prevents accidental removal while still allowing one-handed operation. La Pousette is a practical middle ground for studs between 0.50ct and 2.00ct total weight.
Buyer Verification Checklist
Confirm the post length before ordering. Standard posts are 10mm, which works for most earlobes. If you have thicker lobes or plan to wear the studs with a second piercing, ask whether longer posts are available. Verify whether the setting includes any warranty against stone loss — some manufacturers cover loose prongs or defective settings for a limited period. For studs above 1.00ct total weight, ask the seller directly whether the backing type and post gauge are rated to support the combined weight of the diamonds and setting.
Documentation Consistency Between Setting and Diamond Purchase
When diamonds and settings are purchased separately, buyers should confirm that the documentation from both sources aligns. The setting manufacturer’s specifications for post length, metal type, and prong configuration should match the requirements of the selected diamonds. If the setting is custom-made, written confirmation of the stone measurements used to fabricate the mount helps ensure a proper fit after the diamonds are set. This is particularly important for fancy-shaped stones, where slight variations in girdle thickness or shape outline can affect how securely the diamond sits in the prongs.
Price Optimization: Where to Save and Where to Invest
Laboratory-grown diamond studs give buyers more room to spend intelligently, because the price difference between a good grade and an excellent grade is often narrower than in natural diamonds. But that does not mean every upgrade is worth it. The key is knowing which attributes matter to the visible result and which ones you are paying for but will never see.
Where Buyers Commonly Overpay for Studs
The most common overpayment areas are predictable once you understand how studs are worn.
D-F color grades in yellow or rose gold settings are almost never justified. The warm metal neutralizes any visible color difference. Buyers who choose G or H color with a yellow gold setting get the same visual result for less.
IF or FL clarity grades are equally wasteful for studs. No one will examine your earrings at 10x magnification. VS2 and SI1 clarity grades are completely clean to the naked eye at arm’s length. The difference between VS2 and FL is invisible in a mounted stud. Paying for higher clarity only makes sense if you plan to resell the stones individually, which is uncommon for studs.
Premium-priced brand settings are another area where money often goes further elsewhere. A generic high-quality four-prong martini setting in 14k gold performs identically to a designer-branded setting at a fraction of the cost. The brand name on the inside of the post, as the lab grown diamond jewelry guide suggests, does not affect how the diamond looks or how securely it sits.
What Is Worth Paying More For
Cut quality is worth prioritizing because it directly controls how bright the diamond appears. Two stones with the same color and clarity but different cut grades will look noticeably different on the ear. The better-cut stone will appear brighter, whiter, and larger because it reflects more light. Never downgrade cut quality to save money on studs.
Diameter spread is worth paying for because it determines visible size. Between two diamonds of the same carat weight, the one with the larger face-up diameter will look bigger on the ear. Diameter is not listed on all certificates, but you can request it from the seller. Prioritize stones with wider spread within the same carat weight range.
Certified matching from a single source is worth the premium because it reduces the risk that your two studs will look different. A seller who matches stones by face-up diameter, crown angle, and depth percentage is doing real work that improves the final result. Buying two individual stones from different sources and hoping they match is a gamble that rarely pays off.
What This Means in a Real Purchase
A pair of 1.00ct total weight lab-grown studs with G-H color, VS2 clarity, Excellent cut, and a quality four-prong martini setting in 14k gold will look identical to a pair with D color and VVS1 clarity at roughly half the price. In many cases, the G-H pair may look better because a well-cut stone with strong proportions outperforms a higher-grade stone with average cut.
The savings from avoiding unnecessary color and clarity grades can be redirected where it actually improves the pair. Larger carat weight gives you more visible presence. A better setting with secure backings protects your purchase. Custom engraving or a specific metal finish adds personal value without affecting the diamond’s appearance.
Why Clear Terminology Supports Informed Pricing
The FTC’s guidance on jewelry advertising also applies to how sellers describe laboratory-grown diamonds.[2] When a seller uses clear terms such as “laboratory-created” rather than vague phrases, it helps buyers understand what they are paying for, eliminating surprises about origin or value. This guidance aligns with the principle that informed pricing depends on accurate, transparent communication. For stud buyers, choosing a seller who uses precise terminology from the outset is a useful signal of how they handle other aspects of the transaction, including report verification and return policy.
How to Verify Your Purchase Before the Box Arrives
A confident purchase requires more than a good price and a pretty photo. Before you confirm the order, use a structured checklist to verify that the pair you are buying is actually the pair you expect.
Documentation Checklist
Confirm that both diamonds come with individual grading reports. A single report covering the pair is not sufficient because it does not give you the measurements needed to verify matching. Verify that the report numbers on the certificates match the laser inscriptions on the diamond girdles. Some sellers place the inscription on the side of the stone, which may be hidden once the diamond is set, so check the location before setting.
Request written confirmation that the pair has been matched for face-up diameter, depth percentage, and crown angle. Verbal assurances are not enough. A seller who provides specific measurements in writing is taking the matching process seriously.
Visual Evidence Checklist
Ask for a side-by-side photo of both loose diamonds on a white surface with a ruler or caliper visible in the frame. This lets you verify that the diameters match within an acceptable tolerance. Individual product photos can hide size differences that become obvious in a direct comparison.
Request a 10-second video of both diamonds rotating together under LED bulb light. This reveals differences in brightness, scintillation, and any bow-tie or extinction that would be invisible in static photos. If the seller cannot provide this, it is a warning sign that the stones have not been visually matched.
If the seller offers a return window, confirm that it is long enough to inspect the studs under natural daylight. Fluorescent store lighting and LED showroom lighting can mask color or brightness differences that become obvious in sunlight. Ideally, you should have at least seven days to evaluate the pair in real-world conditions.
What to Check Before You Decide
Confirm the return policy specifically for matched pairs. Some sellers allow return of the full pair but do not accept return of individual stones within the pair. If one diamond has an issue, you may be forced to return both or keep a mismatched pair. Ask whether the studs come with any warranty against stone loss or setting defects, and get the terms in writing. Finally, verify that the post length and backing type are compatible with your daily use before finalizing the order. A well-matched pair of diamonds can be ruined by a backing that does not hold.
For buyers, the verification process should feel like a natural part of confident shopping rather than an adversarial check. A seller who offers clear documentation, side-by-side media, and practical return terms is demonstrating readiness to stand behind the match. Trust emerges from transparency, not from price alone.
Verifying Report Authenticity at Scale
GIA provides an online report verification service where buyers can check their grading document numbers against the institute’s database.[5] IGI and GCAL offer similar accessible verification tools. For matched pairs, confirm both numbers separately. A quick online check before the studs are shipped catches clerical errors and ensures both stones are represented by the grade sheet you are using for comparison. This step takes less than two minutes and is one of the easiest ways to eliminate surprises after the studs arrive.
When a grading report is available, buyers should verify the report details through the issuing laboratory’s official report-check tool where available. This step confirms that the documentation matches the diamond you are purchasing and helps ensure that the certificate has not been altered or issued for a different stone.
FAQ Section
What total carat weight looks normal for everyday studs?
Everyday studs typically fall into a few common size brackets. A pair at 0.50 total carat weight (two 0.25ct stones) is one common everyday size — noticeable without being heavy. A 1.00 total carat weight pair (two 0.50ct stones) offers clear ear presence. A 2.00 total carat weight pair (two 1.00ct stones) shifts into statement territory and is generally reserved for occasions where more visual impact is desired. Personal preference and earlobe size also play a role. A 1.00ct pair may look substantial on a smaller lobe and moderate on a larger one.
Can I return a matched pair if the diamonds do not look the same?
Return policies vary. Some sellers accept returns of matched pairs within a specified return window, provided the studs have not been worn, resized, or altered. The return policy for a matched pair may differ from the policy for individual stones. Some sellers allow the pair to be returned but do not accept returns on individual stones within that pair. Custom settings often carry a stricter policy or no return option at all. Always confirm the return terms before completing the purchase, and inspect the studs under natural daylight as soon as they arrive.
Do lab-grown studs resell for less than natural diamond studs?
Laboratory-grown diamonds generally have a different pricing structure than natural diamonds of comparable size and grade. For studs purchased at retail prices, resale value can be lower than the original cost. The gap can be less pronounced when the studs are purchased at wholesale prices or directly from a source close to the manufacturer. In those cases, the initial cost is lower to begin with, so the effective value retention may be higher relative to the amount spent. Resale value should not be the primary consideration for most stud buyers, but it is worth understanding before assuming a pair will hold its original value over time.
What documentation should I ask for when buying a pre-matched pair?
For a pre-matched pair, request both individual grading reports, written confirmation of the specific measurements used to match the pair (face-up diameter, depth percentage, crown angle), and any side-by-side media that demonstrates visual consistency. If the seller offers a laser inscription matching service, confirm how the inscription location is handled and whether it remains visible after setting. Documentation consistency—where the reports, the seller’s description, and the visual evidence all align—is the strongest indicator that the pair has been treated as a matched unit rather than two loose stones sold together.
Plan Your Stud Earring Comparison
Compare the two stones together: face-up measurements, outline, brightness, color appearance, and the available grading reports. Shape and report-reading guides can help you identify the questions to resolve before choosing a pair.
Decide whether you want a finished pair or stones for a custom setting. Ask which pairs are available, request side-by-side images or video, and confirm the setting metal and backing type. For a custom design, provide your preferred size, shape, metal, and budget with the inquiry.
Request the Details for Your Matched Pair
Ask for the measurements and images of both stones, not just a total carat weight or a representative photo. Include your size preference, budget, and wearing habits so the pair and settings can be considered together. If you need a custom-matched set, confirm availability, design details, and written terms before committing.
Why a Pair Needs Its Own Review
Stud earrings require two diamonds that work together visually, not just two acceptable single stones. Compare face-up size, outline, color, and brightness side by side, then review backing type, post length, and setting alignment for the finished earrings.
Final Matched-Pair Checklist
Before purchase, confirm the individual measurements and total carat weight, inspect both stones together, compare the grading reports where supplied, and check the setting metal, posts, and backings. Ask for written confirmation of the agreed pair specifications and return terms. Resolve visible mismatches before accepting the pair.
[1] GIA, “Identification of Lab-Grown Diamonds,” GIA.edu, accessed 2025. GIA – Identification of Lab-Grown Diamonds
[2] Federal Trade Commission, “Jewelry, Precious Metals, and Pewter Industries Guides,” 16 CFR Part 23, FTC.gov, updated 2018. FTC – Jewelry Guides Revisions
[3] GIA, “4Cs of Diamond Quality,” GIA.edu, accessed 2025. GIA – Diamond Quality
[4] GIA, “GIA Diamond Grading Reports,” GIA.edu, accessed 2025. GIA – Diamond Grading Reports
[5] GIA, “Service Details – Report Check,” GIA.edu, accessed 2025. GIA – Report Check
Disclosure: This article is for general educational purposes only. Diamond grading, pricing, availability, specifications, and seller policies can change, and readers should verify important details through grading reports, official laboratory tools, seller documentation, or qualified professionals before making a purchase decision. Laboratory-grown diamonds should be clearly distinguished from natural diamonds, and environmental or sourcing claims should be supported by specific documentation.
Last updated: February 2025