
Oval lab-grown diamonds can offer impressive finger coverage, but they are also easy to misjudge if you focus only on carat weight or the grading report. Two ovals with the same carat weight can look noticeably different because length, width, depth, shape, and cut quality all affect how large and lively the stone appears, much like the evaluation principles in an emerald cut clarity guide where proportion and visible structure influence the final appearance. The goal is not simply to find the longest oval, but to find one that looks bright, balanced, and intentional in the setting you plan to wear.
For the full framework, read Lab-Grown Diamond Shapes Guide.
This guide helps you judge the details that matter most before buying: length-to-width ratio, bow-tie visibility, face-up size, shape symmetry, color, clarity, and setting fit. You will learn when an elongated oval is worth choosing, when extra spread may be a warning sign, and why photos and video are essential alongside the certificate.
For buyers, the practical point is that an oval diamond should be evaluated as a finished-ring decision, not only as a loose-stone specification. The report, the media, the measurements, and the setting plan should all support the same conclusion before the stone is chosen.
Throughout this guide, “lab-grown diamond” means a laboratory-grown diamond, not a natural diamond and not a diamond simulant. Laboratory-grown diamonds and natural diamonds have different origins, and seller descriptions or grading reports should clearly disclose laboratory-grown origin when applicable.
| Buying Check | What to Look For | Common Mistake to Avoid |
|---|---|---|
| Length-to-width ratio | 1.36–1.45 for balanced; 1.46–1.55 for elongated | Choosing a ratio without seeing the stone in person |
| Face-up size | Compare millimeter length and width | Assuming higher carat always looks larger |
| Bow tie | Mild contrast is normal; fixed darkness is a concern | Relying on the certificate to reveal bow tie |
| Brightness and cut | Look for lively performance in photos and 360-degree video | Chasing spread with a shallow or dull stone |
| Setting fit | Match prongs, halo, side stones, or east-west layout to exact measurements | Choosing the setting after ignoring stone proportions |
Quick Questions Before You Read
Q: Do oval lab-grown diamonds look bigger than round diamonds?
Often, yes. Their elongated shape can give more visible finger coverage, but millimeter measurements matter more than carat weight alone.
Q: Is a bow tie always bad in an oval diamond?
No. A mild bow tie is common, but a dark band that stays fixed through the center can reduce beauty.
Q: Can a grading report tell me if an oval looks good?
It confirms specifications, but it does not fully show shape appeal, bow tie, or brightness in motion.
Q: Should I choose the most elongated oval available?
Not automatically. Longer shapes can look elegant, but the stone still needs good brightness, balanced shoulders, and the right setting fit.
How to Use Evidence in This Guide
This article separates documented facts from visual judgment. A grading report is useful for confirming listed characteristics such as carat weight, measurements, color, clarity, and identification details, but the report should not be treated as proof that an oval has attractive light performance or a subtle bow tie. Those appearance-based decisions require photos, videos, and comparison with the intended ring design.
When a seller makes a claim that affects your decision, ask what supports it. A stone’s lab report can support identity and grading details. A video can support bow-tie and outline review. A setting sketch or measurement confirmation can support fit. Claims about value, sustainability, sourcing, or long-term performance should be kept separate unless the seller provides specific documentation for those points.
What Documentation to Keep Handy
When you compare oval lab-grown diamonds online, save the grading report, the stated measurements, the media used for review, and any message that identifies which stone you are viewing. That record helps if you later compare similar options or need to confirm that the ring is being built around the correct oval.
When a grading report is available, buyers should verify the report details through the issuing laboratory’s official report-check tool where available.
For NUVU, the aim is to make that comparison easier: report details, visual evidence, and intended setting fit should point to the same stone before a purchase is finalized.
Why Oval Lab-Grown Diamonds Look Larger Than Many Other Shapes
Oval lab-grown diamonds are popular because they give buyers a lot of visible presence for the carat weight. The elongated outline stretches across the finger more than a round diamond, so the stone often appears larger from the top view even when the carat weight is similar. For an oval engagement ring, that can mean more finger coverage, a softer shape, and a graceful look without moving into sharper fancy shapes.
This is also where buyers need to be careful. Oval diamond visual size is not just a matter of choosing the biggest carat number or the longest stone listed online. A well-chosen oval should look large, bright, and balanced at the same time. If the stone gains size by sacrificing light return or developing a heavy dark center, the apparent size advantage becomes less valuable in the finished ring.
Laboratory-grown diamonds should be clearly identified as laboratory-grown, and they should not be presented as mined diamonds. When comparing oval lab-grown diamonds with natural diamonds, the useful comparison is usually about appearance, measurements, documentation, and budget fit, not about suggesting that the two origins are the same.
The face-up advantage of the oval outline
The main visual advantage of an oval lab-grown diamond comes from how its weight is distributed. Compared with a round diamond of similar carat weight, an oval often spreads more of its weight across length and width, creating a larger footprint when viewed face-up. A 1.50 ct oval, for example, may look more substantial on the finger than a 1.50 ct round because the eye reads the longer outline as more coverage.
Carat weight tells you how much the diamond weighs, but millimeter measurements tell you how much space it actually occupies. For oval diamonds, length and width are especially important because they shape the entire first impression of the stone. A buyer trying to understand how to choose an oval diamond should compare actual measurements, not just carat weight, because two stones with the same weight can look noticeably different once set.
The mistake is chasing spread at any cost. A very wide or long-looking oval can seem attractive in a listing, but if the cut is too shallow or the proportions are weak, the diamond may look flat, watery, or uneven in real life. Good spread matters, but brightness matters more because the ring will be seen in motion, not as a static measurement on a report.
Why oval diamonds feel softer than some fancy shapes
An oval sits in a useful middle ground between the classic round brilliant and more angular or directional fancy shapes. It keeps the curved outline many buyers like in a round diamond, while adding the length and finger-flattering effect of an elongated diamond. That makes it appealing for someone who wants an elegant shape without the sharper tips of a marquise or pear.
Compared with an emerald cut, an oval usually has more brilliant-style sparkle and a less architectural appearance. Compared with a pear or marquise, it feels more balanced because both ends mirror each other. This balance is one reason oval diamonds work well across simple solitaires, halos, three-stone rings, and more modern designs.
The practical takeaway is that oval is not simply a “bigger-looking round.” It has its own personality. Buyers who want maximum symmetry and a compact outline may still prefer round. Buyers who want length, softness, and more visible coverage across the finger often find that oval offers the better visual compromise.
Where buyers can overestimate the size benefit
Large-looking is not the same as well-performing. An oval can have impressive length on paper and still disappoint if the center looks dark, the ends look lifeless, or the outline feels uneven. This is why a strong oval lab-grown diamond for an engagement ring is usually not the one with the most dramatic measurement, but the one that balances size with light behavior and shape quality.
The size benefit is easiest to overestimate when comparing diamonds only through carat weight and listed dimensions. A longer oval may win the first glance in a product grid, but the better stone may be the one with slightly less length and better brightness across the face. This distinction matters more in ovals than many buyers expect because elongated brilliant cuts can show contrast patterns more noticeably than round stones.
A strong oval diamond guide should make size useful, not distracting. Face-up size should help the ring feel substantial, but it should not hide problems that will be obvious once the diamond is worn every day.
What This Means in a Real Purchase
A buyer comparing two 2.00 ct oval lab-grown diamonds should not choose only the one with the longest measurement. If one stone is longer but visibly darker through the center, while the slightly smaller-looking stone has better brightness and a softer bow tie, the second may be the better ring diamond.
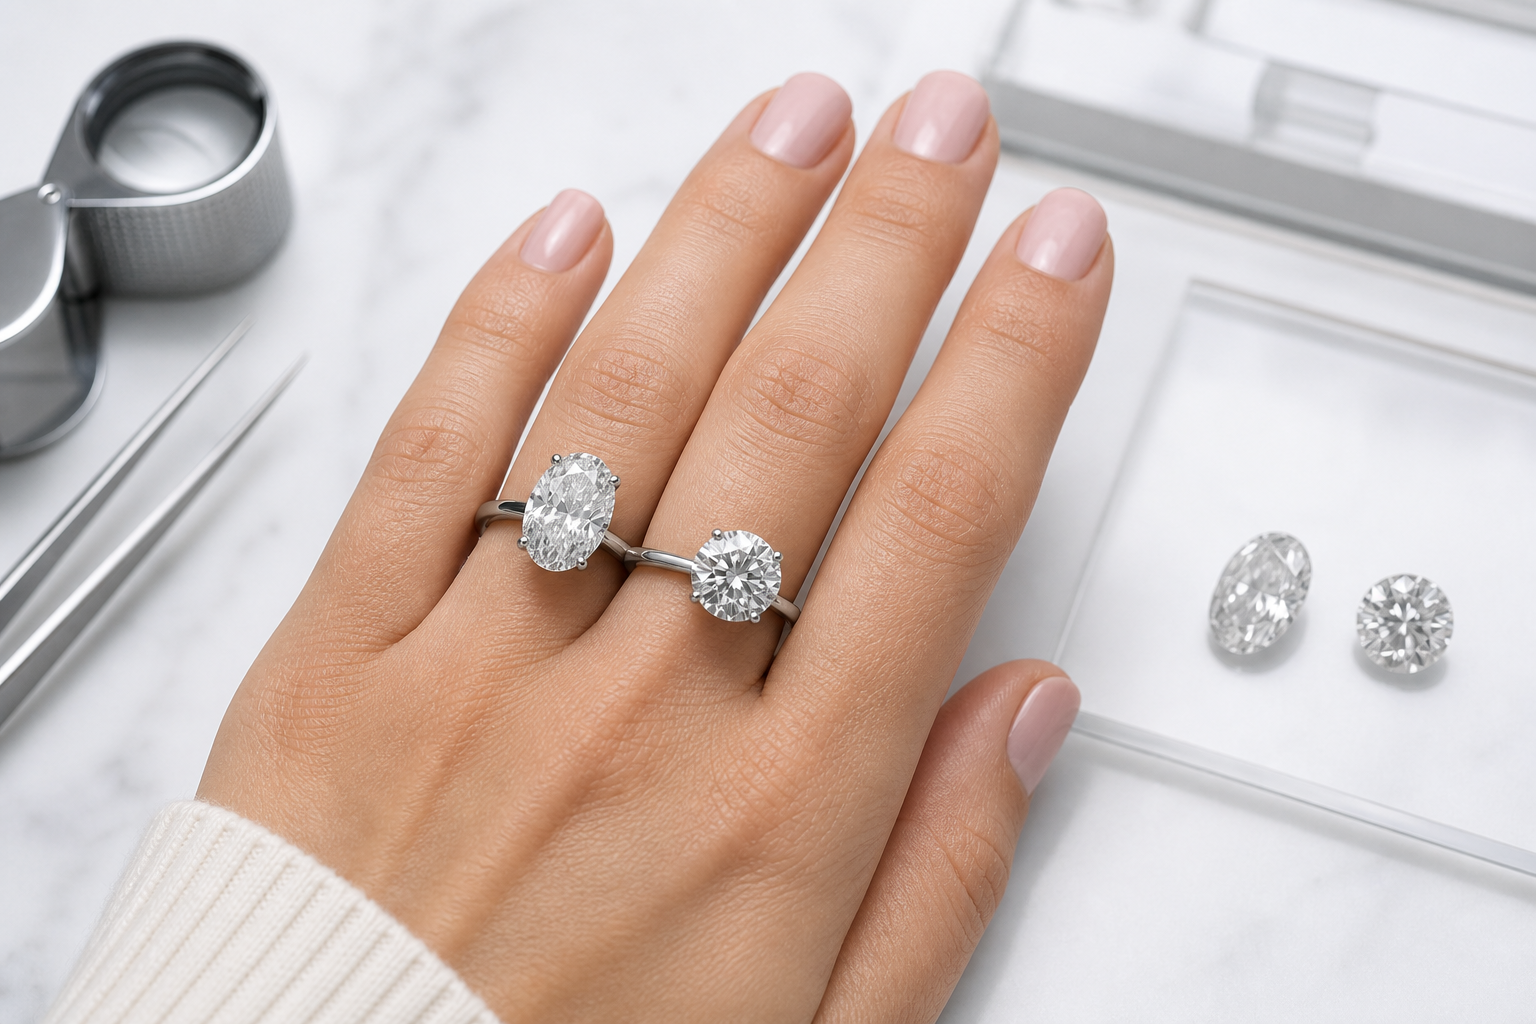
Best Length-to-Width Ratio for Oval Lab-Grown Diamonds
The oval diamond length-to-width ratio controls how full, classic, or elongated the stone appears. It is one of the most important oval-specific decisions because the ratio changes the entire mood of the ring before color, clarity, or setting details are even considered. The best oval diamond ratio is not one fixed number; it depends on the wearer’s hand, the setting style, and the visual effect the buyer wants.
Ratio is calculated by dividing the diamond’s length by its width. A higher number means a longer, slimmer oval. A lower number means a shorter, fuller oval. This sounds simple, but the real decision is visual: the right oval lab-grown diamond ratio should make the stone look intentional, not stretched, squat, or out of proportion with the ring design.
Because these ratio ranges are practical shopping references rather than universal grading standards, they should be used as a first filter rather than a final verdict. A stone at 1.42 can still look awkward if the shoulders are uneven, and a stone outside the “classic” range can still be beautiful if the outline, bow tie, and setting work together. The number helps you compare shape direction; it does not replace visual selection.
Practical ratio ranges buyers can use
Most buyers can use these ranges as a practical starting point, not as strict grading rules:
- 1.30 to 1.35: A shorter, fuller oval with a softer and wider look. This can work well for buyers who want presence without a narrow shape, but it may feel less elongated on the finger.
- 1.36 to 1.45: A balanced classic oval range for many engagement rings. This is often a safe visual zone because it gives length without looking overly slim.
- 1.46 to 1.55: An elongated oval with a stronger finger-lengthening effect. This range suits buyers who like a sleek, modern outline, but the stone still needs enough width to avoid looking too narrow.
- Above 1.55: A very slender oval. It can look elegant in the right setting, but it may appear thin depending on finger shape, prong placement, and band design.
- Below 1.30: A very full oval that can start to look closer to a rounded cushion or squat oval. This is not automatically bad, but it should be a deliberate preference.
For many oval engagement rings, the 1.36 to 1.45 range is a strong first place to look because it tends to balance finger coverage, recognizable oval shape, and setting flexibility. Buyers who specifically want an elongated oval diamond ratio can move higher, but they should be more careful about center darkness and narrow appearance.
How ratio changes the mood of the ring
A shorter oval often feels softer and more substantial. It can give the ring a fuller face-up look and may suit buyers who want an oval that feels gentle rather than sleek. In a halo setting, however, a shorter oval can look even wider because the border of small diamonds expands the outline. That can be attractive, but it can also reduce the elongated effect that made the buyer choose an oval in the first place.
A classic oval ratio tends to be the most adaptable. It works well in solitaires because the shape is clear without needing extra design elements to make it feel balanced. It also gives enough length to flatter the finger while keeping enough width to avoid a fragile or overly narrow appearance.
An elongated oval can feel more modern and dramatic. It often creates stronger vertical movement on the hand, which many buyers like for an engagement ring. The tradeoff is that a very elongated stone gives less visual width, so the setting becomes more important. Thin bands can emphasize length, while side stones or halos may help restore balance if the oval looks too slender on its own.
Why ratio should not be judged without measurements
Ratio tells you shape, but it does not tell you actual size. Two oval diamonds can both have a 1.42 ratio, yet one may face up larger because its length and width measurements are greater for the same carat weight. This is why buyers should always check the millimeter dimensions instead of treating ratio as a complete answer.
Depth also matters because some of the diamond’s weight may sit below the surface where it does not add visible size. A stone with a pleasing ratio can still look smaller than expected if too much weight is hidden in depth. On the other hand, a stone that looks unusually large for its carat weight should be reviewed carefully to make sure it still has good brightness and structure.
The best length-to-width ratio for an oval engagement ring is the one that looks right in actual measurements, not just in the formula. Ratio narrows the search, but photos, video, and setting fit decide whether the oval works as a finished ring.
Buyer Verification Checklist
Before choosing an oval ratio, confirm the diamond’s length, width, depth, and ratio. Ask for a top-down image or video, not just the grading report. If buying for a specific setting, confirm that the jeweler can fit that oval’s exact measurements safely.
How to Judge the Bow-Tie Effect in an Oval Diamond
The oval diamond bow tie is one of the most important details to review before buying. Many oval diamonds show some form of bow tie, and a mild one is not automatically a problem. The issue is severity: if the center of the diamond looks dark and fixed in normal viewing, it can reduce the stone’s beauty even when the report looks strong.
This is especially important with an oval lab-grown diamond bow tie because buyers often compare stones online using carat weight, color, clarity, and ratio first. Those details matter, but they do not show whether the diamond has lively movement across the center. Bow tie evaluation is a visual judgment, not a number buyers can safely outsource to the grading report.
In practical buying, bow tie should be treated as a performance observation rather than a pass-fail label. A stone can have some center contrast and still be attractive, but the contrast should feel active and proportionate instead of fixed, heavy, or visually separating the diamond into two bright ends.
What a bow tie actually is
A bow tie looks like a dark band or butterfly-shaped area across the middle of an oval diamond. It appears because of how light interacts with the elongated brilliant-cut facet pattern. Since oval diamonds are stretched rather than round, they can show contrast through the center in a way that looks different from a round brilliant.
Some contrast is normal and can even make a diamond look more dimensional. A mild bow tie may flash on and off as the stone moves, adding depth rather than making the diamond look dull. The goal is not to avoid every trace of contrast; the goal is to avoid a bow tie that dominates the face of the stone.
Acceptable bow tie versus distracting bow tie
An acceptable bow tie is slight, balanced, and visible only at certain angles or in certain lighting. It should not be the first thing the eye notices. In a good oval, the center still looks active, and the bright areas of the diamond do not feel separated into two disconnected ends.
A caution-level bow tie is darker and easier to see in most positions. The diamond may still be wearable and attractive, but the buyer should compare it directly with another oval of similar size and specs before deciding. If the darker center is obvious in every video frame, the stone may look less lively in a ring than it looked in the listing.
A distracting bow tie makes the oval look split: bright ends, dark middle, weak center. This is the point where the tradeoff becomes unacceptable for many engagement ring buyers, especially in a solitaire setting where there is nothing to distract from the center stone. Lighting conditions can exaggerate or soften the effect, so one photo is not enough to judge it fairly.
Why certificates do not grade bow tie directly
A diamond certificate can confirm useful information such as shape, carat weight, measurements, color, clarity, and other identifying details. It does not fully describe how strong the bow tie looks in real viewing. This is a major reason oval diamonds require more visual review than buyers sometimes expect.
The report should still be checked, but it should not be treated as the complete picture. For ovals, the grading report narrows the options; images and video help determine which stone actually looks better. A diamond with excellent-looking paper specs can still be the wrong choice if the center darkness is too heavy.
A grading report helps document key characteristics, but it should not be treated as a guarantee of beauty, value, or sourcing ethics. For bow-tie review, the report is most useful when it is paired with visual media that shows the exact stone being considered.
Buyers trying to avoid bow tie issues in an oval diamond should prioritize real viewing evidence. A face-up photo and a 360-degree diamond video are more useful for this specific decision than another small difference in color or clarity grade.
How to Document a Bow-Tie Decision
If you are buying online, save or request the specific media used to evaluate the oval. The most useful evidence is a face-up video, a still image taken straight from above, and any seller notes that describe whether the center contrast is mild, moderate, or visually prominent. This creates a clearer record of the decision than relying on a memory of a product page.
For an important purchase, compare at least two ovals with similar carat weight and ratio before deciding that a bow tie is acceptable. The comparison makes the judgment more reliable because it shows whether the darkness is a normal level of contrast for that shape or a more distracting feature of that particular stone.
Certificate and Visual Review Check
Ask for a face-up photo and 360-degree video under neutral lighting. Watch whether the dark center flashes on and off naturally or stays heavy and fixed. If the bow tie remains obvious in every frame, consider comparing another oval with similar specs.
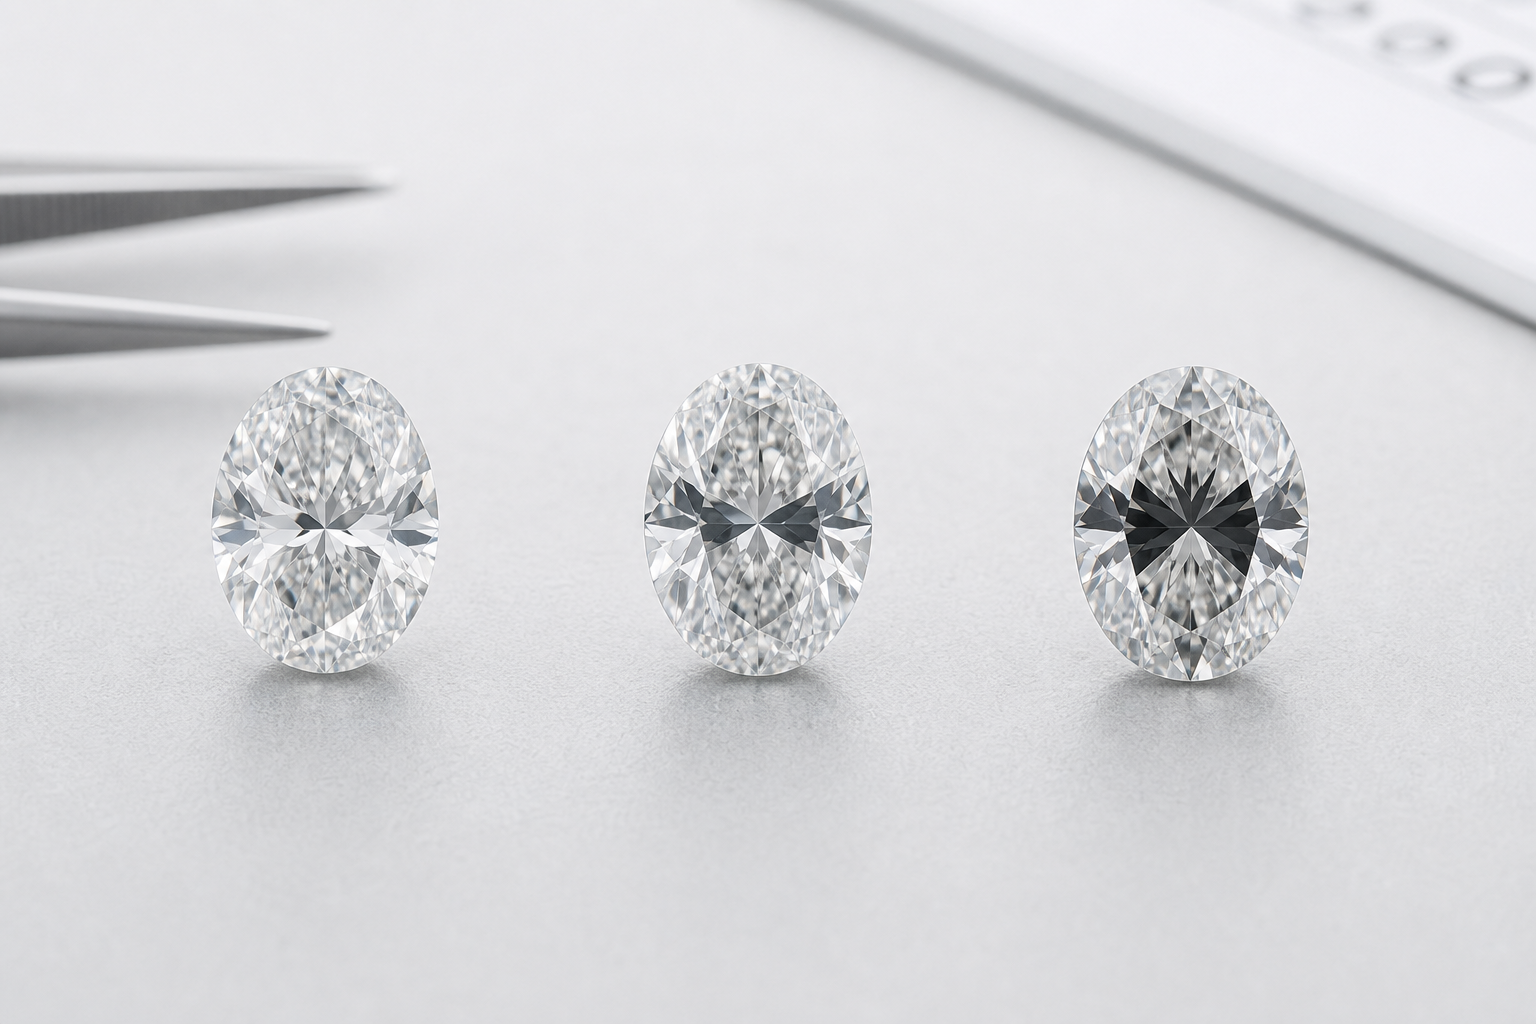
Oval Diamond Symmetry, Outline, and Shape Balance
Oval diamond symmetry is not only about whether a grading report says the stone is symmetrical. For buyers, the more practical question is whether the oval diamond shape looks balanced when viewed from above. A well-shaped oval lab-grown diamond should feel graceful, even, and intentional, not stretched, lopsided, or awkwardly rounded.
This matters because the outline is one of the first things the eye reads in an oval engagement ring. A diamond can have appealing carat weight, color, and clarity, yet still look slightly off if the shoulders are uneven or one end feels sharper than the other. Shape balance is not a minor detail in ovals; it directly affects how refined the finished ring looks.
What a balanced oval outline should look like
A balanced oval outline usually has smooth shoulders, even curves, and ends that are neither too pointed nor too flat. From a straight top-down view, both halves of the diamond should feel visually aligned along the long axis. The left and right sides do not need to be mathematically identical, but they should look harmonious to the eye.
The shoulders are especially important. These are the curved areas that transition from the widest part of the diamond toward the ends, and compared with the round brilliant sparkle standard, they require closer visual checking for symmetry. If the shoulders are smooth and even, the oval tends to look elegant and controlled. If one shoulder rises higher, bulges outward, or drops too quickly toward the tip, the stone may look slightly twisted or uneven once set.
The ends also deserve attention. Rounded ends usually create a softer, more classic oval shape. Slightly narrower ends can look refined in a longer oval, but ends that become too sharp may start to resemble a marquise. Flattened ends create the opposite issue, making the diamond look compressed or less fluid. The best oval diamond shape for a ring is usually the one that keeps its oval identity clearly from every normal viewing angle.
Common outline issues to watch for
The most common outline issue is lopsided shoulders. One side may look fuller while the other looks flatter, or one shoulder may curve more abruptly than the opposite side. This can be subtle in a product listing but more obvious in a ring, especially in a simple solitaire where the center stone is fully exposed.
Another issue is mismatched ends. If one end looks sharper, narrower, or more pointed than the other, the oval may feel visually unbalanced. This is not always a deal-breaker, but it becomes more noticeable in settings with prongs placed at the north and south ends because the prongs can draw attention to the difference.
Watch for sides that bulge outward or run too flat along the middle. A bulging side can make the stone look heavy on one edge, while overly flat sides can make it feel less like an oval and more like a softened rectangle. Some buyers may like a fuller, cushion-like oval, and others may prefer a sharper, more elongated outline. The risk is choosing that look by accident rather than preference.
A stone that looks close to a marquise or rounded cushion is not automatically bad. It may suit a specific design or personal taste. The problem is mismatch: buying what is labeled as an oval while expecting a classic oval silhouette, then receiving a stone whose outline feels much narrower, squatter, or more angular than expected.
Why grading-report symmetry is not the whole answer
A grading report’s symmetry grade is useful, but it does not fully answer how to tell if an oval diamond is well shaped. Report symmetry generally speaks to facet alignment and craftsmanship characteristics; it does not guarantee that the visible outline will be the most pleasing option for your ring.
This is why report symmetry and visual shape review should work together. The report can help you screen out obvious concerns and confirm the diamond’s documented details. The top-down image helps you judge what the report cannot fully describe: whether the shoulders look even, whether the ends are attractive, and whether the outline feels balanced in the style of ring you are planning.
For an oval lab-grown diamond, visual preference carries more weight than many buyers expect. Two stones can both have strong symmetry grades, yet one may look more elegant because the outline is cleaner and the curves are better distributed. If the visual shape bothers you in the image, the grading report is unlikely to make you like it more once it is on the hand.
How to Verify This Before Buying
Use a straight top-down image, not only angled glamour photos. Check whether the diamond’s long axis appears centered and whether the left and right sides mirror each other reasonably well. Pay close attention to the shoulders, the ends, and any areas that look flat, swollen, or uneven.
If the oval will be set east-west, review the outline in that orientation too. A shape that looks elegant vertically may feel wider or less balanced when turned horizontally. The safest choice is not the most technically perfect oval; it is the one whose outline still looks intentional in the exact orientation and setting you plan to wear.
Visual Size, Spread, and Carat Weight in Oval Lab-Grown Diamonds
Oval diamond visual size is one of the main reasons buyers choose this shape, but carat weight alone can be misleading. Carat tells you weight; measurements tell you presence. For an oval lab-grown diamond, the length and width in millimeters usually give a clearer sense of how much space the stone will cover on the finger.
This distinction matters because two diamonds with the same carat weight can look noticeably different from above. One may carry more weight in its depth, while another may distribute more of its weight across the top view. The better choice is not always the largest-looking stone, but the one that balances spread, brightness, shape, and setting fit.
Why millimeter measurements matter more than carat alone
Carat weight measures how much the diamond weighs, not how large it appears when viewed face-up. In an oval, the length and width determine the visible footprint. Depth comes next because it helps explain where some of the diamond’s weight is sitting.
For example, two oval lab-grown diamonds may both be listed at a similar carat weight, but one may look longer and more noticeable on the hand because its millimeter measurements are larger. Another may weigh the same but appear slightly smaller because more of its weight is held below the girdle. That does not automatically make the deeper stone worse, but it does mean the buyer should understand what they are paying for visually.
The practical mistake is shopping by carat first and measurements second. If finger coverage is part of the goal, millimeter dimensions should be reviewed early. A buyer asking what size oval diamond looks best should think in terms of hand proportion, preferred ratio, and setting style, not just the number on the report.
Spread versus brightness tradeoff
Oval diamond spread refers to how large the stone appears from the top relative to its weight. Good spread is valuable because it gives the diamond presence without needing to move into a much higher carat range. Risky spread happens when a diamond looks large on paper but gives up too much brightness, structure, or visual depth.
A shallow oval may face up large, but it can sometimes look watery, flat, or uneven in motion. In other cases, the center may appear darker or less lively than the ends. The warning sign is not simply a large measurement; it is a large measurement paired with weak visual performance.
This is where photos and video matter more than a single number. A well-chosen oval should look bright across the stone, not just impressive in its listed dimensions. If the diamond looks big but lifeless, the size benefit becomes less meaningful in a ring worn every day.
Price comparisons can also become misleading here because a lower price for a larger-looking oval may reflect several factors at once, including color, clarity, proportions, visual performance, growth characteristics, or market availability. The useful question is not only whether the stone is a good value on paper, but whether the visible tradeoffs are ones you would still accept after seeing the ring in normal wear.
Price and value comparison boundaries
Prices can change with market conditions, report type, seller channel, stone-specific characteristics, and availability, so exact comparisons should be verified at the time of purchase. A larger-looking oval is not automatically a better value if the spread comes with a fixed bow tie, weak brightness, uncertain documentation, or a setting fit problem.
When comparing two oval lab-grown diamonds, compare like-for-like details before making a price judgment. Check the report type, carat weight, millimeter dimensions, ratio, color, clarity, fluorescence if listed, growth-related comments if included, visual media, and whether the same setting requirements apply. The more similar the comparison, the more useful the price difference becomes.
Useful size comparison approach
When comparing several oval diamonds in the same carat range, start with length and width, then review ratio, depth, bow tie, outline, and video appearance. This keeps the comparison grounded in what the eye will actually see. A longer stone may be attractive, but only if the shape still looks balanced and the center does not appear heavy or dull.
Side-by-side comparison is especially useful. If two stones are close in carat weight, the one with slightly smaller measurements may still be the better choice if it has stronger brightness, a cleaner outline, and a less distracting bow tie. Buyers often overvalue the longest measurement because it feels objective, but the finished ring is judged by total appearance, not a millimeter count alone.
Also consider total ring presence. A solitaire places more attention on the center stone’s exact dimensions, while a halo or three-stone design can add width and coverage beyond the oval itself. The right oval diamond that looks bigger is not necessarily the widest or longest stone available; it is the stone whose size works with the design instead of fighting it.
What to Check Before You Decide
For two oval diamonds with similar carat weight, compare their millimeter dimensions and videos side by side. Look at length, width, depth, outline balance, bow-tie behavior, and overall brightness. A slightly smaller stone with better brightness and a lighter bow tie can look more attractive than a larger but flatter-performing oval.
Color and Clarity Tips for Oval Lab-Grown Diamonds
Oval lab-grown diamond color and oval diamond clarity should be judged through the lens of appearance, not grade chasing. Because ovals are elongated brilliant cuts, they can hide some characteristics well while making others more noticeable. The goal is to choose a diamond that looks clean, bright, and balanced in the intended ring, not simply the highest grade that fits the budget.
For many buyers, the smartest budget allocation is not maxing out color and clarity. Once a diamond looks white enough for the setting and clean enough for the unaided eye, shape quality, bow-tie control, measurements, and visual performance often have a bigger effect on the final ring.
How color can show in oval diamonds
Oval diamonds can sometimes show color near the ends or along the edges more than a comparable round brilliant. This is more likely to matter in larger stones, longer ratios, or designs where the diamond is viewed closely from multiple angles. It does not mean every oval needs a top color grade, but it does mean the diamond should be judged in the context of its size and setting.
Near-colorless grades may be a strong choice for many oval lab-grown diamond buyers, especially when the stone faces up bright and the setting supports the look. White metals can make warmth easier to notice, while yellow or rose gold may soften the contrast. The better question is not “What is the best color for oval lab-grown diamond in every case?” but “Does this specific diamond look right against the metal I plan to wear?”
If you are choosing a larger oval or a very elongated shape, review video and images carefully for warmth at the tips. A small amount of warmth may be acceptable or even preferred by some buyers, but unexpected color concentration at the ends can make the diamond look less even than the grade suggests.
Clarity and the “eye-clean” standard
For oval diamond clarity, many buyers do not need the highest clarity grade if the stone is eye-clean. Eye-clean means inclusions are not visible to the unaided eye in normal viewing, but the term should not be accepted without visual confirmation. Magnified images and normal-view video are both useful because they show different things.
Inclusion position matters more than many first-time buyers realize. A small inclusion near the edge may be hidden by the setting or difficult to notice, while a similar inclusion near the center can be more distracting. In ovals, the center area already receives attention because of the bow-tie zone, so visible inclusions there deserve extra scrutiny.
Do not assume all VS or SI stones behave the same. Some lower-clarity diamonds look completely clean in real life, while some higher-clarity stones have inclusions placed in visually inconvenient areas. The grade narrows the search, but the actual image decides whether the clarity works for an engagement ring.
Where to prioritize budget in an oval
In an oval, visual performance usually deserves more attention than chasing perfect paper grades. A diamond with excellent-looking shape, strong brightness, balanced spread, and a controlled bow tie will often make a more attractive ring than a higher-color or higher-clarity stone with an awkward outline or dull center.
This does not mean color and clarity are unimportant. They still affect appearance, especially in larger diamonds and clean, minimal settings. But once the stone is visually white enough and eye-clean enough for the buyer, additional grade improvements may have less practical impact than choosing a better-shaped oval.
The best clarity for an oval diamond engagement ring is not always the highest available grade. The best color is not always the whitest grade either. For many buyers, the stronger decision is to set a sensible quality floor, then compare actual stones for brightness, outline, bow tie, and face-up size before spending more on grades the eye may not appreciate.
Disclosure and Claim Boundaries for Lab-Grown Diamonds
For buying purposes, “lab-grown” should be understood as a material origin description, not as a shortcut for every other quality claim. A lab-grown oval still needs its own grading report, measurements, visual review, and setting assessment. The fact that the diamond is lab-grown does not by itself answer whether a specific stone has the right bow tie, color appearance, clarity visibility, or proportions for your ring.
Use the same caution with sustainability or ethics language. Lab-grown diamonds are often discussed as a different sourcing path from mined diamonds, but broad claims such as “eco-friendly,” “carbon-neutral,” or “sustainable” should be supported by specific seller documentation if those claims matter to your purchase. For most buyers comparing individual ovals, the more immediate evidence is the report, the media, the measurements, and the setting plan.
Certificate and Visual Review Check
Review the grading report for color and clarity, then confirm the actual stone through magnified images and normal-view video. If an inclusion is visible in the center or the color looks warmer than expected in video, compare another stone before deciding. The report should support the decision, but the final judgment should come from how the oval looks in real viewing conditions.
Best Settings for Oval Lab-Grown Diamond Engagement Rings
The best setting for an oval lab-grown diamond engagement ring is not only a style choice. It affects how large the diamond appears, how noticeable the bow tie becomes, how the outline reads on the hand, and how securely the stone is held. Because ovals vary so much in length, width, shoulder shape, and depth, the setting should be chosen around the actual diamond measurements rather than a generic idea of an oval center stone.
A well-matched oval lab-grown diamond setting should support the stone’s strongest feature. If the diamond has a graceful elongated ratio, the setting should let that length show. If the stone is shorter and fuller, the design should avoid making it look too wide or crowded. The mistake is treating the setting as decoration added after the diamond is chosen; in a strong oval diamond ring design, the stone and setting are judged together.
For custom design, the stone cannot be evaluated separately from the setting. A drawing or inspiration photo may show the style direction, but the final proportions depend on the actual oval’s length, width, depth, girdle area, prong placement, and how the ring will sit on the wearer’s hand.
For custom jewelry, stone measurements and setting compatibility should be confirmed before finalizing a purchase. This includes the oval’s exact length, width, depth, girdle area, preferred orientation, prong layout, and how any side stones or halo elements will be scaled around the center stone.
Solitaire settings and the clean oval look
A solitaire setting gives an oval diamond the most direct stage. It keeps attention on the outline, ratio, brightness, and face-up size without extra stones changing the visual read. This can be one of the best settings for an oval diamond when the center stone has a balanced shape and lively performance, because nothing distracts from the oval itself.
The same simplicity also makes flaws harder to hide. A heavy bow tie, uneven shoulders, or a slightly awkward outline will be more visible in a solitaire than in a busier design. Buyers choosing a solitaire should be stricter about the actual stone video, especially face-up brightness and center contrast.
Prong style matters more than many buyers expect. Four prongs can create a clean, minimal look, but they need careful placement so the ends of the oval feel secure. Six prongs can offer a more framed appearance and may visually round out the outline. A north-south orientation is the classic choice because it emphasizes finger length, while a very low-profile setting may feel practical for daily wear but can slightly reduce the open, lifted look some buyers want from an oval engagement ring.
A halo setting can increase the overall presence of an oval lab-grown diamond, but it also changes how the shape is perceived. A well-proportioned halo can make the ring look larger across the finger and add a defined border around the oval. A poorly scaled halo can overwhelm the center stone or make the outline look bulky instead of elegant.
Shorter, fuller ovals often look even wider in a traditional halo, which can be attractive if the buyer wants strong finger coverage. For someone who wants a sleek elongated effect, that same halo may work against the goal. The smaller stones around the center should follow the oval’s shape closely; if the halo is too thick or uneven, the ring can start to look more like a general oval-shaped cluster than a center-stone-focused design.
A hidden halo is usually a better choice for buyers who want extra sparkle without changing the top-down outline as much. It adds detail from the side view while allowing the oval’s actual shape to remain the main visual feature from above. The tradeoff is that hidden details are less visible in normal viewing, so they should be chosen for subtle design interest rather than as a substitute for a larger-looking center stone.
Three-stone and side-stone settings
Three-stone and side-stone settings can make an oval engagement ring feel more substantial, but scale control is critical. The side stones should support the center oval, not compete with it. If they are too large or too bright relative to the center, the ring can lose the clean elongated focus that made the oval appealing in the first place.
Tapered baguettes can create a structured, elegant frame and often work well with classic or elongated ovals. Pear-shaped side stones can soften the transition from center to band, while round stones create a more brilliant, decorative look. Smaller oval side stones can be beautiful, but they require careful proportioning because repeated oval shapes can make the ring look busy if the center stone is not clearly dominant.
Side stones also increase the ring’s width across the finger. That can be flattering for buyers who want more hand coverage, but it may feel heavy on smaller hands or with a very elongated center stone. The better decision is not simply “more diamonds equals more presence”; it is whether the full composition still gives the center oval enough space to look intentional.
East-west oval settings
An east-west setting turns the oval horizontally across the finger, creating a modern look that feels less traditional than the standard north-south orientation. It can work especially well for buyers who want a lower-profile, design-forward ring or who prefer width across the finger instead of a lengthening effect.
The tradeoff is clear: an east-west oval will not create the same finger-lengthening look that draws many buyers to oval diamonds in the first place. It can also make a very long oval appear more dramatic than expected, while a shorter oval may look softer and more compact. Before committing, review a rendering, wax model, or real ring photo in the same orientation; east-west settings are highly dependent on finger shape, band style, and the diamond’s exact ratio.
Confirming the Setting Around the Exact Stone
For custom design, ask whether the setting is being built around the oval’s precise measurements or around a general size category. Small changes in length, width, or depth can affect prong placement, head height, and how much of the finger the stone appears to cover.
If the design includes side stones, halo stones, or an east-west orientation, request a simple rendering or written confirmation showing how the oval will sit once mounted. Traceability in custom work is not only about the report number; it is also about making sure the same measurements follow the stone from selection to setting.
Stone-to-Setting Fit Check
Before finalizing the setting, confirm the oval’s exact length, width, and depth with the jeweler. Ask whether the prong placement protects the ends securely and whether the setting was designed for that stone’s measurements rather than a generic oval size. For custom oval engagement ring planning, this is where a measured approach matters: a beautiful stone can still be the wrong fit if the setting does not support its proportions, orientation, and daily wear needs.
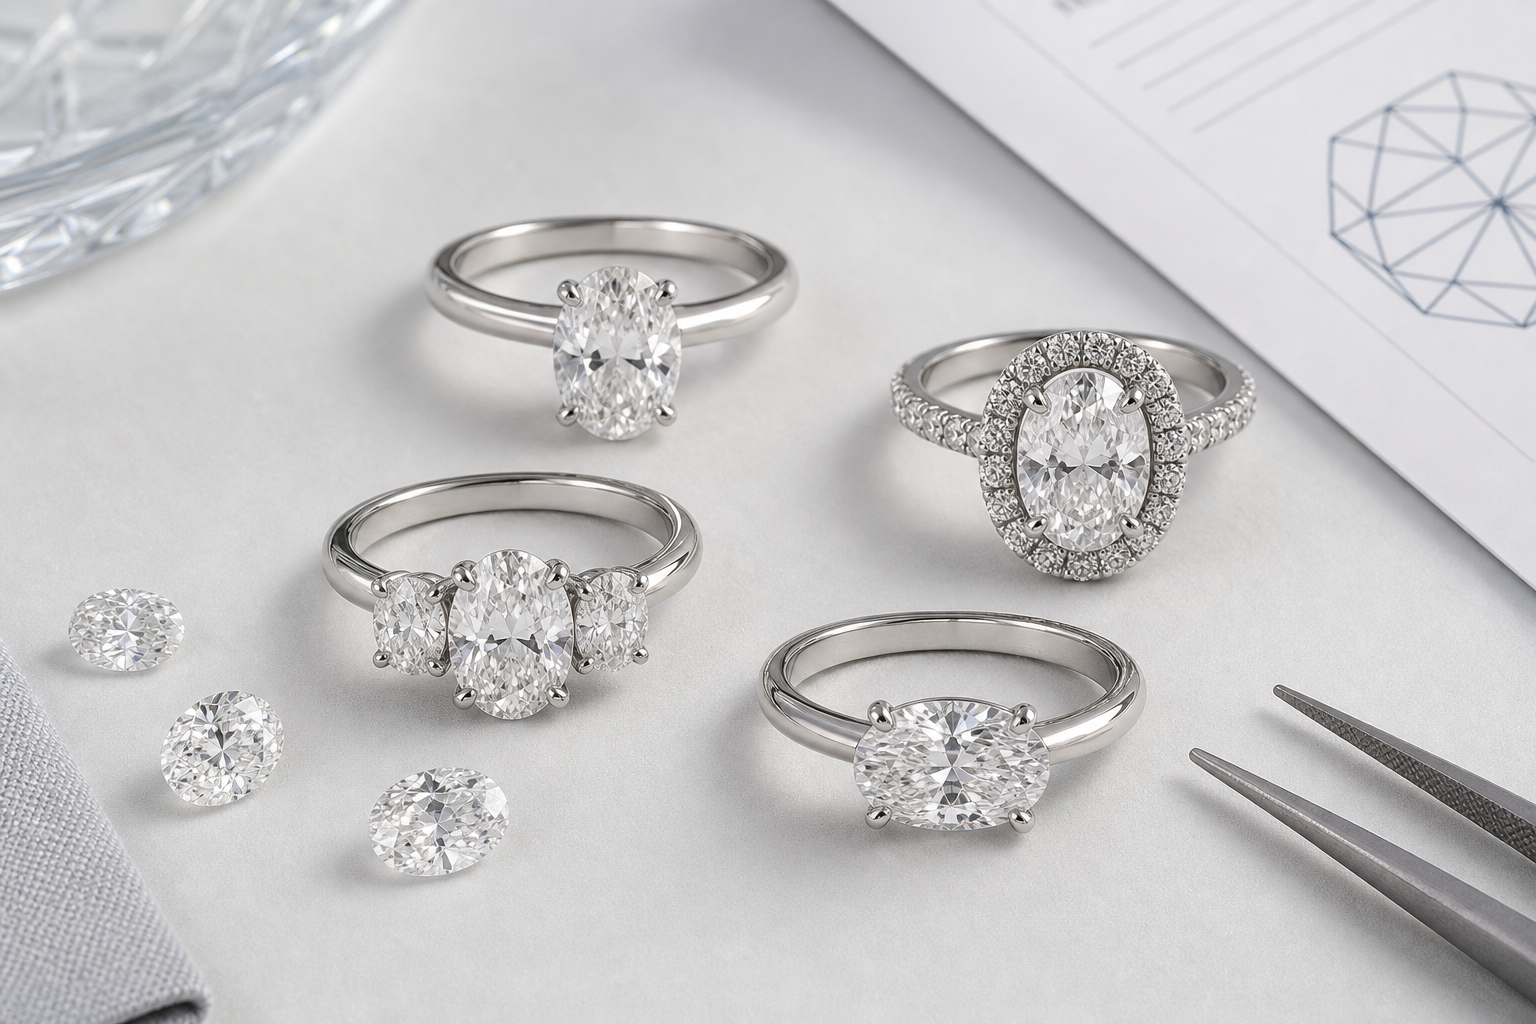
Real Photos and Videos: The Most Important Step Before Buying an Oval Diamond
If there is one step buyers should not skip when they buy an oval lab-grown diamond online, it is visual review. A grading report can narrow the options, but an oval diamond video and clear oval diamond photos often determine which stone is actually worth choosing. This is especially true for ovals because bow tie, outline balance, and brightness distribution are visual qualities that do not fully appear in the numbers.
At NUVU, we treat the report as a starting point rather than the final answer for oval selection, especially when a lab grown diamond shapes guide helps connect outline, price, visual size, and daily wear expectations. The document helps confirm what the diamond is supposed to be; photos and video help show whether it looks good enough to become the center of a ring.
What the report can confirm
A grading report can confirm important basics: shape, carat weight, measurements, color, clarity, and other listed details depending on the lab and report type. It may also include an inscription number that can be checked against the report database when available. This matters because the report helps verify that the stone being considered matches the seller’s listing.
The limit is that a report does not tell you whether the oval has a pleasing outline, whether the bow tie is mild or distracting, or whether the stone looks lively from normal viewing angles. Even two oval lab-grown diamonds with similar carat weight, ratio, color, and clarity can look noticeably different in real life. The report is useful for filtering; it should not be used as the only reason to choose one oval over another.
A certificate also should not be stretched beyond what it documents. It can support identity and grading details, but it does not prove beauty, long-term value, sourcing ethics, or that a specific setting will suit the stone. Those points need separate visual review, seller communication, and design confirmation.
What only images and video can show
A real diamond image can show whether the oval’s shoulders look smooth, whether the ends are balanced, and whether the center has obvious darkness. A 360-degree video is even more useful because it shows how the diamond behaves as it moves. For oval diamonds, movement matters: a little contrast that flashes on and off can look lively, while a dark band that stays fixed across the center can make the stone feel dull.
Review the diamond face-up first, not only through angled glamour shots. Look for center darkness, uneven bright and dark zones, flat-looking ends, and visible inclusions in the middle of the stone. Lighting can influence appearance, so one video is not always enough if the stone is a serious contender. A diamond that only looks good in one controlled view deserves more questions before purchase.
Report and media cross-check
The strongest review happens when the report and the visual evidence agree. The report should match the listed shape, measurements, carat weight, and grading details, while the images and video should show an oval that looks consistent with those measurements. If the report suggests a promising stone but the video shows a fixed dark center or uneven outline, the visual concern should not be ignored.
It is also worth checking whether the seller’s listing, report image, inscription information, and media all refer to the same diamond. This does not require complicated gemological expertise; it means confirming that the report details, measurements, and product listing are consistent before you commit. When something does not match, ask for clarification before purchase rather than assuming it is a harmless listing issue.
A realistic buyer scenario
Maya is choosing between two 1.80 ct oval lab-grown diamonds for a solitaire ring. The first has a slightly longer measurement and a lower price, which makes it look stronger on paper. In the video, though, a heavy dark band stays visible through the center as the stone turns. The second oval is a little shorter, but it has brighter movement, softer contrast, and a cleaner outline. She chooses the second because the finished ring will look more lively in normal wear, even though it is not the longest option by measurement.
Buyer Verification Checklist
Before buying, collect the grading report, top-down photo, 360-degree video, millimeter measurements, and setting compatibility confirmation. If any major decision depends on a seller’s claim, ask for it in writing before purchase. The safer choice is the oval that can be verified both on paper and visually, not the one that only wins one side of the comparison.
Common Mistakes to Avoid When Choosing an Oval Lab-Grown Diamond
Most oval diamond buying mistakes come from judging the stone too narrowly. Buyers may focus on length, carat weight, color grade, or price while missing the factors that determine how the diamond will look in a ring. A strong oval diamond guide should help you avoid those traps before the stone is set, because some issues are much harder to accept once the finished ring is on your hand.
Mistake 1: Choosing the longest oval automatically
Length is one of the reasons buyers like oval diamonds, but the longest stone is not automatically the best one. An oval that is stretched too far for its cut can look narrow, show stronger center darkness, or feel visually unbalanced. A longer measurement only helps if the diamond still has good brightness, a pleasing outline, and a ratio that suits the wearer’s hand and setting.
This is one of the easiest oval diamond buying mistakes to make online because listings often make millimeter length feel like a simple win. The better question is whether the extra length improves the ring or simply pushes the stone into a shape that looks thin, dark, or awkward. If two stones are close in size, choose the one with better visual performance rather than the one with the longest number.
Mistake 2: Ignoring bow tie until the ring arrives
Some bow tie is common in oval diamonds, so the goal is not to eliminate every trace of contrast. The mistake is waiting until the ring arrives to decide whether the bow tie is acceptable. A severe bow tie that dominates the center of the diamond will not become less noticeable just because the stone is set.
Video review is the practical filter. If the dark area appears briefly as the diamond moves, it may be normal contrast. If it stays heavy and obvious in nearly every angle, the stone is riskier. Buyers trying to choose an oval lab-grown diamond should treat bow tie as a visual decision, not a detail to hope will improve later.
Mistake 3: Treating the certificate as the complete picture
A certificate is important, but it is not a beauty report. It can confirm the diamond’s listed specifications, yet it does not fully capture bow tie severity, outline appeal, face-up liveliness, or how visible an inclusion may be in normal viewing. This is why two ovals with similar report details can feel very different side by side.
The minimum review set should include the report, a clear image, and a video. If one of those pieces is missing, the buyer is making a less informed decision. A strong certificate can support a purchase, but it should not override what the actual oval looks like.
Mistake 4: Selecting the stone before considering the setting
An oval diamond and its setting should be planned together. Measurements, ratio, prong placement, height, and orientation all affect the final ring. A stone that looks excellent loose may not suit a particular halo, three-stone design, or east-west setting if the proportions do not align.
This matters even more for custom settings. The jeweler needs the exact length, width, and depth to build a setting that holds the stone securely and presents it well. NUVU can help buyers compare loose oval lab-grown diamonds with the intended setting in mind, which is often the difference between choosing a good diamond and choosing the right diamond for the finished ring.
Mistake 5: Treating origin, sourcing, or environmental language as proof of quality
Lab-grown origin is an important disclosure, but it should not be used as a shortcut for unrelated claims. A laboratory-grown oval can still vary in cut quality, color appearance, clarity visibility, growth method disclosure, post-growth treatment information when relevant, documentation, and visual performance.
Environmental and sustainability claims should be specific, documented, and limited to what can be substantiated. If those claims are part of your buying decision, ask what documentation supports the exact statement being made rather than relying on broad terms or assumptions about all lab-grown diamonds.
Final Purchase Filter
A strong oval lab-grown diamond should pass four checks: the ratio matches the buyer’s preferred look, the bow tie is not distracting, the outline is balanced, and the diamond’s exact measurements work with the intended setting. If one of those checks fails, the better move is usually to compare another stone before committing.
How to Choose the Right Oval Lab-Grown Diamond for Your Ring
The best oval lab-grown diamond is not simply the largest stone within budget. For an oval lab-grown diamond engagement ring, the better choice is usually the stone that looks balanced in shape, lively in motion, and physically right for the setting style. Carat weight matters, but it should not outrank ratio, bow-tie control, outline, and real visual performance.
A practical selection order
Start with the look you want before comparing individual stones. A buyer who prefers a soft, fuller oval should not shop the same way as someone looking for a long, sleek elongated oval. Choosing a preferred ratio range first keeps the search focused and prevents you from being distracted by stones that have strong grades but the wrong overall shape for your ring.
Next, set a realistic size target using both carat weight and millimeter measurements. Carat gives you the weight category, but length and width show how much presence the diamond will have on the finger. If your goal is finger coverage, the millimeter spread deserves more attention than moving up slightly in carat weight without a visible size benefit.
Once the ratio and size range are clear, screen the stone for bow tie and outline. This is where many oval buying decisions are won or lost. A diamond with a flattering ratio can still be a poor choice if the center looks dark in most views or if the shoulders appear uneven. Visual review should happen before you get attached to the certificate specs.
Color and clarity come next, not because they are unimportant, but because they should support the appearance rather than control the entire decision. Many buyers can choose a near-colorless, eye-clean oval successfully if the stone looks bright, balanced, and clean in normal viewing. Paying more for a higher grade may be worthwhile in some cases, but it is rarely a substitute for better light behavior or a more pleasing shape.
Before committing, confirm the grading report details and match the loose diamond to the intended setting. The setting should fit the stone’s actual length, width, and depth, not just a generic oval size. This is especially important for custom ring projects, delicate prong styles, halo designs, and east-west settings where small measurement differences can affect both appearance and fit.
When to prioritize visual performance over paper specs
Grading reports are useful because they narrow the options. They confirm key facts such as carat weight, measurements, color, clarity, and report identification. They do not show whether an oval’s bow tie is distracting, whether the outline looks graceful, or whether the diamond has bright movement across the full stone.
If two ovals are close on report specs, choose the one that looks better in real images and video. A slightly smaller oval with cleaner brightness and a softer bow tie can be the stronger ring diamond than a larger stone that looks flat or dark through the center. This is not ignoring the report; it is using the report for what it does well and letting visual evidence decide the final choice.
The most common mistake is treating a higher specification as an automatic upgrade. With oval diamonds, that can lead to overpaying for a grade difference the eye barely notices while missing a visible shape or light-performance issue. The practical test is simple: if the diamond looks less attractive in motion, the paper advantage may not matter once it is set in a ring.
Comparing oval stones with NUVU
NUVU can help buyers compare oval lab-grown diamonds by ratio, millimeter measurements, bow-tie appearance, visual review, and setting fit. This is most useful when you are deciding between loose diamonds that look similar on paper but different in photos or video.
For a custom oval lab-grown diamond ring, the stone and setting should be considered together. A long oval may look elegant in a solitaire but feel too narrow in a wide halo. A fuller oval may feel balanced in a three-stone design but appear too broad if the side stones are oversized. The right choice depends on the diamond, the wearer’s style, and the ring design working as one piece.
When comparing multiple oval options, ask the seller to keep the report, measurements, photos, and design notes linked to the same stone. If any of those details change, the comparison should be updated before moving forward.
For wholesale or repeat purchasing conversations, consistency and communication often matter as much as the headline specification. Buyers should confirm how the stone is identified in messages, invoices, media, and design notes so the reference remains clear throughout the process.
If a GIA report is provided, the report details may be checked through GIA’s official report verification system where available.
NUVU’s role in this process is best understood as helping buyers compare the stone they are seeing with the documentation attached to it, rather than treating the report as a substitute for visual review.
What to Check Before You Decide
Before committing, make sure the diamond looks good in motion, not only in the report. The best oval for your ring is the one that balances ratio, brightness, bow-tie control, face-up size, and setting compatibility within your budget.
FAQ for Oval Lab-Grown Diamond Buyers
These oval diamond questions focus on the final buying decision rather than repeating every detail of the full oval diamond buying guide. The right answer usually depends on the same core factors: ratio, bow tie, visual size, color, clarity, video review, and setting fit.
What is the best length-to-width ratio for an oval diamond?
Many buyers prefer a ratio around 1.36 to 1.45 for a classic oval shape because it gives a balanced look without feeling too short or too narrow. A ratio from about 1.46 to 1.55 creates a more elongated oval with stronger finger-lengthening effect. There is no single best oval diamond ratio for every ring; the better choice depends on your hand, setting style, and whether you want a softer or sleeker look.
Do all oval diamonds have a bow tie?
Many oval diamonds show some bow-tie effect, but the concern is severity. A mild bow tie can add natural contrast and may only appear at certain angles. A distracting bow tie stays dark through the center in most views and can make the diamond look split into bright ends and a dull middle. Always review video before buying, especially if you are choosing the diamond online.
Do oval diamonds look bigger than round diamonds?
Oval diamonds often look larger face-up than round diamonds of similar carat weight because their elongated outline creates more finger coverage. That size advantage is not automatic, though. Millimeter measurements, depth, brightness, and cut style all affect the final appearance. A large-looking oval is only a good choice if it still looks lively and balanced.
What color grade is best for an oval lab-grown diamond?
The best color grade depends on the diamond’s size, the setting metal, and your sensitivity to warmth. Larger ovals may show color more noticeably near the ends or edges, while yellow or rose gold settings can make slight warmth less obvious. Instead of choosing one universal grade, compare the stone visually against the metal color you plan to use.
Is an oval lab-grown diamond good for an engagement ring?
Yes, an oval lab-grown diamond can be an excellent choice for an engagement ring if you like elongated shape, graceful curves, and strong finger coverage. It is especially appealing for buyers who want a softer alternative to angular fancy shapes without choosing a round diamond. The key is to review bow tie, outline, measurements, and setting fit before purchase.
Are lab-grown oval diamonds the same as diamond simulants?
No. A laboratory-grown diamond is diamond with laboratory-grown origin, while a diamond simulant is a different material that only resembles diamond visually. If a listing uses unclear language, ask the seller to confirm whether the stone is a laboratory-grown diamond, a natural diamond, or a simulant.
FAQ Buying Reminder
Keep each answer tied to the decision in front of you. Ratio affects the shape, bow tie affects the center appearance, measurements affect visual size, video shows real performance, and the setting determines how the oval will look and wear as a finished ring.
Where to Go Next After Choosing an Oval Lab-Grown Diamond
Once you understand how to choose an oval lab-grown diamond, the next step depends on where you are in the buying process. Some buyers need broader diamond education before narrowing down a stone. Others are ready to compare loose lab-grown diamonds, confirm a diamond certificate, or start planning a custom engagement ring around a specific oval.
Helpful next steps for deeper comparison
If you are still learning the basics, a lab-grown diamond buying guide can help you understand how shape, cut, color, clarity, carat, and certification work together. If your main concern is documentation, a diamond certification guide is the better next step because it explains what a grading report can confirm and where visual review still matters.
If you are still comparing shapes, a diamond shape guide can help you decide whether oval is truly the right direction or whether round, pear, marquise, emerald, or cushion better fits your style. If you already prefer oval, move toward loose diamond comparison rather than staying in general education too long. At that point, the decision becomes less about shape theory and more about choosing the specific stone that performs best.
For buyers planning the finished ring, a custom engagement ring guide can be more useful than another diamond article. Oval diamonds are sensitive to orientation, prong placement, halo proportions, and side-stone scale. A strong center stone can still look wrong if the setting was not designed around its actual measurements.
A practical next step
If you are ready to compare oval lab-grown diamonds, focus on ratio, measurements, bow-tie appearance, outline balance, and setting fit. NUVU can be used as a resource for reviewing loose oval diamonds or planning a custom oval engagement ring with those practical checks in mind.
The goal is not to chase the longest stone, the highest grade, or the biggest carat weight at any cost. The better buying path is to compare stones in a way that reflects how the finished ring will actually look on the hand.
Keeping the decision focused
This guide is focused on oval-specific selection. It does not need to replace a complete 4Cs guide, a pricing guide, a certification guide, or a general engagement ring style guide. Those topics matter, but they answer different questions.
For an oval diamond, the most important question is whether the actual stone looks large, bright, balanced, and elegant enough for the ring you want. Color and clarity support that decision, but they should not distract from obvious issues in bow tie, outline, spread, or setting compatibility.
Keep a simple record of the final choice
Before paying, save the report, the selected video, the measurements, the chosen setting details, and any written notes about orientation or prong style. This makes the purchase easier to review later and reduces the chance of misunderstanding if the ring is being made to order.
When a buyer can trace the diamond from report to media to setting plan, the decision is usually easier to communicate to a jeweler or setter and easier to revisit if a question comes up later.
Final decision check
Before you choose a loose oval diamond, make sure you can identify your preferred ratio range, recognize whether the bow tie is acceptable, compare visual size by millimeter measurements, and review real photos or video. Then confirm that the diamond’s exact proportions work with the setting style you want.
A strong oval lab-grown diamond should not require you to ignore a visible concern. If the center looks too dark, the outline feels uneven, or the setting fit is uncertain, keep comparing. The right oval should make the final ring feel intentional rather than compromised.
Final Buying Guardrail
Choose the oval by looking at the actual diamond, not just the numbers. The report helps you narrow the options, but the final decision should come from the stone’s ratio, brightness, bow-tie control, face-up size, and fit with the ring design.
Disclosure: This article is for general educational purposes only. Diamond grading, pricing, availability, specifications, and seller policies can change, and readers should verify important details through grading reports, official laboratory tools, seller documentation, or qualified professionals before making a purchase decision. Laboratory-grown diamonds should be clearly distinguished from natural diamonds, and environmental or sourcing claims should be supported by specific documentation.