
Choosing a lab-grown diamond for a custom ring isn’t like picking a gem off a shelf. The biggest mistake buyers make is selecting a diamond by carat weight alone, then designing a setting around that number—only to discover the actual stone doesn’t fit the mount, sits too high, or forces costly last-minute changes. To avoid that expensive headache, it is essential to adhere to a structured custom engagement ring design process, which outlines the exact decisions you need to make before fabrication begins.
For the full framework, read Custom Lab-Grown Diamond Jewelry Guide.
It explains why millimeter measurements matter more than weight, which certificate specs determine a good fit, and how to match color and clarity to your metal and setting style without overspending. You’ll learn to treat a lab-grown diamond grading report as a technical blueprint, not a scorecard, and how to read it for real-world use rather than theoretical perfection.
| Decision Area | Common Mistake | Smarter Approach |
|---|---|---|
| Stone size for design | Choosing by carat weight only | Provide exact millimeter measurements from the report |
| 4Cs spending for jewelry | Buying D color and VVS clarity by default | Match color to metal; stop at VS2 for most settings |
| Setting fit validation | Assuming any round fits a standard head | Verify stone depth % and girdle thickness against CAD specs |
| Shape & design cost | Picking an elongated shape & expecting standard mounting | Plan for custom head fabrication with fancy shapes |
| Return & risk management | Ordering a stone before confirming return policy | Get written return terms before fabrication begins |
| Visual outcome expectation | Relying on the grading report to predict sparkle | Review real-video or in-person inspection separately |
Quick Questions Before You Read
Q: Can I just pick a 1-carat round and have the jeweler make a standard setting work?
Not reliably. A 1-carat round can range from 6.0 mm to 6.8 mm in diameter. Designing around a generic size risks a loose fit or a setting that can’t hold the stone.
Q: Is a higher color or clarity grade always better for custom jewelry?
No. A D-color stone in a yellow gold bezel or a VVS1 diamond hidden under pavé small stones wastes your budget. Match grade to the setting, not a number.
Q: Does the laser inscription “lab-grown” on the grading report affect cut quality or durability?
Not at all. The inscription is just identification. The cut grade, symmetry, polish, and dimensions follow identical standards to natural diamonds.
Q: What’s the single biggest financial risk in this process?
Buying a loose stone without a return policy, then starting custom fabrication. If the stone or design needs to change, you can be stuck with a diamond you can’t use.
Why Stone Selection Must Come Before Design Finalization
The most expensive mistake in custom jewelry is falling in love with a design before the stone is locked in. A ring drawn around a hypothetical diamond—one that looks right in a sketch but arrives with different measurements—can require structural changes to the prongs, basket, and shank, or worse, may not fit the mounting at all. Stone selection is not a decorative decision you make after the design is finished. It is the foundation the entire piece is built on.
Custom jewelers cannot manufacture a mounting without knowing the exact dimensions of the diamond that will sit in it. Diameter, depth, girdle thickness, and shape all determine how the setting is constructed. A design approved for a 6.5mm round diamond cannot accommodate a 6.2mm or 7.0mm stone without re-engineering the head. That means new metalwork, additional labor, and a ring that may not look or sit the way you expected.
Beyond fit, there is the practical matter of how a stone’s proportions influence the overall visual balance of the piece. Two diamonds with identical carat weight but different face-up sizes will change the ring’s proportions — altering the perceived width of the band, the prominence of side stones, and the silhouette on the finger. Selecting the stone first means that every design decision, from prong style to shank thickness, responds to the actual diamond rather than an approximation.
The importance of selecting the stone before the design is finalized is also emphasized by the Federal Trade Commission’s (FTC) guidelines on jewelry advertising. The FTC requires that any claims about a diamond’s characteristics — including weight, dimensions, or grade — be accurate and substantiated.[1] When a buyer selects a stone first and provides its verified measurements to the designer, the resulting custom piece is built on documented facts rather than estimates. This approach not only improves fit and appearance but also aligns with the principle of accurate representation that guides responsible jewelry commerce.
The Common Mistake: Designing Around a Hypothetical Stone
Many buyers start a custom project by describing an approximate stone: “a 1-carat round” or “around 1.5 carats.” The jeweler sketches a setting based on that rough idea. But 1-carat rounds vary in diameter from roughly 6.0mm to 6.8mm depending on cut proportions. A halo designed for a 6.5mm stone will leave a visible gap if the diamond ends up measuring 6.2mm, and a bezel made for a 6.2mm stone will not hold a 6.5mm diamond securely. The result is either a ring that looks wrong or a setting that cannot be used at all.
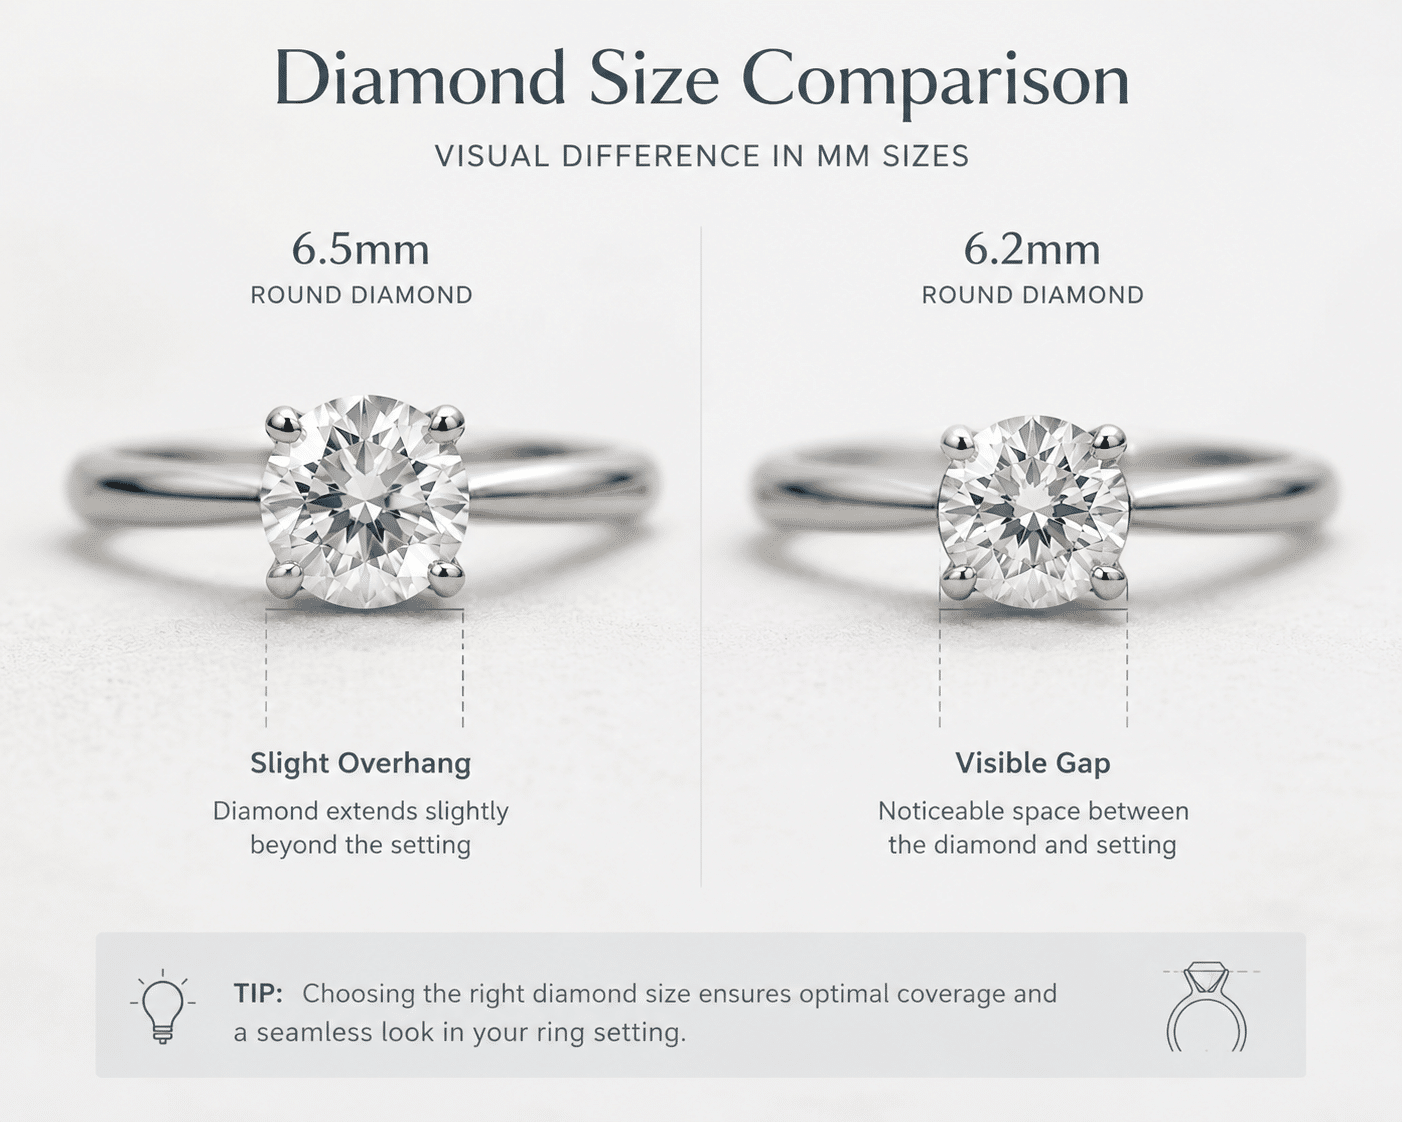
This is not a minor adjustment. Changing a setting to fit a different stone after the metal is cast often requires cutting and re-soldering the head, which weakens the structure and adds cost. The smarter path is to select the exact stone first, then design the mounting around those specific numbers.
How Stone Parameters Directly Affect Setting Options
Every measurement on a grading report becomes a constraint for the jeweler. Prong height depends on the stone’s depth: a shallow diamond needs short prongs to hold it securely, while a deeper stone demands a taller basket. The gallery rail position is determined by the stone’s girdle thickness and the crown angle. Even the head diameter—how wide the setting’s opening must be—is dictated by the stone’s maximum width.
These dependencies are not negotiable after fabrication begins. If the basket is cast for a stone with 4.2mm of depth, a diamond with 4.6mm of depth will sit too high, raising the ring profile and increasing snagging risk. A stone with 3.8mm of depth will sit too low, potentially leaving an exposed gap between the girdle and the setting wall. Both outcomes require starting over.
What to Check Before You Decide
Before approving a design, confirm the loose stone’s measurements against the intended setting type. For a six-prong solitaire, verify that the stone’s diameter falls within the mounting’s adjustable range—typically about ±0.2mm. The jeweler can adjust prongs slightly, but beyond that threshold, the fit becomes unreliable. For a bezel setting, the requirements are stricter: the stone’s girdle thickness and diameter must match the bezel wall height exactly, because bezels cannot be adjusted after fabrication. If the stone does not fit the bezel exactly, the entire setting must be remade.
For a brand like NUVU, the goal is not to push buyers toward a particular stone, but to make sure they understand how the numbers connect to the finished ring. Selecting the diamond first is not an extra step—it is the step that prevents everything after it from going wrong.
The Four Cs as Design Constraints, Not Just Quality Metrics
Most buyers learn the Four Cs as a way to evaluate diamond quality. Cut, color, clarity, and carat weight are useful for that, but in custom jewelry they serve a second, more practical purpose: they determine what settings, metals, and proportions will actually work. Treating the Four Cs as design parameters, not just grades, improves both the process and the result.
Cut Quality: The Overlooked Design Limitation
Cut quality controls more than light performance. A round brilliant with an Excellent or Ideal cut grade has predictable proportions—consistent crown angles, pavilion depth, and table size—that fit standard mounting frames without modification. A stone with Good or Fair cut may have inconsistent proportions that make setting difficult. A too-deep pavilion requires a taller basket. A thick girdle demands longer prongs or deeper bezel walls. And a stone that spreads poorly for its carat weight may look smaller than expected once set, regardless of the budget spent.
Fancy shapes introduce a different problem. Oval, pear, marquise, and radiant cuts do not have a universal cut grading system the way round brilliants do. A “Very Good” grade on one fancy shape does not mean the same thing as “Very Good” on another. This makes proportion analysis essential before approving any design. A round diamond with poor proportions still has predictable setting requirements. A fancy shape with poor proportions may not have safe prong placement or balanced light return at all.
To better understand how cut quality functions as a design constraint, it is helpful to look at how grading laboratories describe their own criteria. GIA, for example, explains that its cut grade for standard round brilliants considers factors such as brightness, fire, scintillation, weight ratio, durability, polish, and symmetry.[2] These are not abstract attributes — they directly affect how a stone interacts with its setting. A diamond graded Excellent by GIA will have a predictable range of crown and pavilion angles that fit standard mounting heads. A stone with a lower cut grade may have proportions outside those ranges, requiring custom basket work or prong modification. This is why the cut grade on a GIA report is not merely a quality label — it is a signal to the jeweler about whether the stone will fit a standard frame or require bespoke engineering.
Color Grade and Metal Selection Interdependence
Color grade is often discussed in terms of preference, but it has a direct functional relationship with the metal the stone will be set in. A lab-grown diamond graded D-F (Colorless) pairs best with platinum or white gold because those metals do nothing to mask the stone’s brightness, and the diamond remains crisp and white from every angle. Setting a D-F stone in yellow or rose gold is fine visually, but you are paying for a color grade the metal does not need.
A G-I (Near Colorless) stone offers a more efficient match. Set in yellow or rose gold, the metal absorbs any faint warmth in the diamond, and the stone appears colorless to the naked eye. The savings between D and G color at the same size and clarity can reach 15-25%—money that can go toward a larger stone, a better cut, or a more elaborate setting. Setting a J-color diamond in white metal, by contrast, often reveals body color that the buyer did not expect, particularly in bright lighting or against a white gold band.
It is also worth noting that lighting conditions in a showroom or online video can influence how a stone’s color appears. A stone that looks perfectly white under bright jewelry lighting may show a faint warm tint in soft, natural daylight. For this reason, viewing the stone in the intended lighting environment — or at least comparing it against the actual metal it will be set in — is a more reliable evaluation than relying on the color grade alone.
Clarity and Setting Visibility
Clarity inclusions matter only if they can be seen. In an open solitaire setting with no side stones and a simple band, every inclusion within the table area is visible to anyone inspecting the stone closely. In a halo setting, pavé band, or cathedral-shoulder design, the eye is drawn away from the center stone by the surrounding detail. Small inclusions near the edge of the diamond, which would be distracting in a solitaire, can be hidden under a prong or behind a halo.
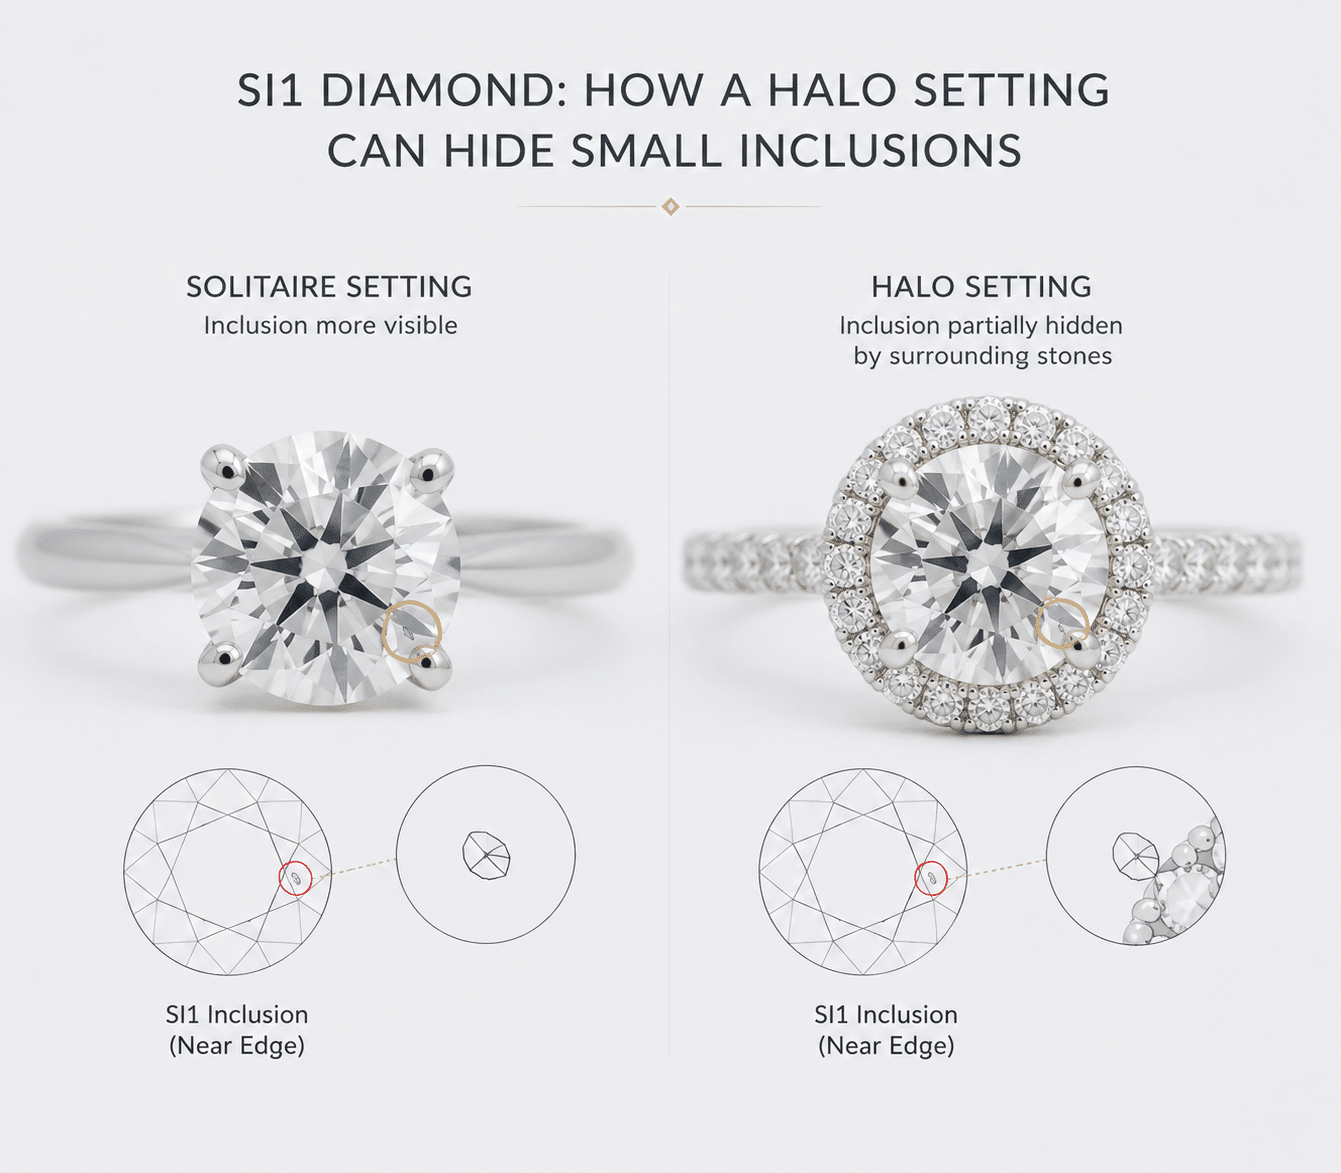
This creates a clear strategy: buyers who want a halo or three-stone setting can comfortably choose SI1 or VS2 without visible compromise, saving cost without sacrificing appearance. A buyer who wants a wide-open solitaire should move up to VS2 or higher, where inclusions are invisible without magnification. The grade itself matters less than how the grade interacts with the setting.
Check Before You Decide
For any custom ring, request a 360-degree video or high-resolution image of the specific stone, not just the grading report. The report tells you a clarity grade, but it does not show you where the inclusion is located. Examine the stone at different angles to confirm whether inclusions are near the edge, where they can be hidden, or near the center of the table, where they cannot. For fancy shapes, ask for an ASET or Idealscope image to verify light return symmetry. Oval and pear diamonds vary significantly in bow-tie effect between individual stones, and a proportion diagram alone will not tell you how pronounced that effect will be.
Why Carat Weight Is a Poor Standalone Measure for Custom Work
Carat weight is the most quoted number in diamond buying, but it is the least useful figure for custom jewelry design. Two diamonds with the same carat weight can look dramatically different on the finger, require different setting structures, and create completely different design proportions. For custom work, millimeters matter more than carats.
Carat vs. Face-Up Size: The Spread Difference
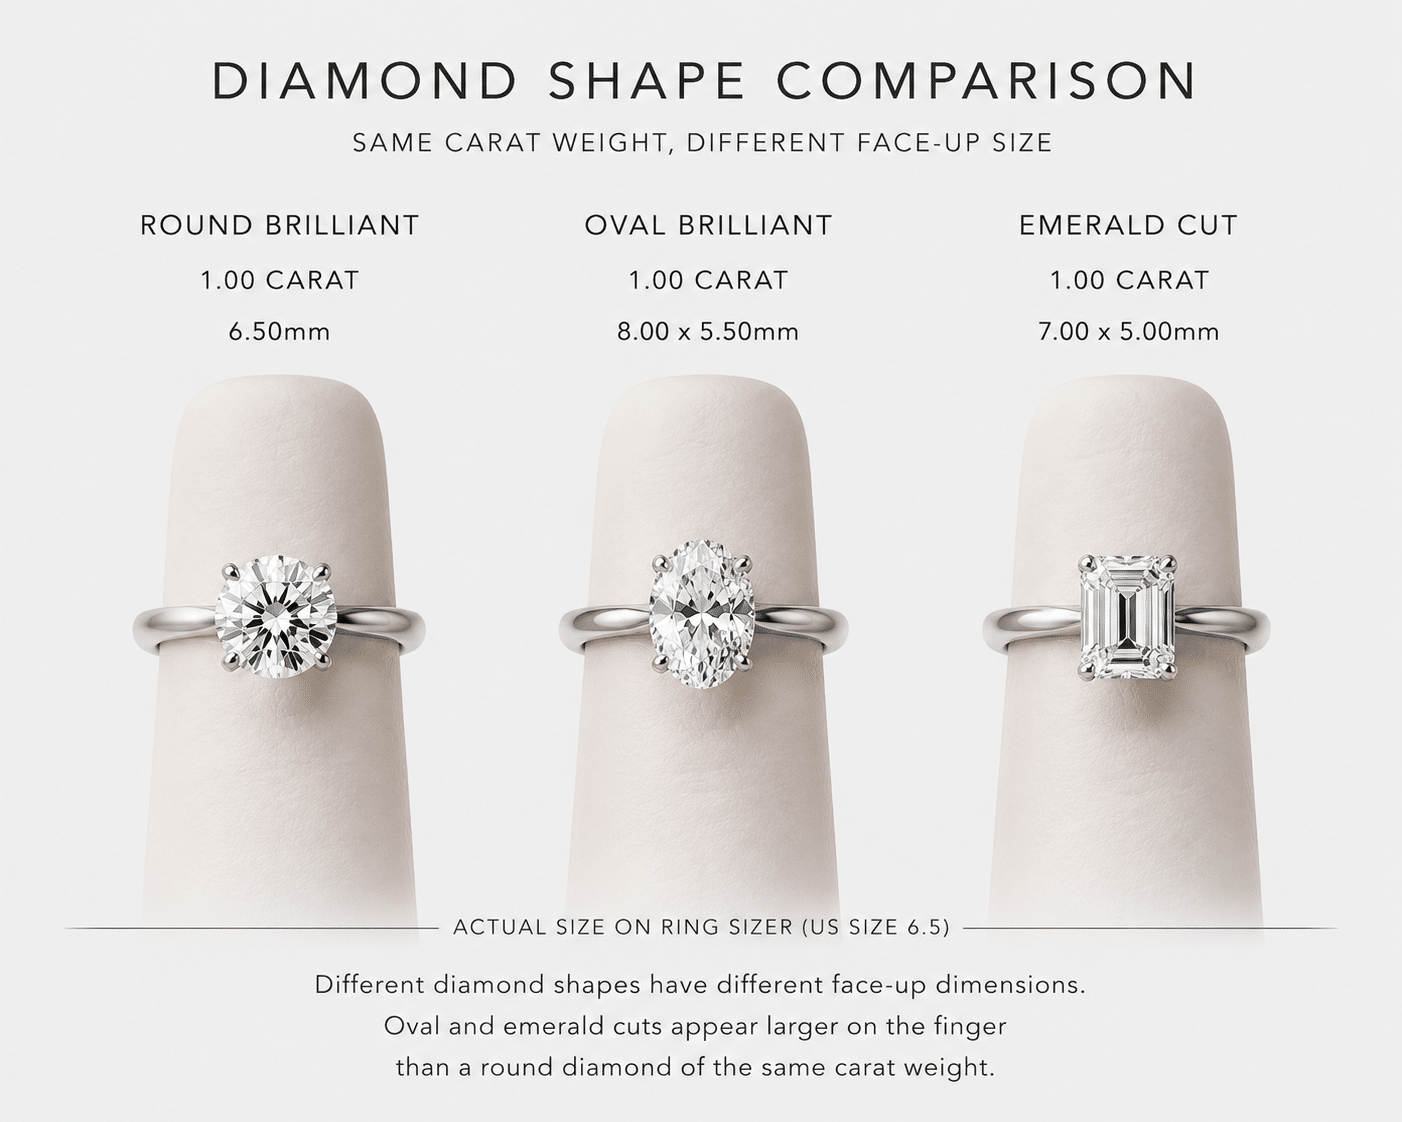
A 1.00-carat round brilliant with ideal proportions measures approximately 6.35-6.50mm in diameter. That is the standard range, and most buyers have a reasonable mental image of how it looks. But a 1.00-carat oval may measure 7.5mm long by 5.5mm wide, creating a longer, narrower silhouette. A 1.00-carat emerald cut may measure just 6.5mm by 4.5mm, with less total surface area visible from above. The same carat weight, three completely different visual impressions.
This spread is not a defect—each shape has its own design value—but it means that specifying a carat weight alone tells the jeweler very little. If you want the finger coverage of a 6.5mm round diamond, the correct search parameter is a 6.5mm diameter, not a 1-carat stone. A shallow-cut 1-carat round may spread to 6.8mm, while a deep-cut stone from the same weight may measure only 6.1mm. Both are 1 carat, but one will dominate a size 6 finger and the other will look noticeably smaller.
How Shape Affects Setting Compatibility
Round diamonds have the most predictable setting availability. Off-the-shelf mountings exist for every standard round diameter, and prong placement is standardized. Elongated shapes like oval, pear, marquise, and emerald cuts require custom head fabrication for every setting because the points need specific protection. A pear diamond needs a V-tip prong at the pointed end and careful balancing of the rounded end. An emerald cut needs prongs placed precisely at the corners to prevent chipping, and the setting must match the exact angle of those corners, which varies between individual stones.
Square shapes like princess, Asscher, and cushion cuts also require corner protection. Bezel and half-bezel settings are common for these shapes, but every stone’s corner geometry is slightly different. A stock mounting designed for one cushion may not fit another cushion of the same carat weight because the corner angles and overall proportions differ. Custom fabrication is the reliable path, and that means the stone must be selected before the setting is designed.
Total Carat Weight vs. Main Stone Carat
A ring described as “2.00 total carat weight” can mean many things. It may feature a 1.00-carat center stone with 1.00 carats of side stones and pavé diamonds. It may feature a 1.50-carat center with 0.50 carats of accent stones. The two rings have very different pricing, different visual proportions, and different design requirements. Buyers comparing custom quotes must distinguish between single-stone carat weight and total carat weight, because the center stone drives the majority of the cost and the entire setting structure.
Total carat weight is useful only as a summary number. For design and budget decisions, the center stone carat weight and the side stone carat weight should be treated as separate line items.
Check Before You Decide
For any custom design project, specify the center stone’s exact measurements in millimeters—length, width, and depth—not just its carat weight. Ask the jeweler how the stone’s face-up area will appear relative to your finger size. A useful reference: a 6.5mm round diamond covers approximately 40% of a size 6 finger width. A 7.0mm diamond (roughly 1.25 carat equivalent in a well-cut round) covers about 50%. Use these proportions as a starting point for deciding what looks right to you, and let the millimeter measurements, not the carat number, guide your search.
Lab-Grown Diamond Certification: What the Report Tells Your Jeweler
A grading report from IGI, GIA, or GCAL is often treated as a quality scorecard, but for custom jewelry, it functions more like a technical specification sheet. The jeweler does not use the report to admire the grade but uses the numbers on it, custom lab grown diamond design guide, to determine whether the stone will physically fit the setting you want. Treating the report as a communication tool between buyer and maker changes how you read it.
Grading Report Fields That Matter for Setting Fit
The key fields for setting compatibility are measurements (length, width, depth), table percentage, crown angle, pavilion depth, girdle thickness, and culet size. Together, these numbers determine how the stone sits inside the mounting.
Prong height depends on the stone’s crown height and total depth. Basket depth is determined by the pavilion depth and culet size. Whether a flush setting, cathedral setting, shared-prong, or channel setting will work depends on whether the stone’s dimensions fall within the mounting’s adjustable range. A stone with a “Very Thick” girdle usually requires a modified setting that raises the stone higher above the band. A stone with a “Medium to Slightly Thick” girdle fits standard mounting frames without modification.
The difference between a stone that fits a stock setting and one that requires custom fabrication is often a fraction of a millimeter. The grading report captures that difference.
Why Lab-Grown Diamond Reports Are Different
Lab-grown diamonds receive the same grading standards as natural diamonds at IGI, GIA, and GCAL. The identifying marker — usually a laser inscription reading “LABORATORY-GROWN” — does not affect cut quality or setting compatibility in any way. A well-cut lab-grown round brilliant and a well-cut natural round brilliant with identical proportions will fit the same mounting.
Some laboratories also provide additional data that is directly useful for custom design. GCAL includes light performance grading for round brilliants, which gives a numerical evaluation of brightness, fire, and scintillation. IGI provides proportion diagrams that help jewelers verify whether the cut precision matches the stated grade. These extras do not replace visual inspection, but they give the jeweler more information before metalwork begins.
It is important to note that federal guidance addresses how laboratory-grown diamonds should be described in the marketplace. The FTC has issued guidance advising that sellers should clearly distinguish laboratory-grown diamonds from natural diamonds to avoid consumer confusion.[3] This applies to how the diamond is described on its grading report, its laser inscription, and in any advertising or sales materials. For the custom jewelry buyer, this means that a lab-grown diamond’s grading report will clearly identify the stone’s origin, making it straightforward to verify that the stone matches the chosen design brief and that all marketing claims about the stone’s nature are accurate.
What the Report Does Not Tell You
No grading report can predict how a specific stone will perform in a specific setting. The report does not measure bow-tie visibility in fancy shapes, fluorescence effects in natural light, or how color tint will appear against yellow versus white metal. It does not tell you whether an inclusion will be visible to the naked eye at normal viewing distance. It cannot measure the symmetry of light return across the entire crown.
These factors require direct visual inspection or detailed imaging of the actual stone. A grading report tells you that a stone meets certain laboratory standards under controlled conditions. It does not tell you whether the stone will look the way you expect on your finger. That gap is where video, real-world viewing, and an experienced jeweler’s assessment become essential.
For buyers, the practical point is not just what the report says, but how the stone performs visually and fits the intended design. At NUVU, this kind of comparison is treated as a practical selection question: the report narrows the field, but the final decision still depends on visual performance, measurements, and design fit.
Understanding Traceability in Grading Reports
Traceability in the lab-grown diamond industry begins with the grading report. The report number inscribed on a diamond’s girdle provides a direct link between the physical stone and the documented characteristics assessed by the laboratory. For custom jewelry, this traceability is crucial because it establishes a single source of truth for the stone’s identity, measurements, and grades. When a buyer selects a diamond based on a specific report and then forwards that stone to a jeweler for setting, the report number serves as the verification anchor throughout the production process. If any discrepancy arises — between the stone’s measured dimensions and what the jeweler expects — the report provides the documented reference point for resolution. This is particularly important when the stone is being set into a custom mounting, where even a 0.1mm difference can affect fit. By ensuring that the grading report number is recorded on the purchase invoice, the design brief, and the final CAD file, buyers and jewelers maintain a clear chain of documentation from selection through completion.
When a grading report is provided, buyers should verify the report details through the issuing laboratory’s official report-check tools where available. This step confirms that the grading report matches the stone you received before it enters the custom fabrication process.
What to Check Before You Decide
Request a photo or scan of the full grading report, not just the summary. Confirm that the report number on the certificate matches the number inscribed on the stone. For fancy shapes, ask the jeweler to evaluate cut characteristics using proportion-based guidelines rather than relying on a single grade. For ovals, look for a table percentage between 53-63% and a depth between 58-63% as starting benchmarks for good visual performance. These numbers are not absolute rules, but stones falling significantly outside these ranges tend to show more bow-tie effect and less consistent light return.
Shape Selection: Matching Diamond Shape to Design Intention
Diamond shape is not an aesthetic preference alone. It determines the entire design language of the piece — the setting style, the prong configuration, the orientation of the stone, the silhouette on the finger, and the final cost of fabrication. Choosing a shape before any sketching begins prevents the common mistake of designing a ring around a shape that cannot be executed well or within budget.
Classic Shapes for Traditional Settings
Round and cushion diamonds integrate easily with solitaires, three-stone settings, halos, and vintage-inspired designs. These shapes have the widest availability of off-the-shelf mounting options and the most predictable setting costs. Prong placement follows standardized patterns. Cathedral arches can be built around standard cushion dimensions without requiring custom head fabrication. If your priority is a straightforward build with fewer variables, a round or cushion is the most reliable starting point.
Elongated Shapes for Modern or Statement Looks
Ovals, pears, marquise, emerald cuts, and radiant cuts create a longer finger silhouette and offer more creative setting possibilities. The tradeoff is that every elongated shape requires custom head fabrication. The points on pears and marquise stones need V-tip prongs to prevent chipping, adding labor cost. The orientation of the stone — vertical, horizontal, or East-West — changes the entire design flow and must be decided before any metalwork begins. A pear set with the point downward reads as a classic engagement silhouette. The same pear set East-West becomes a completely different design statement, requiring a different basket and shank structure.
Square and Rectangular Shapes for Clean, Architectural Designs
Princess, Asscher, radiant, and emerald cuts require careful corner protection. A bezel or half-bezel setting is common for these shapes because the sharp corners are vulnerable to chipping if left exposed. The setting must match the exact angle of the stone’s corners, which varies between individual stones even within the same shape category. Two emerald cuts of the same carat weight may have slightly different corner angles, meaning stock mountings are unreliable. Custom fabrication is almost always necessary.
This makes square and rectangular shapes slightly more expensive to set than rounds. The payoff is a clean, architectural look that stands apart from traditional rounded silhouettes. The buyer should go into this knowing the setting will be bespoke.
Shape Documentation and Consistency in Custom Work
When selecting a fancy-shaped diamond for custom jewelry, consistency in documentation is especially important. Unlike round brilliants, where cut grades and proportion ranges are standardized, fancy shapes rely more heavily on the specific measurements and angles recorded on the grading report. For example, two oval diamonds of similar carat weight may have different length-to-width ratios, which directly affects how the stone looks on the finger and how the setting must be designed. A buyer who chooses an oval with an 8.0mm x 6.0mm measurement will have a very different design brief than one who selects an oval measuring 8.5mm x 5.5mm, even if both stones weigh approximately 1.00 carat. The grading report captures these dimensions, and the jeweler uses them to build the head, prongs, and basket. When the shape documentation is clear and the report number is linked to the design file, the jeweler can proceed with confidence. For the buyer, this means that the written design brief should include not only the shape name but also the specific length, width, and depth measurements from the report, ensuring that the stone’s unique geometry governs the setting from the start.
What to Check Before You Decide
Before committing to a specific shape, try on a sample stone or a cubic zirconia replica of that shape and size. Many jewelers offer try-on kits that let you see how a 6.5mm round, a 1-carat-equivalent oval, or an emerald cut looks on your finger. This visual step prevents the common mismatch between expectation and reality, especially for elongated shapes that look larger than their carat weight might suggest. What looks elegant in a display case can feel oversized on a smaller finger.
Measurements and Proportions: The Numbers That Matter Most
Carat weight tells you how much the stone weighs. Measurements tell you how much finger it will cover and whether it will fit the setting. For custom jewelry, the numbers on the grading report that describe physical dimensions are more important than the carat number. Understanding a few key ranges helps you evaluate a stone before it enters the design process.
Key Measurement Ranges by Shape
For round brilliants, target a depth percentage of 59-62.5%, a table size of 53-58%, a crown angle of 33-35°, and a pavilion angle of 40.4-41.8%. These ranges produce the best light return and most predictable setting behavior.
For ovals, look for depth of 58-63% and table of 53-63%. For pears, depth of 58-63% and table of 53-65%. For emerald cuts, depth of 61-67% and table of 61-69%. For cushions, depth of 61-67% and table of 58-68%.
These ranges are starting points, not absolute rules, but straying far outside them often leads to poor visual performance or setting difficulty. A round with 56% depth will look shallow and may not fit a standard basket. An emerald cut with 70% depth will sit uncomfortably high.
Girdle Thickness and Setting Security
A girdle graded “Thin” to “Slightly Thick” is ideal for most settings. “Very Thin” girdles risk chipping during setting or everyday wear. “Thick” or “Very Thick” girdles may require deeper setting or longer prongs, which changes the overall ring silhouette and proportion.
For custom work, avoid stones with “Extremely Thin” or “Extremely Thick” girdles. An extremely thin girdle creates a durability risk that no setting can fully compensate for. An extremely thick girdle forces design compromises — the stone sits higher, the prongs look bulkier, and the ring profile becomes less comfortable for daily wear.
Total Depth and Setting Height
Total depth percentage — total depth divided by average diameter — directly affects how high the stone sits in the setting. A deeper stone, with depth over 65% for rounds, will sit higher, increasing the risk of snagging and raising the overall profile above what many buyers expect. A shallower stone, with depth below 57% for rounds, may sit so low that a modified basket is required, which can weaken the structural integrity of the setting.
For daily-wear engagement rings, a total depth of 60-63% provides a balanced profile. The stone sits high enough to catch light properly but low enough to fit comfortably under clothing and reduce snagging risk. This range works well for most standard solitaire and halo settings without requiring unusual modifications.
Verifying Proportion Documentation Against the Report
When reviewing a grading report for measurements and proportions, it is worth taking the time to compare the documented numbers against visual expectations. The report provides a proportion diagram for most stones, showing the crown angle, pavilion depth, and table size in relation to each other. These numbers should be cross-referenced with the acceptance criteria in your design brief. For example, if your brief specifies a round diamond with a depth percentage between 59% and 62.5%, and the report shows 64%, you have a direct reason to exclude that stone from consideration. The report also records the girdle thickness in a descriptive range — from “Extremely Thin” to “Extremely Thick” — which should be matched to the setting type you have chosen. A bezel setting, which wraps entirely around the stone, is more forgiving of girdle variations than a four-prong setting, which leaves the girdle exposed. By checking these documented proportions against your design brief before the stone reaches the jeweler, you maintain control over the fit and appearance of the final piece. This verification step, while simple, ensures that the stone you selected based on its report actually meets the physical constraints of your intended design.
What to Check Before You Decide
Ask your jeweler to calculate the expected setting height — crown height plus stone depth plus basket clearance — for each stone you are considering. A typical 1-carat round in a solitaire setting sits approximately 7-8mm above the finger. A 1.5-carat round may sit 8-9mm. If the stone is deeper than average, the setting may rise to 9-10mm, which some buyers find too tall for daily wear. Get this number in millimeters before approving the design. A good-looking diamond that sits too high will be a daily annoyance.
Colorless vs. Near-Colorless: A Practical Cost vs. Appearance Tradeoff
Color grade is one of the most over-prioritized parameters in custom jewelry. Buyers often assume higher is always better, without considering how setting metal and design complexity change what is actually visible. The real question is whether a D-F diamond adds visible value in your specific setting, or whether a G-I stone delivers the same face-up appearance for significantly less.
When Colorless (D-F) Is the Right Choice
D-F diamonds are best suited for platinum, white gold, or palladium settings, where the metal is bright white and will not mask any body color in the stone. They are also the right choice for solitaires with open gallery rails, where the diamond is visible from the side and bottom. In these designs, any hint of warmth becomes more apparent because there is no metal color to blend with. Buyers who plan to sell or trade the stone later may also prefer higher color grades for broader market appeal, though lab-grown diamond resale value is limited regardless of color grade.
When Near-Colorless (G-I) Saves Money Without Visible Sacrifice
G-I diamonds appear colorless when viewed face-up in most settings, particularly in yellow gold, rose gold, or mixed metal designs. The savings between a D-color and a G-color lab-grown diamond of the same size and clarity can reach 15-25%, depending on market conditions. This is money that can go toward a larger stone, a more complex setting, or simply a lower total project cost. A G-I diamond set in yellow gold will show no detectable warmth to the naked eye for the vast majority of buyers. The warmth that a trained grader sees under controlled lighting is invisible in normal wear.
A Note on Warm Tones and Setting Strategy
J and K color diamonds show visible warmth in white metal settings, which many buyers do not expect. But in yellow or rose gold, that same warmth can look intentional and attractive. Some buyers choose a J-K stone specifically for a vintage or warm aesthetic, pairing it with a rose gold band and a delicate halo. This approach can reduce stone cost significantly while creating a cohesive design look where the diamond and metal work together. The key is intentionality. Buyers who know what they are getting and why are rarely disappointed. Buyers who select a lower color grade simply to save money without considering the metal choice often are.
Color Documentation and Lighting Context
The color grade on a grading report is determined under controlled laboratory lighting conditions, typically using daylight-equivalent illumination and a standardized viewing environment. These conditions are designed to isolate the stone’s body color from external factors. However, the way a diamond appears in a custom ring depends heavily on the lighting of the environment where it will be worn — whether that is an office with fluorescent lights, a home with warm incandescent bulbs, or outdoor daylight. Because of this, the color grade on a report should be understood as a reference point rather than an absolute predictor of visible color in daily wear. When evaluating a stone, it is useful to view it in multiple lighting conditions, especially the lighting where the ring will most often be seen. If the stone appears slightly warm under a jeweler’s bright spotlight but looks perfectly white under the softer light of your living room, the color grade is more than adequate for your needs. This is another reason why a grading report, while essential, is most valuable when combined with practical, real-world observation.
What to Check Before You Decide
Ask to view the stone face-up in the metal color you plan to use. A D-color diamond in a yellow gold setting will still look white, but a J-color diamond in white gold may look slightly warm. If you are unsure, place the stone on a white piece of paper next to a reference stone — ask your jeweler for a D-color stone for comparison. If you cannot see a difference at normal viewing distance, the higher color grade is not worth the premium for your design.
Clarity Selection: Finding the Right Balance for Custom Jewelry
Clarity is often overbought in custom jewelry. Lab-grown diamonds typically have fewer and less visible inclusions than natural diamonds at the same clarity grade, which means an SI1 lab-grown diamond often looks cleaner than an SI1 natural diamond. The practical question is not which grade is highest, but which grade is invisible in your specific design.
VVS1-VVS2: When Clarity Is the Priority
VVS diamonds are virtually flawless to the naked eye, with inclusions visible only under high magnification. These are appropriate for solitaires with large, open heads, for buyers who plan to inspect the stone with a loupe, or for those who simply want the cleanest possible stone regardless of cost. But the premium from VS2 to VVS1 rarely adds visible improvement in a ring setting. If you cannot see the difference at arm’s length, the extra spend is for your own knowledge, not for the appearance of the finished piece.
VS1-VS2: The Practical Sweet Spot
VS diamonds have minor inclusions that are difficult to see under 10x magnification and invisible to the naked eye. For most custom designs, as outlined in the custom lab grown diamond jewelry guide, VS2 represents the best balance of cost and visual perfection. A well-cut VS2 diamond will appear flawless to any normal observer and passes even close inspection under good lighting. There is no visible reason to pay more for VS1 or VVS grades in most settings.
SI1-SI2: The Cost-Conscious Option for Covered Settings
SI1 diamonds may have minor inclusions visible under 10x magnification but are rarely visible to the naked eye. SI2 diamonds may have inclusions that are faintly visible under close inspection, especially in large, open solitaires. But in a halo setting, three-stone setting, or any design with side stones or milgrain detail, the eye is drawn away from the center stone. Inclusions that would be noticeable in a solitaire become effectively invisible when surrounded by smaller diamonds or decorative metalwork. This makes SI1-SI2 a very practical choice for buyers who want to maximize carat size or reduce total cost without compromising the finished look.
Clarity Documentation and Inclusion Mapping
Grading reports for lab-grown diamonds often include a clarity plot — a diagram that shows the location, type, and size of inclusions on the stone. This plot is an essential tool for custom jewelry planning because it allows the buyer and jeweler to determine whether an inclusion can be hidden by prongs, a halo, or other design elements. For example, a small crystal inclusion located near the girdle edge of a pear-shaped diamond can be covered by a V-tip prong at the stone’s point, making it completely invisible in the finished ring. Conversely, a feather inclusion located in the center of the table — even if small — will always be visible in an open solitaire setting. By reviewing the clarity plot from the grading report alongside the intended setting design, buyers can make informed decisions about which clarity grades and specific inclusions are acceptable. This documentation also helps establish realistic expectations: an SI2 diamond with a well-placed inclusion in a covered area may appear flawless in the finished ring, while a VS1 diamond with a table-visible inclusion may not. The grading report’s clarity plot, when read with the design in mind, transforms the clarity grade from an abstract number into a practical design input.
What to Check Before You Decide
For SI1 and SI2 stones, always request a high-resolution video of the stone rotating in good lighting. Look for inclusions near the center of the table, which are harder to hide regardless of setting. Inclusions near the edge or under the crown can often be covered by prongs or a halo. Ask your jeweler to mark the setting design over the inclusion map to confirm the inclusion will be hidden. Never accept an SI stone sight-unseen without video verification.
How to Combine Stone Parameters for a Cohesive Design Brief
A custom jewelry project is only as good as the brief that guides it. When stone parameters are communicated clearly, the jeweler can work efficiently and the final piece fits as intended. When the brief is vague or incomplete, revisions and misunderstandings follow.
Building a Written Design Brief
A useful design brief should include the following elements:
– Target stone measurements in millimeters: for example, 6.5-6.7mm round, or 8.0×6.0mm oval
– Shape: round, oval, cushion, princess, emerald, pear, marquise, radiant, Asscher
– Acceptable color range: D-F, G-I, or a specific grade
– Acceptable clarity range: VS2 or better, or SI1 or better, with a note about whether inclusions near the edge are acceptable
– Setting type: solitaire, halo, three-stone, bezel, cathedral, pavé band, etc.
– Metal: platinum, 14k white gold, 18k yellow gold, rose gold, palladium
– Budget for the stone: a range, not a fixed number
– Budget for the setting: a separate range
– Deadline and expected lead time
Writing this down before contacting a jeweler forces you to make decisions in order of priority rather than reacting to available inventory.
The written design brief also serves as a grounding reference when comparing options. GIA recommends that consumers use grading reports to compare diamonds and to understand a diamond’s specific characteristics.[4] When your brief lists exact measurement ranges, acceptable color and clarity grades, and the intended setting type, you can directly match each available stone against your own requirements. This prevents the common mistake of falling for a stone that looks good in isolation but does not fit the design parameters you established. The brief becomes the framework that keeps every choice aligned with your original vision.
Matching Stone Parameters to Setting Complexity
A simple solitaire with a round stone is the easiest and most predictable custom project. Adding a halo, complex cathedral arches, a pavé band, or multiple side stones increases both cost and build time. A buyer with a strict budget should prioritize the center stone and choose a simpler setting. A buyer wanting an elaborate design may need to accept a slightly lower color or clarity grade to stay within budget. There is no right answer — only a tradeoff that should be made consciously rather than discovered after the design is complete.
When to Ask for a CAD Preview
Most custom jewelers provide a CAD preview after the stone is selected and before any metal is cut. At this stage, the jeweler will show prong placement, basket design, shank height, and side stone positions based on your stone’s exact measurements. This is the best time to request changes to prong height, basket depth, or gallery detail. Once metalwork begins, adjustments become expensive or impossible.
Documentation Flow from Brief to CAD to Final Ring
Traceability in custom jewelry extends beyond the grading report to include the entire documentation flow from design brief through CAD approval to final production. When the design brief is complete and the stone is selected, the grading report number should be recorded in the project file. The CAD model should be dimensioned to the exact measurements of that specific stone, and the jeweler should be able to confirm that the CAD file references the stone’s serial number or report number. Before metalwork begins, the buyer should receive a written confirmation that the CAD has been built around the stone’s documented dimensions. This documentation chain creates a verifiable record: the buyer selected the stone based on its report, the design was approved based on that stone’s measurements, and the final ring was fabricated to match those specifications. If any issue arises — such as a stone that does not fit the mounting or a setting that appears different from the CAD — the documentation provides a clear path to identifying where the discrepancy occurred. For both buyers and jewelers, this level of documentation reduces ambiguity and builds confidence in the final result.
Check Before You Decide
Before approving the CAD, verify that the stone’s measurements match the CAD file. The file should show the stone’s exact diameter and depth in the setting. If the CAD shows a different stone size than what you selected, the final ring will not fit your stone. Ask the jeweler to confirm in writing that the CAD is dimensioned for your specific stone’s grading report number or serial number. This single step prevents the most common and costly error in custom jewelry production.
Common Mistakes Buyers Make in Stone Selection for Custom Jewelry
Even experienced buyers make predictable errors when choosing a lab-grown diamond for a custom project. The mistakes are not random. They follow the same pattern: focusing on one number, ignoring the design context, or skipping verification at the wrong stage. Correcting these four mistakes will save most buyers from the costliest outcomes.
Mistake 1: Choosing a Stone by Carat Weight Alone
Carat weight measures mass, not visible size. Two 1.00-carat round brilliants can differ in diameter by nearly a full millimeter depending on how the stone was cut. A narrow-cut 1-carat round may measure 6.0mm; a well-proportioned or slightly spread cut can reach 6.8mm. On the finger, that difference is dramatic. A ring designed for a 6.8mm stone will look unbalanced with a 6.0mm center, leaving visible gaps between the prongs that no jeweler can fully correct after fabrication.
The solution is simple: specify target diameter in millimeters, not carat weight. Tell your jeweler you want a round near 6.5mm or an oval around 8.0×6.0mm. This locks in visual size and setting fit regardless of whether the stone ends up being 1.00 carat or 1.10 carats.
Mistake 2: Ignoring Depth Percentage
Depth percentage determines how high a diamond sits above the finger. A 1-carat round with 60% depth will sit lower and feel less obtrusive than the same weight stone at 64% depth. For a low-profile bezel setting or a tension set ring, that difference can mean the difference between a stone that fits and one that does not.
The practical range depends on the setting. Low-profile designs need shallower stones, typically 59–61% depth. Standard solitaires and cathedral settings can handle 60–63%. Deep basket settings can accommodate 63–65%, but anything above that usually requires structural modifications that increase cost and elevate the ring profile higher than most buyers want for daily wear. Check the depth percentage against the setting type before approving the stone.
Mistake 3: Buying a Clarity Grade Higher Than Needed
A VVS1 diamond is virtually flawless under magnification. It is also unnecessary in any setting where prongs, halos, or side stones cover part of the diamond. A halo covering forty to fifty percent of a stone’s surface area does not need VVS clarity, because the cost difference to SI1 buys zero visible improvement.
Match clarity to setting coverage. Open solitaires and three-stone rings deserve VS2 or better, because nothing hides the center. Halo, pavé, and cathedral settings can comfortably use SI1 or even well-placed SI2 stones, since the inclusion will sit behind metal or be visually broken up by surrounding diamonds. The visible result is identical, and the savings are real.
Mistake 4: Not Confirming Return Policy for the Stone
Custom settings are built around a single stone. Once the jeweler fabricates the mounting, returning the diamond becomes difficult or impossible without losing the setting cost. If the buyer decides they do not like the stone’s face-up appearance, color tint, or bow-tie visibility after it is set, they are stuck.
The solution must come before the setting order. Insist on a return window for the loose stone before fabrication begins. Reputable sellers offer 14 to 30 days for returns on loose lab-grown diamonds. Confirm the policy in writing. If a seller does not offer a return period for an uncertified or unset stone, that is a warning sign worth paying attention to.
This also highlights a broader buyer protection point. The return window is most valuable when it is used to verify the stone’s appearance in natural light, against the intended metal, and on the wearer’s hand. A stone that looks perfect in a jeweler’s display case may read differently in the softer light of a living room — and the return policy is the safety net that allows you to confirm that fit before committing to the setting.
It is also worth noting the practical value of the grading report’s verification tools during this return period. Organizations like GIA and IGI provide online report check services for their graded diamonds.[5] Before accepting a loose stone and forwarding it to your jeweler, you should verify the report number on the issuing laboratory’s website. This confirms that the grading report matches the stone you received and that the inscribed number on the diamond’s girdle corresponds to the report. This step is straightforward, takes only a few minutes, and prevents the rare but serious problem of a stone substitution or a mismatched report.
Establishing a Verification Workflow for the Loose Stone
Creating a repeatable verification workflow for the loose stone before it enters fabrication builds confidence and reduces risk. The workflow should include three steps. First, upon receiving the stone, confirm that the laser inscription on the girdle matches the report number on the grading report. This can be done with a jeweler’s loupe or a smartphone macro lens. Second, measure the stone’s diameter and depth using a digital caliper or a jeweler’s gauge, and compare these measurements to the dimensions listed on the report. Third, verify the report number through the issuing laboratory’s online report-check portal. This three-step process — inscription check, measurement confirmation, and report verification — creates a documented record that the stone matches its graded characteristics. When this verification is completed before the stone is sent to the jeweler for setting, the buyer has independent confirmation that the stone is exactly what was purchased. This workflow is especially important in custom jewelry, where the stone becomes permanently mounted and cannot be easily inspected or returned after fabrication.
Check Before You Decide
Before authorizing the setting, confirm that the stone’s measurements, grade, and serial number match the invoice. Take a photo of the stone next to a ruler to verify its dimensions, or ask for a measurement confirmation document from your jeweler. This simple step prevents the most expensive mistake in custom jewelry: setting the wrong stone into a custom mounting that cannot be undone.
When a grading report is provided, buyers should verify the report details through the issuing laboratory’s official report-check tools where available, and confirm that the stone’s measurements match the documented values before the setting process begins.
[1] Federal Trade Commission, “Guides for the Jewelry, Precious Metals, and Pewter Industries,” FTC, reviewed 2025. Available at: FTC Jewelry Guides.
[2] GIA, “Diamond Cut Grading,” Gemological Institute of America, accessed 2025. Available at: GIA 4Cs: Cut.
[3] Federal Trade Commission, “FTC Warns Jewelry Sellers to Disclose Laboratory-Grown Diamonds,” FTC, March 2025. Available at: FTC Warns Jewelry Sellers.
[4] GIA, “Using Diamond Grading Reports,” Gemological Institute of America, accessed 2025. Available at: GIA FAQ: Using Grading Reports.
[5] GIA, “Report Check,” Gemological Institute of America, accessed 2025. Available at: GIA Report Check.
Disclosure: This article is for general educational purposes only. Diamond grading, pricing, availability, specifications, and seller policies can change, and readers should verify important details through grading reports, official laboratory tools, seller documentation, or qualified professionals before making a purchase decision. Laboratory-grown diamonds should be clearly distinguished from natural diamonds, and environmental or sourcing claims should be supported by specific documentation. Prices can vary with market conditions, report type, seller channel, and stone-specific details, so exact comparisons should be verified at the time of purchase.