
Choosing a diamond shape and a ring setting separately often leads to a frustrating mismatch—the proportions feel off, the stone sits too high or too low, or an elongated shape loses its elegant line when packed inside a halo. The real problem is that most buyers pick the stone first without considering how its length-to-width ratio, depth, and silhouette interact with band thickness, basket clearance, and setting style. A round brilliant in a low-profile bezel looks completely different from an oval in a high cathedral mounting, lab grown diamond engagement ring budget guide, and getting that wrong means a ring that never feels quite right.
For the full framework, read Lab-Grown Diamond Engagement Rings Guide.
This article breaks down exactly which combinations work and why, covering everything from solitaire proportions and three-stone layouts to bezel and cathedral compatibility. By the end, you will know how to verify fit using actual measurements, avoid the common visual and structural mistakes, and confidently match a specific diamond shape with a setting that enhances—not fights—its natural beauty.
For buyers, an important distinction to keep in mind is that no single “perfect” combination exists for everyone. The best match depends on the wearer’s hand proportions, daily activities, and visual preferences. A setting that looks elegant on one person can seem bulky or delicate on another, simply because finger size and shape vary. The goal is not to find a universal rule, but to understand how the stone and setting interact as a single object on a specific hand.
| Combination Check | What Works Best | What to Avoid |
|---|---|---|
| Round brilliant + solitaire | Simple prong setting (4 or 6 prongs) balances symmetry | Heavy cathedral arches that crowd the round shape |
| Oval/pear + band width | Thin bands (1.2–1.8mm) preserve the elongated look | Wide bands that shorten the visual length of the stone |
| Emerald cut + custom setting | Elevated basket (6.5–7.5mm) allows light to return | Low, flush settings that kill table brilliance |
| Three-stone arrangement | Side stones at 50–60% of center carat weight | Mismatched shapes or stones set at different heights |
| Bezel for pointed shapes | Round or oval bezels fit securely with standard edges | Step-cut or marquise in a thin bezel—corners chip |
| Cathedral arch height | High arches (5–7mm) boost light for stones over 1 ct | Low arches on large stones—blocked brilliance |
Quick Questions Before You Read
Q: Can I change the setting after I already bought the diamond?
Yes, but you must verify the new setting accommodates your stone’s exact dimensions (length, width, depth, and bottom clearance for deep cuts). Many mismatches happen when only carat weight is considered.
Q: Is a halo always a safe choice for an oval or pear diamond?
No. A full halo around an elongated shape shortens its visual length and destroys the tapered silhouette. A hidden halo adds sparkle without altering the gem’s profile.
Q: How do I know if a three-stone ring will look balanced?
Keep side stones at roughly 50–60% of the center’s carat weight, and make sure the setting holds all three stones at the same height so the profile stays even.
Q: What is the most common mistake people make when matching shape to setting?
Buying the setting before confirming the stone’s exact dimensions, especially depth percentage. A stone deeper than 64.5% often needs extra basket clearance that standard settings don’t provide.
Why Shape and Setting Must Be a Single Decision
Most engagement ring buyers treat the diamond and the setting as two separate purchases. They pick a shape first — round, oval, emerald, pear — based on what looks good in photos or on a friend’s hand. Then they shop for a setting that will hold it. This sequence seems logical, but it is the most common cause of a ring that looks off once assembled.
The Problem with Picking a Diamond First
Choosing a stone shape before considering the setting almost always leads to proportion mismatches. A round brilliant that looked substantial in a loose stone display can look unexpectedly small when placed in a wide pave band that dominates the finger. A marquise that appears elegant on its own can feel visually lost in a plain solitaire with no surrounding structure to anchor its elongated outline. The issue is not the quality of the diamond or the setting individually. The issue is that they were never evaluated as a single silhouette. A ring is not a stone plus a band. It is one object, and its proportions must be resolved together, not sequentially.
What the Ring Silhouette Communicates
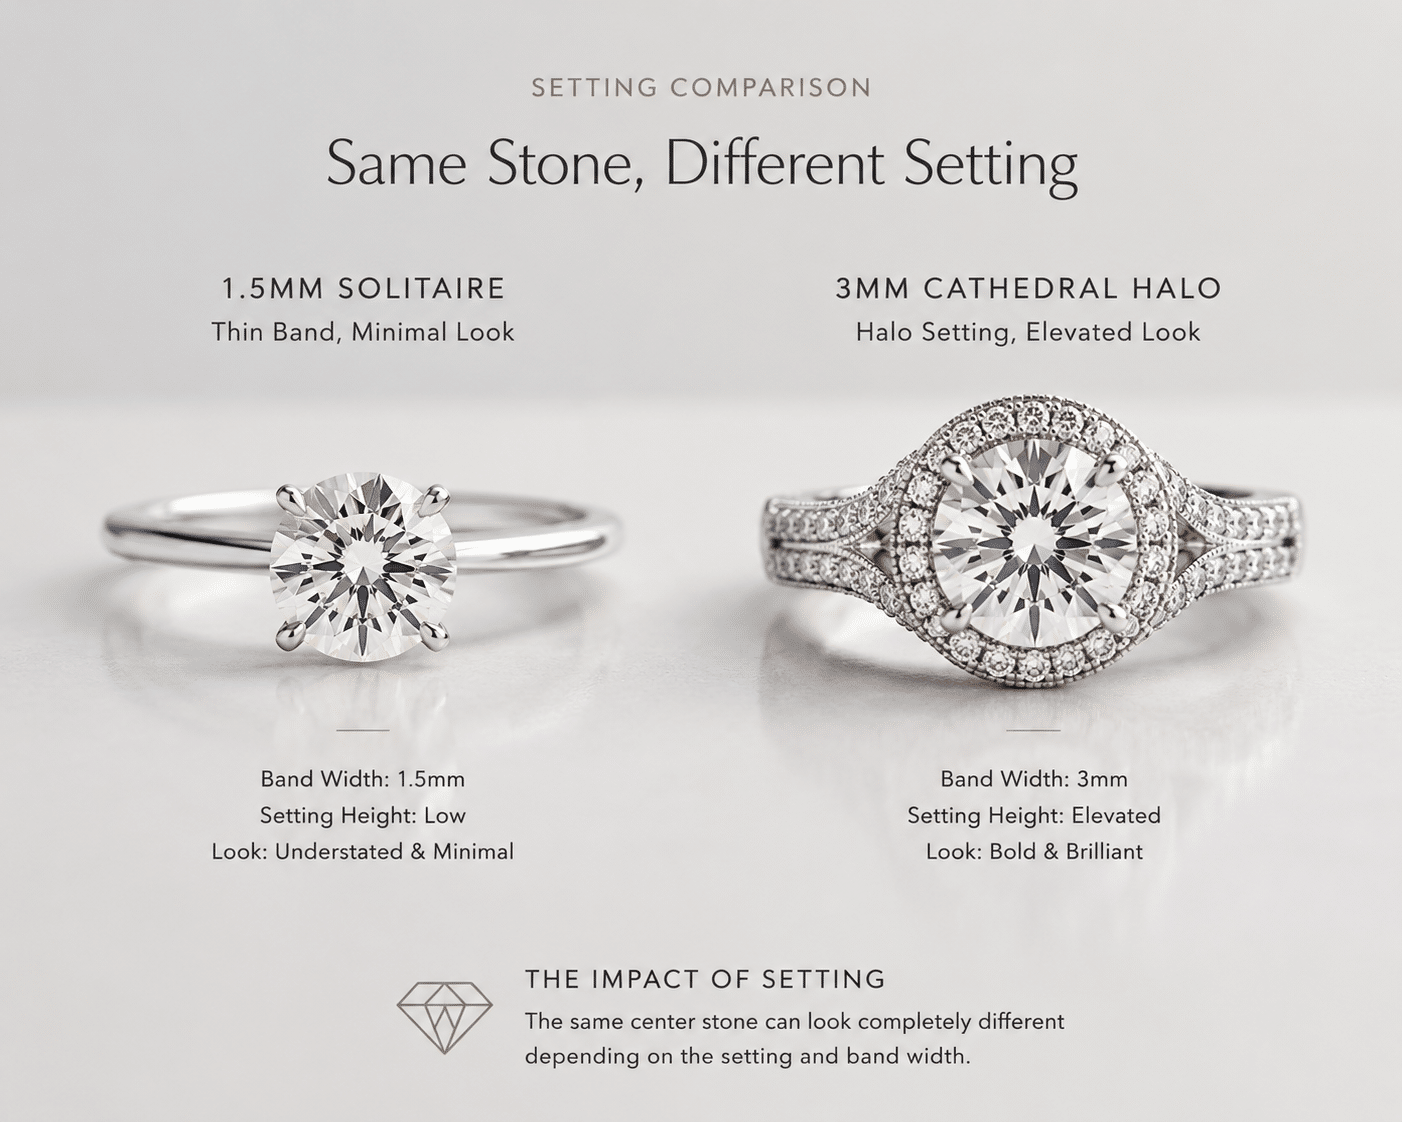
The final ring silhouette is determined by how the center stone’s outline interacts with the setting’s structure. Length-to-width ratio, faceting pattern, basket depth, band width, and taper all contribute to the visual weight of the finished ring. A round stone on a thin 1.5mm knife-edge band reads minimalist and modern — the stone’s symmetry becomes the focal point. The same round stone on a 3mm cathedral halo reads traditional and substantial — the metal and melee compete with the diamond for attention. Both combinations can be beautiful, but they communicate completely different design intentions. What the buyer sees on their hand every day is the combined outline, not the stone alone. That outline must be intentional, not accidental.
It is worth noting that the silhouette also affects how the ring fits alongside a wedding band. A high cathedral or a tall basket may leave a noticeable gap between the engagement ring and a straight wedding band, which some buyers find visually unappealing. Buyers who plan to wear both rings together should check the side profile against their chosen wedding band style, or consider a curved or notched band designed to sit flush. This is one more reason to evaluate the stone and setting as part of a larger set, not in isolation.
What to Check Before You Decide
Compare the stone’s exact length-to-width ratio with the setting’s basket width and band taper before committing. A pear shape with a 1.45 L/W ratio on a 2mm straight band creates a stable, balanced silhouette. The same pear on a 1.4mm tapered knife-edge band stretches that silhouette into something longer and more delicate. Small differences in band taper or basket width change how the ring reads. Ask the seller for the setting’s basket measurement and the stone’s exact dimensions in millimeters. Do not rely on carat weight alone — two stones with the same carat weight can have different outlines that fit the same setting differently.
Understanding Measurement Precision in Diamond Certification
Buyers often assume that carat weight alone defines a diamond’s size, but grading reports document millimeter dimensions that directly determine setting compatibility. The Gemological Institute of America (GIA) explains that a diamond grading report includes precise measurements to the hundredth of a millimeter, because carat weight does not fully predict how a stone fits a mounting.[1] A 1.0-carat round brilliant, for example, typically measures around 6.4–6.5mm in diameter, but a 1.0-carat oval can vary in length from 7.0mm to over 8.0mm depending on its specific length-to-width ratio. This distinction matters when matching a stone to a halo frame or a basket designed within a narrow millimeter range. Relying only on carat weight can lead to a stone that is physically too wide or too long for the intended setting, even though the weight appears correct on paper. Official grading documentation provides the dimensions needed for a precise fit check, which is why the report is an essential reference, not just a grade summary.
It is also important for buyers to understand that a grading report documents the characteristics of a specific stone at the time of evaluation, but it does not guarantee that the stone will look or perform identically under every lighting condition or in every setting. The report is a useful tool for comparing documented features, but it should be read alongside visual evidence, seller documentation, and the intended jewelry use. A grading report helps narrow the field, but the final decision still depends on how the stone appears to the buyer and how it fits within the chosen design.
Classic Combos That Work: Solitaire and Standard Prong Settings
A standard solitaire with four or six prongs is the most reliable combination in engagement ring design. It is versatile, structurally simple, and hard to get wrong — provided the stone shape is appropriate for the setting height and prong configuration. The reason some shapes work perfectly in a solitaire while others struggle is not about quality. It is about how the stone’s optical behavior and physical depth interact with the setting’s minimal frame.
Round Brilliant with 4-Prong or 6-Prong Solitaire
The round brilliant is the most forgiving shape for a standard solitaire. Its symmetrical outline and 360-degree sparkle pattern mean no single orientation matters — it looks equally impressive from every angle. A 4-prong setting exposes more of the stone’s crown and pavilion, allowing maximum light return through the full faceting pattern. A 6-prong setting adds security and creates a slightly more structured visual appearance, though it covers a small portion of the stone’s optical performance. Buyers who prioritize maximum brilliance should choose 4-prong. Buyers who lead an active lifestyle or want extra protection against accidental knocks should choose 6-prong with claws that are slightly thicker at the tips. Neither choice is objectively better — they serve different priorities.
Oval and Pear with a Minimal Solitaire
Oval and pear shapes depend on the setting to reinforce their elongation, not compete with it. A thin, uninterrupted solitaire profile — a plain knife-edge or flat-profile band between 1.8mm and 2.0mm wide — lets the stone’s outline define the ring’s visual direction. A wider band or a setting with side stones disrupts that clean line and makes the elongated shape look compressed. The bow-tie effect that is common in oval and pear shapes becomes less visually distracting when the setting is restrained. Buyers considering an oval or pear solitaire should request video of the specific stone under direct overhead light. A visible bow tie is expected in these shapes, but its prominence varies significantly between individual stones. Accept the shape’s normal optical behavior, but confirm you are comfortable with the specific stone before pairing it with a sparse setting that offers no visual distraction.
For practical buying, it is helpful to remember that the bow-tie effect is not a defect but a natural consequence of the faceting geometry in elongated modified brilliant cuts. Some buyers prefer a subtle bow tie because it adds depth and contrast to the stone’s appearance. Others find a pronounced bow tie distracting. Because the prominence varies from stone to stone, the useful approach is to compare multiple examples of the same shape and carat weight under the same lighting, rather than assuming all oval or pear stones will look the same. A seller who can show you several options side by side is providing a real advantage here.
Why Emerald and Asscher Need Height
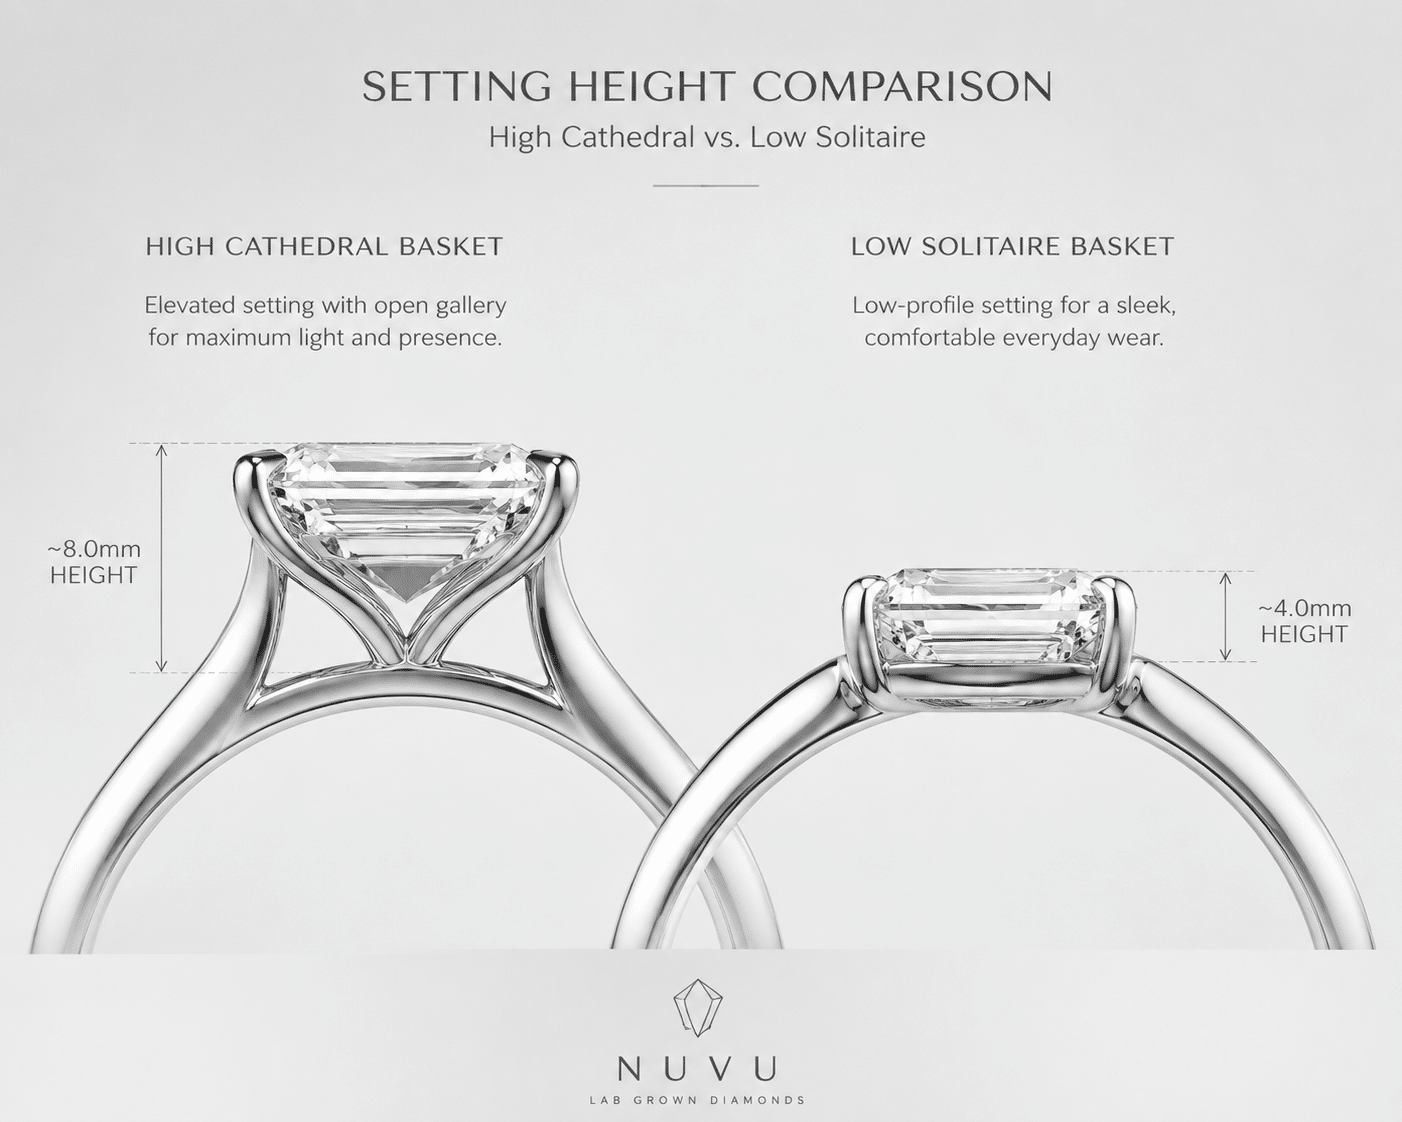
Step-cut shapes like emerald and asscher have a deep pavilion and a flat, open faceting pattern often described as a hall of mirrors. These stones look best when they are elevated high enough above the finger — typically 6.5mm to 7.5mm from the finger surface to the crown — so that light can enter the facets at the correct angle. A low-set solitaire with minimal basket clearance traps the stone’s depth below the finger line, creating a dark, blocked appearance that makes the stone look flat and lifeless. Buyers should request the stone’s total depth percentage. For emerald and asscher, 60% to 68% is normal. Then confirm that the setting’s basket clearance is at least equal to the stone’s depth measurement. If the stone is 6.2mm deep and the basket clearance is only 4.5mm, the stone will sit too low and the ring will fail optically.
A grading report for an emerald or asscher cut will list the depth percentage, but it will not tell you how the stone interacts with a specific basket height. That is why a side-profile evaluation—either through a CAD rendering or a custom-design preview—is essential. The report is a useful starting point, but the basket clearance must be physically matched to the stone’s depth measurement. Relying solely on the report without this verification can lead to an expensive mistake that cannot be corrected after the ring is assembled.
What to Check Before You Decide
For emerald and asscher shapes specifically, verify the setting’s basket clearance against the stone’s depth before purchasing. Ask the seller for a side-profile photo or a CAD diagram with the stone seated inside the basket. If the seller cannot provide this, consider it a warning sign. The stone’s depth and the basket’s clearance are the two numbers that determine whether a step-cut solitaire will look brilliant or dark.
Key Terminology for Lab-Grown Diamond Buyers
Buyers considering a lab-grown diamond for their setting, as explained in lab grown diamond ring settings, should be familiar with the standard disclosure terms used across the industry. The Federal Trade Commission (FTC) has addressed how lab-grown diamonds should be described in advertising to ensure consumers are not misled by unclear terminology.[2] Terms like “lab-grown,” “laboratory-created,” or “synthetic” are intended to distinguish these stones from natural diamonds, and the FTC has issued guidance to help sellers avoid confusing language. For the buyer choosing a setting, this disclosure clarity means the diamond’s origin should be transparent before the stone is paired with any setting. A grading report from a recognized laboratory such as GIA or IGI will clearly indicate whether the stone is natural or lab-grown, and this information is essential for verifying that the diamond matches the buyer’s intention. Understanding this distinction helps the buyer move forward with confidence, knowing that the stone’s origin and the setting’s design are both documented and verifiable.
Halo Settings: When They Improve the Look and When They Add Clutter
A halo setting surrounds the center stone with a ring of smaller diamonds, adding the appearance of size and sparkle. But halo is not a neutral upgrade. It changes the ring’s silhouette, proportion, and wearability in specific ways that depend entirely on the center stone’s shape. Applied correctly, a halo improves the ring. Applied carelessly, it produces a bulky, unbalanced look that the buyer may not notice until the ring is on their finger.
When a Halo Actually Helps a Shape
Round and cushion shapes are the best candidates for a halo. Their compact outlines allow the halo to create a unified, natural-looking circular or cushion-shaped silhouette that reads as a larger version of the same stone shape. A well-executed halo with melee diamonds between 0.7mm and 1.2mm can make a 1.5-carat round brilliant read visually as large as a 2-carat stone in a plain solitaire. The critical rule is that the halo must match the stone’s shape exactly — a round halo on a round stone, a cushion halo on a cushion stone. Any mismatch creates an irregular outline that looks assembled rather than designed. When the halo is tight and proportional, the ring gains visual presence without losing coherence.
When a Halo Hurts Elongated Shapes
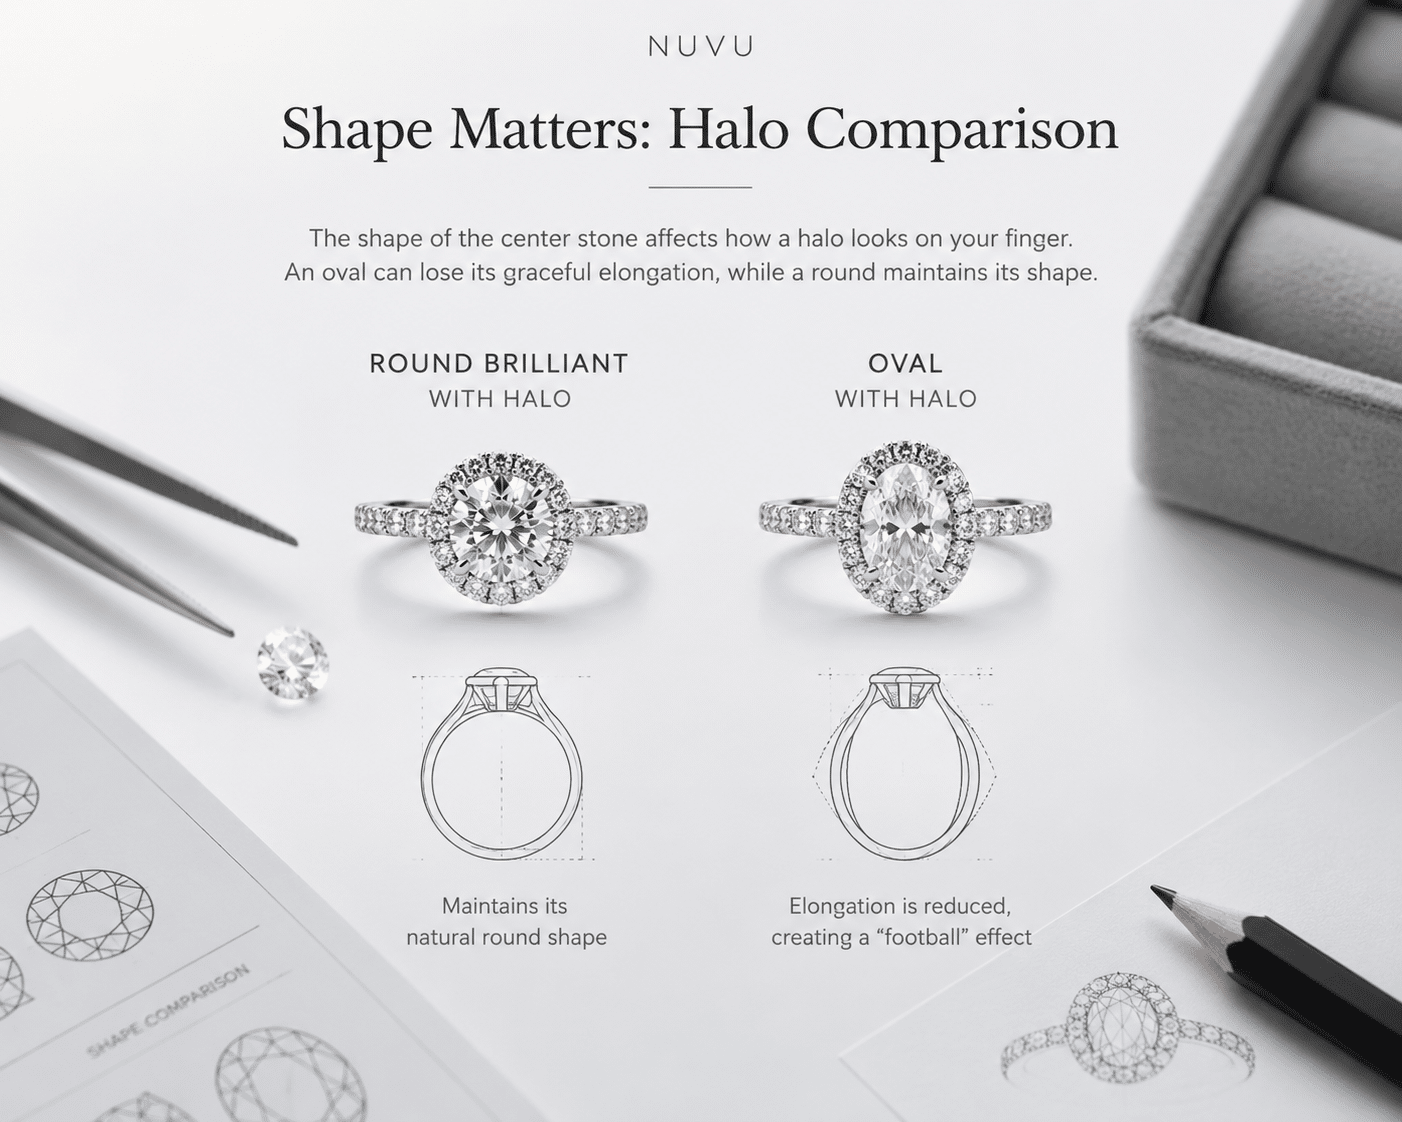
Oval, pear, and marquise shapes have a strong directional outline that is easily disrupted by a halo. Encircling an oval with a ring of melee creates a bloated, football-like silhouette that eliminates the elegant taper that makes oval shapes attractive in the first place. A pear shape with a halo often looks crowded at the pointed tip, where the melee stones can extend beyond the natural outline and create an irregular silhouette. Halos can work on elongated shapes only if the melee stones are very small — 0.5mm or less — and the halo follows the exact stone outline without extending beyond it. Most halo settings do not meet this standard. Buyers choosing oval, pear, or marquise should be skeptical of halo designs and ask for a top-view photo of the ring with the stone seated before purchasing.
For buyers considering an elongated shape, a practical alternative to a full halo is a “semi-halo” or “floating halo” where the melee is concentrated at the rounded end of the pear or the widest part of the oval. This preserves the stone’s tapered line while still adding some side sparkle. It is a less common design, so it may require a custom request, but it can avoid the silhouette distortion that a full halo creates. The key is to see the specific design rendered in the correct proportions before committing, rather than assuming any halo will work.
Double Halo and Hidden Halo Risks
A double halo — two concentric rings of melee surrounding the center stone — adds enough visual weight to overwhelm most center stones under 2.5 carats. The effect is a ring that reads more as metal and sparkle than as diamond, which is the opposite of most buyers’ intention. A hidden halo, in contrast, sets melee stones under the center stone on the basket, visible only from a side or 45-degree angle. This adds a subtle sparkle without changing the top silhouette at all. Hidden halos work well for nearly every shape because they do not alter the stone’s outline. Buyers should request a photo of the ring from a 45-degree angle to see how the hidden halo interacts with the stone’s pavilion and whether the melee reflects into the diamond rather than washing it out.
What to Check Before You Decide
Request the halo’s total width — the stone width plus the halo extension on both sides. If the halo adds more than 2mm to each side of the stone, the ring may appear visually heavy on a finger size 5 or smaller. Also insist on seeing the ring in the specific finger size you need, not a generic display size 7. A halo that looks balanced on a larger display finger can look overwhelming when sized down.
When a grading report is available, buyers should verify the report details through the issuing laboratory’s official report-check tool where available. This is a simple step that confirms the reported measurements and grades match the stone in hand. A grading report can document key characteristics, but it should not be treated as a guarantee of beauty, value, or sourcing ethics.
Three-Stone Settings: Proportions, Not Just Three Diamonds
A three-stone ring looks simple from the top, but the visual balance is surprisingly easy to get wrong. The side stones are not decorative fillers. Their shape, size, and placement must follow the center stone’s outline, or the ring reads as three unrelated diamonds rather than one intentional design.
Matching Side Stone Shape to Center Stone Outline
A round center stone pairs naturally with round side stones or tapered baguettes. The curved outline handles either shape without visual tension. An oval center stone works best with pear-shaped or tapered baguette side stones that follow its elongated curve—round side stones on an oval often create a gap between the stones that breaks the line. An emerald or asscher center stone demands clean angles. Step-cut baguettes or trapezoid side stones maintain the geometric consistency these shapes require. The common mismatch is pairing an emerald center with round side stones. The contrast between sharp rectangular edges and round melee creates a design conflict that cannot be hidden by the setting.
Side Stone Size Ratio for Visual Balance
The total carat weight of both side stones should fall around 50 to 60 percent of the center stone’s weight. For a 2.0 carat center, that means side stones of roughly 0.5 to 0.6 carats each. This proportion keeps the center stone visually dominant while the side stones support the composition. Larger side stones can work, but they shift the ring toward a trilogy design where all three stones compete for attention rather than one leading. The millimeter measurements matter more than carat weight because density varies by shape. Request the exact width and length of all three stones and overlay them on a printed template before approving the layout.
How the Setting Frame Holds the Trio
A three-stone setting requires a basket that carries all three stones in a single continuous curve. The basket must hold the side stones so their culet sits level with the center stone’s culet, not higher or lower. If the side stones sit high, the ring looks disjointed from the side profile. If they sit low, the center stone appears to float without support. This is one of the details that separates a well-made ring from an average one. Request a side-profile photo of the completed setting with the stones seated before the final casting.
It is also important to verify that the side stones match the center stone in color grade, especially for step-cut or emerald shapes where the open facets make color differences more visible. A side stone that appears noticeably warmer or cooler than the center will stand out in a way that is hard to ignore once the ring is on the finger. A grading report for each stone provides a starting point, but a side-by-side visual comparison under natural daylight is the best way to confirm they look consistent.
What to Check Before You Decide
Request the center stone’s width in millimeters and the width of each side stone. The center stone should be at least 1.5 times wider than each side stone to maintain visual dominance. If the center is 7.5mm wide and each side stone is 5mm wide, the ring will read as three roughly equal stones, not a single focal point. The proportion difference is critical, and it is easy to confirm before purchasing.
It is also worth noting that for a three-stone ring, the setting’s documentation and craftsmanship matter as much as the individual stone reports. A buyer should confirm that the setting is designed to secure each stone independently, and that the prongs or bezel walls are proportioned for the specific dimensions of all three stones. A grading report for the center stone will not address how it fits alongside side stones, so the seller should provide a combined image or CAD rendering showing the relationship between all three stones in the setting. This kind of verification helps avoid the common problem of a ring that looks correct on paper but unbalanced in person.
Bezel Settings: Secure Fit for Active Lifestyles and Unusual Shapes
A bezel setting wraps a metal rim around the diamond’s girdle, holding the stone in place without prongs. It is the most secure setting type for daily wear and works especially well for buyers who want a low-profile ring that does not catch on clothing. But bezels require specific proportion adjustments depending on shape, and not every diamond fits well inside the frame.
Why Round and Oval Excel in a Full Bezel
Round and oval shapes have a smooth, continuous outline that fits easily inside a bezel frame without gap issues. The bezel rim adds 0.3 to 0.5 millimeters per side to the total ring diameter. A 6.5mm round stone in a full bezel will measure about 7.1 to 7.3mm across when finished. That is a minimal increase, and most buyers do not notice the extra width unless the bezel wall thickness exceeds 0.6mm. For active lifestyles, the full bezel eliminates the risk of snagging or loosening that comes with prongs. It also keeps the stone protected on all sides.
Bezel for Elongated Shapes (Pear, Marquise, Emerald)
Pear and marquise shapes require a custom bezel that precisely follows the pointed tip. A standard bezel blank will not conform to the taper, and the result is either a visible gap at the tip or a sharp metal edge that catches on fabric. Emerald and asscher shapes benefit from a bezel because their straight edges align cleanly with the frame, creating a modern, architectural silhouette. But the corners of step-cut shapes are vulnerable, so the bezel should be slightly thicker—0.5 to 0.7mm—at the corners to protect against chipping.
A useful distinction for buyers: the bezel’s rim thickness affects not just the ring’s appearance but also its cleaning access. A full bezel that wraps completely around the stone can trap dirt and oil against the pavilion, making the diamond appear dull over time. A partial bezel or a bezel with small cleaning ports can make maintenance easier. If you choose a full bezel for its security, plan for regular professional cleaning or check whether the design allows water and mild soap to flush through the underside during home cleaning.
Partial Bezel vs. Full Bezel
A partial bezel covers roughly half the diamond, typically the top half or the bottom half, while exposing the rest of the crown for light performance. It provides most of the edge protection a full bezel offers but keeps the stone more accessible for cleaning and inspection. For round and oval shapes that do not need full edge protection, a partial bezel can be a smart compromise. Buyers who want an active-lifestyle ring but dislike the look of a full metal frame should consider the partial bezel as an alternative.
What to Check Before You Decide
Request the bezel rim thickness in millimeters. Anything above 0.6mm on a full bezel will look heavy, especially on a smaller finger size 5 or below. Also confirm whether the bezel is hand-fabricated or cast. Hand-fabricated bezels fit tighter and more consistently because the metal is formed directly around the stone. Cast bezels can have slight gaps that require filling.
Understanding HPHT and CVD Growth Methods
For buyers selecting a lab-grown diamond for a bezel setting, knowing the growth method can add useful context about what the grading report documents. The two primary methods for creating lab-grown diamonds are High Pressure High Temperature (HPHT) and Chemical Vapor Deposition (CVD). The GIA notes that both HPHT and CVD produce diamonds that share the same chemical composition, crystal structure, and optical properties as natural diamonds, though their growth processes differ.[3] HPHT diamonds are created by exposing a carbon source to extremely high pressure and temperature, while CVD diamonds grow from a gas mixture in a low-pressure chamber. A grading report from a recognized laboratory will identify the growth method, which can be relevant for buyers who have a preference. This technical background helps the buyer understand that the stone they select is fully documented, regardless of which growth process was used, and that the setting choice should be based on the stone’s measured dimensions and optical performance rather than the growth path.
For buyers, the important takeaway is that both HPHT and CVD methods produce real diamonds — not simulants — and the primary distinction is the growth process rather than any difference in final quality or appearance. The grading report serves as the best reference for confirming the stone’s identity and characteristics, including its lab-grown origin. Whether the stone was grown through HPHT or CVD, the setting compatibility still depends on the exact millimeter measurements, depth, and cut quality documented in the report.
Cathedral Settings: How Arch Height Changes the Stone’s Visual Weight
A cathedral setting lifts the center stone above the band using two arches that rise from the shank. It is one of the most common setting styles, but the arch height is a structural parameter that changes how the ring looks from every angle. Buyers often choose a cathedral for its elegant silhouette without realizing that the height determines light entry, visual weight, and daily wear comfort.
Low Cathedral vs. High Cathedral
A low cathedral with an arch height of 3 to 4 millimeters above the band creates a compact profile that works well for smaller stones up to about 1.5 carats and for buyers who prefer a lower-set ring for active wear. A high cathedral at 5 to 7 millimeters is better suited for larger stones over 2 carats because it lifts the diamond higher off the finger, allowing more light to enter through the pavilion for better brilliance. The arch thickness should match the band width—a thin 1.6mm band paired with a thick 2.5mm arch looks unbalanced and top-heavy.
For buyers choosing a cathedral setting, it is worth checking how the ring feels in daily use. A high cathedral with a large stone may catch on clothing, gloves, or hair more frequently than a lower-set design. The visual benefit of greater light entry and a more dramatic profile comes with a practical tradeoff in wearability. This is not a reason to avoid a high cathedral, but it is a reason to consider your lifestyle honestly. If you work with your hands or wear gloves frequently, a medium arch height of 4 to 5 millimeters, a choice highlighted in lab grown diamond engagement rings guide, may offer a better balance of brilliance and practicality.
Cathedral with Side Stones or Accents
A cathedral setting can carry side stones set directly into the arch itself, creating a three-dimensional stone layout that appears larger than a flat setting design. This works well for buyers who want a more substantial look without increasing the center stone’s carat weight. The side stones should be positioned so they do not touch the center stone’s girdle. A gap of about 0.5mm between center and side stones prevents mechanical pressure that could damage either stone and allows space for cleaning.
How the Arch Connects to the Shank
The arch should flow smoothly into the band rather than meeting at a sharp angle. Sharp joins at the connection point create weak spots that can bend or crack under daily wear. A continuous curve from arch to shank is structurally stronger and distributes stress more evenly. Before committing, inspect high-resolution photos of the join area from multiple angles. If the join looks abrupt or squared off, ask whether the connection can be softened.
What to Check Before You Decide
Request the arch height and the shank width in millimeters. Confirm the arch is at least 1.5mm thick at its narrowest point. If the arch is thinner than the shank, the ring may twist over time under the weight of the stone. Ask for a profile image showing the arch-to-shank connection from the side so you can see the transition point clearly.
For custom design, trust comes from matching the stone to the setting, budget, and wearer’s daily use—not from choosing grades in isolation. A grading report helps you understand the stone, but the final decision should balance the report’s data with visual evaluation and real-world fit.
Common Mistakes Buyers Make When Combining Shape and Setting
Even experienced buyers make avoidable errors when pairing a diamond with a setting. These mistakes usually come from treating the stone and the ring as separate decisions. Here are the most common problems and what to check before you commit.
Choosing a Shape First Without Considering Setting Availability
A buyer finds a radiant or cushion shape they love, then discovers the specific setting they want—a delicate solitaire with a thin hidden halo—is not available for that stone from their chosen seller. This happens frequently because some settings are designed around specific stone dimensions. The fix is simple: confirm the setting works for the chosen shape before buying the loose stone. Ask directly: “Can this setting accommodate a 7.5mm x 5.5mm radiant?” If the seller cannot answer with confidence, the combination likely has not been tested.
Ignoring Setting Width Relative to Finger Size
A 2.5mm band with a cathedral halo may look balanced on a size 7 finger but overwhelming on a size 4.5 finger. The ring’s total visual width—halo plus band plus cathedral—should not exceed roughly 40 percent of the finger width. A size 4.5 finger is about 15mm wide, so the ring band should total no more than 6mm. What looks proportionate on a display size 7 may look bulky on a smaller hand. Always ask how the ring will appear at your specific finger size, not a generic stock size.
Overlooking the Stone Underneath the Setting
Buyers focus on the top view and never examine the stone’s underside. A round brilliant with a depth percentage in the normal range (62.5–63.5 percent) sits well in most settings. But a deeper stone—64.5 percent or above—may need extra basket clearance or may look bulky from the side. The same stone that appears ideal from above can protrude awkwardly below the band. Request both the stone’s total depth percentage and the setting’s clearance height in millimeters before pairing them.
Another commonly overlooked factor is the culet condition. A pointed culet on a deeper stone may contact the basket base directly, creating a pressure point that could damage the stone over time. Most modern diamonds have a small or faceted culet to prevent this, but it is worth confirming with the seller. A simple question about culet size and clearance can prevent a structural issue that would only show up months after the ring is worn.
The Role of Diamond Grading Reports in the Selection Process
A diamond grading report from a recognized laboratory documents the specific dimensions, proportions, clarity characteristics, and color grade of a stone, which directly supports the buyer’s ability to verify setting compatibility. The GIA emphasizes that a grading report provides an independent assessment of a diamond’s quality characteristics based on established standards, which can help buyers compare stones on an objective basis.[4] For the setting-matching process, the report’s millimeter measurements, crown angle, pavilion depth, and girdle thickness are far more actionable than the carat weight alone. A buyer who uses the report to confirm the stone’s exact width and depth before selecting a setting is far less likely to encounter a fit problem. The report does not replace a visual inspection or a physical placement test, but it provides the data needed to screen out incompatible combinations before any purchase is made. This is why the report is most useful when treated as a pre-filter, not as a final guarantee.
If a GIA report is provided, the report details can usually be checked through GIA’s official report verification system. This step confirms that the measurements and grades correspond to the stone being considered.
What to Check Before You Decide
Before finalizing, run through a quick checklist. Confirm the stone’s length-to-width ratio matches the setting silhouette. Verify the setting basket clearance is at least equal to the stone depth. Make sure band width is proportional to your finger size. For three-stone rings, check that side stones are sized at roughly 50–60 percent of the center stone weight. And always request photos or video of the exact stone seated in the exact setting before purchase. If the seller cannot provide a combined image, consider it a warning sign.
How to Use the Loose Diamond Preview and Custom Setting Together
The smartest way to avoid these mistakes is to evaluate the stone and setting as one unit before buying. A loose diamond preview combined with a custom setting workflow lets you see the final ring before it is made. Here is how to use both tools together.
Selecting the Stone with the Final Setting in Mind
Before choosing a loose diamond, decide which setting silhouette you want: solitaire, halo, three-stone, cathedral, or bezel. Then filter the stone by dimensions that match that setting. A specific length-to-width ratio for an oval—say 1.35 to 1.45—works differently in a solitaire versus a three-stone versus a halo. At NUVU, this kind of comparison is treated as a practical selection question: the report narrows the field, but the final decision still depends on visual performance, measurements, and design fit. The loose diamond preview allows dimension-based filtering so you can narrow stones by exact millimeter width, depth, and ratio before you ever see a setting.
Previewing the Combination Before Purchase
Use the custom design workflow to place the selected stone into the chosen setting. Review the ring from both top view and side view. Confirm the stone’s outline fits within the halo or setting frame without overhang or gaps. Check the side profile for basket clearance and arch height. If the preview does not look balanced, adjust either the stone or the setting before proceeding. The goal is to see the full silhouette, not a catalog of separate parts.
What to Do If the Combination Doesn’t Work
If the stone you like does not fit the setting you want, you have two options. Find a different stone with compatible dimensions, or adjust the setting itself—changing from a standard halo to a custom bezel, or shifting from a low cathedral to a high one. NUVU’s custom design path allows both changes. The goal is a single, integrated ring, not forcing a square peg into a round hole.
For buyers working through this process, a practical last step is to compare the completed design against your original inspiration images or sketches. If the final ring looks different from what you envisioned, ask yourself whether the difference is a compromise you are comfortable with or a genuine preference you should preserve. It is common for the stone and setting to look slightly different when combined than they did individually, and a small adjustment can often bring the design closer to your original goal.
Considering the FTC Advertising Framework for Lab-Grown Diamonds
As the lab-grown diamond market continues to grow, the Federal Trade Commission (FTC) has provided important guidance on how these stones should be marketed to consumers. The FTC has clarified that the term “diamond” can be used for both natural and lab-grown stones, provided the origin is clearly disclosed in a way that is not misleading.[2] For the buyer combining a lab-grown diamond with a custom setting, this framework means the stone’s origin should be transparent and verifiable from the outset. A grading report that identifies the stone as lab-grown, along with a documented growth method, provides the necessary clarity. This allows the buyer to focus on the design and fit of the ring without confusion about what they are purchasing. The FTC’s guidance supports the principle that the buyer’s decision should be based on accurate information, which is consistent with the careful measurement and fit verification steps already outlined in this article.
What to Check Before You Decide
Before finalizing, confirm the stone’s exact width in millimeters and the setting’s maximum stone width capacity. Ask directly: “Does this setting accommodate a stone up to 8.2mm wide?” If the answer is no, the stone will not fit without a custom adjustment. Get this confirmation in writing before purchase. A few minutes of verification can prevent weeks of disappointment.
NUVU’s role in buyer education is to make comparison clearer, especially around grading reports, visual evidence, design fit, and documentation. The goal is to help buyers make informed, comfortable decisions about a piece they will wear every day. NUVU’s buyer-first approach is to make comparison clearer, especially around report details, visual evidence, setting fit, and documentation. NUVU does not guarantee specific outcomes such as authenticity, sustainability, lowest price, or certification authority; instead, the focus is on providing tools and information so buyers can verify important details themselves.
[1] Gemological Institute of America, “Diamond Grading Report,” GIA.edu, accessed 2025. https://www.gia.edu/report-check-landing
[2] Federal Trade Commission, “Guides for the Jewelry, Precious Metals, and Pewter Industries,” 16 CFR Part 23, accessed 2025. https://www.ftc.gov/news-events/news/press-releases/2018/07/ftc-announces-crackdown-deceptive-advertising-lab-grown-diamonds
[3] Gemological Institute of America, “How Lab-Grown Diamonds Are Made,” GIA.edu, accessed 2025. https://www.gia.edu/gia-news-research/how-lab-grown-diamonds-are-made
[4] Gemological Institute of America, “GIA Diamond Grading Report,” GIA.edu, accessed 2025. https://www.gia.edu/report-check-landing
Disclosure: This article is for general educational purposes only. Diamond grading, pricing, availability, specifications, and seller policies can change, and readers should verify important details through grading reports, official laboratory tools, seller documentation, or qualified professionals before making a purchase decision. Laboratory-grown diamonds should be clearly distinguished from natural diamonds, and environmental or sourcing claims should be supported by specific documentation.