
Reading a lab-grown diamond certificate can feel like decoding a mix of familiar terms and hidden traps. While the 4Cs (color, clarity, cut, carat) use the same scales as mined diamonds, the meaning of each grade shifts because lab-grown stones start with fewer imperfections. A “D” color or “VVS1” clarity is common, not rare—so, as certificate vs actual appearance shows, the letter alone tells you less about value. What truly determines a stone’s beauty is the cut grade, the precision of its polish and symmetry, and how those measurements translate into real-world sparkle.
For the full framework, read Lab-Grown Diamond Certification Guide.
This article cuts through the certification clutter, helping you separate critical data from noise. You’ll learn exactly which fields matter for visual performance, which grades signal hidden issues, and how to use the report alongside your own eyes to make a confident buying decision.
| Certificate Field | What It Actually Tells You | Why It Matters for Your Decision |
|---|---|---|
| Color (e.g., D–F) | Common range in lab-grown; slight tint is rarer | Don’t overpay for D when E or F looks identical to the naked eye |
| Clarity (e.g., VS1–VVS2) | Grade alone is less meaningful than the inclusion plot | Check the plot—a small inclusion on the edge matters far less than one near the table |
| Cut Grade (for rounds) | Controls brightness, fire, and scintillation | This is the single most important field for sparkle; prioritize it over color or clarity |
| Polish & Symmetry | Sub-grades for facet precision and optical performance | All three—cut, polish, symmetry—should be at least “Very Good” for optimal light return |
| Table & Depth % | Proportions that affect brilliance and setting fit | Rounds: Table 54–57%, Depth 60–62.5%. Outside this range risks dullness or poor seating |
| Girdle Thickness | Edge durability indicator | Avoid “Very Thin” sections; they create chipping risk during setting or daily wear |
| Lab Report (IGI, GIA, GCAL) | Institution standards vary, not stone quality | Verify the report number online; trust visual inspection over certificate claims for final judgment |
Quick Questions Before You Read
Q: Is a “D” color lab-grown diamond always better than an “F”?
Not necessarily. In lab-grown diamonds, D–F color is the norm, so the visual difference between D and F is often undetectable. The real value lies in cut quality and proportions, not chasing the highest color letter.
Q: Can I rely on the clarity grade alone to judge a stone?
No. The clarity grade (like VS1) tells you how many inclusions exist, but the inclusion plot shows where they are. A small inclusion near the edge is far less distracting than one under the table, even if both stones share the same grade.
Q: Does an “Excellent” cut guarantee the stone will sparkle perfectly?
Not always. “Excellent” cut means good proportions, but polish and symmetry sub-grades also matter. A stone with “Excellent” cut but “Good” symmetry may show less brilliance. Always verify that all three are at least “Very Good.”
Q: Should I trust the certificate or my own eyes?
Both. The certificate provides essential data, but it can’t capture actual light performance, facet precision, or the visual impact of an inclusion. Always pair the report with real imagery—360 video, magnification photos, and hearts-and-arrows viewers—before buying.
Why Certificate Fields Matter Differently for Lab-Grown Diamonds
A grading report for a lab-grown diamond looks nearly identical to one for a natural stone. The fields are the same: color, clarity, cut, carat weight, polish, symmetry, measurements, and proportions. But reading them correctly requires understanding a critical difference. Lab-grown diamonds cluster in higher color and clarity ranges due to controlled growth conditions, which shifts the practical meaning of each grade. Some fields become decisive for visual performance, while others matter far less than first-time buyers assume.
How Lab-Grown and Natural Grading Reports Diverge in Practice
IGI and GIA apply the same grading scales to lab-grown and natural diamonds.[1] The twist is in the distribution. Because lab-grown rough is produced under tightly controlled conditions, the majority of commercial inventory falls within D–F color and VS–VVS clarity. A D color on a lab-grown report does not represent the same top-tier scarcity it would in natural diamonds, where D stones are rare. Two lab-grown stones both graded D may come from different growers, different growth cycles, and different quality controls. The letter grade alone does not guarantee identical appearance.
The practical takeaway is straightforward: treat the grade as a useful range marker, not a precise quality fingerprint. Within the D–F color band or the VS–VVS clarity band, visual differences between stones exist, and they show up in cut precision rather than in the grade letter.
Which Fields Drive Real-World Price and Visual Differences
For price comparison, the four anchor fields remain carat weight, cut grade, color grade, and clarity grade. But in lab-grown diamonds, cut quality often creates more visible variation than color or clarity shifts within the D–G and VS–SI range. A buyer comparing two one-carat stones, both graded D and VS1, may see a meaningful price gap and a noticeable sparkle difference driven entirely by cut grade, polish, and symmetry.
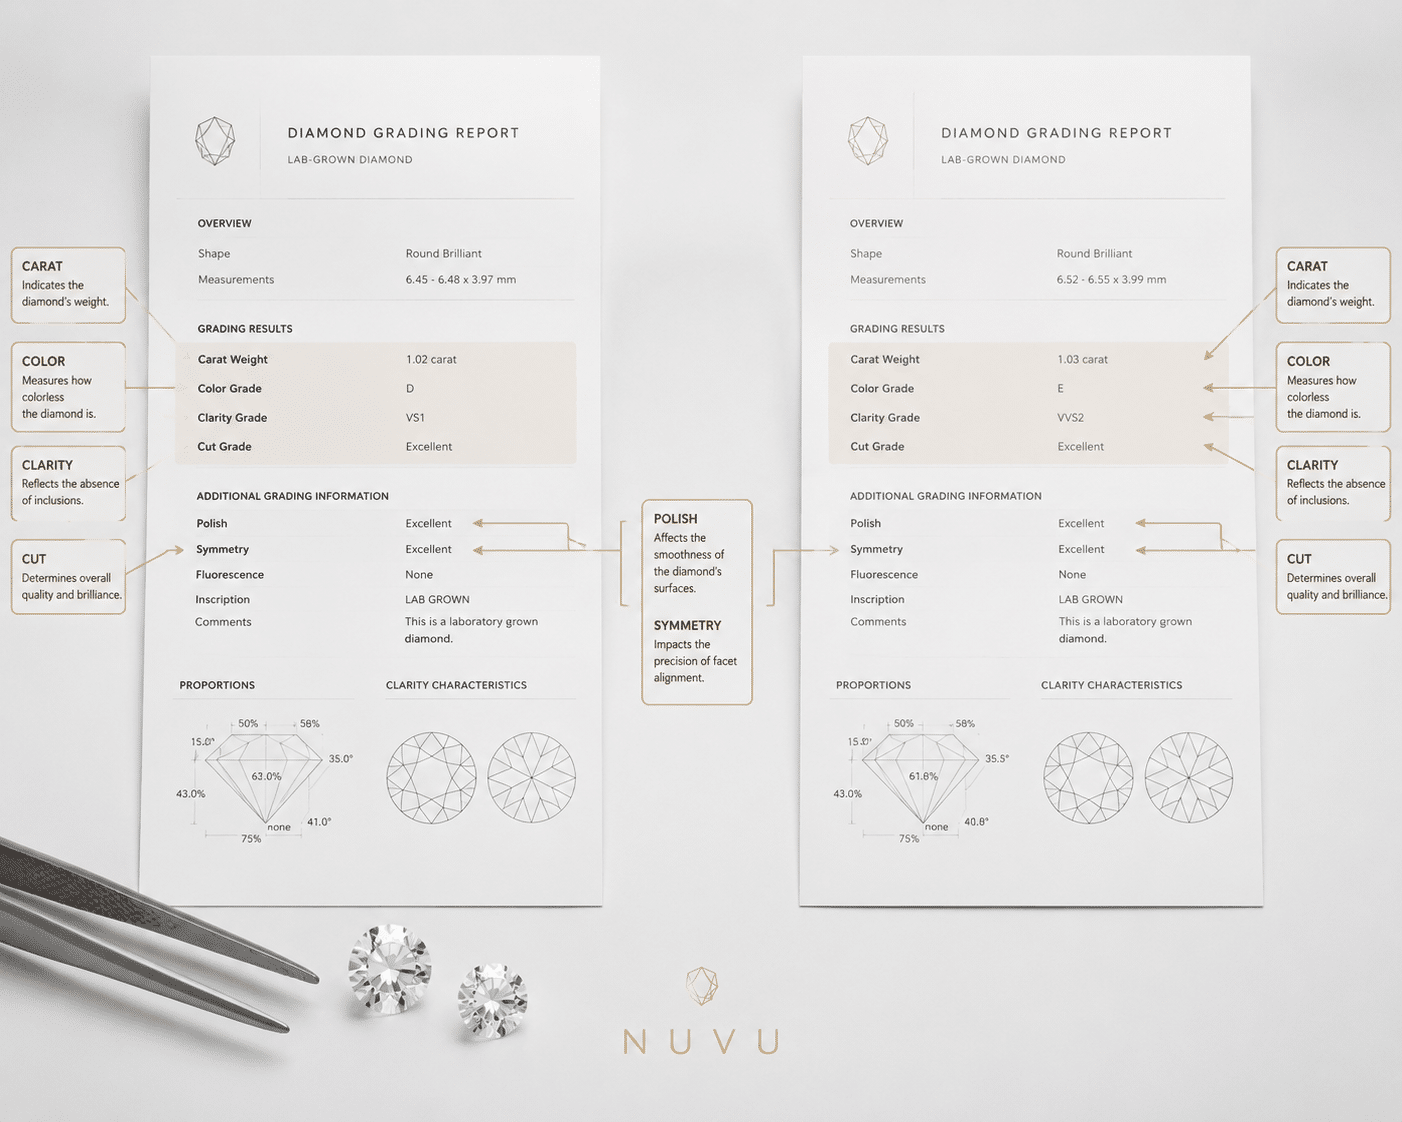
The sub-grades are not decorative extras. They represent measurable differences in how the stone handles light. An Excellent cut grade paired with a Good polish grade will underperform a stone with Very Good cut and Very Good polish. The combined assessment matters more than any single field.
The Two Fields Buyers Most Often Misinterpret
Fluorescence appears on some lab-grown reports. Many buyers over-weigh it. For natural diamonds, strong fluorescence can sometimes cause a hazy or milky appearance. For lab-grown diamonds, visible fluorescence effects are uncommon, and the field rarely carries practical weight in the buying decision. If fluorescence is listed as Medium or stronger, a quick UV light photo or video will confirm whether the stone appears clear. In most cases, it does.
Table percentage and depth percentage sit at the opposite end of attention. Most buyers skip them entirely. These structural fields control light performance within the stone and determine whether the diamond will fit a specific setting. A stone with excellent color and clarity grades can still behave poorly if the proportions fall outside the ideal range for its shape. And a diamond with unusual depth or table measurements may sit awkwardly in a prong or bezel setting.
The buyer’s real task is to treat the certificate as a filtering tool, not a final judgment. It helps identify which stones are worth looking at more closely, but it does not replace the need to see the stone, compare proportions, and verify fit against the intended design.
What to Check Before You Decide
– Compare cut grade, polish, and symmetry together — do not look at cut grade alone
– For stones below 1.5 carats, verify table percentage and depth percentage against your setting’s prong or bezel allowances
– If fluorescence is listed as “Medium” or stronger, request a UV light photo or video to confirm the stone does not appear hazy
How the Report Distinguishes Lab-Grown from Natural
One of the most important — and most frequently misunderstood — features of a lab-grown diamond grading report is how it identifies the stone as laboratory-grown. This distinction is not a matter of quality; it is a matter of clear terminology required by official guidance in major diamond markets.
The Federal Trade Commission (FTC) has issued guidance on how laboratory-grown diamonds should be described in advertising and documentation.[2] The FTC emphasizes that terms like “cultured,” “synthetic,” or “lab-grown” must be clear, conspicuous, and placed close to the product description to avoid misleading buyers. A properly issued grading report will use one of these standard terms in the report heading or comments section, not buried in fine print. For example, a GIA report for a lab-grown diamond carries the notation “Laboratory-Grown” in a prominent position on the face of the document.[3]
This labeling is not a disadvantage to the stone — it is a protection for the buyer. A report that clearly identifies the origin of the diamond allows the buyer to make an informed decision without confusion. If a certificate is ambiguous or does not clearly state the stone’s growth origin, that is a red flag, not a sign of equivalence. A proper report should leave no room for doubt about whether the diamond is lab-grown or natural.
A buyer should confirm that the report language matches what the seller has stated. If the report says “Laboratory-Grown” but the seller’s description avoids that term, the discrepancy should be resolved before purchase. Clear documentation is the foundation of a trustworthy transaction.
Verifying the Report Through the Issuing Laboratory
The report number is the most direct link to the stone’s grading record. Every major grading laboratory—including GIA, IGI, and GCAL—provides a publicly accessible online database where buyers can confirm the report details. Entering the report number on the lab’s verification page pulls up the full grading data, the stone’s measurements, the inclusion plot, and the laser inscription information, as detailed in the lab grown diamond laser inscription guide. This step protects against altered or counterfeit certificates, which do appear in the secondary market.
When verifying a report, compare the stone’s actual laser inscription against the report number. The inscription is usually located on the girdle and can be read with a 10x loupe. If the inscription matches the report number and the online record confirms the same grading data, the documentation is legitimate. If the seller cannot provide a clear image of the inscription, or if the online record differs from the printed report, the discrepancy should be investigated before proceeding with the purchase. A grading report is only as reliable as the verification path behind it.
Color Grade: How the Lab-Grown Cluster Changes the Buying Logic
The D–Z color scale is the same for all diamonds. What changes for lab-grown stones is the buying logic. Because lab-grown rough consistently yields higher color grades, the letter on the report carries different weight than it does in natural diamonds. Understanding when color grade actually affects visual appearance — and when it does not — will keep you from overpaying for a distinction you cannot see.
Why D–F Is the New Normal in Lab-Grown Inventory
Controlled growth conditions mean that most lab-grown diamonds exit the reactor with D–F color. There is no rarity premium here. A D color lab-grown stone does not represent a scarce find the way a D color natural stone does. Paying a significant premium for D over G usually makes sense only in specific scenarios, such as a multi-stone ring where all diamonds must match at the highest color grade. For a single stone in a solitaire setting, the visual difference between D and G under normal lighting is minimal, and the money is better spent on cut quality or carat weight.
When Color Grade Becomes Visually Decisive
Color differences become visible under certain conditions. A large face-up stone above two carats shows warmth more easily. White metal settings — platinum or white gold — reflect any hint of body color back to the eye, making lower color grades more apparent. Yellow or rose gold settings have the opposite effect: they mask warmth, allowing a buyer to comfortably consider H or I color without visible difference.
For step-cut shapes such as emerald, asscher, or baguette, color is more visible face-up than in round brilliants, where brilliance scatters light and minimizes color perception. A buyer choosing a step-cut shape in a white metal setting should prioritize G or higher. A buyer choosing a round brilliant in yellow gold can often drop to I color without sacrificing appearance.
An important nuance: even within the same color grade, two stones can show slightly different warmth depending on how the rough was grown and cut. The report grade gives you a general band, but a side-by-side photo or video against a white background is the only reliable way to confirm whether the stone’s color suits your preference.
What to Check Before You Decide
– Request the stone in both face-up and profile photos against a white background
– For round brilliants, color is less visible face-up than for step-cut shapes (emerald, asscher, baguette)
– If the report shows a color grade of J or below, ask for a video showing the stone in natural light next to a D–F reference stone
Clarity Grade: What the Plot Says and What It Doesn’t
The clarity grade is a single letter. The inclusion plot is a map. Most buyers stop at the letter and miss the more useful information in the plot. Two stones with the same clarity grade can perform very differently in wear, and the difference is visible in the plot, not the grade.
Why the Inclusion Plot Matters More Than the Grade
A VS2 stone with a small inclusion near the girdle — the outer edge of the diamond — will often appear perfectly clean to the naked eye. A VS2 stone with a feather or crystal near the center of the table will be visible face-up, especially in step-cut shapes where the open facets do not hide inclusions the way brilliant cuts do. The plot tells you location, type, and relative size. Always review it before making a final decision.
The Clarity Cliff Between Eye-Clean and Not
For lab-grown diamonds, the majority of VS1 and VS2 stones are eye-clean to an untrained observer under normal lighting. SI1 stones are often eye-clean but require individual verification — some are, some are not. SI2 and below carry a higher risk of visible inclusions that affect both appearance and durability.
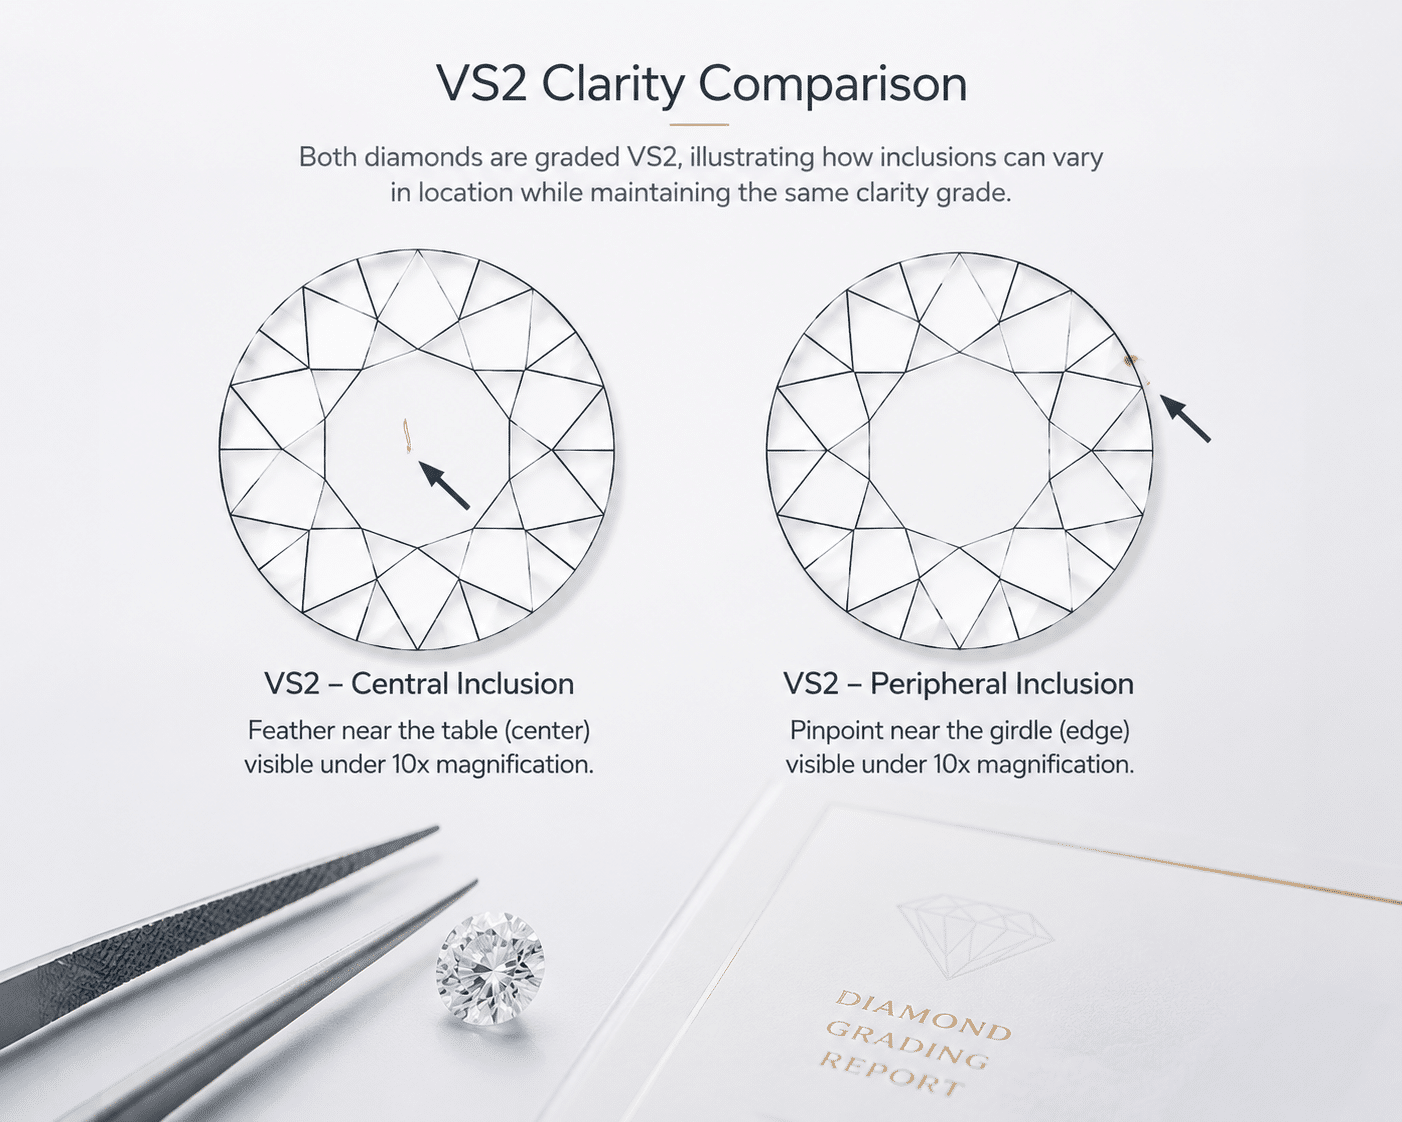
Set a personal threshold: eye-clean under twelve-inch viewing distance in mixed lighting. Select based on that standard, not the grade letter. An SI1 stone with a peripheral inclusion that is invisible in wear is a better choice than a VS1 stone with a central inclusion that catches the eye.
The clarity grade is also affected by the grader’s judgment, which can vary slightly between labs and even between individual graders at the same lab. A stone graded VS1 at one lab might receive VS2 at another. This is one more reason to treat the grade as a reference point and rely on visual inspection — particularly the inclusion plot and magnification images — for the final call.
What to Check Before You Decide
– For round brilliants, inclusions under the crown facets are often hidden by brilliance; for step cuts, any table inclusion will be visible
– Request 40x magnification images or a 10x loop video if the clarity grade is SI1 or below
– Confirm with the seller that the stone has been verified eye-clean by a human grader, not just the report
Cut Grade: The Most Decisive Field for Visual Performance
For round brilliant lab-grown diamonds, no other field on the certificate has as much direct impact on how the stone actually looks. Cut grade controls brightness, fire, and scintillation — the three elements that most people mean when they say a diamond “sparkles.” A stone with excellent color and clarity but a middling cut grade will underperform visually compared to a well-cut stone with lower color and clarity grades. This is the field that deserves the most attention during comparison.
What the Cut Grade Measures and What It Misses
The cut grade evaluates brightness (white light return), fire (colorful light dispersion), scintillation (sparkle pattern under movement), weight ratio, durability, and finish. That sounds comprehensive, but the grade does not capture facet precision or optical symmetry in full detail. Two stones can both earn an “Excellent” cut grade from the same lab, yet one may show visible misalignment in its facet pattern under magnification. This happens more often in lab-grown diamonds because faster growth and cutting cycles can produce minor asymmetries that the grading pass does not fully penalize. The cut grade on the report tells you the stone falls within an acceptable range. It does not guarantee perfect optical performance.
Why Polish and Symmetry Sub-Grades Complete the Cut Picture
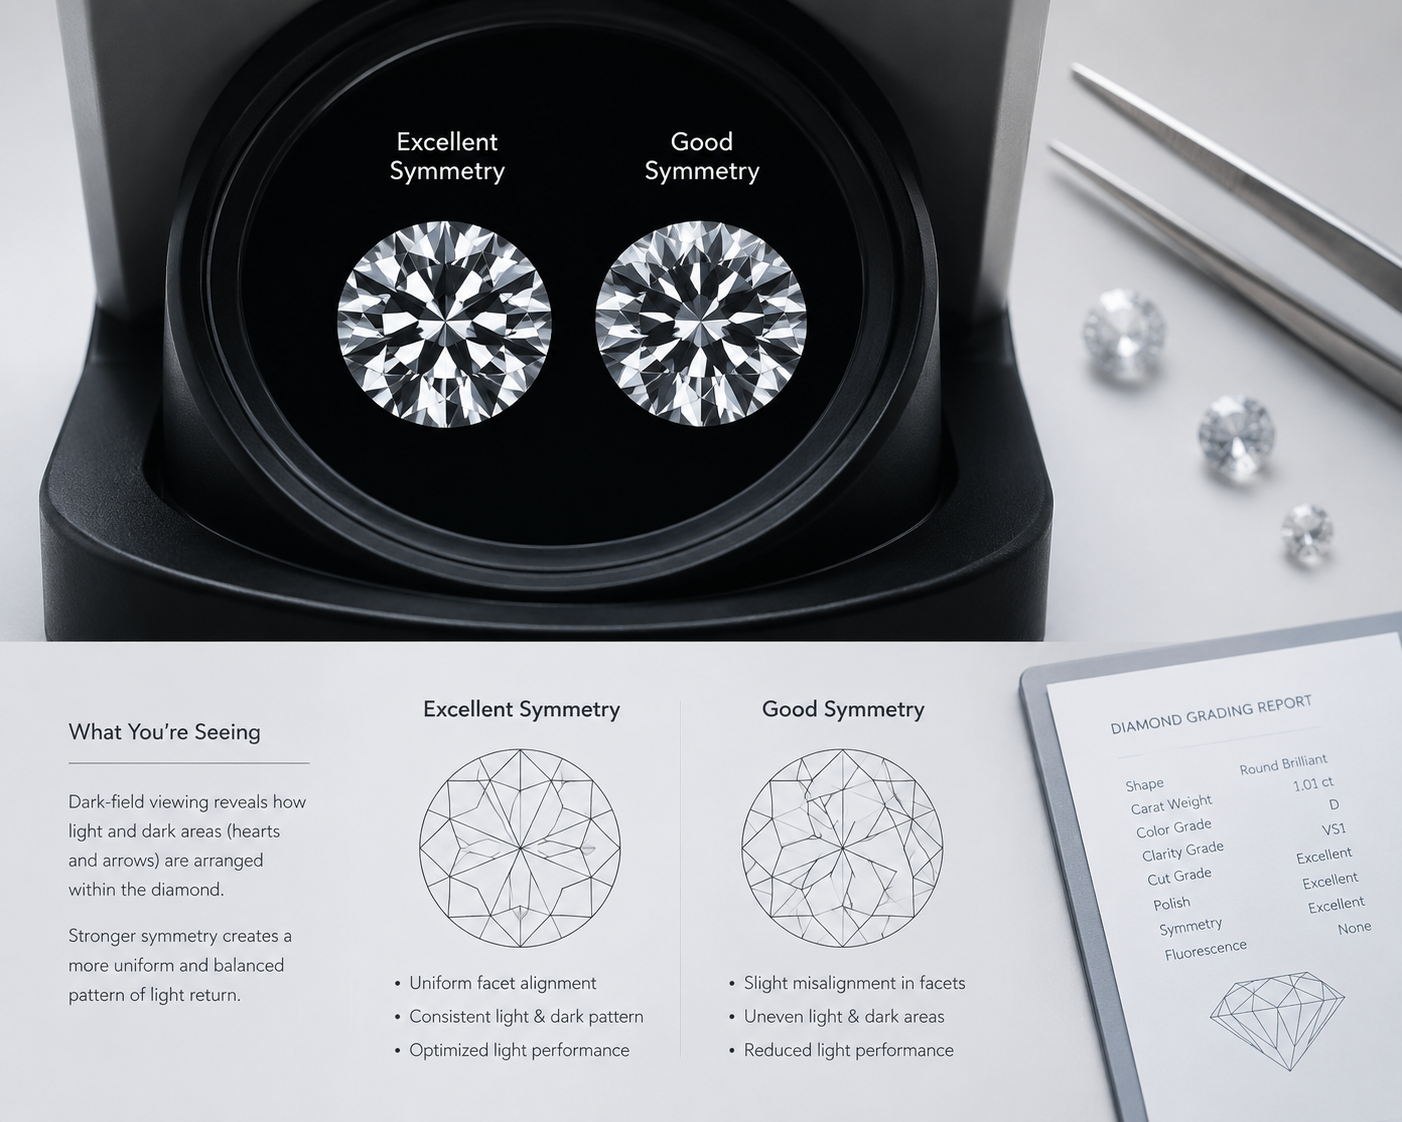
The cut grade is the headline, but polish and symmetry are the supporting details that determine whether the headline holds up. A report may show an Excellent cut grade while listing Polish or Symmetry as Very Good or Good. That combination means the stone has uneven facet junctions or surface irregularities that reduce light return, even though the overall proportions are within range. The buyer should treat cut, polish, and symmetry as a single package. For best visual performance, all three should be Excellent. At minimum, all three should be Very Good. A stone with Excellent cut but Good symmetry will often perform worse than a stone with Very Good cut and Excellent symmetry, because uniform facet alignment matters more to the human eye than a narrow proportion tolerance.
For buyers comparing multiple stones, a useful approach is to begin by filtering on cut grade, then visually compare the polish and symmetry sub-grades. If two stones share the same cut grade, the one with higher polish and symmetry sub-grades is very likely the better performer, even if its color or clarity grade is slightly lower.
The Role of Visual Evidence in Cut Assessment
Because the cut grade on a report does not capture full optical precision, buyers should supplement it with visual tools. A hearts-and-arrows viewer reveals whether the stone’s facet pattern is symmetrical. A dark-field or light-performance image shows how evenly the stone returns light across its surface. These visual references are not part of the standard grading report, but they are widely available from sellers who prioritize transparency. If a seller provides these images for one stone but not for another of similar grade, the difference in imaging capability may reflect a difference in the stone’s actual performance. A grading report can help narrow the choice, but the final comparison between two similarly graded stones often comes down to what the eye can see.
What to Check Before You Decide
- For rounds, confirm the cut grade is “Excellent” and that polish and symmetry are also “Excellent” or “Very Good”
- Ask for a hearts-and-arrows viewer image or a 360-degree video to verify optical symmetry
- For fancy shapes, there is no cut grade — rely on profile images, symmetry comments, and proportion measurements instead
Polish and Symmetry: The Two Fields Beginners Overlook
First-time buyers almost always focus on the main 4Cs and skip polish and symmetry entirely. That is a mistake, especially for lab-grown diamonds where cut precision variance is wider than many expect. These two fields directly affect how much sparkle a stone produces and whether the light pattern looks clean or patchy.
How Polish Affects Surface Brightness
Polish grade measures the smoothness of the facet surfaces. An “Excellent” polish means no visible surface defects under 10x magnification. “Very Good” may show minor polish lines that are invisible to the naked eye but can slightly reduce light return by scattering a small fraction of the light entering the stone. “Good” or lower means visible surface irregularities that reduce brightness to a degree that most people can detect in side-by-side comparison. The difference between Excellent and Very Good polish is subtle. The difference between Very Good and Good is not.
How Symmetry Affects Light Pattern Uniformity
Symmetry grade measures how precisely the facets align with each other. Poor symmetry creates uneven light return, meaning some parts of the stone appear bright while others look dark or dull under normal lighting. This is especially important for lab-grown diamonds, where faster cutting cycles can introduce facet misalignment that a natural diamond cutter would take more time to correct. A stone with Excellent cut but Good symmetry may still perform below a stone with Very Good cut and Excellent symmetry; this performance difference is explained in detail in the lab grown diamond certification guide, because the symmetrical light pattern matters more to the visual impression than a perfectly proportioned but misaligned stone.
Stone-to-Setting Fit Check
- When symmetry is rated Good or lower, the stone may sit unevenly in a prong setting — verify the girdle thickness and roundness measurement
- For tension or bezel settings, symmetry and polish become more important because the setting does not hide facet irregularities
- If the polish grade is not Excellent, request a 40x photo of the crown facets to confirm no visible surface lines
Measurements and Proportions: The Fields That Determine Setting Fit
Most buyers skip the measurement section of the certificate, but these numbers determine whether a loose diamond actually fits the chosen setting. Table percentage, depth percentage, crown angle, pavilion angle, and girdle thickness are not abstract data points. They are compatibility specifications that affect both visual performance and physical fit.
Table Percentage and Depth Percentage: The Two Anchors
For round brilliants, a table percentage between 54% and 57% and a depth percentage between 60% and 62.5% are typical for Excellent cut stones. Fancy shapes have different ideal ranges that vary by shape. If the table is too large, the stone looks flat and lifeless because the center facet dominates and reduces the sparkling area. If the table is too small, brilliance concentrates in a narrow ring and the stone appears dark in the center. Depth measurements outside the ideal range cause two different problems: too shallow creates light leakage through the bottom (a “fish-eye” effect), while too deep makes the stone look bulky and smaller than its carat weight suggests face-up.
Girdle Thickness and Setting Compatibility
Girdle thickness is listed as a range — for example, “Thin to Slightly Thick.” The range matters because it tells you the thinnest and thickest points around the stone’s circumference. A very thin girdle anywhere along the range risks chipping during setting or with everyday wear. A very thick girdle adds weight without increasing visible face-up size, which means you are paying for carat weight you cannot see. For prong settings, a medium to slightly thick girdle provides the safest hold without adding bulk. For bezel or channel settings, a uniform girdle thickness is more important than the absolute measurement, because an uneven girdle creates gaps or pressure points inside the setting.
An often-overlooked detail: the stone’s total depth measurement (in millimeters) is critical for low-profile settings. A stone with deep proportions may require a higher setting, which changes the ring’s look and feel on the hand. Always check whether the depth measurement works with your design, not just the depth percentage on the report.
Documenting Measurements for Custom Design Fit
When planning a custom setting, the measurement fields on the report become the primary communication tool between the buyer and the jeweler. The exact millimeter measurements — length, width, and depth — determine how the stone seats in the prong, bezel, or channel. A stone that is slightly wider than its setting’s intended dimensions may require modifications to the setting, which can add cost and delay. Similarly, a stone with a deep pavilion may extend below the shank of a ring, requiring a higher basket or a different design approach.
For custom design, trust comes from matching the stone to the setting, budget, and wearer’s daily use — not from choosing grades in isolation. Buyers should provide the full measurement set from the report to the jeweler before the setting is fabricated. This allows the jeweler to design around the stone’s specific dimensions rather than assuming a standard fit. If the jeweler requests additional angles or measurements beyond what the report provides, a proportion diagram or an ASET image can help clarify the stone’s light behavior and physical shape.
What to Check Before You Decide
- Compare table and depth percentages against your setting style — prong settings are more tolerant than bezel or tension settings
- For fancy shapes, request the full measurement set: length, width, depth, table, and crown angle (if available)
- If the girdle thickness range includes “Very Thin” at any point, request a confirmation that the stone has been examined for chip risk
Certificate Type and Lab Authority: How to Read the Issuer Information
The grading report matters, but not every report carries the same weight. For lab-grown diamonds, the issuing laboratory affects verification confidence, seller credibility, and even how the stone compares to others in the market. Knowing which lab issued the report and what that lab’s grading tendencies are helps a buyer evaluate the stone more accurately.
IGI vs GIA for Lab-Grown Diamonds
The International Gemological Institute (IGI) issues the majority of lab-grown diamond reports globally. Their volume is not a drawback — it simply reflects that IGI was the first major lab to adopt lab-grown grading at scale. IGI’s grading is consistent enough for commercial comparison across most inventory. A buyer comparing two IGI-graded stones can generally trust that the same grade means similar quality within that lab’s standards.
The Gemological Institute of America (GIA) now also issues lab-grown reports, but with important differences. GIA includes a specific “Laboratory-Grown” notation on the report and a QR code linking to its digital record.[3] GIA’s lab-grown grading tends to be slightly stricter on cut and symmetry than IGI’s. This does not mean GIA-graded stones are inherently better — it means a GIA Excellent cut may represent a narrower tolerance than an IGI Excellent cut. A buyer comparing stones across reports from different labs should account for this shift rather than assuming the grade is identical.
The key insight: the report tells you which standard the stone was held to, not the stone’s quality in absolute terms. A stone should be evaluated against the report’s claims using visual review, not accepted at face value because of the lab’s name. A grading report is a tool for documenting characteristics, but it should not be treated as a guarantee of beauty, value, or sourcing ethics.
GCAL and Third-Party Verification Reports
GCAL (Gem Certification and Assurance Lab) provides additional verification beyond standard grading. GCAL reports include light performance grading and inscription verification, which adds another layer of confidence. GCAL is less common in general inventory but useful for buyers who want maximum documentation.
For buyers considering a high-value stone above $5,000, combining an IGI or GIA report with a GCAL light performance test provides the strongest documentation set. The GCAL report confirms that the stone not only meets grade standards but also performs well in light return. For most buyers, however, a single IGI or GIA report from a reputable seller is sufficient. The report number, when verified online, confirms grading legitimacy. The laser inscription on the stone confirms identity.
A practical consideration for wholesale buyers or those purchasing multiple stones: consistency in the issuing lab across your selection simplifies comparison. Mixing reports from different labs for stones you plan to set together can introduce subtle grade offsets that are hard to resolve. When possible, source all stones from the same grading lab to keep your comparison straightforward.
Certificate and Visual Review Check
- Verify the report number on the lab’s website — do not rely on the printed report alone
- Confirm the stone’s laser inscription matches the report number
- For high-value purchases above $5,000, consider requesting a third-party light performance report in addition to the grading report
When a grading report is available, buyers should verify the report details through the issuing laboratory’s official report-check tool where available. Matching the online record with the printed report is the most direct way to confirm grading legitimacy, especially when comparing stones from different sellers or labs.
Visual Review as the Final Verification Step
No certificate field replaces seeing the actual stone. The report is a starting framework, not a final verdict. It narrows the field, but the final decision depends on how the stone looks under real conditions. A buyer who relies only on certificate fields risks missing subtle but meaningful differences between two similarly graded stones.
What the Certificate Cannot Confirm
The grading report does not capture facet precision in full detail. It does not measure actual light return, evaluate color tint under natural light, or confirm how the stone will behave in a specific ring setting. Two stones with identical cut, color, and clarity grades can perform very differently in side-by-side comparison. One may appear brighter with cleaner facet patterns. The other may show dull zones or uneven light return.
These differences require visual inspection. Photos, videos, and in-person review are the only way to confirm what the report suggests. At NUVU, we treat the grading report as a starting point — it helps narrow the field, but video, proportions, and setting compatibility still do the final work.
Building a Personal Verification Process
The most reliable confirmation method is to compare the stone’s visual performance against the certificate claims using objective tools. A 360-degree video shows how the stone behaves in motion. 40x magnification images reveal facet precision. A hearts-and-arrows viewer confirms optical symmetry for rounds. Natural-light photos show color behavior outside studio lighting.
Establishing a verification checklist before purchasing helps a buyer evaluate every stone consistently. Using the same criteria for every candidate removes the risk of making a decision based on the certificate alone.
Buyer Verification Checklist
- Confirm report number matches laser inscription using 10x loupe or seller-provided image
- Review 360-degree video in standard lighting, not only studio lighting
- Request face-up and profile photos against a white background
- For rounds, request a hearts-and-arrows image or dark-field viewer photo
- Compare table percentage and depth percentage against your setting specification
- Confirm polish and symmetry are graded Excellent or Very Good on the report
- Ask the seller to confirm the stone is eye-clean from 12 inches under mixed lighting
- Verify that any price differences between two similarly graded stones can be explained by cut precision, size, or certification completeness
The certificate tells you what the stone should be. Visual review tells you what the stone actually is. Both are necessary. One without the other leaves room for disappointment.
[1] GIA, “GIA Lab-Grown Diamond Reports,” Gemological Institute of America, https://www.gia.edu/gia-lab-grown-diamond-reports. GIA explains that its grading methodology for color, clarity, and cut applies consistently to both natural and lab-grown diamonds, ensuring the same standards.
[2] Federal Trade Commission, “Guides for the Jewelry, Precious Metals, and Pewter Industries,” 16 CFR Part 23, Federal Trade Commission, updated 2018. The FTC provides guidance on the use of terms such as “laboratory-grown,” “cultured,” and “synthetic,” emphasizing that such disclosures must be clear and conspicuous to avoid consumer deception.
[3] GIA, “GIA Lab-Grown Diamond Reports,” Gemological Institute of America, https://www.gia.edu/gia-lab-grown-diamond-reports. GIA’s lab-grown diamond report prominently features the “Laboratory-Grown” notation on the face of the document to clearly distinguish it from a natural diamond report.
Disclosure: This article is for general educational purposes only. Diamond grading, pricing, availability, specifications, and seller policies can change, and readers should verify important details through grading reports, official laboratory tools, seller documentation, or qualified professionals before making a purchase decision. Laboratory-grown diamonds should be clearly distinguished from natural diamonds, and environmental or sourcing claims should be supported by specific documentation. A grading report helps document key characteristics, but it should not be treated as a guarantee of beauty, value, or sourcing ethics.