
Choosing diamonds for a pair of earrings is not the same as picking one stone for a ring. You need two diamonds that look identical side by side, not just on paper. A single IGI report with the same grade does not guarantee visual consistency, and common mistakes—like mismatched diameters, unsafe settings, or heavy backs that tilt the earring—only become obvious after purchase. This article walks through the specific logic for studs, drops, and hoops, and explains how to verify stone pairs, choose the right backing for daily or formal wear, and avoid costly errors during the custom design process for earrings, as the custom lab grown diamond bracelet guide explains in the context of tennis bracelets, bangles, and personalized designs, highlighting stone selection and setting safety.
For the full framework, read Custom Lab-Grown Diamond Jewelry Guide.
| Earring Style | Key Decision Criteria | Common Mistake to Avoid |
|---|---|---|
| Stud earrings | Shape affects perceived size; verify diameter match within 0.1mm. | Choosing large carat weight without measuring earlobe or face protrusion. |
| Drop earrings | Weight distribution must prevent tilting; lever-backs suit daily wear. | Skipping wear-test mock-ups before final purchase. |
| Hoop earrings | Half-hoops are lighter and practical; full-circle costs 1.5–2x more. | Ignoring diamond distribution balance across the hoop arc. |
| Matching stone pairs | Visual matching beats identical grades; same production batch reduces tint risk. | Relying only on IGI reports without side-by-side daylight comparison. |
| Daily vs. formal wear | Daily: lever-backs, low profile, 14k gold. Formal: higher carat, elaborate settings. | One-pair compromise that fails for both use cases. |
Quick Questions Before You Read
Q: Why can two diamonds with the same IGI grade still look mismatched?
Grades group stones within ranges. Two VS2 diamonds can have different clarity characteristics and slightly different tint, which becomes visible when worn side by side.
Q: Are full-circle diamond hoops always better than half-hoops?
Not for daily wear. Full-circle hoops are heavier, cost more, and can snag more. Half-hoops offer better comfort and practicality while maintaining visual impact from the front.
Q: Should I own one or two pairs for different occasions?
Own separate pairs for daily and formal wear. A single compromise pair often fails at both—too heavy for everyday, not impressive enough for events.
Q: What’s the most important measurement before ordering custom earrings?
Stone diameter match (within 0.1mm) and earlobe dimensions. Incorrect post alignment or weight distribution causes tilting, which cannot be fixed after purchase.
Custom Lab-Grown Diamond Earrings: Why Pairs Change the Buying Logic
Most diamond buyers enter the market thinking in terms of single stones. Engagement ring logic trains you to find one exceptional diamond and judge it on its own merits. Earrings break that model completely. With a pair, two diamonds must perform together under the same light, at the same angle, and within a fraction of a millimeter of each other. The decision shifts from selecting a great stone to verifying that two stones are genuinely interchangeable.
The Single-Stone vs. Matching-Pair Decision Gap
A diamond that looks excellent in isolation can fail as part of a pair. The reason is straightforward: earrings sit on opposite sides of the face, often catching different light sources simultaneously. If one stone appears warmer, or one measures even slightly larger, the mismatch becomes visible the moment both earrings are on. The constraints are specific. Two stones need to match in face-up color appearance under natural and indoor light. They need to be within 0.1mm in diameter. They need identical or visually equivalent clarity characteristics. These requirements eliminate many individually good stones from pair suitability — not because the stones are flawed, but because they cannot be matched.
At NUVU, stone pairing relies on actual gemological measurement, not certificate averages. Two diamonds with the same IGI color grade may still differ in face-up tint depending on growth-plane orientation or post-growth treatment. The certificate gives a starting point. The side-by-side measurement gives the real answer.
Why Lab-Grown Diamonds Are a Structural Advantage for Earring Pairs
Lab-grown diamond production, particularly from major CVD and HPHT facilities, yields tighter batch-level consistency than mined diamond runs. GIA explains that lab-grown diamonds share the same physical and chemical properties as natural diamonds, but they can be distinguished through advanced gemological testing.[1] Manufacturers producing large volumes under controlled conditions can sustain narrower color and clarity ranges within a single production batch. This manufacturing reality makes matching pairs more achievable and more price-stable. You are less likely to encounter the wide variation in hue and inclusion type that makes mined diamond pairing a constant compromise.
The tradeoff is that buyers must verify pair documentation, not just individual reports. A pair of lab-grown diamonds from the same production batch carries a different kind of consistency guarantee than two stones pulled from separate inventory lots. The documentation should reflect that linkage.
What to Verify in a Diamond Pair Before Purchase
Confirm that both diamonds are listed on the same or linked grading reports. Check that the face-up diameter of each stone is within 0.1mm of the other. Ask for side-by-side photos under natural daylight and LED lighting — two very different color temperature conditions that can reveal mismatches a single photo will hide. Verify that the color and clarity grades are identical on paper and match visually in person or on video. Do not accept descriptions like “similar” or “comparable.” Demand actual measurements and side-by-side evidence.
Compliance note on pair documentation. When reviewing grading reports for a diamond pair, laboratory-grown diamonds should be clearly identified as laboratory-grown, and they should not be presented as mined diamonds. The report should state the origin and growth method. For pair confirmation, the report is a baseline, but the visual match is what determines whether the pair works, not the certificate alone.
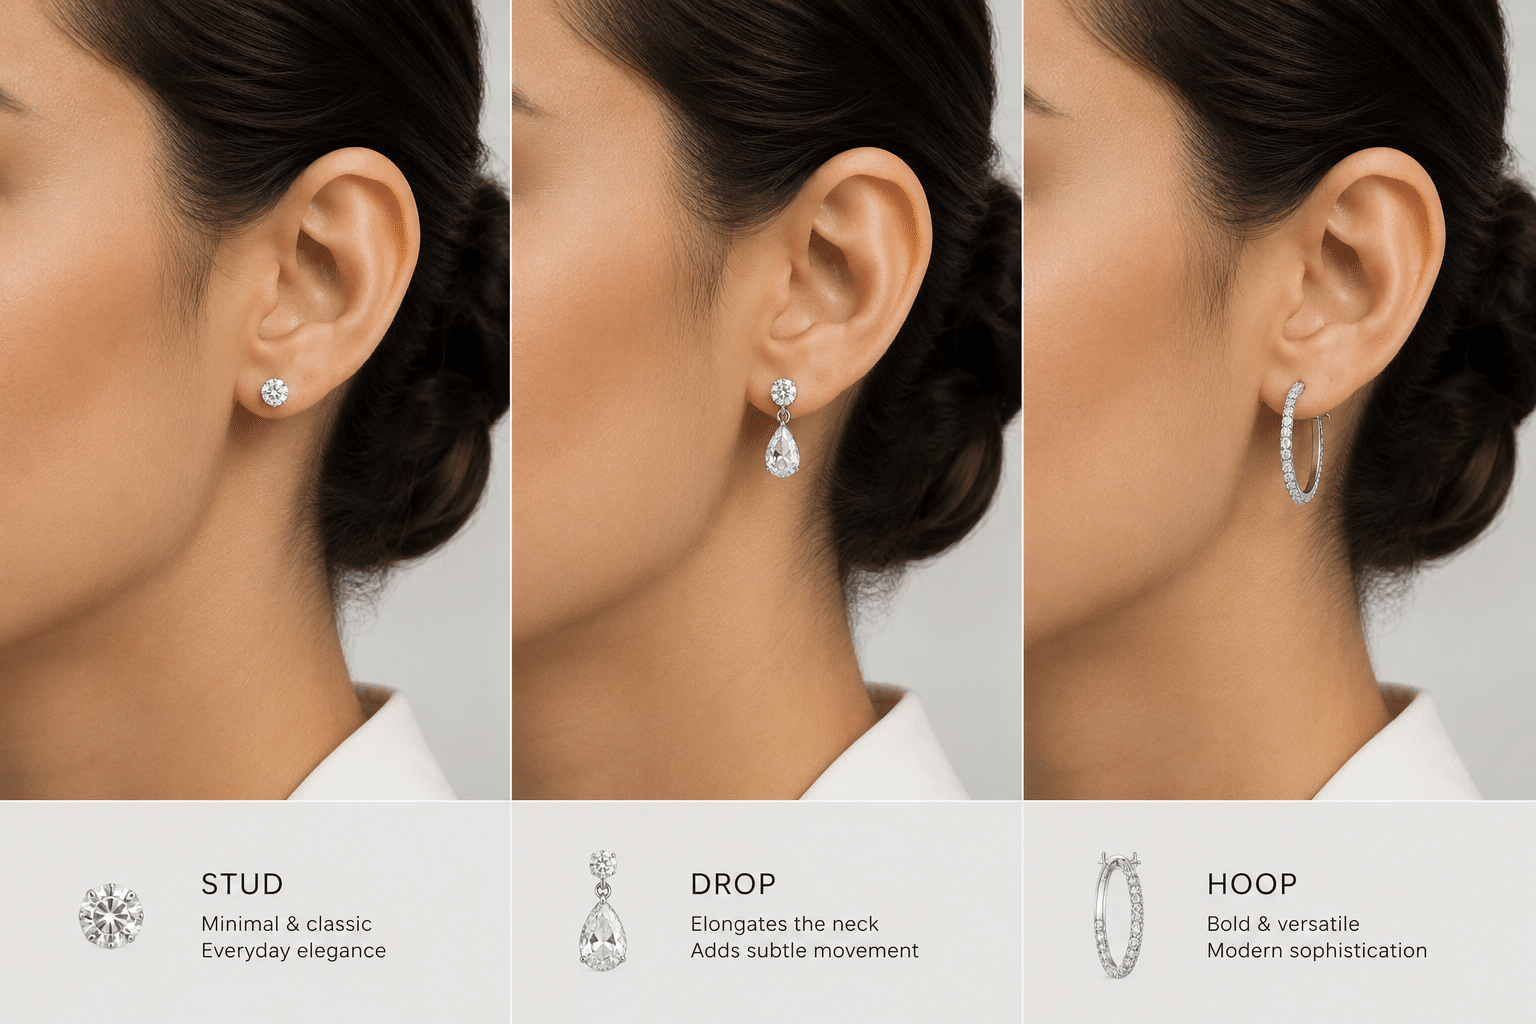
Stud Earrings: The Shape, Size, and Face-Framing Tradeoff
Stud earrings are the most common custom earring request, and for good reason. They are versatile, secure, and suited to everything from daily wear to formal occasions. But their visual effect depends heavily on the interaction between diamond shape, total carat weight, and the wearer’s earlobe and face geometry. A stud that looks proportional on one person can overwhelm or underwhelm on another.
Round vs. Fancy Shapes for Studs: How Carat Weight Visualizes Differently
Carat weight distributes differently depending on shape. A 1-carat round brilliant stud sits approximately 6.5mm in diameter — a compact, circular footprint. A 1-carat oval or pear, by contrast, appears larger in one dimension, creating an elongated silhouette that can make the earring look bigger than its actual weight suggests.
This difference matters for face-framing. Round and cushion shapes offer balanced light return from every angle and tend to read as classic and conservative. Elongated shapes like oval, pear, and marquise draw the eye vertically, which can complement certain face shapes but may feel less balanced for daily wear. Buyers choosing studs for daily use typically prefer round or cushion shapes. Those buying for formal or special-occasion wear often choose elongated shapes for a more dramatic profile and a larger visual presence at the same carat weight.
Total Carat Weight (TCW) Selection: What 2ct, 4ct, and 6ct Actually Look Like On-Ear
Total carat weight is the combined weight of both stones. At 1ct each (2ct TCW), studs are the most common entry point for custom lab-grown orders. They provide noticeable presence without requiring additional structural reinforcement. At 2ct each (4ct TCW), the post and backing must be proportionally stronger. Standard push-backs become unreliable at this weight. Lever-backs or screw-backs are the practical minimum. At 3ct each (6ct TCW), security becomes the primary design constraint. Prongs must be thick enough to hold the stone securely, and a bezel setting is often the safer choice over a prong setting.
Before committing to a high TCW pair, request a physical mock-up or proportion diagram. Carat weight on paper does not tell you how the stud will sit on your ear. A mock-up reveals whether the stone protrudes, tilts forward, or extends beyond the earlobe edge.
Stone-to-Ear Proportion Check
Measure your earlobe height and width in millimeters. Compare these measurements against the diamond’s total diameter. A stud that exceeds lobe width will protrude unsafely and is more likely to catch on clothing or hair. Ask your jeweler for a silicone backing test to confirm the earring sits flush against the lobe and does not tilt forward. A forward-tilting stud looks unbalanced and puts uneven pressure on the piercing.
The Role of Documentation in Stud Selection
For stud earrings, the grading report serves a different purpose than it does for a single ring stone. The report provides a measurement baseline, but the pair must be evaluated together. Buyers should ask for the report number of each stone and verify that both are from a consistent grading batch or laboratory, especially when the stones are from the same production run. This documentation awareness helps confirm that the two reports are not simply similar but represent diamonds that were graded under comparable conditions. A grading report can narrow the comparison, but it should be read alongside the stone’s proportions, visual evidence, and intended jewelry use.
Drop and Dangle Earrings: Weight Balance, Backing Choice, and All-Day Comfort
Drop earrings introduce constraints that studs and rings do not. The earring must remain upright during movement, distribute weight evenly across the ear, and feel secure for as long as it is worn. A poorly balanced drop earring rotates forward, sags, or pulls uncomfortably on the piercing. These are not minor issues — they determine whether the earring is wearable for more than an hour.
How Diamond Weight Affects Drop Earring Construction
At low weights, drop earrings are straightforward to construct. Above 3ct total weight per ear, the engineering changes. Standard push-backs are inadequate. The earwire or lever-back must be reinforced to handle the load. The center of gravity shifts forward as diamond carat increases, which means the earring will tilt unless the setting compensates with counterweighting or wire gauge adjustment.
For custom earring builds, the approach is to calculate the center of gravity before the setting is finalized. Stones weighing more on one side of the earwire, as discussed in the custom lab grown diamond necklace guide, need additional metal weight on the opposite side to keep the earring upright. This is not something a buyer can assess from a photo. It requires a CAD rendering with weight distribution marked, or a physical prototype.
Backing Styles: Screw-Back, Lever-Back, and Push-Back for Different Use Cases
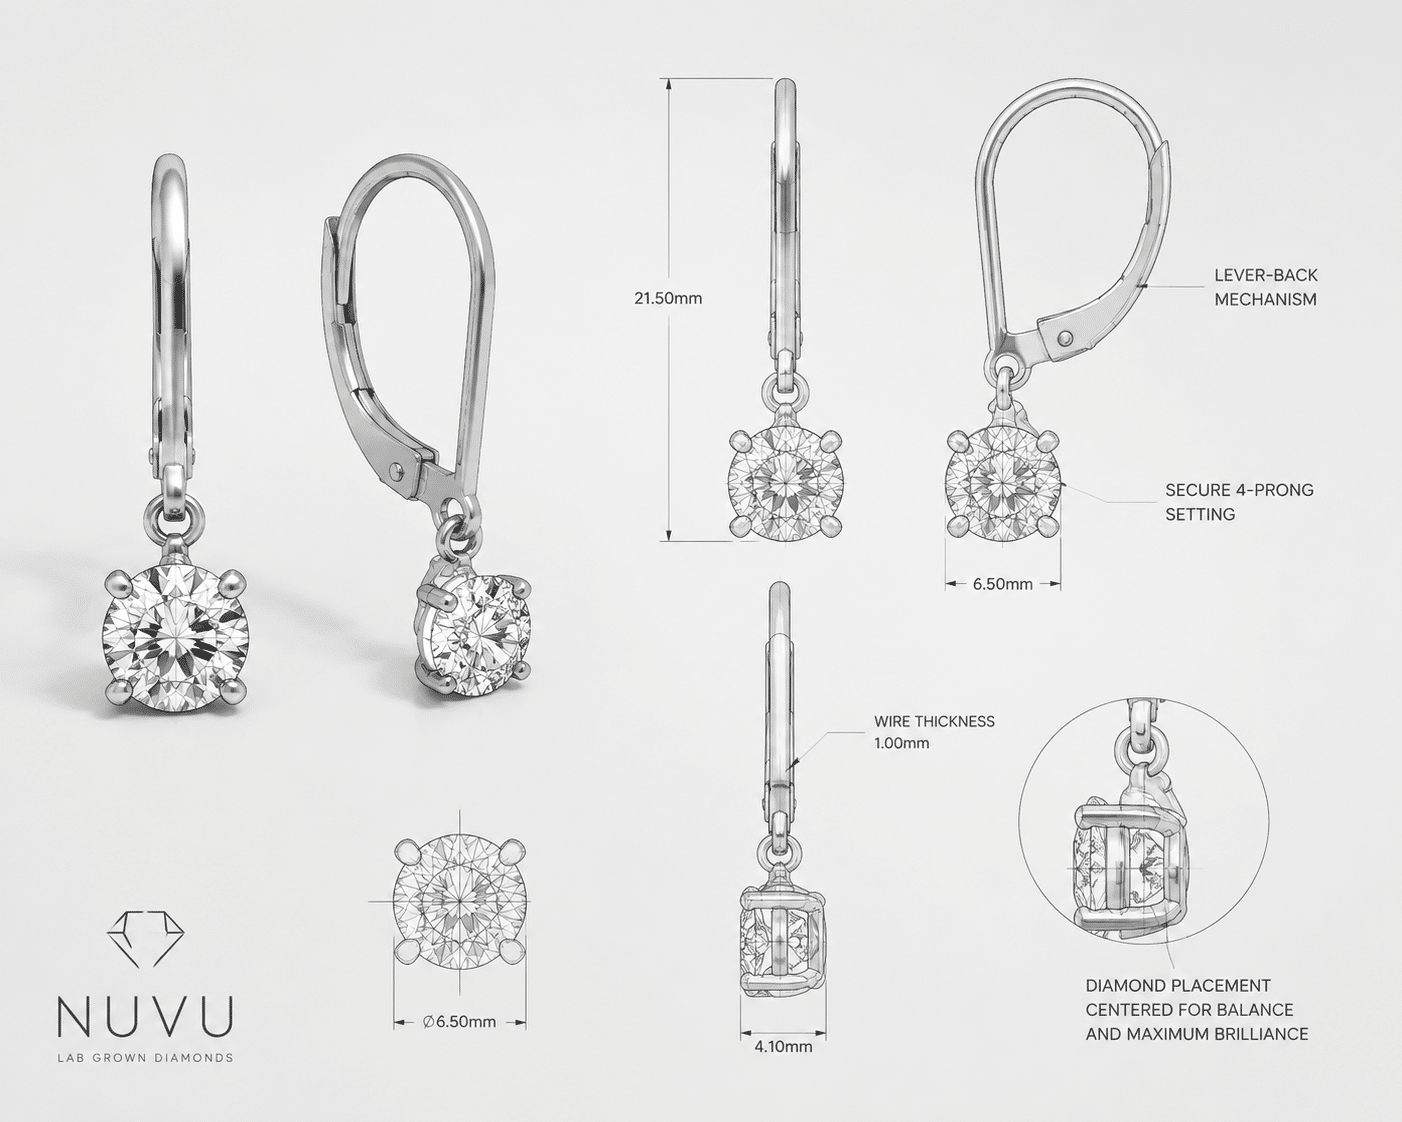
Push-backs are adequate for studs under 1ct each. For drops and hoops above 2ct TCW, they should be avoided. Lever-backs are the standard recommendation. They distribute weight more evenly than push-backs and are less likely to loosen during movement. Screw-backs add an extra layer of security for high carat weights or formal wear, where the cost of losing an earring is highest. The tradeoff is convenience. Screw-backs are harder to put on and remove without assistance. If you plan to take the earrings off daily, screw-backs become a nuisance.
Choose based on removal frequency. Daily wear favors lever-backs. Occasional or formal wear can accommodate screw-backs. Do not choose a backing style based on looks alone — it directly affects how the earring performs over time.
What This Means in a Real Purchase
Tell your jeweler whether the earrings are for daily wear, occasional office wear, or formal events only. This single piece of information determines the backing recommendation, the stone size ceiling, and the metal gauge. Daily wear favors lighter drops with lever-backs and lower profiles to reduce snagging. Formal wear can accommodate heavier drops with screw-backs and more elaborate settings. Request a weight test with a dummy post before finalizing the design. A few minutes of wear testing will reveal balance problems that no CAD rendering can predict.
For buyers, the practical distinction is that a drop earring certified as structurally sound on paper may still feel unstable during movement. This is why many experienced wearers prioritize balance metrics—post length, earwire thickness, and center-of-gravity offset—over the diamond grade alone. A well-balanced drop with a slightly lower clarity grade often performs better on the ear than an internally flawless stone set in a poorly weighted frame.
Hoops with Lab-Grown Diamonds: Setting Density and Visual Balance
Hoop earrings introduce a buying logic that is distinct from studs or drops. With hoops, the diamond setting pattern and the metal thickness determine how the earring feels on the ear, whether it stays in the correct orientation, and whether the overall look is balanced or off. Two hoops with the same total carat weight can look completely different depending on how the stones are distributed.
Full Hoop vs. Half Hoop: Diamond Distribution and Cost Tradeoff
Full hoops set diamonds across the entire 360-degree circumference. Half-hoops concentrate stones only on the visible front face, leaving the back of the hoop smooth or minimally set. The cost difference is significant. A full hoop typically requires 1.5x to 2x more stones than a half-hoop of the same diameter, and that premium applies to both the diamond cost and the setting labor.
Half-hoops are the more practical choice for most daily-wear buyers. They reduce total weight, which helps the hoop stay upright and prevents sagging. The smooth back also reduces snagging on hair or clothing. The tradeoff is that half-hoops lose their diamond appearance when viewed from the side or behind. For formal or special-occasion buyers, full hoops offer a more complete visual statement, especially in settings where the earring may be seen from multiple angles.
Diamond Size and Setting Pattern for Hoop Proportions
For a standard 30mm hoop, the most common diamond sizes range from 1.5mm to 2.5mm per stone. Within that range, the setting pattern changes the overall look more than the individual stone size does. Smaller stones set close together create a dense, continuous band of sparkle that reads almost as a solid line of light. Larger stones set with visible gaps produce a more modern, open look, where each diamond is individually noticeable.
The choice between these two approaches depends partly on the wearer’s face shape and hairline. A dense, continuous sparkle tends to draw attention to the ear itself and works well with shorter hairstyles or exposed necks. A more open, graduated pattern creates a softer transition between the ear and the face. Setting density is not a matter of better or worse—it is a visual preference that should match how the earring will be worn and seen.
Buyer Verification Checklist for Custom Hoops
Before approving a custom hoop design, confirm each of the following with your jeweler. First, get the exact total number of stones per hoop—not an estimate, but the count. Second, ask for a diagram or CAD rendering that shows the spacing pattern between each stone. Third, verify that the hoop’s inner diameter matches your earlobe thickness; a hoop that is too wide will slide and rotate, while one that is too narrow will pinch. Fourth, request a weight comparison between the diamond content and the metal content. If the metal is disproportionately heavy, the hoop may sag or sit lower than intended.
A useful perspective: a 30mm hoop with 1.8mm diamonds set in a micro-pave pattern will look fuller and more uniform than the same hoop with 2.2mm stones set with visible gaps. Neither is wrong, but the buyer should see both patterns before committing. The grading report for each small diamond is less relevant here than the overall distribution and how the hoop frames the face.
Additional Note on Hoop Symmetry and Wear Testing
When evaluating custom hoops, a practical step is to assess the balance of the finished piece by holding it at the post point and observing how it hangs. If the hoop rotates inward or sags forward under its own weight, the diamond distribution or metal thickness may need adjustment. This kind of simple mechanical check, performed before the final polish, can confirm whether the earring meets the intended balance criteria and helps avoid post-delivery dissatisfaction with the wear experience.
Documentation and Verification for Hoop Stones
Because hoops often contain many small diamonds, individual grading reports for each stone are usually not provided. Instead, the seller should be able to state the color and clarity range for the set. Buyers should ask for the documented range as well as confirmation of the number of stones, their approximate measurements, and the setting type. If the seller claims a specific color or clarity grade for the entire set, it is worth asking whether this claim is based on a single representative report or on the actual lot. A clear answer about documentation helps avoid disappointment later.
Matching Pairs: Beyond Certificate Grades to Actual Visual Consistency
Two diamonds with identical IGI or GIA grades can still look visibly different when set side by side in earrings. The grades on a report describe each stone individually, but they do not guarantee that two stones will appear as a matched pair on the ear. This gap between certificate data and visual performance is where many earring buyers encounter disappointment.
Why Face-Up Color Can Differ Even with the Same IGI Grade
Two diamonds both graded G can appear noticeably different in face-up color. With CVD-grown diamonds, the variation often comes from growth-plane orientation and whether the stone received post-growth HPHT treatment. One stone may lean slightly warm, while another from a different batch may read cooler or more neutral. These differences are subtle on a single stone, but visible and distracting when two are worn side by side.
The most reliable way to minimize this risk is to select diamonds from the same production batch. At NUVU, pairs are sourced from the same facility and production run wherever possible. This does not eliminate the need for visual confirmation, but it significantly reduces the chance of a tint mismatch that the certificate alone would not flag. As GIA notes, lab-grown diamonds can be identified through their growth features, which makes batch-level consistency a meaningful advantage for pair matching.[1]
Clarity Tolerance: Which Grades Are Safe for Earrings vs. Rings
Earrings sit farther from the observer’s eye than a ring on a hand, so clarity features that would be visible in a ring become invisible in an earring. This makes SI1 and even some SI2 stones perfectly acceptable for most earring buyers, as long as the inclusions are not dark or centrally located. VS2 is the practical ceiling—most buyers will not see a visible difference between VS2 and VVS1 in an earring setting, and the price difference is steep.
The pairing challenge with clarity is not just the grade but the type and position of the inclusions. Two VS2 stones may both be clean to the naked eye individually, but one may contain a small feather and the other a pinpoint crystal. Under direct light, these different inclusion types can catch or scatter light differently, making the stones appear unevenly bright. For a pair, the goal is not just the same grade but the same visual behavior under typical lighting.
When a grading report is available for each stone in a pair, buyers should verify the report details through the issuing laboratory’s official report-check tool where available. This step confirms that the report matches the stone and provides an independent check on the grade. For pair matching, verifying both reports independently is a useful practice before finalizing the purchase.
Certificate and Visual Review Check
Never approve a diamond pair based on certificates alone. Request both grading reports and a side-by-side video of both stones under identical lighting conditions. Look for any uneven tint between the two stones. Pay attention to whether one appears warmer, cooler, or cloudier than the other. Then confirm that the table percentage and crown angle of both diamonds are within 1 degree of each other. This level of cut matching ensures that both stones return light in the same way, which is what makes a pair look consistent on the ear. The Federal Trade Commission advises that careful terminology and disclosure are important when describing lab-grown diamonds in advertising, reinforcing the need for precise claims at every stage of the buying process.[2]
Custom Earring Design Workflow: From Loose Pairs to Finished Piece
Custom earring design follows a structured process that requires the buyer’s input at specific stages. Understanding these stages in advance prevents delays and ensures the finished piece matches what was agreed upon.
Stone Selection: Choosing Two Diamonds from NUVU’s Loose Inventory
NUVU’s loose diamond inventory allows buyers to select individual stones rather than accepting pre-paired lots. This gives more control over the matching process. The recommended approach is to select two stones with identical IGI report details—same color, same clarity, and similar cut measurements—and then request a pair confirmation before moving to the setting stage. The pair confirmation is the step where the team places both stones side by side and verifies visual consistency. This is the moment to raise any concerns, not after the stones are set.
Setting and Metal Selection for Earring Durability
Metal choice affects both the look and the long-term behavior of the earring. 14k gold and platinum are the standard choices for stud and drop settings because they offer the best balance of strength and weight. 18k gold is softer and heavier, which can be beneficial for hoops that need weight to hang correctly, but problematic for drops where excess weight causes the earring to pull or sag.
White gold and platinum require periodic rhodium plating to maintain their white color. Yellow and rose gold do not require this maintenance. For buyers who want a white metal look without ongoing upkeep, platinum is the better long-term choice despite the higher upfront cost. Skin tone also matters—yellow and rose gold tend to complement warmer skin tones, while white metals work well with cooler undertones.
Timeline, Revisions, and Confirmation
A custom earring project at NUVU typically requires 2 to 4 weeks from stone selection to the finished piece. The workflow follows a clear sequence: pair confirmation, CAD rendering, prototype approval if requested, stone setting, final quality check, and shipping. The buyer’s active decisions are required at two points: the pair confirmation and the CAD approval. These are the stages where changes are still easy to make. Once stone setting begins, revisions to the design become more difficult and costly.
Documentation and Verification During the Workflow
Throughout the custom workflow, the documents that matter are the grading reports, the CAD rendering with annotated measurements as per the custom lab grown diamond jewelry guide, and any written communication about stone matching and metal specifications. Buyers should request that the final invoice include the report numbers and exact TCW for both stones. This creates a clear record of what was delivered and makes verification easier later. For custom design, trust comes from matching the stone to the setting, budget, and wearer’s daily use—not from choosing grades in isolation. A written record of each stage helps confirm that all parties are aligned before production begins.
Stone-to-Setting Fit Check
Before approving the CAD rendering, confirm that the diamond diameter is accurately represented relative to the setting flange. Ask for the prong height and the angle of each prong. For stud earrings specifically, verify that the post center aligns with the diamond’s center of gravity. If the post is off-center, the stud will tilt forward or backward when worn. This is a common issue with asymmetrical fancy shapes and should be resolved in the CAD stage, not after the piece is built.
For buyers working through the design workflow, a useful checkpoint is the measurement tolerance. A CAD rendering may show a perfect fit, but the actual setting depends on the jeweler’s tolerance for prong height, post alignment, and metal thickness. Asking about these tolerances during the design phase—rather than after the piece is cast—helps ensure the final result matches the model.
Daily Wear vs. Formal Occasion Earrings: Design and Durability Differences
The most common mistake in custom earring design is trying to make one pair do everything. A pair that looks elegant at a wedding may feel heavy during a workday. A pair that stays comfortable through a commute may feel too understated for a formal event. These are not the same product. The use case determines metal gauge, backing type, stone size, and setting security, and trying to compromise usually results in earrings that do not fully satisfy either scenario.
For Daily Wear: Security, Comfort, and Low Maintenance
Daily-wear earrings need to survive real conditions: hair catching, clothing snagging, head movement, and extended hours on the ear. Lever-backs or screw-backs are the correct choice here. Push-backs, which work for lightweight studs under 1ct each, become a risk factor at higher weights or for drop styles. A daily-wear pair should also use a low-profile setting. Bezel settings or snug prongs reduce snagging significantly compared to tall, exposed claw prongs.
Stone weight matters more for comfort than most buyers expect. Stud pairs at 2ct TCW or less are generally comfortable for full-day wear. Drop earrings should stay under 3ct TCW to avoid ear fatigue. At higher weights, the earlobe begins to feel the pull after a few hours, and the earring may shift out of alignment during normal movement. For daily wear, the goal is to forget the earrings are there.
Metal choice also affects durability. 14k gold is tougher than 18k gold and holds up better to daily bumps and cleaning. Platinum is denser and more durable over time, though it requires occasional polishing. White gold needs periodic rhodium plating to maintain its finish. Yellow and rose gold require the least maintenance.
For Formal Occasions: Visual Impact Over Comfort Constraints
Formal earrings follow a different logic. Visual impact is the priority, and the wearer is unlikely to keep them on for more than a few hours. This opens the door to higher TCW, elaborate settings, and more complex stone arrangements that would be impractical for daily use.
Drops of 4ct TCW or more become reasonable for formal wear. Full hoops with 360-degree diamond coverage can work here in ways they cannot for daily use. The tradeoff is clear: reduced comfort for extended wear, higher risk of snagging or loss if worn in uncontrolled environments, and more maintenance required over time. The reader should also consider that a high-carat formal pair demands proportionally stronger backing, usually screw-backs, and a setting built to handle the weight.
The practical advice here is straightforward: own both. A single all-purpose design usually ends up being too heavy for daily use and too restrained for formal events. A dedicated daily pair handles the commute, the office, and the weekend. A dedicated formal pair delivers the impression when it counts.
What This Means in a Real Purchase
Before approving a design, write down the specific occasions where you will wear these earrings. If the answer includes the gym, a commute, sleeping, or time around children, choose daily-wear specifications. If the answer includes weddings, galas, anniversary dinners, or photos only, choose formal specifications. Do not attempt to serve both use cases with one build. The design compromises required to span both categories usually weaken the earring in both roles. If your budget allows only one pair, lean toward daily-wear specifications, because a comfortable, secure pair worn regularly offers better value than a dramatic pair that stays in a box.
An additional consideration: a daily-wear pair with 14k gold, lever-backs, and bezel-set stones may cost less upfront, but it also reduces the risk of loss or damage. A formal pair with heavier stones and more delicate settings has higher replacement cost. This is not an argument against owning both, but it is a reason to treat daily-wear specifications as the baseline investment and formal upgrades as a separate decision.
What to Ask When Determining Use Case
During the initial consultation, consider asking your jeweler about the maximum comfortable carat weight for your piercing type and earlobe thickness. Some buyers find that a 2ct TCW stud pair feels light, while a 3ct TCW pair with the same backing style creates noticeable pull after a few hours. This variation is individual, so a brief wear test with weighted dummy stones can be a helpful step before finalizing the design.
Conclusion: How to Start a Custom Earring Project with Confidence
Custom earrings require a different decision process than rings because you are not choosing one stone. You are choosing two stones, a backing mechanism, a setting style, and a metal, all of which must function together against the specific conditions of how and when the earrings will be worn. A clear head at the start prevents expensive corrections at the end.
The Four Checkpoints Before You Order
Before approving any custom earring project, confirm four things. First, pair matching must go beyond certificate grades. Two diamonds with identical IGI reports can still differ in face-up color or diameter. Request actual side-by-side video under the same lighting, and verify diameter is within 0.1mm.
Second, the proportion check. Measure your earlobe height and width in millimeters. Compare these dimensions against the diamond diameter or, for drops and hoops, the total earring length. A stone that exceeds your lobe width will protrude unsafely, and a drop that extends too far may pull the earring forward or cause the backing to loosen.
Third, the backing choice. This decision depends on wear frequency and total carat weight, not personal preference. If a family member or friend recommends push-backs for formal drops over 3ct TCW, that is bad advice. Use the table: daily wear uses lever-backs or screw-backs; formal wear can use screw-backs; high TCW requires reinforced backing regardless of use case.
Fourth, metal and setting compatibility. Your daily wear should favor 14k gold or platinum for durability and low maintenance. Your formal pair can use 18k gold or a more delicate setting. At NUVU, our team usually discusses metal gauge and setting height together because they determine both longevity and appearance.
Documentation as a Final Checkpoint
Before the project begins, buyers should confirm in writing which documents will be provided with the finished earrings. This includes the grading reports for the pair stones, a description of any documentation for small accent stones if applicable, and a final invoice that lists the stone weights and metal specifications. In sourcing or wholesale conversations, documentation, consistency, and communication often matter as much as the headline specification. This practice creates a clear record of what was ordered and delivered, and it makes verification simpler after the piece arrives.
Next Steps: Loose Diamond Pair Inquiry and Custom Design Consultation
A custom earring project begins with knowing your TCW target, shape preference, and intended use case. Without those three specifications, the conversation stays vague. With them, the jeweler can move directly to stone selection, pair matching, and design options.
At NUVU, the process starts with a loose diamond pair inquiry or a custom design consultation form. Buyers who prepare their use case and weight target in advance move through the design phase faster and with fewer revisions. If you are unsure about backing styles or metal selection, that is the right question to ask during the consultation, not a reason to delay starting.
What to Ask Your Jeweler in the First Conversation
Get answers to four questions before approving any design. First, can you show me both diamonds side by side in person or on video? Second, what is the exact diameter of each stone? Third, what backing style do you recommend for my total carat weight and intended use? Fourth, can you confirm the total project cost including setting, metal, and shipping? Get all answers in writing before approving the design. A written quote with specifications is the only reliable record of what was agreed upon. Verbal assurances are not useful if a discrepancy appears during production.
Custom earrings done correctly look effortless. That effortlessness depends on decisions made before the first stone is set. Start with clarity about use, verify pair matching with actual measurements, choose backing by frequency not fashion, and confirm costs in writing. The earrings that result will be more comfortable, more secure, and more likely to match their intended occasion.
[1] GIA, “Lab-Grown Diamonds,” Gemological Institute of America, gia.edu/lab-grown-diamond.
[2] Federal Trade Commission, “Guides for the Jewelry, Precious Metals, and Pewter Industries,” FTC, 2018, ftc.gov.
Disclosure: This article is for general educational purposes only. Diamond grading, pricing, availability, specifications, and seller policies can change, and readers should verify important details through grading reports, official laboratory tools, seller documentation, or qualified professionals before making a purchase decision. Laboratory-grown diamonds should be clearly distinguished from natural diamonds, and environmental or sourcing claims should be supported by specific documentation. A grading report documents key characteristics, but it should not be treated as a guarantee of beauty, value, or visual consistency in pair matching.