
Choosing a lab-grown diamond for an engagement ring can feel like a test of certificate literacy, but a grading report alone won’t tell you if a stone actually looks beautiful in person. Two diamonds with identical “Excellent” cut grades and the same color and clarity scores can perform very differently in real light—one may sparkle brilliantly while another appears dark or hazy. The certificate confirms the stone’s identity and basic specifications, but it misses critical visual flaws like windowing, extinction, or a distracting bow-tie effect. This article helps you move beyond the report to evaluate what truly matters: cut proportions, shape’s impact on style and wearability, setting compatibility, and how to balance your budget across the diamond, the mounting, and insurance. You will learn a practical decision framework that prioritizes visual performance over paperwork.
For the full framework, read Lab-Grown Diamond Engagement Rings Guide.
| Priority | What to Look For | What the Certificate Misses |
|---|---|---|
| Cut Quality | Table 54–57%, crown angle 34–35°, pavilion angle 40.6–41° | Windowing, extinction, haziness, or light leakage |
| Shape Fit | Oval ratio 1.35–1.45; check setting dimensions | Bow-tie darkness, tip vulnerability, or proportion imbalance |
| Color in Context | G–J for yellow/rose gold; D–E for platinum | How the metal tint interacts with the stone’s hue |
| Clarity Threshold | VS2–SI1 if eye-clean | Inclusions visible only under magnification vs. unaided eye |
| Setting Security | Six-prong or cathedral for round; bezel for pointed shapes | Gap risk between stone dimensions and mounting |
| Total Budget Split | 55–70% diamond, 25–35% setting, 5% insurance | Tradeoff between carat size, stone quality, and design detail |
Quick Questions Before You Read
Q: If the certificate says “Excellent” cut, is the diamond guaranteed to be brilliant?
No. Two “Excellent” stones can look very different due to proportion variations. You need to check specific table, crown, and pavilion angles and request video in multiple lighting conditions.
Q: Does a higher color grade like D or E always look better in a ring?
Not necessarily. In yellow or rose gold settings, G–J color stones often appear warmer and more natural. Very colorless D–E diamonds can look stark or cold against warm metals.
Q: Can I trust that an SI1 clarity diamond is eye-clean from the certificate alone?
No. Some SI1 stones are visibly included. You should verify eye-cleanliness through high-resolution video or in-person inspection, especially for step-cut shapes like emerald or asscher.
Q: How do I know if an oval diamond will have a strong bow-tie effect?
Length-to-width ratio (1.35–1.45 is ideal) and video review under diffused light are essential. The certificate does not flag this at all, so visual inspection is the only reliable method.
Introduction: The Certificate Is a Starting Point, Not the Final Answer
When you start looking for a lab-grown diamond for an engagement ring, the grading report feels like the obvious answer. You compare carat weight, color, clarity, and cut grade. You think you have everything you need to make a confident decision. But the report tells you less than you might expect about how the stone will actually look on your partner’s hand.
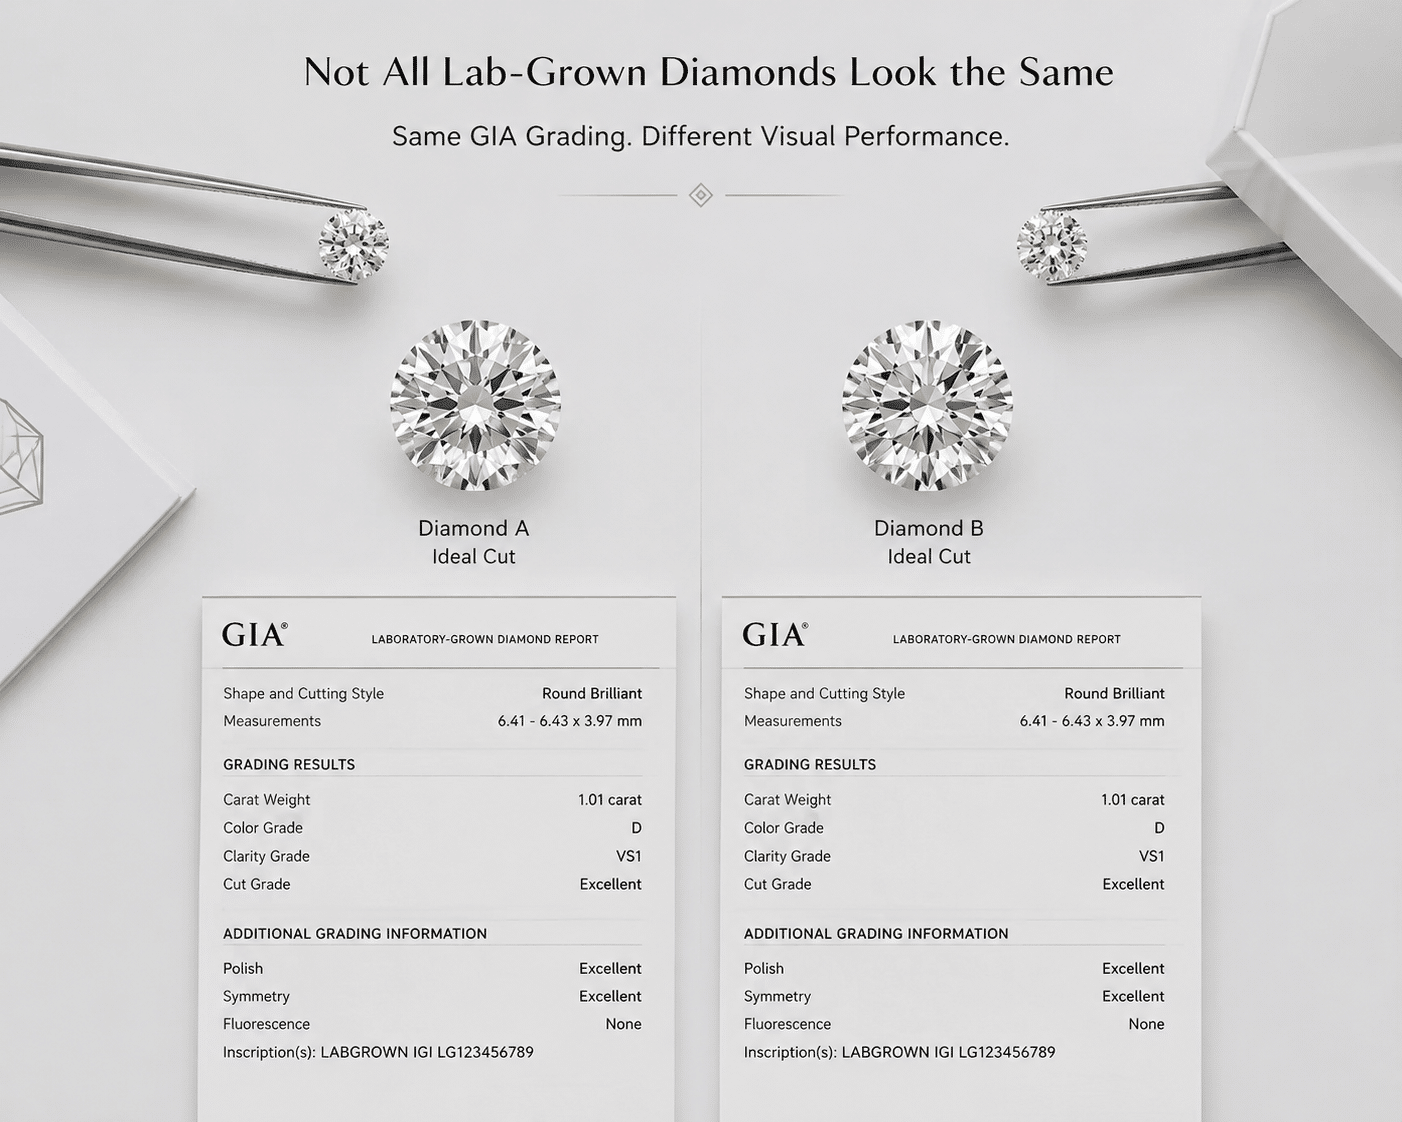
Certification confirms identity. It verifies that the stone is lab-grown, records its measurements, and assigns grades within standard ranges. But it cannot evaluate how the stone performs in real light. It cannot show you whether the facets appear crisp or muddy. And it cannot tell you whether the stone will fit the specific engagement ring setting you have in mind. That gap — between what the report confirms and what you still need to judge for yourself — is where most buying mistakes happen.
For buyers, the practical starting point is to treat the certificate as a screening tool, not a verdict. It helps narrow the field, but the final decision still depends on how the stone behaves visually and whether its measurements align with the intended design.
Understanding the Distinction: Laboratory-Grown vs. Natural Diamonds
Throughout the buying process, it is important to distinguish laboratory-grown diamonds from natural diamonds. A lab-grown diamond shares the same chemical composition and crystal structure as a mined diamond, but the two have different origins. Laboratory-grown diamonds are created through controlled processes such as High Pressure-High Temperature (HPHT) or Chemical Vapor Deposition (CVD), while natural diamonds form over geological timescales deep within the earth. A grading report for a lab-grown diamond should clearly indicate the growth method, and sellers should not present lab-grown stones as mined diamonds. For buyers, this distinction is primarily a matter of preference and budget, but it must be correctly disclosed at every stage of the transaction.
The Real Question Behind Most Searches: Will This Stone Actually Look Beautiful in My Ring?
You may have already narrowed your search to a few candidate stones. The reports all look strong. But you are still unsure. That hesitation is reasonable. Two diamonds with identical GIA reports can look noticeably different when placed side by side. One might appear brighter, better proportioned, and more balanced. The other might look slightly dull or uneven, even though every grade on paper is the same.
What makes the difference? Cut precision that falls within the same grading range but produces different results. Visual performance that no report line captures. And whether the stone’s dimensions actually work with the ring design you are buying.
The real question is not whether the certificate checks out. It is whether this specific stone will look beautiful when mounted and worn every day. That requires looking beyond the report.
What This Guide Covers — and What It Does Not
This article focuses on center stone selection specifically for engagement rings. It assumes you already understand the basics of lab-grown diamonds — how they are made, how they compare to natural diamonds, and what the 4Cs mean. If you need that foundation, NUVU’s education hub covers those topics separately.
What this guide does address: How to evaluate cut performance beyond the grade. How to read proportion data. What to look for in video and photos. How to match a stone to a setting. And how to avoid the common mistake of choosing a stone that looks perfect on paper but disappointing in person.
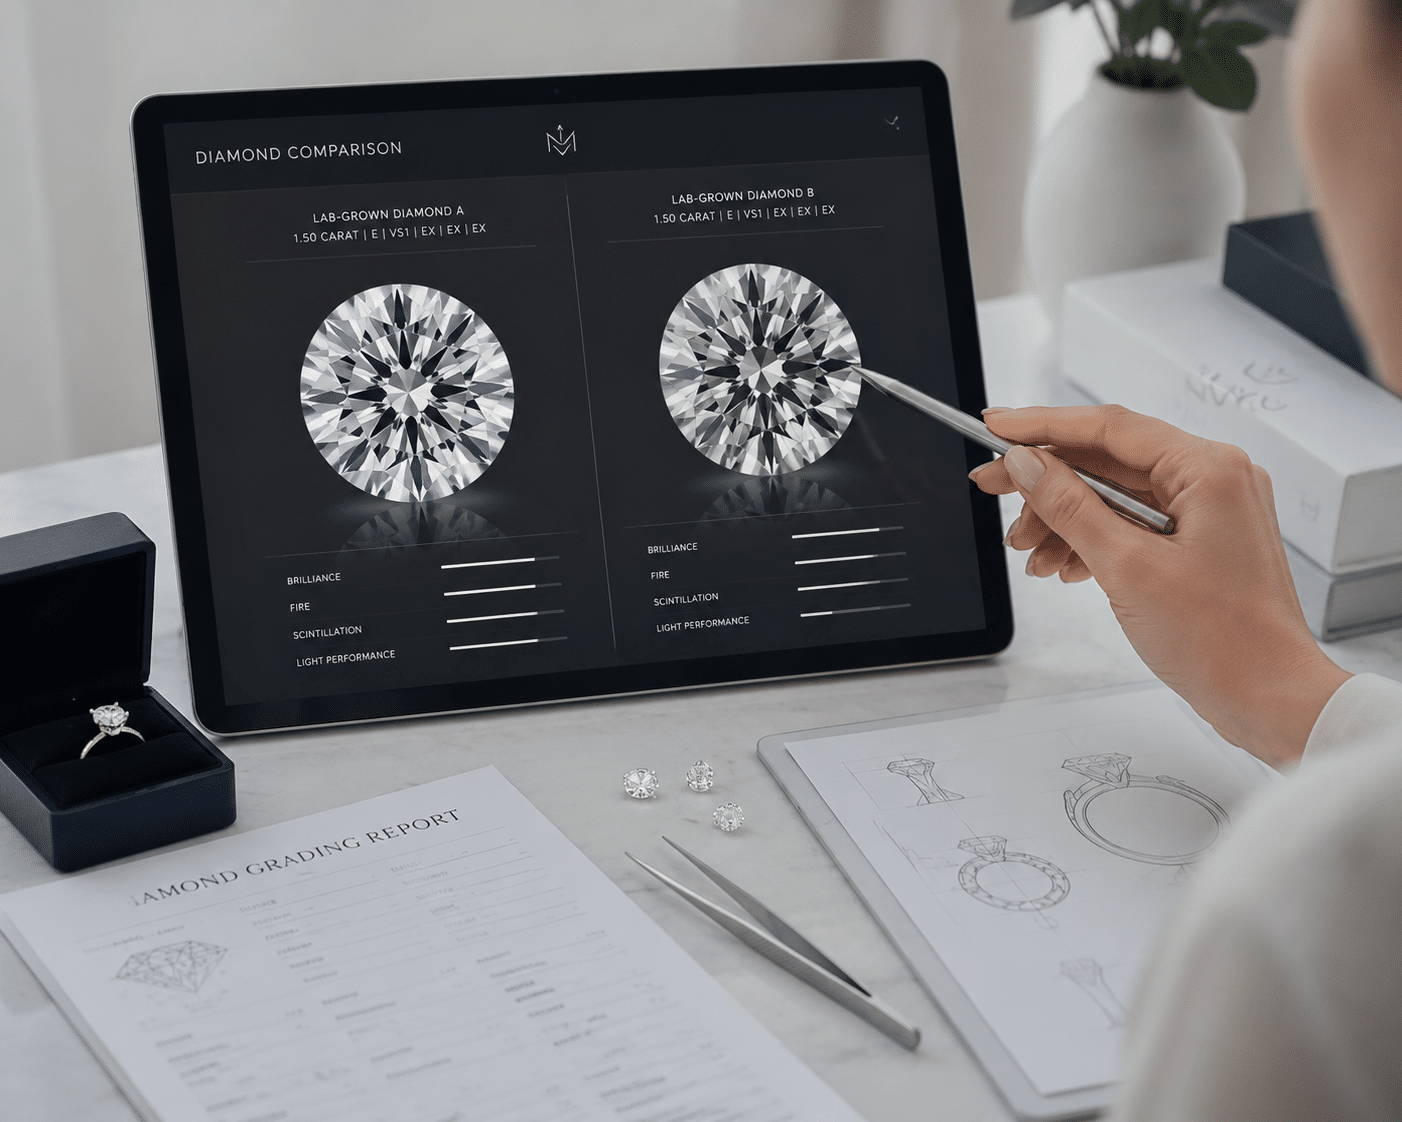
Consider this scenario: A buyer has narrowed the search to two 1.5-carat round brilliants with identical GIA reports. Both are graded D color, VS1 clarity, Excellent cut. But when watching high-resolution video, one stone looks noticeably brighter, with even facet patterns and strong light return from every angle. The other appears slightly darker in the center and less lively. The report does not explain the difference. The rest of this article will.
Why Cut Quality Drives Visual Performance More Than Any Other Report Line
Among the 4Cs, cut has the strongest influence on how a diamond looks. Color and clarity matter, but a well-cut stone can still appear beautiful at slightly lower grades. A poorly cut stone will look dull even at D color and IF clarity. For engagement ring center stones, cut performance determines whether the diamond delivers the brilliance you expect.
What GIA and IGI Cut Grades Actually Tell You
GIA assigns cut grades only for round brilliants. IGI assigns cut grades for rounds and some fancy shapes, including ovals and cushions. Both systems evaluate proportions — table size, crown angle, pavilion angle, and total depth — and assign a grade based on how those measurements perform within acceptable ranges.
The critical detail: These grading systems use tolerance ranges, not single ideal values. Two stones can receive the same “Excellent” or “Ideal” cut grade even though their proportions fall at opposite ends of the acceptable range. One stone might have proportions near the sweet spot, producing strong brightness and fire. The other might sit at the edge of the range, still technically “Excellent” but noticeably less brilliant in person.
That means the cut grade alone is not enough. You need the actual proportion data to evaluate whether a stone is genuinely well-cut or merely grade-qualified.
This distinction is worth emphasizing because it explains a common buyer frustration: the stone that looks disappointing often has a cut grade that passes the grading threshold but lacks the precision needed for optimal light return. The grade is a range, not a guarantee.
Proportion Combinations That Matter Most in Center Stones
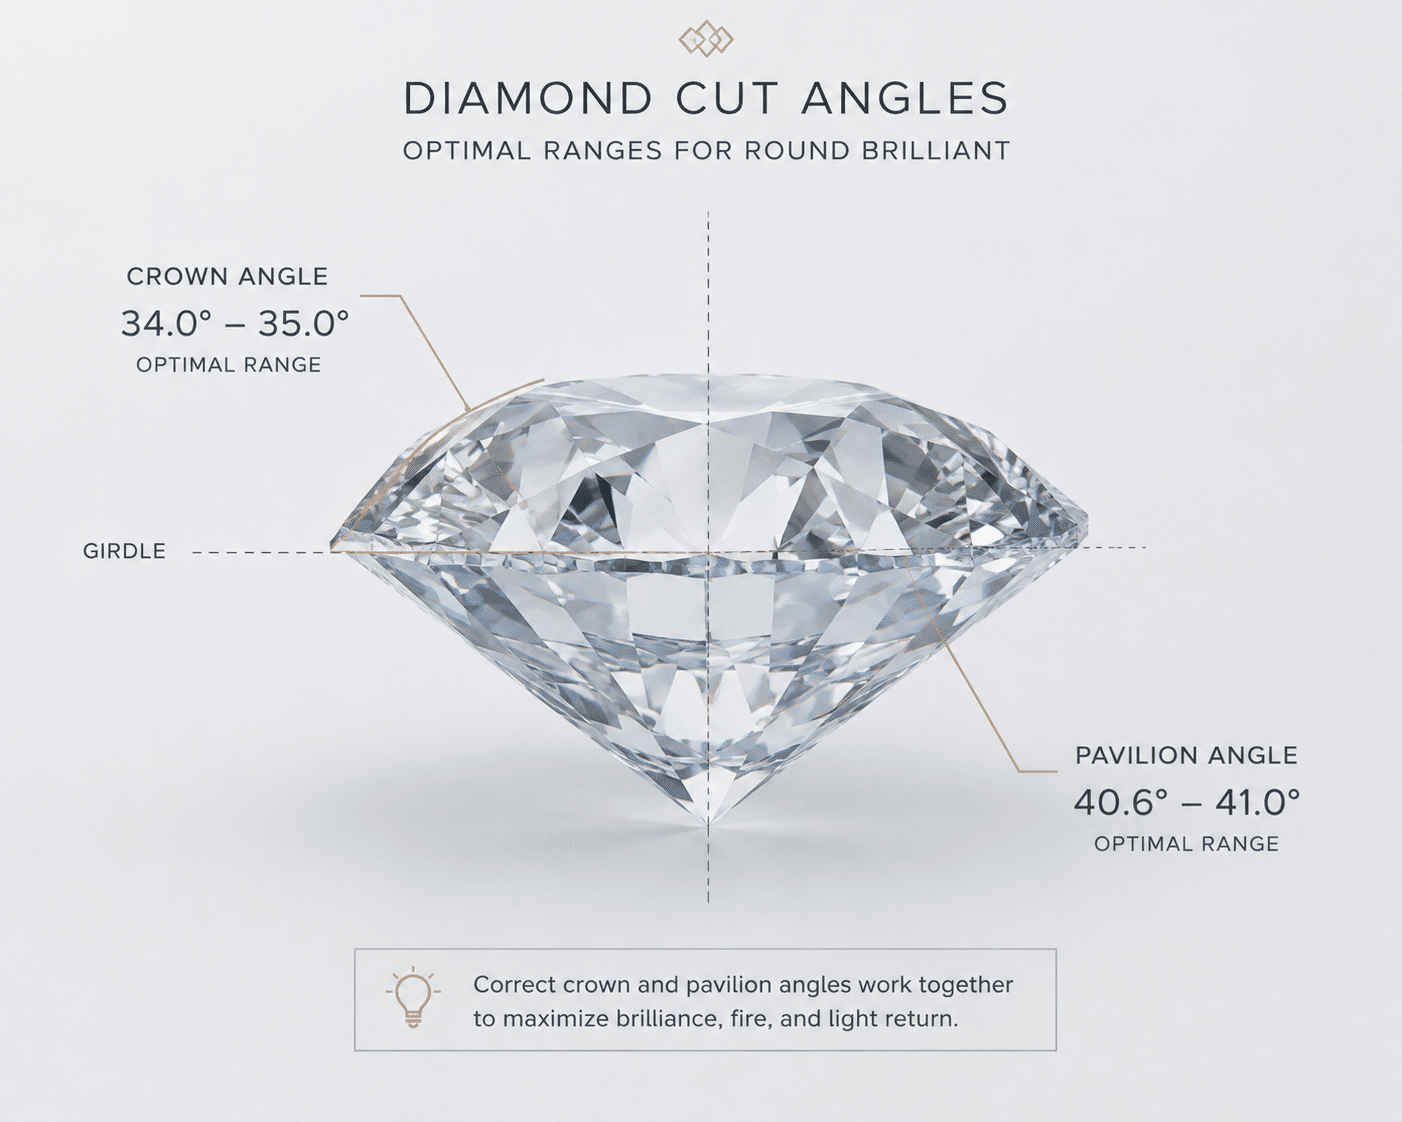
Three proportion measurements interact to determine light performance: table percentage, crown angle, and pavilion angle. Total depth provides a secondary check but matters less than the combination of crown and pavilion angles.
When the crown angle is too steep (over 36°) or too shallow (under 33°), light entering through the crown may escape through the pavilion instead of reflecting back to the eye. A similar issue occurs when the pavilion angle falls outside the optimal range. The result is a stone that appears darker, less fiery, or unevenly bright across its face.
This is why a stone with an Excellent cut grade and aggressive crown and pavilion angles can still lose light return through the side. It qualifies for the grade, but its proportions are not optimized for maximum performance.
Proportion Verification Check
Before buying, request the full proportion data from the grading report — not just the cut grade. For round brilliants, verify the following ranges:
- Table percentage: 54–57%
- Crown angle: 34–35°
- Pavilion angle: 40.6–41°
- Total depth: 60–62.5%
Stones within these ranges consistently produce strong brightness and fire. If a stone falls outside these ranges but still holds an Excellent grade, ask to see video under multiple lighting conditions before making a decision.
For fancy shapes, the approach is different. Since cut grading for fancy shapes is not standardized by GIA, you must rely on visual inspection. Request 360-degree video and verify symmetry, length-to-width ratio, and face-up balance. A well-proportioned oval should not show significant bow-tie darkening. A cushion should show even facet brightness across the crown. An emerald cut should display consistent step patterns without obvious windowing.
As GIA explains, the cut grade for round brilliants is determined by a combination of brightness, fire, scintillation, weight ratio, durability, and polish and symmetry.[1] However, these factors are evaluated within tolerance ranges, meaning two stones with the same grade can differ in how their proportions interact. For fancy shapes, GIA does not assign a cut grade, and the buyer must rely on direct proportion data and visual inspection to assess performance.[2]
A grading report can narrow the comparison, but it should be read alongside the stone’s proportions, visual evidence, and intended jewelry use. No single grade line replaces the need for direct observation.
Growth Method and Post-Growth Treatments: What the Report Should Document
For lab-grown diamonds, HPHT and CVD refer to the growth method — the process by which the diamond was created under controlled conditions. These are not “treatments” in the same sense as post-growth enhancements like laser drilling or fracture filling. However, in some contexts, HPHT may also be applied as a post-growth process to modify color or clarity. When growth method or post-growth treatment is relevant, buyers should look for clear disclosure in the grading report or seller documentation. A reputable report will specify the growth method and, if applicable, indicate whether any post-growth treatment has been performed. This information helps the buyer understand the diamond’s full production history and supports an informed purchase decision.
Face-Up Appearance: What Photos and Video Reveal That a Report Cannot
A grading report provides measurements and grades but no visual representation of the stone. It cannot show you brightness, fire, or how the diamond handles different lighting environments. For engagement ring center stones, where the diamond will be worn daily and viewed in countless settings, visual inspection is not optional.
Brightness, Fire, and Scintillation in Different Lighting Conditions
A diamond that looks brilliant under jewelry store spotlighting may appear flat or dark in restaurant lighting, indoor office light, or overcast daylight. Different lighting environments emphasize different optical qualities. Direct light produces sharp brightness and strong scintillation. Diffuse light tests the stone’s overall light return and reveals dark patches or uneven facet performance. Low light exposes haziness or extinction that may not be visible under brighter conditions.
When evaluating a stone for an engagement ring, you need to imagine how it will look across the range of environments where it will actually be worn — not only how it performs under ideal display lighting.
This is why high-resolution video is so valuable. A 360-degree view under standard 3600K lighting reveals how brightness holds as the stone rotates. A secondary video under lower light shows whether the stone maintains even light return or develops dark zones.
Another practical observation: even well-cut stones can respond differently to diffuse versus direct light. A stone that performs evenly under both conditions is typically a more reliable choice for daily wear than one that only shines under bright spotlights.
Windowed, Dark, or Hazy Stones and How to Spot Them
Three visual defects commonly appear in lab-grown center stones, none of which are flagged on a grading report:
Windowed pavilion. When the pavilion is too shallow or the crown is too flat, the stone acts like a window. You can see through the diamond to the surface below it — a finger, the setting metal, or the tabletop. In an engagement ring, a windowed stone shows the ring plane through its center, which significantly reduces face-up beauty.
Extinction. Overly dark facets caused by light leakage. A stone with excessive extinction develops persistent dark patches that do not brighten as the diamond moves. This is most visible in diffuse lighting and strongly correlates with suboptimal crown and pavilion angles.
Haziness. A milky or cloudy appearance caused by manufacturing defects, strain patterns, or dense inclusion arrangements. Hazy stones appear less crisp and less transparent than their color and clarity grades would suggest. This defect is sometimes visible in video but rarely documented on a report.
All three issues are detectable in high-resolution video but invisible on a certificate. This is why buying based on the report alone carries real risk.
Visual Review Checklist for Buyers
Before purchasing a center stone, request a 360-degree video under at least two lighting conditions. Review the footage for the following:
- Uneven facet brightness — some facets appear noticeably darker than others
- Persistent dark patches that do not shift as the stone rotates
- A glassy or transparent center that reveals the surface beneath the stone
- Overall haziness or reduced transparency compared to a reference stone
If the seller provides only static photos or a single lighting condition, consider that a warning sign. Compare the stone side by side with a reference diamond if available. Many online sellers now provide comparison tools, and for custom lab grown diamond engagement rings, some — including NUVU — include full 360-degree video in every stone listing. Use that footage to make your own visual assessment before committing to a purchase.
When a grading report is available, buyers should verify the report details through the issuing laboratory’s official report-check tool where available. The laser inscription on the girdle should match the report number, and the measured dimensions should align with the certified values. This verification step helps confirm that the stone in hand is the same stone documented in the report.
How Diamond Shape Affects Setting Compatibility and Center Stone Look
The shape you choose does more than define the ring’s style. It determines how the stone performs optically, how securely it can be mounted, and how the final ring looks on the hand. In an engagement ring context, shape is not just a cosmetic preference. It is a structural and visual decision that affects everything from brightness to long-term durability.
Round Brilliant vs. Fancy Shapes: What Changes in an Engagement Ring Context
Round brilliants remain the most predictable choice for an engagement ring center stone. Their cut geometry is well understood, the GIA cut grading system applies only to rounds, and they offer the widest setting compatibility. A well-cut round brilliant delivers consistent brightness across lighting conditions and fits comfortably into almost any mounting style — solitaire, halo, three-stone, or bezel.
Fancy shapes change the equation. Ovals, cushions, emeralds, pears, and marquise cuts each have their own proportion tolerances, light return behavior, and setting requirements. A buyer evaluating a fancy shape needs to go beyond the grading report and look at the stone’s specific dimensions, length-to-width ratio, and symmetry as it will appear in a setting. The same shape from two different manufacturers can look completely different once mounted.
A useful rule of thumb: for fancy shapes, the certificate is even less informative than it is for rounds, because most fancy shapes do not receive a cut grade. The buyer must rely entirely on seller-provided measurements, imagery, and proportion data.
Shape-Specific Proportion and Clarity Tolerance Guidelines
For ovals, the length-to-width ratio determines the stone’s silhouette. A ratio between 1.35 and 1.45 produces a classic oval shape that sits well on the finger. Ratios below 1.30 begin to look chunky, while ratios above 1.50 appear elongated and may leave gaps in certain settings. Ovals also require attention to the bow-tie effect — a dark transverse zone across the center. Some bow-tie is normal, but a pronounced one that shifts as the stone tilts is a sign of poor cut precision.
Cushion cuts add another layer of decision. Buyers must choose between a brilliant-style cushion with scattered facet patterns and a crushed-ice cushion with smaller, more numerous facets. Brilliant cushions tend to show more fire and contrast. Crushed-ice cushions appear softer and more diffuse under light. Neither is inherently better, but the two styles look entirely different in a ring.
Emerald cuts place the highest demand on clarity. Because step cuts use broad, open facets arranged in parallel tiers, they show inclusions more readily than brilliant cuts do. An emerald cut that looks clean under a loupe may reveal a visible inclusion once set and viewed in natural light. For emerald cuts, VS2 or higher is generally safer, and SI1 should be inspected carefully for any inclusion that falls near the table.
Pears and marquise cuts share a common vulnerability: the pointed tip. These shapes require prong protection at the tip to prevent chipping during daily wear. A pear with a thin or sharp tip is more fragile regardless of its grade.
For any fancy shape, the key tradeoff is between design appeal and verification difficulty. The more complex the shape, the more you need to rely on direct visual inspection rather than certificate data.
Shape-to-Setting Fit Check
Before buying a loose stone, confirm the shape’s recommended setting style. Recommended length-to-width ratios for common shapes are as follows: oval 1.35–1.45, cushion 1.10–1.25, emerald 1.40–1.50, pear 1.45–1.60, marquise 1.75–2.00. These ranges produce balanced face-up proportions in standard engagement ring settings.
Ovals and pears need prong protection at the tip. Emerald cuts demand higher clarity verification. Cushions vary heavily by cut style, so request a video of the specific stone you are considering. A shape that looks good in a loose stone tray may look entirely different once prongs are added.
Color and Clarity in Real Engagement Ring Wear: When the Report Overstates or Understates
A grading report assigns color and clarity grades under controlled laboratory conditions. But an engagement ring is worn in restaurants, offices, outdoors, and under warm dinner lighting. The way color and clarity behave in real wear differs meaningfully from what the report alone suggests.
Color Grade and Mounting Context: Why G–J Range Is Often Ideal for Lab-Grown Engagement Rings
The mounting metal changes how color is perceived. A D-color or E-color stone set in yellow gold can appear stark, because the contrast between a completely colorless diamond and warm yellow metal makes the stone look bluish or cold. The same stone in white gold or platinum looks brilliant and crisp.
For yellow or rose gold settings, G through I color grades perform best. They appear colorless in most lighting but pick up a faint warmth that complements the metal rather than clashing with it. J-color stones work well in yellow gold settings, where the metal masks any visible tint. In white metal, J-color may show a slight warmth that some buyers notice and others do not.
The certification color grade is more useful as a compatibility indicator than an absolute quality measure. A stone that looks warm next to a platinum setting may look perfectly neutral in a rose gold one. Buyers should evaluate color in the context of the intended mounting, not in isolation.
Clarity Grade Realism: Why VS2–SI1 Is Typically Sufficient for Center Stones
Most engagement ring center stones are viewed from dinner-table distance, not under a jeweler’s loupe. At that distance, VS2 and the majority of SI1 stones appear eye-clean — meaning no inclusions are visible to the naked eye under normal viewing conditions.
The practical threshold is not the clarity grade itself but whether any inclusion falls in a position that catches light. A feather inclusion near the edge of a brilliant-cut stone may never be visible. A crystal inclusion near the table of a step-cut emerald may be noticeable even at VS1.
This is where the certificate can be misleading: it grades clarity under magnification, but the real question for an engagement ring is whether the stone looks clean at arm’s length. That question can only be answered by viewing the actual stone, not by reading the grade.
Certificate and Visual Review Check
Compare the report’s clarity plot against actual stone photos. Some SI1 inclusions described as feather or crystal may be eye-visible. Other SI1 stones are perfectly clean. The plot only shows inclusion type and location, not its visual prominence. Request a 30-second video rotating the stone at arm’s length to confirm eye-clean appearance before buying. This is the only reliable way to verify clarity for real wear.
How the Setting Affects the Stone’s Visual Impact and Practical Security
The setting is not a neutral container. It changes how light enters the stone, how the stone sits on the finger, and how secure the diamond is during daily wear. A stone that performs well in a temporary setting may look different once mounted permanently.
Prong Count, Basket Style, and Stone Exposure
A six-prong setting offers more security than a four-prong setting, especially for center stones over one carat. The additional prongs reduce the risk of stone loss if one prong is damaged. They also create a more open look that lets more light reach the stone from the sides.
A cathedral setting, where the shank rises to meet the basket, provides structural strength and elevates the stone slightly for maximum light entry. A peg head setting, where the basket is attached to the shank at a single point, is less secure and more prone to bending under impact. For daily-wear engagement rings, cathedral settings are generally preferred.
Bezel settings encircle the stone with metal, offering maximum protection but reducing side light entry. They work well for active lifestyles and for stones with delicate tips, such as pears and marquise cuts. The tradeoff is slightly reduced brilliance compared to a prong setting.
The choice of setting involves tradeoffs that cannot be fully evaluated from the stone’s certificate alone. A stone that looks brilliant in a loose stone viewer may appear less lively in a deep bezel, while a stone with slightly lower clarity may look perfectly clean once surrounded by a halo. The setting and the stone should be considered together.
Profile Height and Stone Measurement Compatibility
The total depth of the stone plus the setting height determines how much the ring protrudes from the finger. A stone with a deep pavilion — over 62.5 percent total depth for rounds — will sit higher and is more likely to snag on clothing, knitwear, or hair. For everyday wear, a lower profile is usually more practical.
Stone-to-Setting Fit Check
Before finalizing, verify stone diameter or dimensions against the setting prong spacing. For rounds, request the exact diameter. For fancy shapes, confirm the length and width fit the setting’s basket width. A buyer who chooses a 1.2-carat oval with a 1.40 ratio but pairs it with a setting whose prongs are too wide may end up with visible gaps between the stone and the metal. Ask whether the setting can accommodate the stone depth before committing to a specific combination.
For custom design, trust comes from matching the stone to the setting, budget, and wearer’s daily use—not from choosing grades in isolation.
Practical Verification for Setting Compatibility
For custom jewelry, stone measurements and setting compatibility should be confirmed before finalizing a purchase. This means comparing the diamond’s exact diameter or length and width against the setting basket dimensions provided by the jeweler. A stone that is too wide for the prongs may require a custom basket, which adds cost and lead time. A stone that is too narrow may appear loose or require extra metalwork to secure it properly. Asking the seller or designer to confirm that the specific stone measurements align with the intended mounting saves time and reduces the risk of a poor fit.
Total Cost Thinking: Why Loose Stone Price Alone Misleads Engagement Ring Budgets
It is easy to focus entirely on the per-carat price of the loose diamond and treat that as the engagement ring budget. That approach almost always leads to miscalculation. The loose stone is the largest line item, but it is not the only significant one. A $4,000 stone does not produce a $4,000 ring. Understanding what drives cost at each stage prevents budget surprises and helps you allocate money where it actually improves the final result.
What Drives Stone Price vs. What Drives Setting Cost
Stone price is determined primarily by carat weight, cut precision, and how uncommon the combination of size, color, and clarity happens to be. A well-cut 1.5-carat round with D/VS1 grades will carry a noticeable premium over a 1.5-carat J/SI2 with the same growth method, even though both are lab-grown and both come with certification. Buyers often overestimate how much the color and clarity grades affect the stone price and underestimate how much carat weight drives it.
Setting cost follows a completely different logic. The price of the mounting depends on metal weight, design complexity, and the shape of the center stone. A simple four-prong solitaire in 14k gold might cost $600 to $1,000 to produce. A pave band with a hidden halo, milgrain details, and a basket that must be custom-fit to an oval stone can easily run $1,800 to $3,000. The shape itself matters. A round brilliant requires only standard prong spacing, while an oval or pear requires a custom-made basket with tip protection, which adds labor time.
The trap buyers fall into is simple: they stretch the budget for a larger stone and then have too little left for a setting that fits it properly. A 2-carat stone set in a thin, generic mounting often looks worse than a 1.5-carat stone with a well-built setting that complements its proportions.
Tradeoff Decision: Bigger Stone vs. Better Proportions vs. More Complex Setting
Every engagement ring buyer eventually faces a three-way tradeoff. You can have a larger carat weight, or better cut proportions and color, or a more detailed setting. You cannot maximize all three at once within a fixed budget.
The decision should depend on how the ring will be worn and seen. For a ring that will be photographed and admired from a normal social distance, a well-proportioned stone with strong light performance will look more impressive than a larger stone with mediocre cut quality. The eye registers brightness and sparkle faster than it registers carat size. On the other hand, if the wearer has explicitly prioritized a big face-up appearance, a slightly larger stone with an acceptable cut grade in a simple solitaire may be the right call.
The most common mistake is choosing a complex setting at the expense of stone quality. A heavy pave band with side stones and engraving can make a D-color stone look warmer by comparison or add bulk that overwhelms the center. That $800 upgrade to the setting might have been better spent on raising the stone’s cut grade from Good to Excellent.
A practical way to evaluate this tradeoff: ask yourself which element will be noticed first when someone sees the ring. In most cases, it is the diamond’s brightness, not the setting’s detail. Allocating budget toward cut quality and visual performance usually delivers a stronger first impression than allocating it toward ornate mounting design.
Budget Allocation Framework
The most practical budget split for a typical engagement ring: allocate 55 to 70 percent of the total budget to the loose diamond, 25 to 35 percent to the setting and labor, and approximately 5 percent to insurance and documentation. These percentages should shift depending on the shape. A round brilliant allows lower setting costs because the basket is standard. An emerald-cut or pear-shaped stone requires custom work, so the setting allocation should move toward the higher end of the range.
For a $3,000 to $5,000 total budget, a balanced split looks like $1,800 to $3,500 for the stone and $1,000 to $1,500 for a solitaire or simple three-stone setting. If the design involves a custom basket for a fancy shape, budget 30 to 40 percent for the setting and expect the stone budget to compress accordingly.
Do not finalize the stone purchase until you have a setting quote in hand. The stone price only makes sense in the context of the total project.
Pricing Variability and Market Conditions
Prices for lab-grown diamonds can vary depending on cut precision, report type, seller channel, size, shape, availability, and documentation. A price that looks attractive for one stone may not reflect the same value when compared to another with different specifications. Buyers should compare like-for-like specifications — such as exact carat weight, cut proportions, color grade, and clarity grade — before treating one stone as a better value. Prices can also change with market conditions, so exact comparisons should be verified at the time of purchase using current seller listings and documented quotes.
How to Verify Seller Claims Without Relying Only on the Report
A grading report confirms basic identity and grade boundaries, but it does not guarantee the stone matches its description or that the seller is accurately representing it. A small number of mismatches and misrepresentations occur in the lab-grown diamond market, usually from sellers who pass along a report without verifying the stone. Verification is not difficult, but it requires asking the right questions before purchase.
Report Verification: Confirming the Certificate Matches the Stone
Every certified lab-grown diamond should have a laser inscription on the girdle that matches the report number. For GIA and IGI reports, this inscription is standard on most lab-grown stones. Verify the number is present and legible. Some sellers provide a photo of the inscription through a gemological microscope; if not, request one.
Beyond the inscription, compare the actual stone measurements against the report. The report lists exact dimensions for a round diamond in millimeters. If the seller provides the stone’s measured diameter and it does not match the report within a reasonable tolerance, investigate further following the lab grown diamond engagement rings guide, as mismatches can mean the stone was swapped, the report was issued for a different stone, or the stone was recut after certification.
The common risk is not deliberate fraud. It is that a seller lists the stone using only the report summary and has not confirmed the stone matches the document. Report-only buying without independent verification introduces unnecessary uncertainty.
GIA advises that a grading report provides a reliable assessment of a diamond’s quality, but buyers should still verify the stone’s laser inscription matches the report number, as this is the primary link between the stone and its certificate.[3] For lab-grown diamonds, the report also explicitly states the growth method, which helps distinguish it from a natural stone.[2]
Requesting Measured Data Beyond the Report
The grading summary on a report includes the overall cut grade, color, and clarity, but it rarely publishes the full proportion data. For a round brilliant, you need crown angle, pavilion angle, table percentage, and total depth to evaluate light performance beyond the single cut grade. Some sellers provide Sarine reports or OGI reports that include precise proportion mapping, optical symmetry data, and light performance estimates. These are useful supplements, though they should be read alongside video rather than taken as final answers.
For fancy shapes, the report becomes even less informative. It typically does not assign a cut grade for shapes like cushion, emerald, or pear. The buyer must rely entirely on seller-provided measurements and video. Ask for the length-to-width ratio, total depth, and any available crown or pavilion data. Sellers who cannot or will not provide these measurements may not have inspected the stone beyond the certificate.
Buyer Verification Checklist
Before finalizing a purchase, confirm the seller provides each of the following. A seller who offers all of them is likely transparent and confident in the stone. Missing items do not necessarily mean a bad stone, but they mean more risk for the buyer.
- 360-degree video under standard lighting. The video should show the stone rotating on a white or neutral background, not heavily filtered or backlit to exaggerate brightness.
- Stone measurements matching the report. The seller should confirm the exact dimensions, not just repeat the report line.
- Full proportion data. For rounds, this means table, crown angle, pavilion angle, and depth. For fancy shapes, length, width, depth, and ratio.
- Setting compatibility confirmation. The seller should be able to tell you whether the stone fits a standard solitaire basket or requires custom mounting, and what the prong spacing needs to be.
- Written return or exchange policy. If the stone does not match expectations when it arrives, you need a clear path for return. No written policy places all the risk on the buyer.
Cautious Interpretation of Grading Reports
A grading report helps document key characteristics such as carat weight, color, clarity, and cut grade, but it should not be treated as a guarantee of beauty, value, or sourcing ethics. The report reflects measurements and observations under specific laboratory conditions. It does not predict how the stone will appear in different lighting, how it will perform in a specific setting, or whether the seller’s claims about its origin are fully accurate. Buyers should use the report as one tool among several — alongside visual evidence, measurements, and seller documentation — to make an informed decision.
When a grading report is provided, buyers should compare the report details with the issuing laboratory’s verification tools where available. The laser inscription and measured dimensions are the primary links between the stone and its certificate. For lab-grown diamonds, the report should also clearly state the growth method.
When a Custom Design Changes the Selection Criteria
Custom engagement rings change the priority of every selection factor. A diamond that would be the obvious choice for a simple solitaire may be the wrong stone for a halo setting, a bezel wrap, or a three-stone design with side stones. The custom context forces a more careful evaluation of how the stone will sit, how it will relate to surrounding metal and smaller diamonds, and whether it can be reset later.
Custom Mounting Shapes and Stone Orientation
East-west settings, where a fancy-shaped diamond is set horizontally rather than vertically, change how the stone’s proportions are perceived. A marquise or oval that looks elongated in the traditional vertical orientation may appear compact and wide in an east-west mount. The length-to-width ratio that worked for a standard setting may not work for a horizontal design. Request video of the stone oriented in the intended direction before finalizing the selection.
Bezel settings and halo rings reduce the amount of direct light that reaches the diamond from the side. A stone with slightly lower clarity or a faint warmth may look clean and colorless once surrounded by a metal bezel or a halo of smaller stones. This means a buyer can sometimes move down one color grade or one clarity grade without visible loss. But the tradeoff is that the setting becomes permanent. A bezel-set stone is difficult to remove and replace, so the color or clarity decision you make now will be locked in.
At NUVU, our team routinely sees buyers who selected a stone based entirely on the report for a custom design, only to discover later that the stone’s proportions did not match the intended setting orientation. The extra step of confirming the stone against the exact mounting design saves significant rework.
Matching Multiple Stones in a Single Ring
Three-stone rings, side-stone designs, and cluster settings require color and clarity matching across multiple diamonds. A center stone graded G may look noticeably cool next to side stones graded H, even though both grades are considered near-colorless on their own. The contrast becomes visible under normal room lighting, not just under a jeweler’s lamp.
The solution is not to rely on the individual grades. Ask the seller to provide all stones together under the same lighting. Better yet, request a matched set where the seller has confirmed face-up color consistency between the center and side stones. For fancy-shaped side stones, also verify that the length-to-width ratio and depth are visually compatible. A mismatched set will always look assembled rather than designed.
Custom designers often buy stones from different sources and attempt to match them by report number alone. This works only if the stones are placed side by side and evaluated together. If the seller cannot show you all three stones in one video or photo, do not assume they match.
For custom designs, the certificate is even less reliable as a matching tool. Visual verification under consistent lighting is the only practical way to confirm that the stones in a multi-stone ring will look harmonious together.
Custom Design Preparation Check
Before starting any custom design project, confirm the following with your designer or seller:
- The designer has reviewed the exact stone dimensions and proportions, not just the report summary.
- The mounting design has been drafted around the specific stone measurements, not a generic size guide.
- The stone can be removed and reset later if needed. Bezel and tension settings are the most restrictive; cathedral prong settings are the most flexible.
- The side stones or accent stones have been visually matched to the center stone under consistent lighting, not graded separately.
This article focuses on engagement ring center stone selection beyond certification. For a general explanation of how to read a grading report or a comparison between lab-grown and natural diamonds, NUVU’s education hub covers those topics separately.
In sourcing or wholesale conversations, documentation, consistency, and communication often matter as much as the headline specification.
FAQ: Common Engagement Ring Diamond Selection Questions
Should I Buy a Round or Fancy Shape for an Engagement Ring?
Round brilliants deliver the most predictable brilliance and widest setting compatibility. If you want maximum light performance and the easiest path to a well-proportioned stone, round is the safer choice. Fancy shapes offer more design personality and a lower price per carat, but they require more careful evaluation of length-to-width ratio, symmetry, and setting fit. Shape preference is ultimately personal, but setting compatibility must be verified before purchase — especially for ovals, pears, and marquises that need prong protection at their tips.
Is a Certificate Necessary for Lab-Grown Engagement Ring Diamonds?
Yes, but only for verifying stone identity — not for predicting visual performance. Use the certificate to confirm carat weight, clarity grade, report number, and laser inscription. Do not rely on the report alone to judge whether the stone will look beautiful in your ring. That requires video, proportion data, and setting compatibility review. A certificate confirms what the stone is. It does not confirm how the stone performs.
Can I Upgrade or Replace the Center Stone Later?
Yes, if the setting is designed for center stone replacement. Prong settings with four or six prongs make future swaps straightforward. Bezel and tension settings make replacement more difficult and sometimes impossible without rebuilding the ring. If upgradability is a priority, confirm with the designer or jeweler before purchase that the setting allows for a future center stone change.
How Important Is Polish and Symmetry for Engagement Rings?
Both should be at least Very Good for a clean appearance under normal wear. Good may be acceptable for value-conscious buyers, but Fair or Poor should be avoided entirely. Polish and symmetry directly affect how evenly light reflects from the stone and how symmetrical the diamond appears once mounted. In an engagement ring, where the stone is the focal point, these details become visible at normal viewing distance.
A practical note about polish and symmetry: even within the “Excellent” or “Very Good” range, slight variations can affect how crisp the facet junctions appear under magnification. For most engagement ring buyers, Very Good is sufficient, but requesting a close-up photo of the stone’s facet patterns can confirm that the polish quality meets expectations.
Conclusion: The Decision Framework
The Order of Priority for Engagement Ring Center Stone Selection
The choice of a center stone for an engagement ring comes down to a repeatable sequence. Working through these steps in order reduces the chance of missing something that matters.
1. Confirm cut performance through proportion data and video — not just the cut grade.
2. Verify face-up appearance under multiple lighting conditions.
3. Confirm shape and setting compatibility before purchase.
4. Evaluate color and clarity in context of the mounting metal and design.
5. Use total cost thinking — stone, setting, and labor within a single budget.
6. Verify all seller documentation and return policies before committing.
This order prioritizes what actually affects how the stone looks in the ring. A diamond with strong grades on paper but poor proportions or setting fit will not perform as expected. Starting with cut and visual performance, then confirming physical compatibility, leads to a more confident decision.
Further Guidance on Disclosure and Terminology
The Federal Trade Commission (FTC) provides guidance on how lab-grown diamonds should be described in advertising and sales. According to the FTC, terms like “cultured” or “laboratory-created” are acceptable, but any description must make the origin of the diamond clear to the buyer.[4] Misleading terms such as “natural lab-grown” or “real synthetic” are not in line with this guidance. For buyers, this means that a clear, accurate disclosure on the grading report is a sign of a reputable seller. If a certificate or seller description uses ambiguous language about the diamond’s origin, that should be treated as a red flag.
Environmental and Sustainability Claims: What Buyers Should Know
Lab-grown diamonds are often chosen as an alternative to mined origin, but environmental and sustainability claims should still be supported with specific information about production, energy use, and seller documentation. Broad green language such as “eco-friendly,” “sustainable,” or “carbon-neutral” is less useful than clear documentation covering the specific production practices, energy sources, and any third-party verification involved. Buyers who consider environmental impact a priority should ask the seller for specific, documented claims rather than relying on general marketing statements.
Further Reading and Responsibility
For a more detailed discussion of certification, grading terminology, and how to compare lab-grown and natural diamonds, refer to the seller’s educational materials and independent laboratory resources. The FTC guides and GIA’s educational content provide a valuable foundation for understanding disclosure and grading terminology. Buyers are encouraged to cross-reference information from multiple sources and to ask direct questions about any claim that seems unclear or unsupported.
Next Step: Evaluate Your Shortlist
Take your top two or three stone candidates and apply the verification steps from this guide. Compare proportion data side by side. Review video under at least two lighting conditions. Confirm that the stone dimensions will fit your chosen setting. The most common mistakes in engagement ring diamond selection happen when buyers skip these checks and rely only on the certificate.
Sustainability claims should be specific and documented. Broad green language is less useful than clear information about production, energy, sourcing, and seller transparency.
At NUVU, every loose lab-grown diamond in our library includes full proportion data and 360-degree video so you can evaluate actual visual performance, not just a grade. If you have a shortlist and want a side-by-side comparison, contact our team. We treat the selection process as a conversation, not a transaction.
NUVU’s buyer-first approach is to make the comparison clearer: what the report shows, what the visuals reveal, and whether the stone fits the intended piece.
[1] GIA, “Diamond Cut Grading,” Gemological Institute of America, accessed from https://www.gia.edu/diamond-cut.
[2] GIA, “GIA Lab-Grown Diamonds,” Gemological Institute of America, accessed from https://www.gia.edu/lab-grown-diamond.
[3] GIA, “Diamond Grading Report,” Gemological Institute of America, accessed from https://www.gia.edu/diamond-grading-report.
[4] Federal Trade Commission, “Guides for the Jewelry, Precious Metals, and Pewter Industries,” 16 CFR Part 23, subpart X (Lab-Grown Diamonds), as updated.
Disclosure: This article is for general educational purposes only. Diamond grading, pricing, availability, specifications, and seller policies can change, and readers should verify important details through grading reports, official laboratory tools, seller documentation, or qualified professionals before making a purchase decision. Laboratory-grown diamonds should be clearly distinguished from natural diamonds, and environmental or sourcing claims should be supported by specific documentation.